Easy Guide to Add an Admin User in WordPress using FTP

In this tutorial, we will learn how to add an admin user in WordPress using FTP.

Add an Admin User in WordPress Using FTP

Sometimes you may forget your username or email address on a WordPress site and cannot login to the admin area.

One way to do this is by adding an admin user to the WordPress database using MySQL. But you may be unable to connect to phpMyAdmin or don’t want to run MySQL queries directly.

Some users may get their site hacked and admin account deleted. In that case, adding an admin user using FTP can quickly restore your access to the WordPress admin area.

Having said that, let’s see how you can easily add an admin user in WordPress using FTP access.

Adding an Admin User in WordPress Using FTP

First thing you will need is an FTP client. If you are new to using FTP, then see our guide on how to use FTP to upload files in WordPress.

Once connected to your WordPress site, you need to locate your WordPress theme’s functions.php file. It would be at a location like this:

/yoursite.com/wp-content/themes/your-current-theme/functions.php

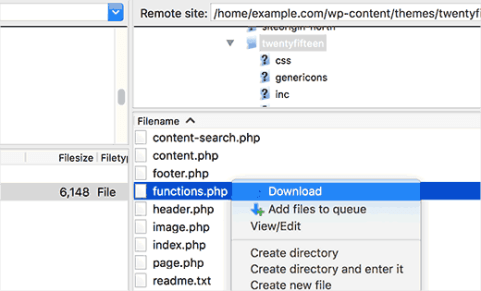
Right click on functions.php file and then select download. Your FTP client will download the functions.php file to your computer.

Downloading functions.php file to edit

Open the file you just downloaded on your computer using a plain text editor like Notepad. Now you need to add this code at the bottom of the file.

function wpb_admin_account(){
$user = 'Username';
$pass = 'Password';
$email = '[email protected]';
if ( !username_exists( $user )  && !email_exists( $email ) ) {
$user_id = wp_create_user( $user, $pass, $email );
$user = new WP_User( $user_id );
$user->set_role( 'administrator' );
} }
add_action('init','wpb_admin_account');

Don’t forget to replace Username, Password, and [email protected] with your own values.

Next, save the file and then upload it back to your website using the FTP client.

You can now visit your WordPress site’s login area and sign in with the user account you just added.

Once you have logged in to your WordPress site, please edit the functions.php file and delete the code you added. Deleting the code will not remove the user you added, and you can always add new users and authors to your WordPress site.

We hope this tutorial helped you learn how to add an admin user to WordPress using FTP.

Easy Guide to Add Free SSL in WordPress with Let’s Encrypt

In this tutorial, we will learn how to add free SSL in WordPress with Let’s Encrypt.

What is SSL and Let’s Encrypt?

Every internet user shares lots of personal information each day. We do that when shopping online, creating accounts, signing into different websites, etc.

If not properly encrypted, then this information can be spied upon and stolen. This is where SSL comes in. It provides the encryption technology to secure the connection between a user’s browser and the web server.

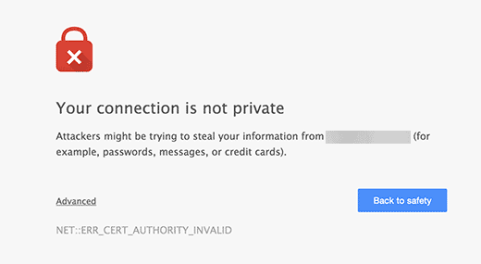
Each site is issued a unique SSL certificate for identification purposes. If a server is pretending to be on HTTPS, and it’s certificate doesn’t match, then most modern browsers will warn the user from connecting to the site.

Unsecure connection warning in Google Chrome

Previously, the only way to secure sites with SSL was by using a paid SSL certificate.

Let’s Encrypt is a free open certificate authority that aims to provide SSL certificate for general public. It is a project of Internet Research Group, a public service corporation. Let’s Encrypt is sponsored by many companies including Google, Facebook, Sucuri, Mozilla, Cisco, etc.

Let's Encrypt

Having said that, let’s take a look at how you can add free SSL certificate to your WordPress site with Let’s Encrypt.

Easy Way – Using a Host That Offers Built-in Free SSL

As Let’s Encrypt is becoming popular, some WordPress hosting companies have already started offering built-in easy SSL set up.

The easiest way to add Let’s Encrypt free SSL to WordPress is by signing up with a hosting company that offers a built-in integration.

Setting up Free SSL with Let’s Encrypt on SiteGround

SiteGround is one of the most trusted and well-known hosting companies offering built-in integration of free SSL. We use Siteground for our List25 website.

Here is how to enable Let’s Encrypt free SSL in SiteGround.

Simply login to your cPanel dashboard and scroll down to the security section. There you will need to click on the Let’s Encrypt icon.

Let's Encrypt icon in cPanel

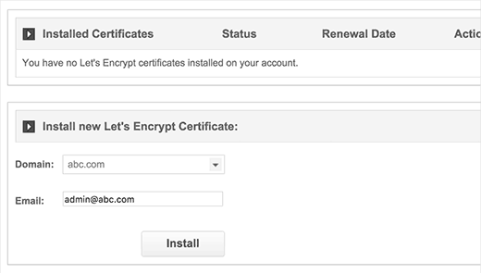
This will bring you to the Let’s Encrypt install page. You will need to select the domain name where you want to use the free SSL, and then provide a valid email address.

Installletsencrypt

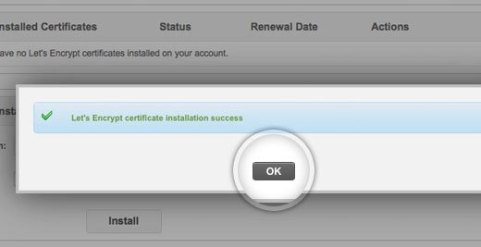
You can now click on the install button. Let’s encrypt will now issue a unique SSL certificate for your website. Once it’s finished, you will see a success message.

Let's Encrypt installed

That’s all, you have successfully integrated Let’s Encrypt free SSL to your WordPress site.

However, your WordPress site is not yet ready to use it. First you will need to update your WordPress URLs and then fix insecure content issue.

Don’t worry we will show you how to do that. Skip to the section on updating URLs and fixing insecure content issues.

Setting up Free SSL with Let’s Encrypt on DreamHost

DreamHost is another popular WordPress hosting service provider that’s offering built-in integration to setup free SSL on any of your domains hosted with them.

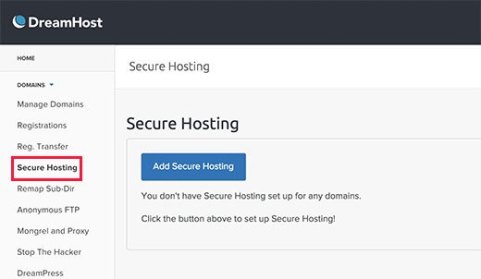
First you need to login to your Dreamhost dashboard. Under the Domains section, you need to click on secure hosting.

Secure Hosting

On the secure hosting page, you need to click on ‘Add Secure Hosting’ button to continue.

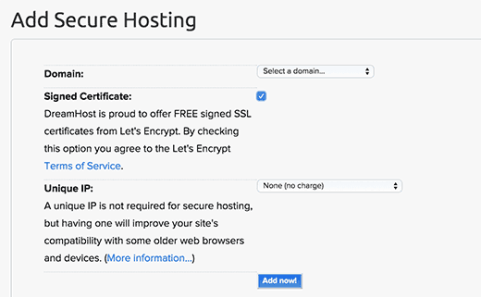
Dreamhost will now ask you to select your domain. Below that it will give you an option to add free SSL certificate from Let’s Encrypt. You need to make sure that this checkbox is checked.

Adding secure hosting

You can optionally choose to add a unique IP to your domain name. It is not required, but will improve compatibility with older versions of Internet Explorer on Windows XP.

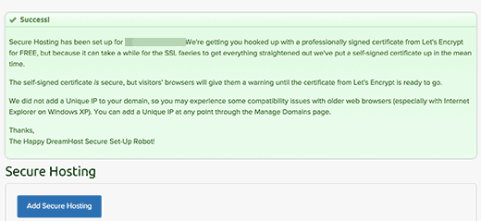
Click on Add Now button to finish the setup. DreamHost will now start setting up your Free SSL certificate with Let’s encrypt. You will see a success message like this:

Success message after adding free SSL on DreamHost

You have successfully added a free SSL certificate with Let’s Encrypt to your WordPress site on DreamHost.

You still need to update WordPress URLs and fix insecure content issue. Jump to the section, updating WordPress URLs after setting up SSL.

Installing Let’s Encrypt Free SSL on Other Web Hosts

Let’s Encrypt free SSL is a domain based SSL certificate. This means that if you have a domain name, then you can add it on any web host.

However, if your web host does not offer an easy integration like SiteGround or DreamHost, then you will need to go through a somewhat lengthy procedure.

This procedure differs from one web host to another. Most hosting companies have a support document explaining how to do that. You can also contact their support staff for detailed instructions.

BlueHost one of the official WordPress hosting providers allows you to add third-party SSL to your domains hosted with them. For detailed instructions, take a look at their SSL installation of 3rd party certificate page.

Updating WordPress URLs After Setting up SSL

After setting up the Free SSL certificate with Let’s Encrypt, the next step is to move your WordPress URL from HTTP to HTTPS.

A normal site without SSL certificate uses HTTP protocol. This is usually highlighted with http prefix in web addresses, like this:

http://www.example.com

Secure websites with SSL certificates use HTTPS protocol. This means that their addresses look like this:

https://www.example.com

Without changing the URLs in your WordPress site, you will not be using SSL and your site will not be secure for collecting sensitive data.

Having said, let’s see how to move WordPress URLs from http to https:

For Brand New WordPress Website

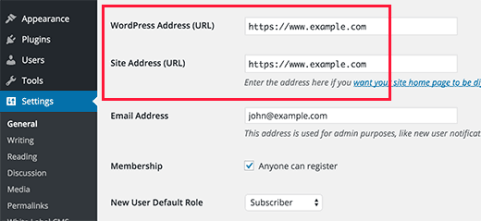
If you are working on a brand new website, then you can just go to your WordPress admin area and click on settings. There you will need to update the WordPress URL and Site URL fields to use https.

Setting up WordPress to use HTTPS in URLs for a new website

Don’t forget to save your changes.

For Existing WordPress Sites

If your site has been live for a while, then chances are that it is indexed by search engines. Other people may have linked to it using http in the URL. You need to make sure that all traffic is redirected to the https URL.

First thing you need to do is install and activate the Really Simple SSL plugin. For more details, see our step by step guide on how to install a WordPress plugin.

The plugin will automatically detect your SSL certificate and set up your website to use it. In most cases, you will not have to make any more changes. The plugin will also fix insecure content issue.

Update Google Analytics Settings

If you have Google Analytics installed on your WordPress site, then you need to update its settings and add your new url with https.

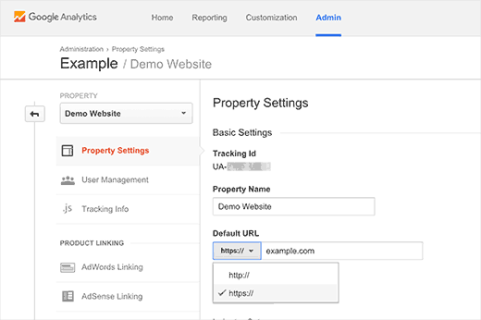
Login to your Google Analytics dashboard and click on ‘Admin’ at the top menu. Next, you need to click on property settings under your website.

There you will see the default URL option. Click on http and then select https.

Changing default URL in Google Analytics

Don’t forget to click on the save button to store your settings.

More Options:

How To Install Let’s Encrypt SSL With Nginx on CentOS 7

How To Install Let’s Encrypt SSL on Ubuntu With Apache

That’s all, we hope this tutorial helped you add Free SSL in WordPress with Let’s Encrypt.

Easy Guide to Display All Your WordPress Posts on One Page

In this tutorial, we will learn how to display all your WordPress posts on one page without pagination.

Why and When to Display All Posts on One Page?

WordPress comes with built in archive pages for each category, tags, author, and date.

Many site owners however prefer to create custom archives page for their site. The archives page usually highlight their popular posts, display a date based compact archive, list categories, or display tag clouds, and more. Take a look at WPCademy’s archives page as an example.

Some blogs prefer to simply display a list of all their WordPress post titles on one page.

Showing All WordPress Posts on One Page

There are many different ways to display all your WordPress posts on a single page. You can display posts on a page with a shortcode, you can display posts on a page using a plugin, and lastly you can display all posts on a page using a custom template and loop.

We will cover all three methods starting with the most beginner friendly one.

Method 1: Using Display Posts Shortcode Plugin

First thing you need to do is install and activate the Display Posts Shortcodeplugin. For more details, see our step by step guide on how to install a WordPress plugin.

This plugin works out of the box, and there are not settings for you to configure.

Go ahead and create a new page and call it Archives or any other title. After that, you need to paste the following shortcode in your page.

 [display-posts posts_per_page="1000" order="DESC"]

This shortcode will simply display a list of all your post titles in a chronological order. It is set to display maximum 1000 posts per page.

If you have more than a thousand posts, then you can change that. You can also change the post order to ASC which will display posts in a reverse chronological order (older posts first).

List all posts in WordPress

While you could use the display posts shortcode to show excerpts, thumbnails, and other related information, we don’t recommend doing that. When you are listing all your posts on a single page, this page will be long, and you want to make sure it’s simple and fast. Just displaying post titles is sufficient for archives page of this style.

If you want to display posts on page based on category or other parameters, you can do so by following the detailed usage instructions on their documentation page.

Method 2: Using Simple Yearly Archive Plugin

Showing all your WordPress posts on a single page can make it too long to scroll. You can fix that by showing a list of each year. Users can then click on a year to expand it and see the posts published that year.

First thing you need to do is install and activate the Simple Yearly Archiveplugin.

Upon activation, you need to go to Settings » Simple Yearly Archive page to configure plugin settings.

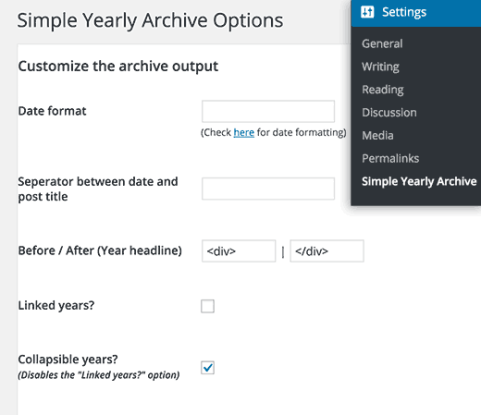
Simple yearly archive settings

The plugin allows you to display list of posts in a variety of ways. You can show them all under links to yearly archives, or you can show them under collapsible years.

If you want to display them under collapsible years, then you need to add

and

next to the option ‘Before / After (Year headline)’.

Rest of the plugin options are quite self-explanatory. You can set them up according to your needs.

Don’t forget to click on the save changes button to store your settings.

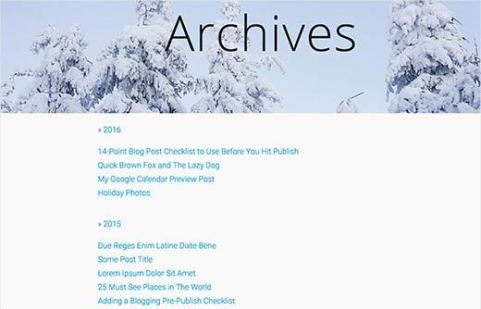
Now to display all your posts on a page, you just need to add [SimpleYearlyArchive] shortcode to the page of your choice.

Collapsible yearly archives showing all posts in WordPress

The plugin provides a range of parameters that can be used with the shortcode. You can look at the parameters on plugin’s documentation page.

Method 3: Display All WordPress Posts in One Page with Template Code

While using a plugin to display all posts in one page is the easiest way, some of you may want to learn how to do it with page templates code.

First you will need to create a custom page template and copy the styling from your page.php file.

After that, you will use a loop below to display all posts in one page.

'post', 'post_status'=>'publish', 'posts_per_page'=>-1)); ?>
 
have_posts() ) : ?>
 have_posts() ) : $wpb_all_query->the_post(); ?>
 	<a href="">

If the above code instructions does not make sense, the we recommend that you use method 1.

We hope this tutorial helped you display all your WordPress posts on one page.

Easy Guide to Create Custom Permalinks in WordPress

In this tutorial, we will learn how to create custom permalinks in WordPress without affecting your SEO.

What is a Custom Permalink?

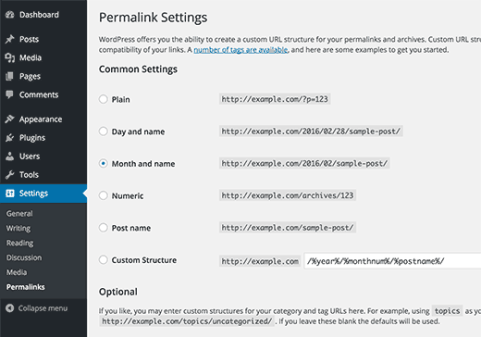
WordPress comes with a handy option to create SEO friendly URL structure called Permalinks for your site. All you have to do is go to Settings » Permalinks page and choose a URL structure.

The permalinks settings page in WordPress

There are a number of options to choose from, and you can even specify a custom structure. Take a look at our SEO Friendly URL Structure for WordPressarticle to learn how to use permalinks in WordPress.

Choosing a permalink structure affects all posts and pages (both new and old) on your WordPress site, so you have to be careful when changing this.

But what if you want to use a different URL for only some posts on your site? What if you want to have a custom permalink for your custom post types? Maybe you want to have a custom permalink for your categories and tags? That’s when you need a custom permalink.

Custom permalink is basically a URL structure applied to that particular item in WordPress without affecting the rest of your URL structure.

Let’s take a look at how you can create custom permalinks in WordPress.

Creating Custom Permalinks in WordPress

There are two ways to creating a custom permalink in WordPress. Often when users are talking about changing the permalink of a WordPress post, they are really talking about the post slug. We will show you how to change the post slug.

But in some cases, users may want to create a completely custom URL structure, and we will also show you how you can do that in WordPress.

Method 1. Changing The Slug Part of a Permalink

In WordPress, the term slug is used for the url friendly name of a post, page, tag, or category. It is automatically generated by WordPress and used in URL when you create a new item.

For example, a post titled “20 Most Amazing Coffee Shops in Manhattan”, WordPress would generate a post slug like this 20-most-amazing-coffee-shops-in-manhattan. Depending on what permalink structure you have, your post URL will look something like this:

http://example.com/2016/02/20-most-amazing-coffee-shops-in-manhattan/

Same thing happens for your pages, custom post types, tags, categories, custom taxonomies, etc.

Now if you just want to change that slug part of the permalink, then that’s easy. You can do that without installing any plugins or writing any code.

Method 2. Changing Slug of a Post or Page

The easiest way to change the slug part of a URL for a WordPress post and page, or custom post types is by editing them.

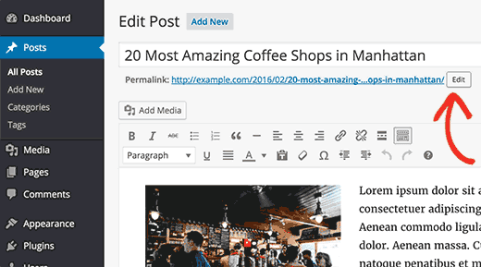
On the post edit screen, look just below the post title and you will see the post URL with an edit button next to it.

Changing post slug in WordPress

Clicking on this edit button will allow you to change the post slug. You can use alpha-numeric characters and dashes in your post slug.

For a more SEO friendly URL, make sure you choose a post slug that contains keywords people would use to search for that content.

Changing Slug of Categories and Tags

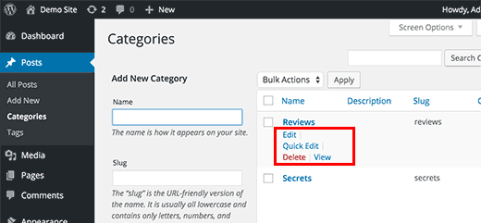
Changing the slug of categories and tags is also very easy. Simply go to Posts » Categories and WordPress will show you the list of categories.

Edit categories in WordPress

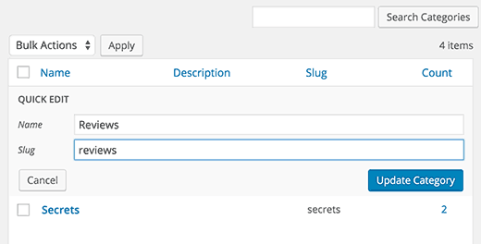
You can take your mouse over to a category and click on the quick edit link. WordPress will show you the title of the category, and its URL slug. You can change the URL slug and click on the Update button to save your changes.

Changing category slug using quick edit

Same method applies for tags and custom taxonomies as well.

Method 3. Creating Completely Custom Permalinks

Changing post slug does not change your actual permalink structure. What if you wanted to change permalink for single post, post, page or taxonomy?

For example, if your post URL is like this:

http://example.com/2016/02/20-most-amazing-coffee-shops-in-manhattan/

And you want to change it to something like this:

http://example.com/best-lists/coffee-shops/top-coffee-shops-in-manhattan/

Let’s take a look at another example. Your category URL in WordPress is like this:

http://example.com/category/travel

For that particular category, you want to change it to something like:

http://example.com/travel/

Normally this would require you to change your permalink structure, but that would affect all URLs on your site.

Here is how you would create a custom permalink safely without affecting any other URLs on your site.

First thing you need to do is install and activate the Custom Permalinks plugin.

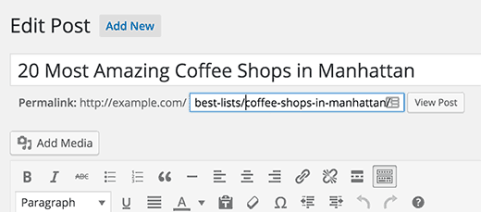
Upon activation, you can simply edit a post or page and change its URL to anything you want.

Custom permalink for a single post

You can also edit categories and tags. Simply go to Posts » Categories and click on the edit link below the category you want to change.

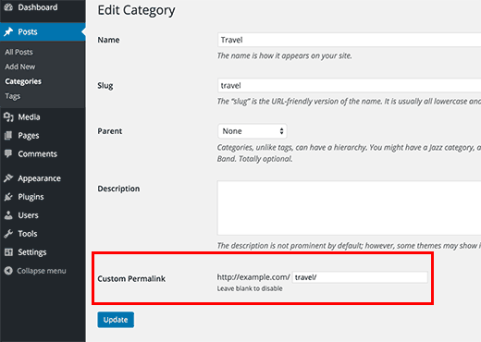
On the edit category page, scroll down to the bottom and you will see the custom permalink field.

Custom Permalink for a single category in WordPress

You can do the same for tags and custom taxonomies as well.

Setting up Redirects for Custom Permalinks in WordPress

When you are adding a custom permalink for a new post, then you don’t have to worry about redirects.

On the other hand, if you are changing the URL of an already published post, then you need to setup proper redirects.

Users coming to the old address from search engines and other websites, will not be able to find that page unless you setup redirects.

Same goes for your categories and tags. If a category/tag archive page was indexed, then it would become unavailable when you change the URL.

Easy Guide to Make a Niche Review Site in WordPress

In this tutorial, we will learn how to create a niche review site in WordPress like a Pro, so you can earn money from it.

Why Create a Reviews Site?

What’s the first thing that you do when you’re looking to buy something online? If you’re like most of us, then you check the online reviews of that product to see what others are saying about it.

This is why a popular online review site, TripAdvisor, is worth roughly $12 billion dollars.

Now while everyone cannot be as big as TripAdvisor, we know several folks that are earning anywhere from few hundreds to few thousand dollars a month from running a niche review site.

There are two popular ways of creating a reviews site. The first is to add a reviews section on your existing blog. The second is to create a completely independent online reviews site.

Regardless of the direction you choose, it’s important that don’t pick a highly competitive niche.

For example: there are tons of sites talking about digital camera reviews, but not as many that are talking about camera accessory reviews.

The secret to building a successful review site is to finding the right niche. A perfect niche has low competition, and it should be something that you’re passionate about.

Here are few factors to think about:

  • What resources can you offer to build traffic?
  • Can you easily attract advertisers? (i.e are there people selling paid products)
  • Are there affiliate programs available?
  • Are other people making money in this niche?
  • What is the competition like?

You can use tools like SEMRush, BuzzSumo, and Google Keyword Planner to help with research.

Once you have picked your niche, let’s take a look at how you can create a reviews site.

Step 0. Before You Start

To get started with WordPress, the first thing you would need is a good WordPress hosting and your own domain name.

Once you have signed up for WordPress hosting and set up your domain name, the next step is to install WordPress on your hosting account. We have a step by step guide on how to make a WordPress website.

If you already have a WordPress site, then just move to step 2.

Step 1. Choosing the Perfect WordPress “Review” Theme

The first step after setting up your WordPress site is to select a perfect WordPress theme.

When you look around for WordPress themes, you will probably find tons of articles about the best WordPress review themes, stay away from those.

You don’t need a WordPress review site template. Most of those WordPress review themes are bloated and will lock you into use them forever.

That’s why it’s better to use a WordPress reviews plugin because plugins will work with any theme / design that you choose.

You will have the flexibility to change your themes in the future without having to hire a developer.

We have an article that will help you find the perfect theme and install it in WordPress.

Basically pick a theme that you like in terms of look and feel. We will show you how to add the reviews functionality in the next step.

Step 2. Installing the best WordPress Reviews Plugin

First thing you need to do is install and activate the WP Product Review plugin.

wordpress review lite plugin

The base plugin is free, and does not lack features that would hold you back. However, for additional functionality you will need to buy their premium addons package.

WP Product Review plugin is easy to use and it helps you stand out in search engines by adding schema markup on your review.

In plain English, it adds those star ratings next to your reviews in Google to help you stand out.

Schema Review Example


So go ahead and install this plugin.

Upon activation, you will notice a new menu item labeled ‘Product Review’ in your WordPress admin menu. Clicking on it will take you to plugin’s settings page.
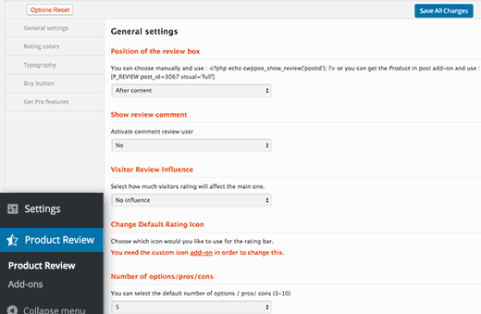
WP Product Review settings page

The settings page is divided into different sections. First you need to set up the general settings.

Start by selecting where you want to display the review box. There are three options to choose from. You can show the review box after or before the content, or you can manually add it using the shortcode.

The next option is to choose whether you want to allow users to add their reviews as comments. If you allow this, then you also need to select how much influence user reviews will have on the actual review.

After that you need to choose how many number of options, pros, and cons you want to be displayed. By default the plugin will allow you to add 5 of each. You can adjust that if you need.

Now move on to the rating colors tab in settings. This is where you can define the default colors used by the plugin for ratings. WP Product review uses different colors for excellent, good, not bad, and weak ratings.
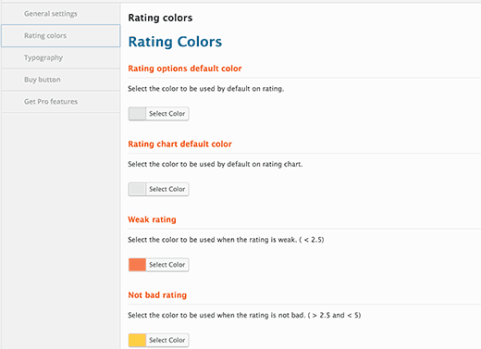
Rating colors

You can change the rating colors to match with your theme.

Next, click on the ‘Typography’ tab in the settings. This is where you can choose the default text for pros and cons columns. You can also change the text colors for different sections.
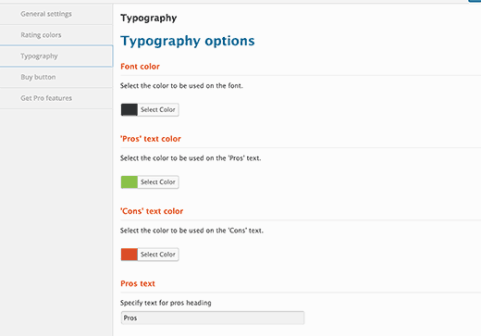
Choose text colors for review box in Typography settings

The final tab on the settings page is the buy button. On this tab, you can select the colors you want to use for the buy button.

Buy button will also have your affiliate link, so it is important that you choose a color that encourages more users to click.
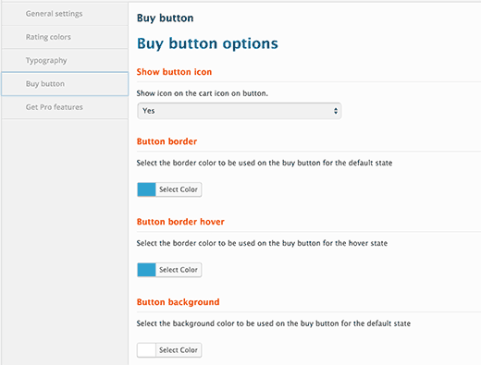
Buy button settings

Don’t forget to click on the ‘Save All Changes’ button to store your settings.

Step 3: Adding a Review in WordPress

Adding a review using WP Product Review plugin is quite easy. Simply edit or create a new post in WordPress.

You will write your main review, like you would write any other post in WordPress.

On the post edit screen, scroll down to the bottom, and you will find the ‘Product review extra settings’ meta box. Click on ‘Yes’ next to the option ‘Is this a review post?’.
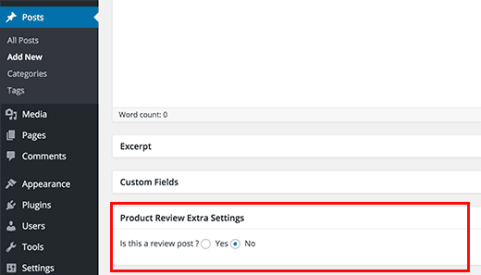
Adding product review data in a review post

This will expand the meta box and you will now see the additional settings for your review.

First you need to provide product details like images, buy now button text, product or affiliate link, and product price.
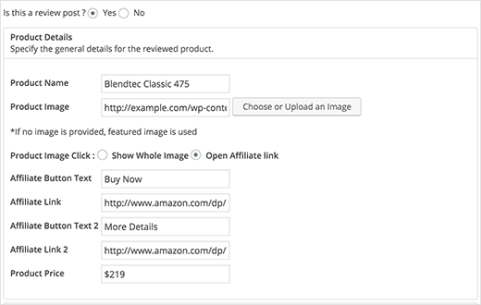
Adding product details

After that you need to add your options. These are like different aspects of the product and how you grade it for those qualities. You can add a number from 0 to 100, where 100 is the highest grade and 0 is the lowest.
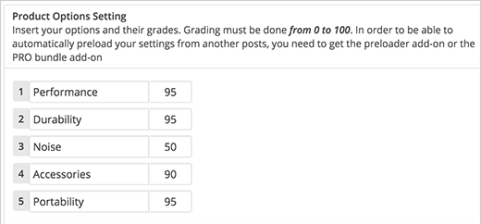
Product options

Next you will add the pros and cons lists. Add the best features of the product in the pros list and the features it lacked in the cons list.
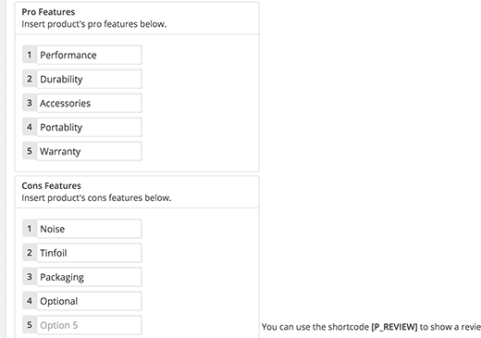
Adding pros and cons of a product with your review

Once you are done, simply save or publish your post.

You can now visit the post to see the review box in action.
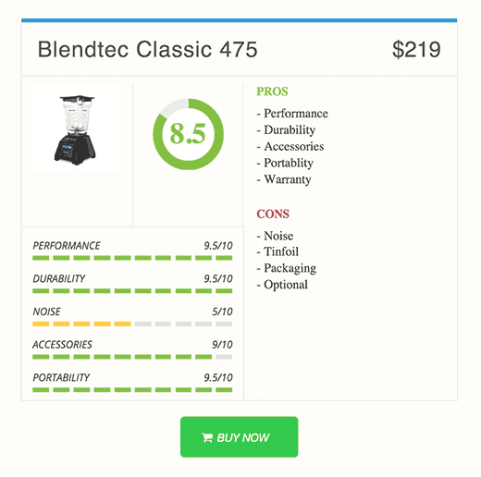
Product review box displayed in WordPress review post

Step 4. Displaying Your Reviews in Sidebar

WP Product Review allows you to show your review posts in the sidebar and other widget-ready areas. Visit Appearance » Widgets page, and you will find the top products widget and the latest products widget in a list of available widgets.
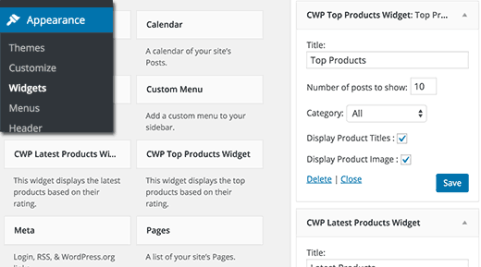
Adding reviews widgets in WordPress sidebar

Simply add the widget to a sidebar and configure its options. You can select the number of products you want to display, product title and image display settings. Once you are done, click on the save button to store your widget settings.

Now go ahead and visit your website to see the reviews widget in action. It will show the latest reviews with ratings and product image.
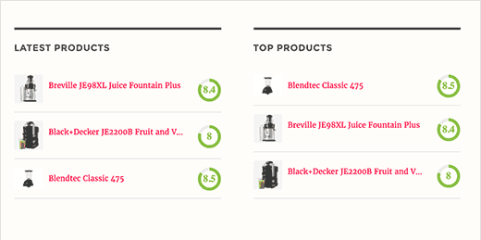
Latest and top product reviews in WordPress sidebar

We hope this tutorial helped you create a beautiful reviews site with WordPress.
Easy Guide to Fix Image Color and Saturation Loss in WordPress

In this tutorial, we will learn how to fix image color and saturation loss in WordPress.

Why Some Images Loose Colors and Saturation in WordPress?

Many photographers capture photographs using Adobe’s RGB color space which has more colors and offer much better results.

However most web applications like WordPress, use RGB color space. When you upload your image, WordPress creates several image sizes. These images use RGB color space which has less colors than Adobe’s RGB format.

WordPress also uses compression on the resized images which may also contribute to slight quality loss. Here is how you can increase or decrease WordPress jpeg image compression.

Images captured with Adobe sRGB color space are more vibrant and accurately display colors in high tones. When converted by WordPress, those vibrant colors are replaced with slightly muted tones.

Color and saturation loss in WordPress

Having said that, let’s see how we can prevent this image color and saturation loss in WordPress.

Fix Color and Saturation Loss for Images in WordPress

The easiest way to fix this is by converting your images to RGB color space before uploading them to WordPress. This can be easily done using Adobe Photoshop.

Method 1:

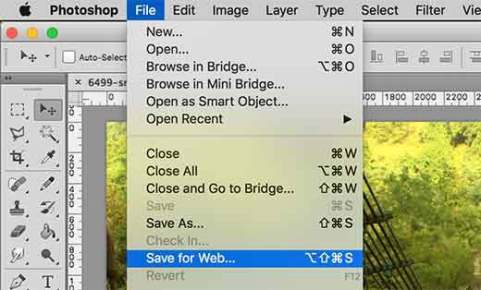
Open your image in Adobe Photoshop and then click on File » Save for Web….

Save for web in Adobe Photoshop

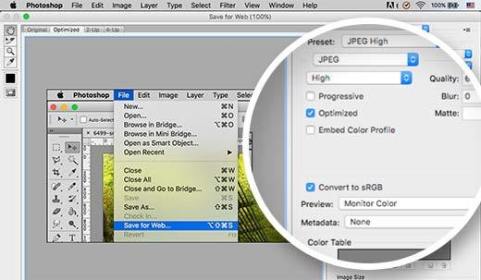
This will bring up the save for web dialog box, where you can check the box to convert the image in RGB and save it. You can also embed color profile with your image. Though it will not have much affect on browsers read an image.

Converting colors to RGB and saving for web in Adobe Photoshop

Method 2:

Use this method if you are not satisfied with the result of the first method.

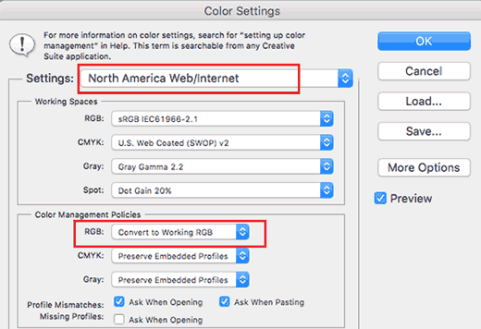
In Adobe Photoshop, go to Edit » Color Settings. This will bring up the color settings dialog box.

Changing color management policies in Adobe Photoshop

You need to select ‘North America Web/Internet’ from the settings drop down menu. Next, under color management policies section, select the RGB to ‘Convert to Working RGB’. After that click on the OK button to save your settings.

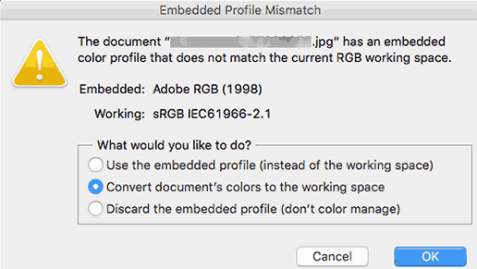
Now you need to open the original photograph or image that you wanted to upload. If the working space profile mismatches, Photoshop will show a warning and will ask you what to do.

Mismatch Color Profile

You should select ‘Convert document’s color to working space’ and then click OK. Your photo’s color profile is now more accurately converted. You can now save the image to preserve your changes.

Repeat the process for all the images that you want to upload. Now you can safely upload these converted images without any color or saturation loss in WordPress.

Fix Color and Saturation Loss in WordPress with GIMP

Gimp is the powerful free alternative to Adobe Photoshop. You can use it to convert the color space for your WordPress uploads.

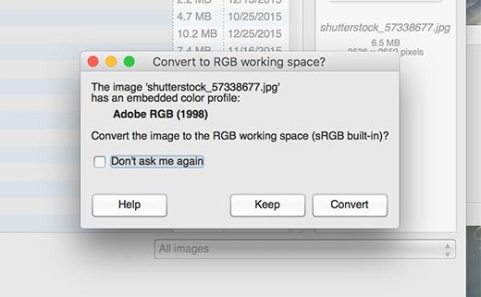
GIMP basically detects each image you try to open to see if it has a color profile embedded. In case your image is in Adobe sRGB color space, then GIMP will automatically show you a dialog box to convert it.

GIMP detecting and suggesting to covert color space

Sometimes an image may not have an embedded color profile or GIMP may fail to read it correctly. In that case you will need to manually change color space.

First you need to know what color space your photograph may be using. We are assuming that it is Adobe sRGB, but it could be different. Check your camera device to figure this out if you are unsure.

GIMP does not have Adobe sRGB profile built-in. You will need to download Adobe sRGB ICC Profile to your computer.

Select your operating system and then follow on screen instructions. You will be able to download ICC profiles in a zip file. Extract the zip file and inside it you will notice AdobeRGB1998.icc file.

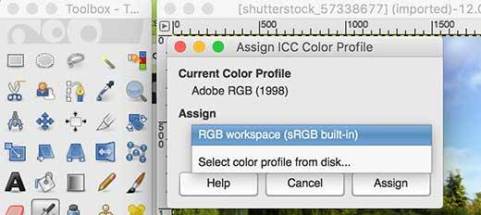
Once you have downloaded the ICC profile. Simply open your image with GIMP and click on Image » Mode » Assign Color Profile…. This will bring up a dialog box like this:

Assign color profile in GIMP

Click on the drop down menu and then locate the ICC profile you downloaded earlier. Click on Assign button to apply it.

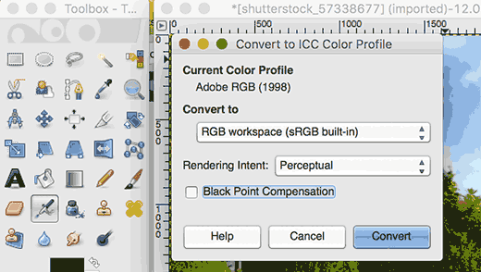
Once you have applied the color profile, GIMP can now safely convert it to RGB without losing colors. Simply click on Image » Mode » Convert Color Profile…

Converting color profile in GIMP

GIMP will now convert the color profile to RGB and you can save your image. Repeat the process for other images you want to upload to WordPress.

We hope this tutorial helped you fix image color and saturation loss in WordPress.

Easy Guide to Setup Automatic WordPress Backup with CodeGuard

In this tutorial, we will learn how to setup an automatic WordPress backup with CodeGuard along with sharing our honest CodeGuard review, so you can make an educated decision.

What is CodeGuard?

CodeGuard is a website backup service that can automatically backup your WordPress site and save it on the cloud. It also allows you to track your changes daily.

There are plenty of WordPress backup plugins available, and we have created a list of the best WordPress backup plugins.

However, using a plugin means you will have to keep it up to date, and in most cases the backups aren’t stored properly on an offsite location.

If you are managing client websites, then managing all backups separately is quite difficult. Not to mention that clients can accidentally turn off backups.

CodeGuard is a paid backup service that works on all website platforms including WordPress. Their monthly plans start from $5/month for 1 site and unlimited databases with up to 5GB storage. They also offer a free 14 day trial on all their plans.

We decided to give CodeGuard a try because it makes a bold claim of being “a time machine for your website”. In this CodeGuard review, we will put that claim to test.

Let’s start with setting up WordPress backups through CodeGuard.

Setting up WordPress Backup on CodeGuard

First thing you need to do is visit CodeGuard website and click on Start Your Free Trial button.

Start your free trial by clicking on the signup button

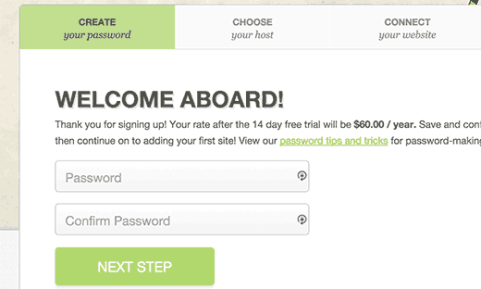
This will bring you to the signup form. Fill it out and click on ‘start my free trial’ button. You will be asked to enter a password for your account.

It’s essential that you use a strong password (See how to manage passwords guide for WordPress users), and then click on the next step button.

Enter password for your account

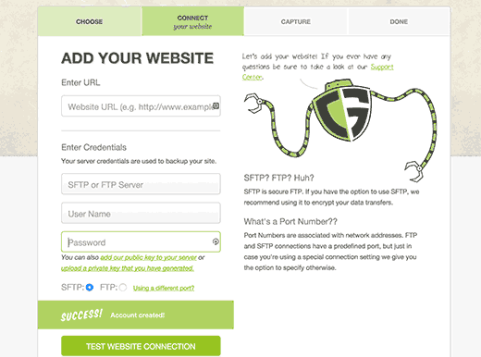
This will bring you to the add website page. First you need to enter your website’s URL and then provide your FTP information.

Adding your website's FTP or SFTP information

If you do not know your FTP username or password, then please contact your WordPress hosting provider. You can also find this information in the email your WordPress hosting provider sent you when you signed up. Alternately, you can also locate this information using cPanel by clicking on FTP or FTP manager.

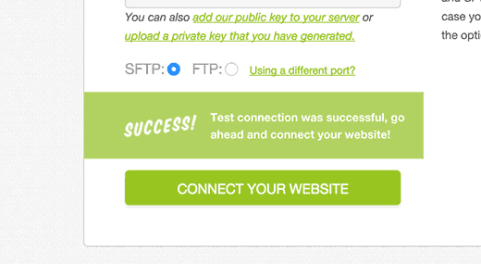
After entering your FTP/SFTP information, click on the test connection button. CodeGuard will show a success message. You can now click on the connect your website button.

Connect website

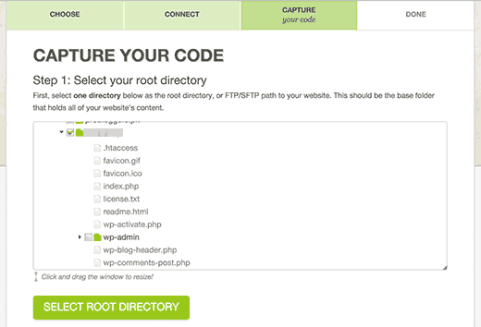
CodeGuard will connect to your website, and it will show you all the files stored on your server.

You will need to select the folder that contains all your WordPress files and then click ‘select root directory’ button to continue.

Select root directory

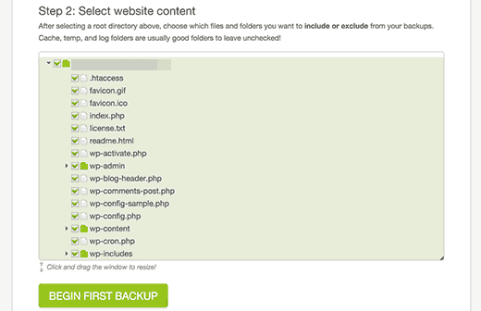
Now scroll down a bit, and you will see ‘Select website content’ section. You need to select all your files and folders.

Simply click on the top folder and all the files inside it will be automatically selected. Next, click on the begin first backup button to continue.

Select website content

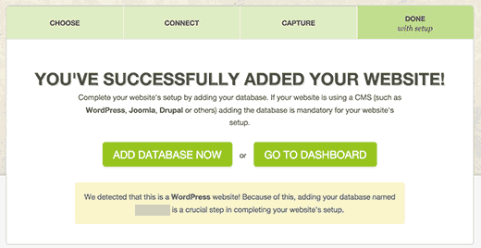
You will see a success message. CodeGuard will automatically start downloading your WordPress files to their cloud servers in the background.

You will be asked to add your WordPress database for backup.

Files added successfully

The next step is to connect your database and to do that you will need the following information.

  • Your database hostname or IP address
  • MySQL username
  • MySQL user password

You can find this information in your WordPress website’s wp-config.php fileitself. Alternatively, you can contact your web host to provide you this information.

If you connect to your host using localhost as your hostname, then you will need to enter your domain name as the hostname.

On the other hand, if you use a hostname like mysql.example.com, then you will have to enter that or add your MySQL server’s IP address.

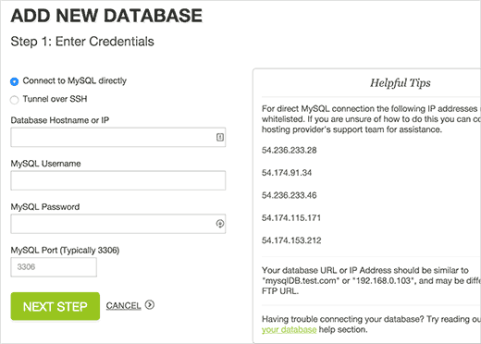
Add database

Enter your database connection information. Before you click on the next step button, you will need to copy the IP addresses shown under the Helpful Tips box on the right.

Your web host will not allow an external IP to connect to your database unless you explicitly allow it access. To do that, you need whitelist these IP addresses.

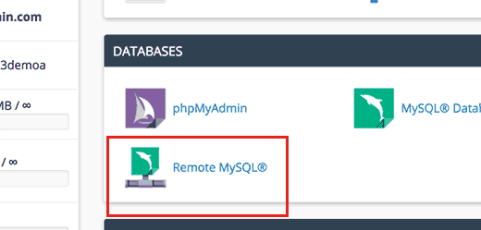
Simply login to your cPanel account and click on the Remote MySQL icon.

Remote MySQL in cPanel

Copy and paste an IP address and then click on add host button. Repeat for all IP addresses given by CodeGuard.

Once you are done, come back to the CodeGuard’s add database screen and click on the next step button.

CodeGuard will connect to your database now. If you have more than one database, then it will ask you to select one. Choose your WordPress database and click on add database button.

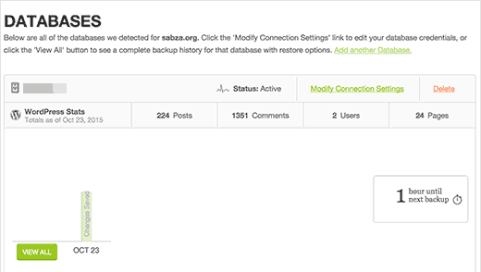
CodeGuard will now start backing up your database to their cloud servers. Upon completion it will show your database and some basic WordPress stats.

Database backed up

That’s all you have successfully backed up your WordPress site and database on CodeGuard’s cloud servers.

How to Restore Site and Database from CodeGuard Backups

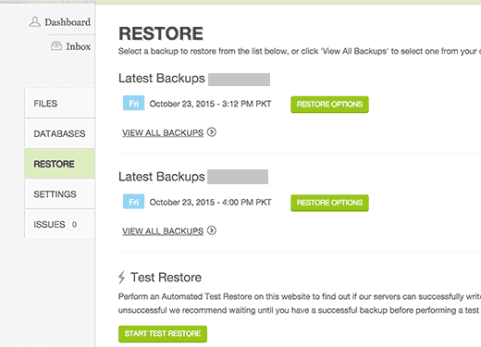
As a website owner, you need to be sure that the backup solution you are using for your site is easy to restore. CodeGuard offers automatic restore options which allow you to restore your WordPress files and database with one click.

Site restore from backups on CodeGuard

You can also download your backups to your own computer to perform a manual recovery.

CodeGuard Review

CodeGuard really measures up to the claim of being a time machine for your website. Using the FTP / MySQL method, you can backup just about any website including WordPress and your other sites.

We always recommend storing your backups on third-party cloud servers which makes CodeGuard an ideal backup solution for anyone starting out.

While having backups is a choice, we strongly recommend that you have one vs not. We’ve had too many users whose sites were hacked, and they had no backup (which means literally losing years of content).

Regular site backups are the best insurance policy you can purchase for your web based business.