Easy guide to Add Your WordPress Site in Yandex Webmaster Tools

Add your Wordpress in yandex

In this tutorial, we will share how to add your WordPress site in Yandex webmaster tools to monitor your search engine traffic.

What is Yandex?

Yandex is a popular search engine like Google and Bing based in Russia. You can optimize your site for SEO in Yandex to get more visitors from Russia.


Yandex has a range of tools like generalized search engine, image search, email, videos, maps and more. It also has webmaster tools to help you rank your site, monitor traffic stats, search queries, keywords, and more.

You can connect your WordPress site with Yandex using the Yoast SEO plugin. It works similar to Google search console and Bing Webmaster tools.

Adding WordPress Site in Yandex Webmaster Tools

Before we start, you would need a Yandex Webmaster tools account to connect your site. Once you have created your account, you can login to your WordPress site to configure Yandex webmaster tools with Yoast SEO plugin.

Let’s take a look on how you can add your site in Yandex webmaster tools and start optimizing it right away.

Step 1: Create an Account at Yandex

First thing you need to do is login to your Yandex webmaster tools account. If you don’t have a Yandex account, then you can create one using this link.

After creating the account, you’ll see the Yandex Webmaster page. On this page, you need to click on the ‘+‘ button in top bar to add your site in Yandex.

In the site address field, you need to add your website’s full domain name and click on the Add button.

Note: If your main domain uses ‘www’ in the URL, then you need to add it before the domain (for example www.wpcademy.com)

On the next page, you will be asked to verify website ownership by adding meta content in your WordPress site. Go ahead and copy the content code from this page because you will need it in Step 2.

Step 2: Login to WordPress Admin Area and Add the Code

Now you need to login to your WordPress admin area and add the verification code in the Yoast SEO webmaster settings.

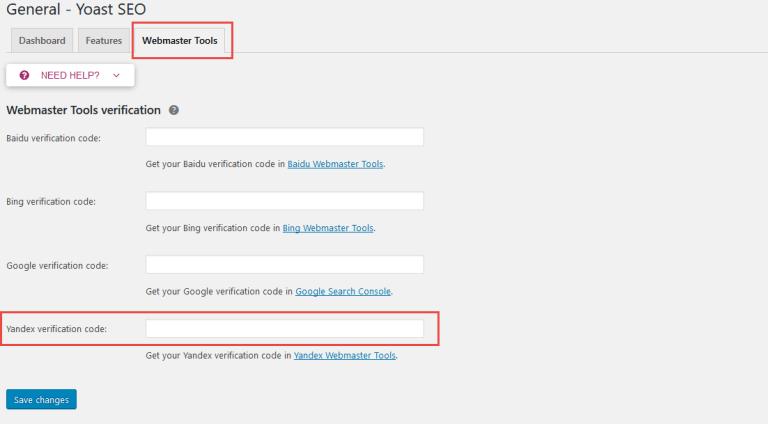
Simply head over to the SEO » General area and click on the Webmaster tools tab.

Next, you need to paste the code in the Yandex verification code field and click on the Save Changes button.

After adding the code in your WordPress site, you need to go back to the Yandex Webmaster tools page where you copied the code from and click on the Check button to verify ownership.

After successful verification, it will show your username that has the rights to manage your site in Yandex Webmaster tools. You can also delegate the rights to other users by adding their username and clicking on the Delegate rights button.

Now that your site is verified and added in Yandex Webmaster tools, you can see traffic stats, search errors, search queries, internal and external links, site information, robots.txt analysis, audit pages for mobile, and more on the Yandex dashboard. You can use the menu on left side of the screen to find any information that you may need.

Yandex Webmaster tools have options for site optimization that are filtered from troubleshooting to important settings like robots.txt and .htaccess. You can further optimize your robots.txt for SEO separately and regularly perform WordPress maintenance tasks to keep your site up to date.

Easy Guide to Convert WooCommerce Visitors into Customers

In this tutorial, we will show you how to easily convert WooCommerce visitors into customers like a pro.

Why I Need to Conversion Optimization for My WooCommerce Store

Most eCommerce stores rely on search engines or paid advertising campaigns for traffic. There are many other ways to get more traffic to your website.

However, more than 75% visitors who find your website through search engines will never find it again. Those who stick around, only a small percentage of them will add products to the cart.

In the end, more than 69% shopping carts are abandoned without making the purchase. Shipping costs, complicated checkout experience, and bad design are among the top reasons for abandoned carts.

Now, considering these statistics, your eCommerce website will continue losing potential customers if you don’t work on converting those visitors into customers.

How do I Convert Visitors into Customers?

The process and technique that are used to convert visitors into customers is called conversion rate optimization (CRO). Marketers and usability experts use CRO to successfully drive visitors to become a customer or a potential customer.

Basically, you remove obstacles that affect a user’s experience on your website. You also incentivize users to make a purchasing decision.

Lastly if a user must leave without making a purchase, then your goal is to try and get their information through lead generation. This allows you to communicate with them via email and offer personalized messages, special discounts, or new product announcements.

In early days of eCommerce, you would have needed programming skills to work on all these but not anymore. Now you have tools that make it extremely easy to do all these things without writing code or acquiring any new technical skills.

That being said let’s take a look at how to convert WooCommerce visitors into customers.

What You Need to Boost WooCommerce Conversions

First, you will need a WooCommerce store. If you don’t already have one, see our guide on how to create an online store.

This tutorial is about WooCommerce, so we will be using it in our screenshots. However, all these techniques would also work on any other eCommerce platform including Shopify.

We will be using the OptinMonster tool. It is the best conversion optimization software on the market and helps you easily convert WooCommerce visitors into customers.

OptinMonster is a paid service, and you will need at least their Pro plan to access all the features mentioned later in this article.

Ready? let’s begin.

Disclosure: We believe in full transparency. WPCademy founder, Syed Balkhi, is also the co-founder of OptinMonster. We only recommend tools that we personally use and believe will add value to our readers.

Installing and Setting up OptinMonster

After you have purchased OptinMonster, you will need to install the OptinMonster plugin. For more details, see our step by step guide on how to install a WordPress plugin.

This plugin is just a connector between your WooCommerce store and OptinMonster.

Upon activation, you need to click on the OptinMonster menu item in your WordPress admin sidebar. You will be asked to enter your license key. You can find this information under your account on OptinMonster website.
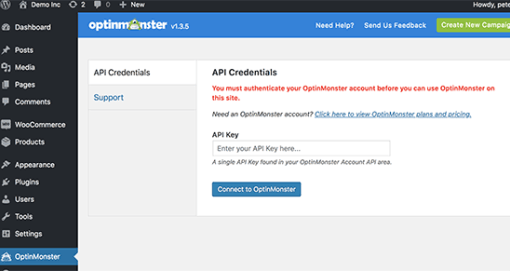
You have now successfully connected your WooCommerce store to OptinMonster, and you can now start optimizing your conversion rates.

Creating Your First WooCommerce Conversion Optimization Campaign

Let’s create your first WooCommerce conversion optimization campaign using OptinMonster. Our first campaign will reduce shopping cart abandonment ratewhile increasing conversions at the same time.

Visit the OptinMonster page in WordPress admin area and then click on ‘Create New Campaign’ button.
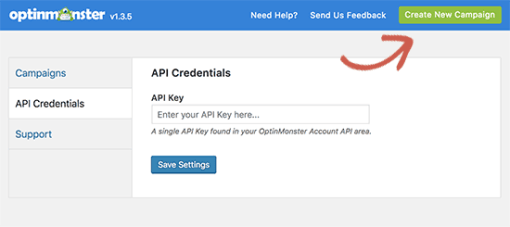
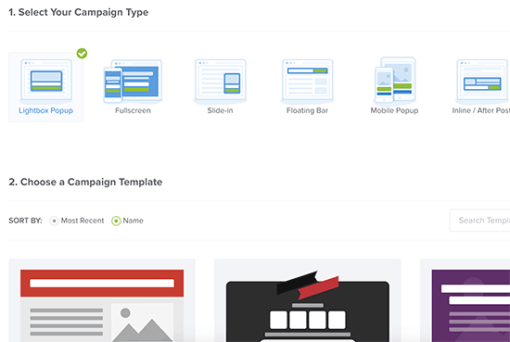
This will take you to the OptinMonster website where you will be asked to select a campaign type and a campaign template. For this tutorial, you need to select lightbox as your campaign type. We will be using the ‘Coupon’ template in this tutorial, but you can use any template that you like.
As soon as you select a template, you will be asked to provide a name for your campaign and enter the website address where you will be using it.
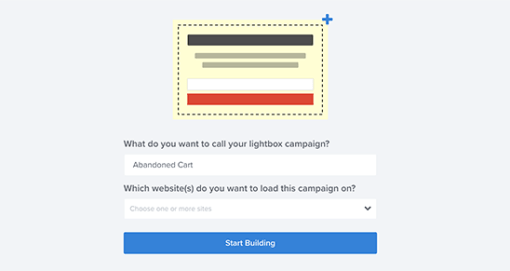
After entering this information, click on the ‘Start Building’ button to continue.

This will launch the OptinMonster builder interface with a live preview of your popup. You can simply point and click on any item to edit it.
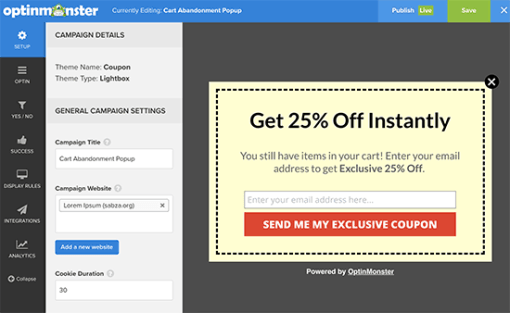
As you can see we are using a popup that collects user’s email address. You can connect OptinMonster to your favorite email service provider by clicking on the integrations tab.
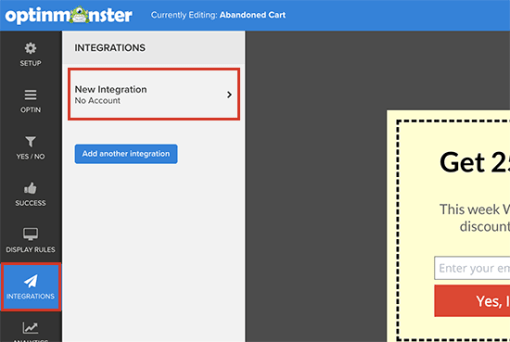
From here you can add a new integration to connect with your email service by following the on-screen prompts.

Next, you need to choose which users will see the popup and when.

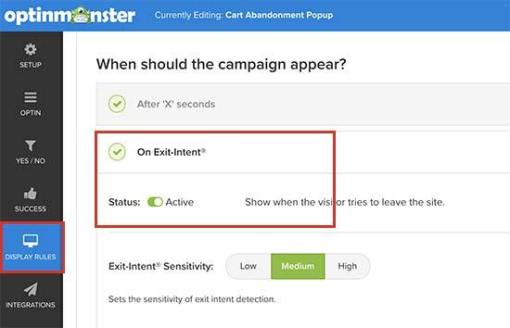
Click on the ‘Display Rules’ tab from the left menu, and OptinMonster will show you a list of default display rulesets that you can use.

First, click on the ‘Exit Intent’ ruleset to expand it, and then make sure it is active. Exit-Intent basically detects user’s behavior and prompt them with a message at the precise moment they’re about to leave.
When a visitor adds a product to the cart, WooCommerce automatically sets a cookie ‘woocommerce_items_in_cart’ in their browser with the number of items in their cart.

We only want to show our popup to users who have products in their cart. To do that, scroll down a little and then click on ‘Select visitors with a specific cookie’ ruleset to expand it.

This ruleset allows you to trigger a campaign when a specific cookie is found. From here you need to switch the status toggle to ‘Active’.
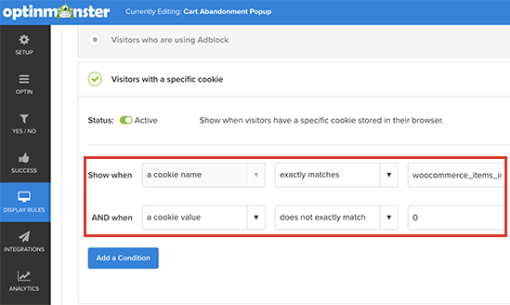
First, option in this ruleset is to show when a cookie name is matched. After that, click on ‘Add a condition’ button and select ‘Cookie value’ does not exactly match 0.

Lastly, click on the save button at the top right corner of the screen to save your changes and then click on the publish button next to it.
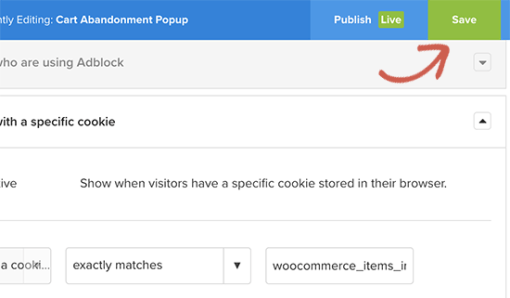
Your campaign is now ready to be served on your WooCommerce store. You just need to click on the ‘OptinMonster’ tab in your WordPress admin area and then click on ‘Campaigns’ tab.

You will see the campaign you just created listed there. If you don’t see your campaign, then click on the ‘Refresh campaigns’ button.
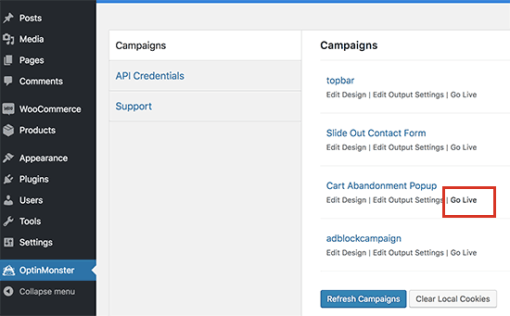
Next, you need to click on the ‘Go Live’ link below your campaign.

That’s all your lightbox popup is live now. To test it out, you will need to open a new browser window in the incognito mode and visit your store. Simply add a few products to your cart and then try to leave.

Congratulations! you have just set up your first conversion optimization campaign targeting users who are about to abandon their cart and leave without purchasing.

Other Campaign Ideas to Boost WooCommerce Conversions

OptinMonster is a powerful tool with tons of different campaign styles that you can use with a wide range of display rules. This allows you to target customers with highly effective messaging at the perfect time.

Here are some more campaign ideas that can help you boost WooCommerce conversions.

Using Multiple Campaign Types

OptinMonster comes with several campaign styles including lightbox popups, slide-in scroll box, floating bar, countdown timer, sidebar forms, in-line forms, and more.
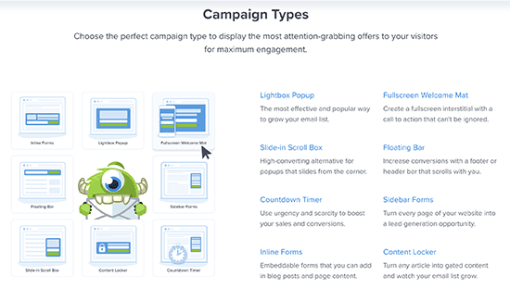
You can maximize your WooCommerce conversion rates by using multiple campaign types. For example, you can target users leaving your website with an Exit-Intent ® popup while showing other campaigns throughout your store.

Page Level Targeting

OptinMonster allows you to display your campaigns on any page on your website. This page can be a product, product category, a blog post, homepage, or a landing page.

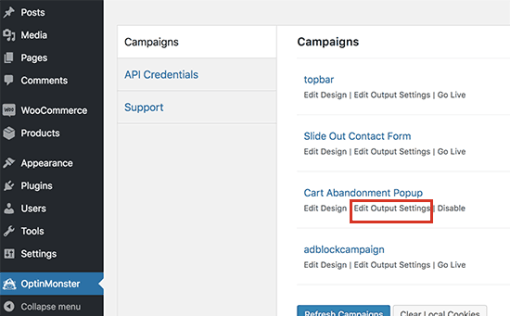
Simply go to OptinMonster page in your WordPress admin area and click on the ‘Edit output settings’ link below your campaign.
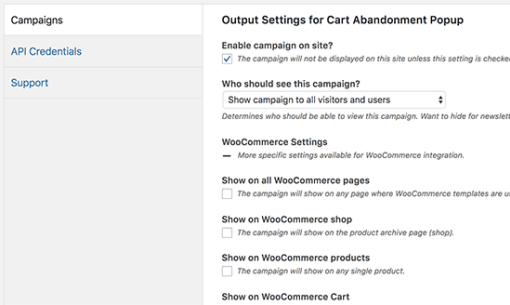
This will show you a variety of page level targeting options that you can use. It also includes WooCommerce specific targeting options.
Apart from these options, you also have display rulesets in the OptinMonster app which provide even more page level targeting options.

Peronalization and Behavioral Targeting

Personalization helps you improve user experience by making it more personal for each user. Behavioral targetting allows you to target your campaigns based on customer behavior.

For example, you can greet logged in customers with their name, show them products based on their browsing history, offer them discount or coupon.

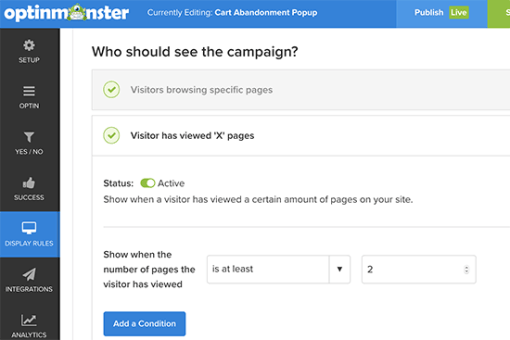
Edit your campaign in the OptinMonster app and click on the ‘Display Rules’ tab. Scroll down to the ‘Who should see the campaign’ section, and you will find a treasure of targeting options.

Click on any of these options to expand them. From here you can activate the ruleset and set it up.
Using FOMO to Increase WooCommerce Conversions

FOMO or ‘fear of missing out’ is a psychological term used to describe anxiety about missing out on something exciting and trendy.

As an eCommerce store owner, you can take advantage of this human behavior with your marketing strategy and improve your conversions.

OptinMonster comes with the countdown timer templates, floating bars, and coupon themes that you can use to build up FOMO in your marketing campaigns.

Combine it with behavioral targeting and customization to make your campaigns even more effective.

For more on this topic, see our article on how to use FOMO on your WordPress site to increase conversions or see these clever FOMO marketing examples from across the web.

We hope this article helped you learn how to convert WooCommerce visitors into customers.
Easy Guide to Fix the WordPress Failed to Open Stream Error

In this tutorial, we will show you how to easily fix the WordPress failed to open stream error.

Why Failed to Open Stream Error Occurs?

Before we try to fix the error, it would be helpful to understand what causes the ‘Failed to open stream’ error in WordPress.

This error occurs when WordPress is unable to load the file mentioned in website code. When this error occurs, sometimes WordPress will continue loading the site and only show a warning message, while other times WordPress will show a fatal error and will not load anything else.

The message phrasing will be different depending on where the error occurs in the code and the reason for failure. It will also give you clues about what needs to be fixed.

Typically, this message would look something like this:

Warning: require(/home/website/wp-includes/load.php): failed to open stream: No such file or directory in /home/website/wp-settings.php on line 19 
 
Fatal error: require(): Failed opening required ‘/home/website/wp-includes/load.php’ (include_path=’.:/usr/share/php/:/usr/share/php5/’) in /home/website/wp-settings.php on line 19

Here is another example:

Last Error: 2018-04-04 14:52:13: (2) HTTP Error: Unable to connect: ‘fopen(compress.zlib://https://www.googleapis.com/analytics/v3/management/accounts/~all/webproperties/~all/profiles?start-index=1): failed to open stream: operation failed’

Having said that, let’s take a look at how to troubleshoot and fix ‘failed to open stream’ error in WordPress.

Fixing Failed to Open Stream Error in WordPress

As we mentioned earlier, the error can be caused by a variety of reasons and the error message will be different depending on the cause and location of the file that’s causing the error.

In each instance, failed to open stream phrase would be followed by a reason. For example, permission denied, no such file or directory, operation failed, and more.

Now if your error message contains ‘no such file or directory’, then you need to look in the code to figure out which file is mentioned at that particular line.

If it is a plugin or theme file, then this means that the plugin or theme files were either deleted or not installed correctly. Simply deactivate and reinstall the theme / plugin in question to fix the error.

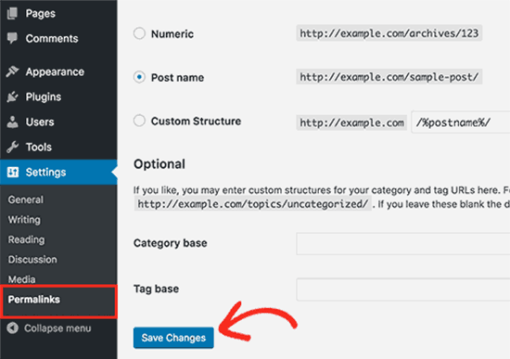
However, it is also possible that WordPress is unable to locate the files because of a missing .htaccess file in your root folder. In that case, you need to go to Settings » Permalinks page in your WordPress admin and just click on the ‘Save changes’ button to regenerate the .htaccess file.

If the error message is followed by ‘Permission denied’, then this means that WordPress does not have the right permission to access the file or directory referenced in the code.

To fix this, you need to check WordPress files and directory permissions and correct them if needed.

Lastly, some WordPress plugins load scripts from third-party sources like Google Analytics, Facebook APIs, Google Maps, and other third-party APIs.

Some of these APIs may require authentication or may have changed the way developers can access them. A failure to authenticate or incorrect access method will result in WordPress failing to open the required files.

To fix this, you will need to contact the plugin author for support. They will be able to help you fix the error.

If none of these tips help you resolve the issue, then follow the steps mentioned in our WordPress troubleshooting guide. This step by step guide will help you pinpoint the issue, so you can easily find the solution.

We hope this tutorial helped you fix the WordPress ‘failed to open stream’ error.


Easy Guide to Let Contributors Edit Their WordPress Posts After Being Approved

In this tutorial, we will show you how to let contributors edit their posts after being approved.

Let Contributors Edit Their Posts After Being Approved

Contributors or guest authors with contributor user role write posts and send them to review in WordPress. A user with the administrator or editor user role can review and publish it. Once published, the contributors are unable to edit their own posts. This is a generalized hierarchy in WordPress that distribute user role and status.

However, you can add or remove capabilities to user roles in WordPress. Let’s take a look at how to let contributors edit their published posts.

Method 1: Allow Contributors to Edit Their Posts (Plugin)

This method is easier and recommended for most users. This method also allows you to edit other user roles and permissions right away.
First thing you need to do is install and activate the Capability Manager Enhanced plugin. For more details, see our step by step guide on how to install a plugin in WordPress.

Upon activation, you need to visit Users » Capabilities in your WordPress admin area to edit capabilities of contributor user role.

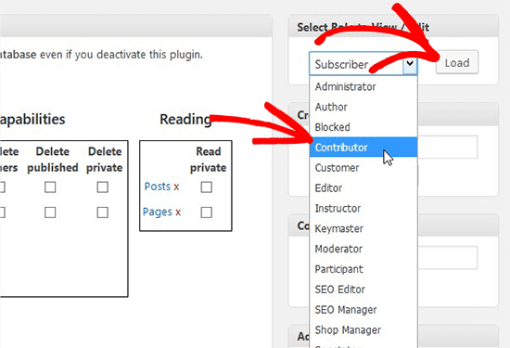
On this page, you need to select Contributor role on the right side, so you can change their permission level.

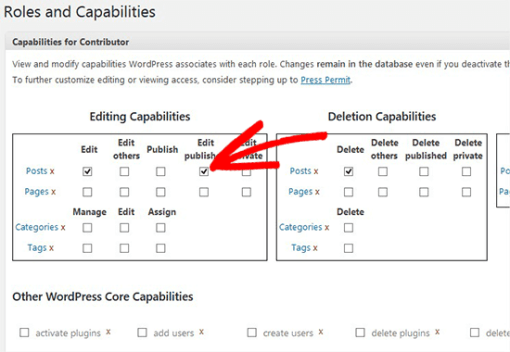
Once selected, you’ll see a lot of options in this section. In the Editing Capabilities area, you need to select Edit Published option and scroll to the bottom to click on Save Changes button.

After that you can test the permissions by switching to a contributor role in WordPress and going to the Posts page. You will now see the option to edit published posts. Hint: you can instantly switch between user accounts while testing roles and permissions in WordPress.

Method 2: Manually Allowing Contributor to Edit Their Posts

This method requires you to add code to your WordPress files. If you haven’t done this before, then please take a look at our guide on how to copy and paste code in WordPress.

You’ll need to add the following code to your WordPress theme’s functions.php file or site-specific plugin.

// get the "contributor" role object
$obj_existing_role = get_role( 'contributor' );
 
// add the "Edit published posts" capability
$obj_existing_role->add_cap( 'edit_published_posts' );

This code snippet needs to run only once which means you can save it and then delete it. It will allow contributors to edit their published posts in WordPress.

Even though we have shown you how to allow contributors to edit their published posts, we believe it is not a good practice to let contributors or authors edit their published content.

If there’s a need for any change or correction in the content, then the writer should ask an administrator or editor to update it. This allows you to maintain editorial integrity.

Before publishing a post, an editor checks multiple necessary elements like keywords, images, meta description, URL, and more. These things are important to get better rankings in search results. A user with a contributor user role may not be fully aware of your editorial best practices and can make mistakes that would go unnoticed if not reviewed by an editor or administrator.

One way to deal with this is by sharing a blog post checklist with your contributors and authors. This checklist will help them cover all the tasks before submitting a post to review. It will also help an editor to quickly review a post.
We hope this tutorial helped you learn how to let contributors edit their posts after being approved.

Easy Guide to Easily Accept Credit Card Payments on Your WordPress Site

In this article, we will show you how to easily accept credit card payments on your WordPress site.


Note: You will need to enable HTTPS / SSL on your website to accept credit card payments.
Accepting Credit Card Payments in WordPress without Shopping Cart

Often users don’t want to setup a full-fledged shopping cart to accept credit card payments. This makes a lot of sense specially if you’re only selling a single product or accepting payments for consulting / services.
In this case, all you need is an online order form with a credit card payment option.

Here is how you can easily accept credit card payments without adding a shopping cart to your website.

First thing you need to do is install and activate the WPForms plugin. For more details, see our step by step guide on how to install a WordPress plugin.

WPForms is the most beginner friendly WordPress form builder plugin. While they have a Lite version that’s free, you will need their PRO plan to access the payment add-ons.

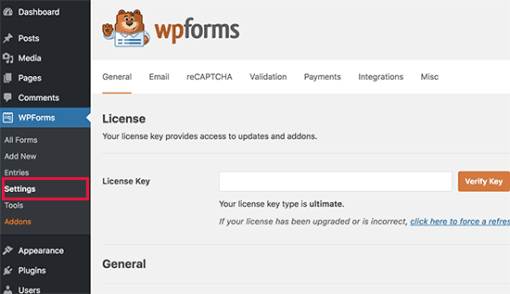
Upon activation, you need to visit WPForms » Settings page to enter your license key. You can find this information in your WPForms account area.

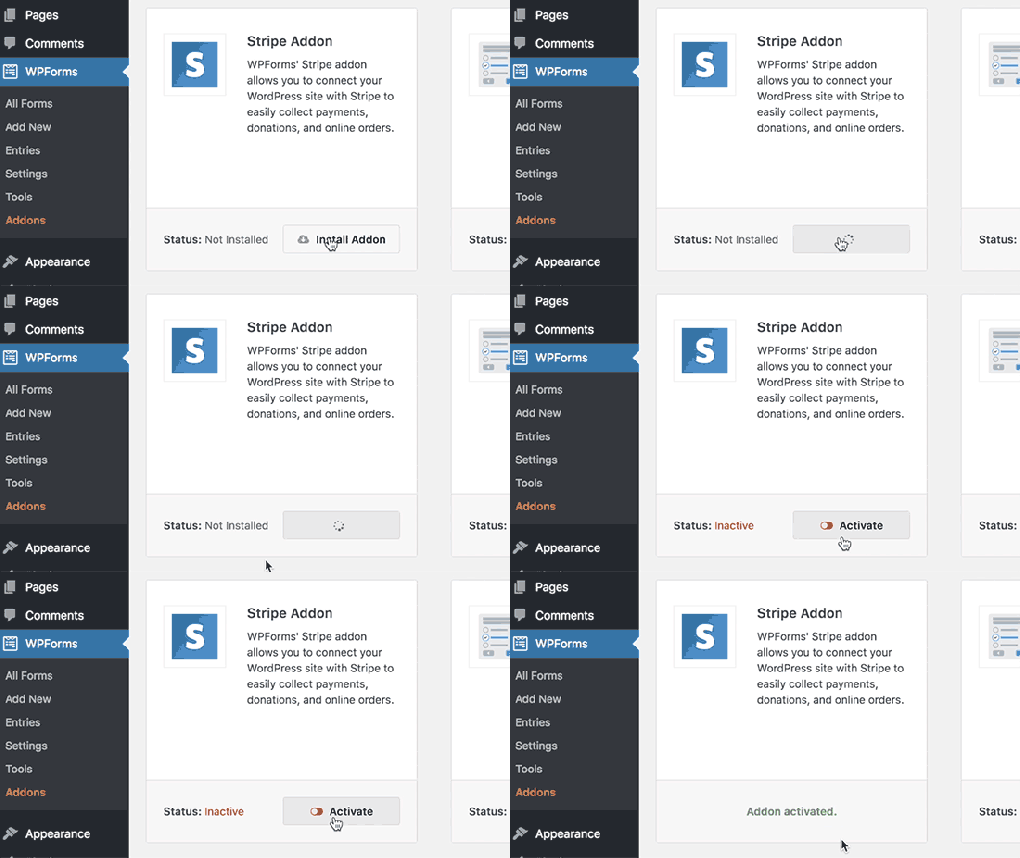
Next, you need to head over to WPForms » Addons page and locate the Stripe addon. Go ahead and click on the ‘Install Addon’ button and then click on the ‘Activate’ button.

Stripe is a credit-card processing platform that makes it easy for businesses to accept credit card payments on their website. WPForms makes it easy to connect your WordPress website to Stripe.

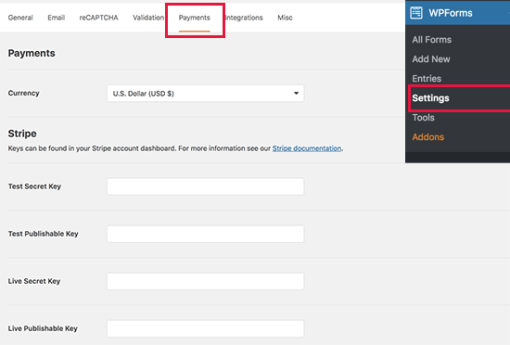
Once the Stripe addon is activated, we need to connect WPForms to your Stripe account. To do that, head over to WPForms » Settings page and click on the ‘Payments’ tab.

You will need to enter your Stripe API keys. You can find this information in your account settings on Stripe’s website.

Don’t forget to click on the ‘Save Settings’ button to store your changes after entering the API keys.

WPForms is now ready to accept credit card payments. Let’s create an online billing or order form that you can add to your website for accepting credit card payments.

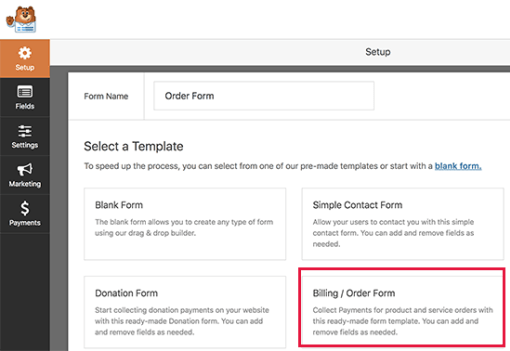
Head over to WPForms » Add New page. From here you need to provide a title for your form and then select ‘Billing / Order Form’ template.

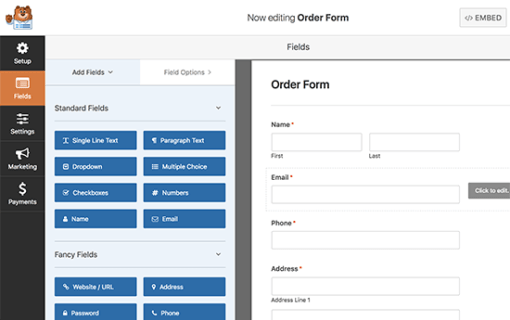
WPForms will pre-load the form builder with a billing/order form template with commonly used fields. You can point and click to edit any form field. You can also add new fields from the left column.

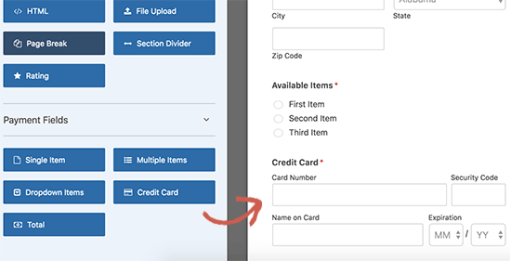
Next, you need to scroll down to the Payment Fields section in the left column. From here you can add payment related form fields.

WPForms allows you to add multiple items as well as single items that users can order. You can click on the item field to change item details and pricing.

After editing item details, go ahead and click to add the credit card field to your form.

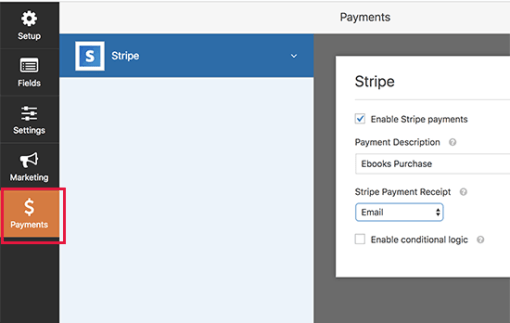
Now that your form is setup, let’s enable payments for this form. To do that, you need to click on the Payments tab on the left and then select Stripe.

You will need to click on the checkbox next to ‘Enable Stripe payments’ option and provide a description of the payment. Optionally, you can send an email receipt to your users by selecting the email field from the drop-down menu.

Next, you may want to receive an email notification for new orders and purchases. You can also send a confirmation email to notify the user that you have received their order.

Let’s setup notifications for your billing form.

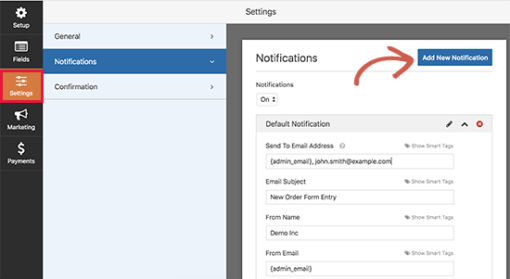
You need to start with clicking the ‘Settings’ tab on the left and then select ‘Notifications’. You will notice that WPForms has already created a notification that sends an email to your WordPress admin email address when a new order is placed.

You can edit this notification message. For example, you can provide additional email addresses, change email copy, subject, and more.

If you want to send a separate notification to your users, then click on the ‘Add New Notification’ button.

You will be asked to provide a name for the new notification. Let’s call it ‘Customer Notification’. After that you will see the notification fields that you can edit.

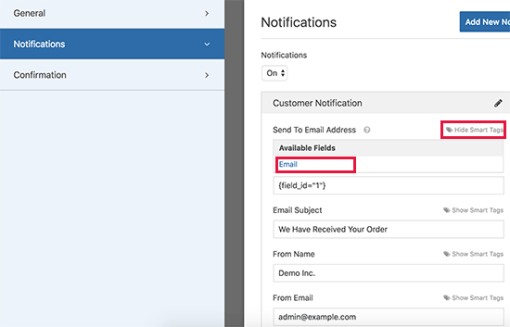
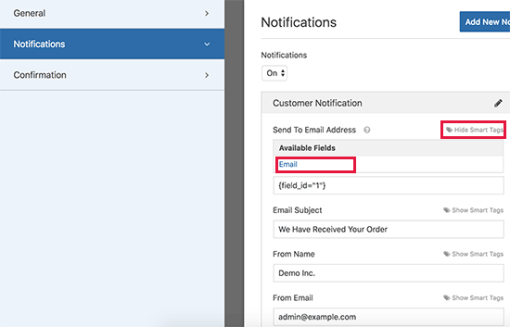
You need to click on the ‘Show Smart Tags’ link next to ‘Send to email address’ option and select the ‘Email’ field. This allows WPForms to use the email address that your customer provided when submitting the form.

You can edit rest of the notification email by providing a subject line and message. You can also use smart tags to use the form fields submitted by the user to add item details, user’s name, and other personalized information.

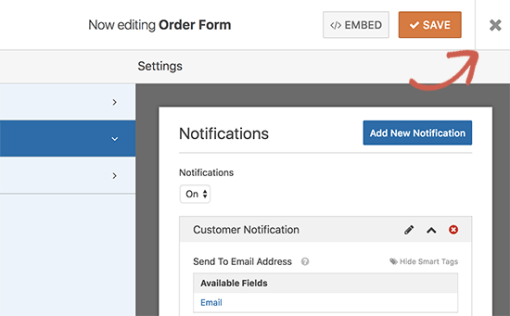
Once you are done, you can click on the save button at the top and exit the form builder.

Your online credit card payment form is now ready, and you can add it to any WordPress page on your site.

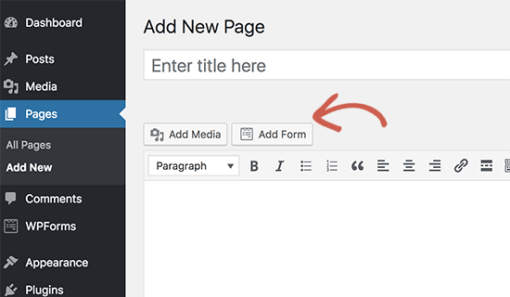
Simply edit a page or create a new one, and then click on the ‘Add Form’ button above the page editor.

This will bring up a popup where you can select the order form and click on the add form button to continue. WPForms will now enter the required shortcode to your post edit area.

You can now save or publish your page and click on the preview button to see your form in action.

Note: Don’t forget to test your form to make sure everything is working fine. If you are unable to send or receive email notifications, then follow the instructions in our guide on how to fix WordPress not sending email issue.

WPForms is the simplest way to accept credit card payments in WordPress, and it is the easiest way to create just about any type of form in WordPress. This is why it ranks #1 in our list of the best WordPress contact form plugin. WPForms has over 1 million active installs and a 4.9 out of 5 star rating average.

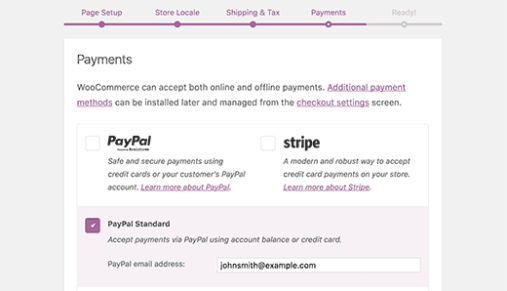
If you don’t want to use Stripe, then you can also use PayPal to accept credit card payments using the WPForms PayPal addon.

However a simple payment form isn’t a perfect solution for everyone. Based on use-case, you may need a different solution for accepting credit card payments on your website. Here are some other ways to accept credit card payments in WordPress.

Accepting Credit Card Payments in an Online Store

If you want to add a shopping cart and sell multiple items, then you will need an eCommerce plugin like: WooCommerce. It is the best WordPress eCommerce plugin on the market. WooCommerce makes it easy to sell things online and accept credit card payments.

For complete step by step instructions, see our guide on how to start an online store for beginners.

Accept Credit Card Payments on a Membership Website

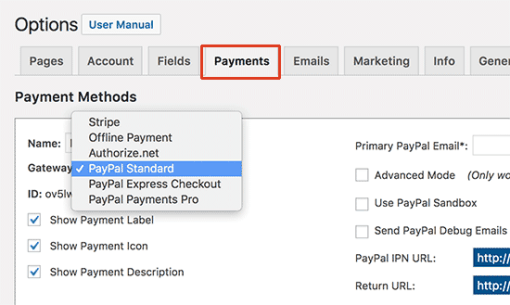
If you want to build a membership website to sell membership subscriptions and paid content, then we recommend using MemberPress. It is the most powerful WordPress membership plugin that easily integrates with Stripe, PayPal, or Authorize.net to accept credit card payments on your website.

Here is a complete guide on how to create a membership website with step by step instructions.

Accept Payments by Selling Online Courses

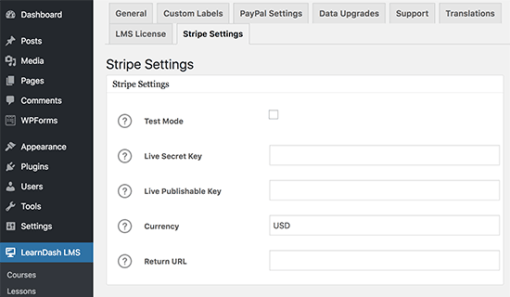
If you want to sell online courses, then we recommend using LearnDash. It is the best LMS plugin for WordPress and allows you to process credit card payments on your website.

For details, see our guide on how to how to sell online courses with WordPress with step by step instructions.

We hope this article helped you learn how to accept and process credit card payments in WordPress.

Easy Guide to Install WordPress on Amazon Web Services

In this article, we will show you how to install WordPress on Amazon Web Services.


Note: If you are just starting a website, then we recommend using one of the easier solutions from our how to install WordPress guide.

We have split this article in two methods. The first method is a manual process that is very technical and complicated. The second method is an easier solution for beginners because it allows you to use AWS infrastructure by going through a preferred managed WordPress hosting solution.

  1. Manually Install WordPress on AWS
  2. Install WordPress on AWS through Managed Hosting Solution

Method 1. Creating a Custom WordPress Install on AWS

First thing you need to do is visit the Amazon Web Services website. You can create a free account, but you will need to enter credit card information. Amazon will verify your identity by sending a $1 charge to your card.

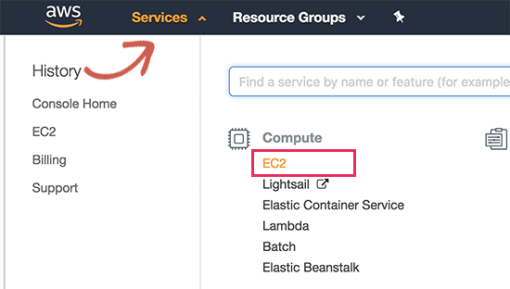
Once your account is verified, you need to login to your AWS console and click on the ‘Services’ menu. Under the compute section, you need to select EC2 to continue.

EC2 is AWS’s cloud computing platform that allows you to create virtual machines and run web apps like WordPress. For more details on what’s a virtual machine, read our guide on what is a VPS and do you need it.

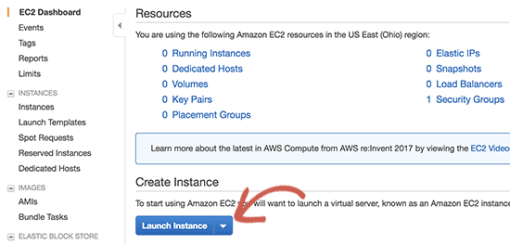
Next, click on the ‘Launch Instance’ button to launch and configure your instance settings.

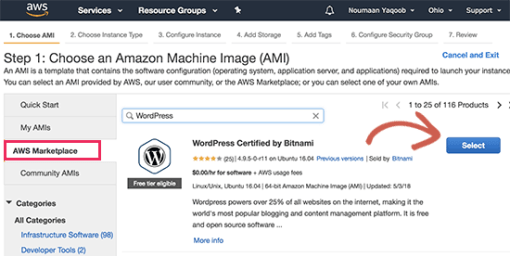
You will need to select an Amazon Machine Image. These are pre-configured software stacks that you can install with a single click.

Under the ‘AWS Marketplace’ search for WordPress and then select ‘WordPress by Bitnami’.

You will now see a pricing popup where you simply need to click on the continue button.

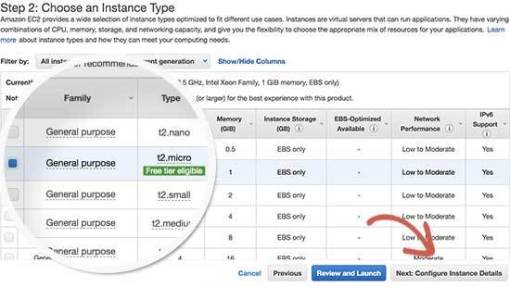
On the next screen, you will be asked to choose an instance type. You can go ahead and select td.micro free tier and then click on ‘Configure instance details’ button.

On the next screen, you don’t need to change anything. Simply click on ‘Next: Add Storage’ and then click ‘Next: Add Tags’ buttons.

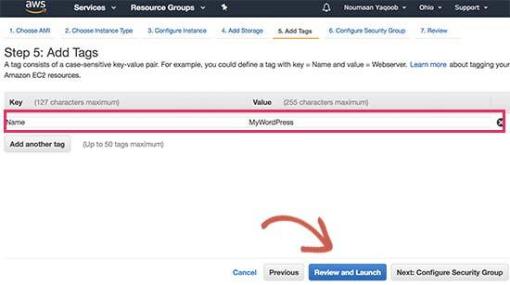
Now we will enter a name for this instance as a tag. Click on the Add Tag button and enter ‘Name’ as key, and ‘MyWordPress’ as value.

Click on the ‘Review and launch’ button to continue.

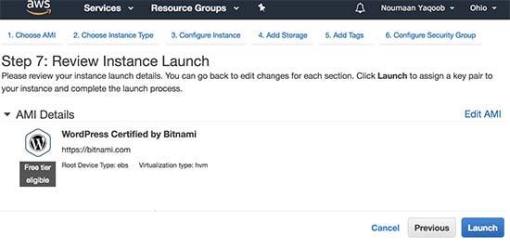
You will now be presented with an overview of your EC2 Instance configuration. Click on the ‘Launch’ button to start your instance.

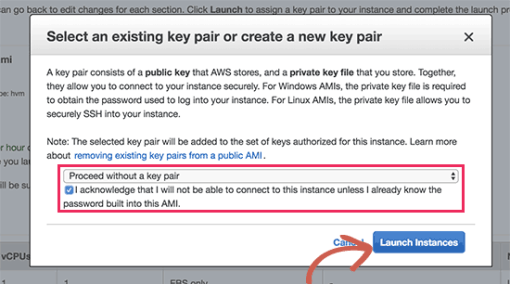
Next, you will be asked to select pair keys. You need to select ‘Proceed without a key pair’ and then check the box below it.

After that click on the launch instances button to store your settings and launch your EC2 instance.

AWS will now show a success message. Click on the ‘View Instances’ button at the bottom right corner of the screen.

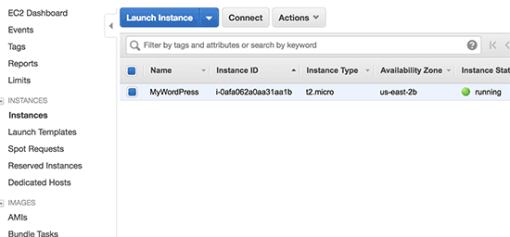
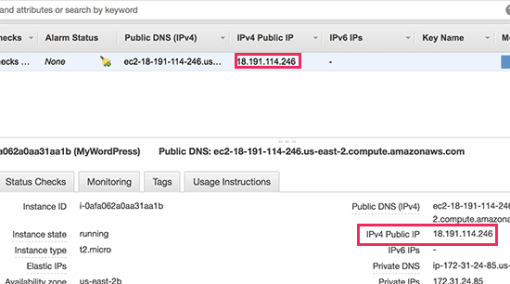
You will now be able to see your WordPress instance running.

To test your WordPress site, you need to locate its public IP address. You can find it under IPV4 Public IP column next to your instance.

You can now copy this IP address and enter it in the address bar of a new browser tab to view your website. You will be able to see your WordPress site with the default theme.

To visit your WordPress admin area, simply add /wp-admin/ next to your site’s public IP address, like this:

http://18.191.114.246/wp-admin

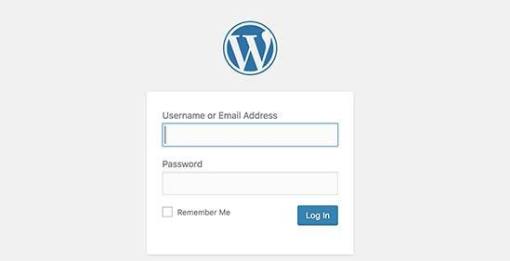
You will now see the default WordPress login page.

However, you will need to know the username and password to access the admin area.

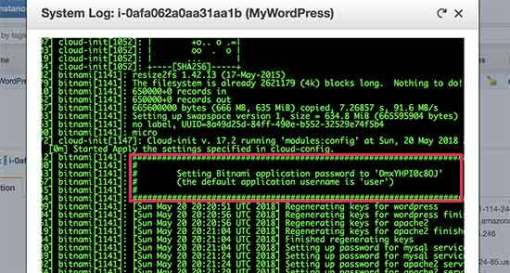
You can get that by going back to your EC2 Console and clicking on the ‘Actions’ button and then select Instance Settings » Get System Log.

This will bring up a log file in a popup window with lots of text. You will need to scroll down towards the bottom, and you will find a line with ‘Setting Bitnami user password to’ surrounded by ## signs. You will also see the default username set by the app.

You can now copy the username / password and enter it on the login screen of your WordPress site.

Congratulations, you have successfully installed WordPress on Amazon Web Services. However, your website is still only accessible by using the IP address.

If you want to point a domain name to your AWS WordPress install, then you will need to connect your domain name to AWS’s DNS servers.

See our step by step guide on how to register a domain name.

Once you have registered your domain name, you’re ready to add it to your AWS instance.

Add a Domain Name to Your WordPress Site on Amazon Web Services

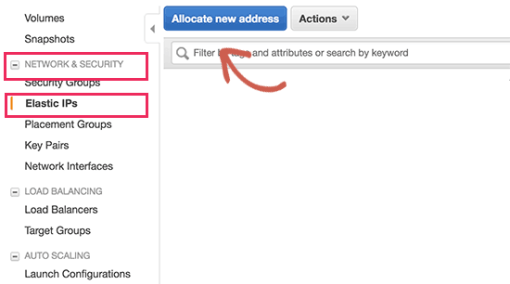
First, go to your EC2 instances dashboard and then from the left column click on ‘Elastic IPS’ under ‘Network & Security’ section.

Next, click on the ‘Allocate New Address’ button to continue.

You will be asked how do you want to use the IP address. Simply click on the Allocate button to continue.

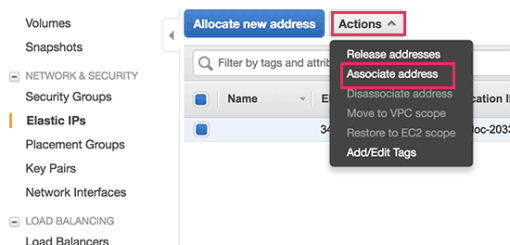
AWS will now create a new elastic IP for your WordPress EC2 instance. You will see your IP address listed in a table. Simply select the IP address row and then select ‘Associate Address’ under the ‘Actions’ button.

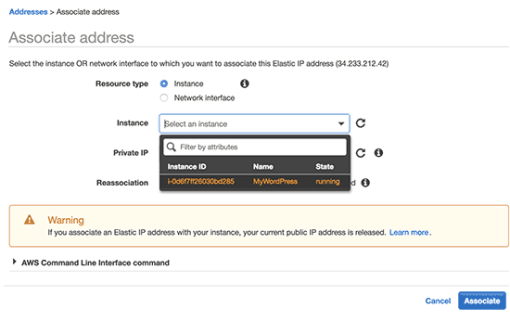
On the next screen, select your WordPress instance from the drop-down menu and click on the Associate button.

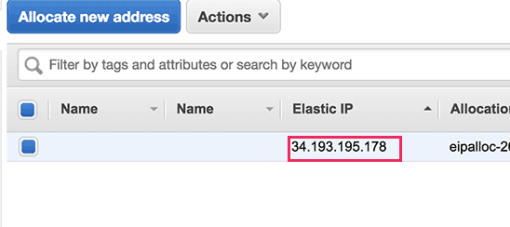
You will now see your Elastic IP listed in the table. Go ahead and copy the IP address and paste it into a text editor like Notepad. We will need it in the next step.

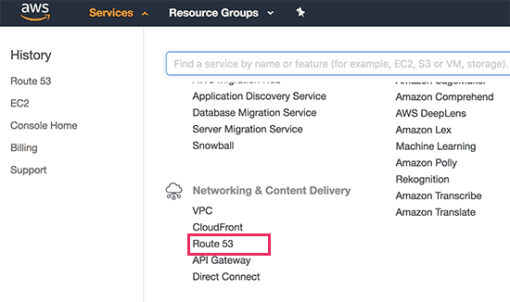
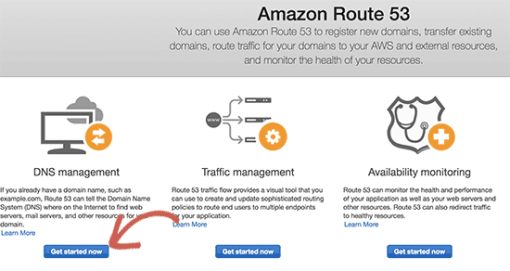
Next, you need to click on the ‘Services’ menu at the top and search for ‘Route53′. This is Amazon web services’ DNS management service that allows you to route traffic to your EC2 instance.

On the next page, click on the ‘Get Started Now’ button under the DNS management section.

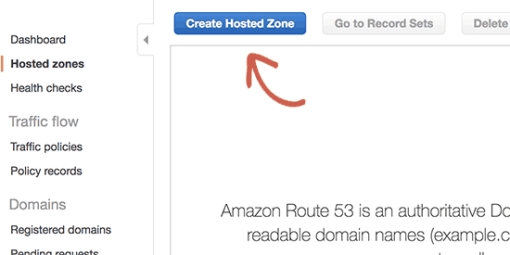
This will bring you to hosted zones section. Go ahead and click on the ‘Create hosted zone’ button.

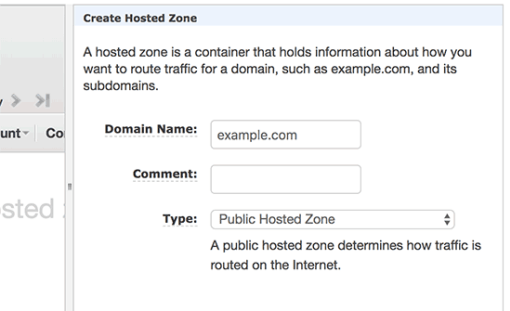
Next, you need to add your domain name and click on the create button to add it to a hosted zone.

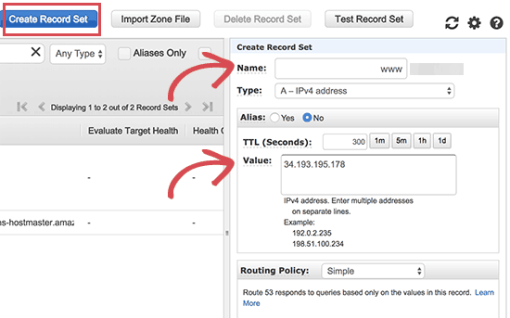
After you have added your domain to a hosted zone, click on the ‘Create Record Set’ button. Now you need to enter www next to ‘Name’ field. Enter the elastic IP you copied earlier in the ‘Value’ field and then click on create button.

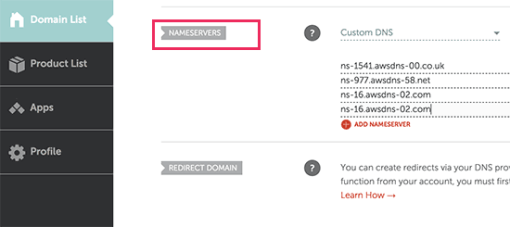
The A record will now be added to your hosted zone along with your domain name. From the left column, you need to copy the lines under NS field. These are Nameserver addresses that you will need in the next step.

Now you need to go to your domain name registrar website and edit your domain name settings. The screenshots below may vary from your provider, but the basic instructions are similar for each provider.

Under your domain’s DNS Nameservers settings, enter the nameserver addresses you copied earlier.

addnameservers21

Don’t forget to save your changes. You can now visit the domain name you added and it will take you to your WordPress site on Amazon Web Services.

Note: DNS changes may take some time to take effect.

Method 2. Using Amazon Web Services via Managed WordPress Hosting

As you may have noticed that setting up a custom WordPress install on Amazon web services is a very technical and complicated process.

The cloud computing infrastructure provided by Amazon Web Services is a pay as you go solution. This means that traffic spikes will increase your hosting bill significantly. Not to mention, that you will still be responsible for managing your own services which is just extra work.

An easier way to use WordPress on Amazon Web Services without any hassle is by using a managed WordPress hosting provider.

We recommend using WP Engine. They run part of their hosting platform on the AWS infrastructure, and you don’t have to worry about traffic spikes, server management, or WordPress maintenance.

Another great alternative is Pagely, a premium managed WordPress hosting provider. They also run their platform on Amazon Web Services and offer a hassle-free, WordPress environment to grow your business.

We hope this article helped you learn how to install WordPress on Amazon Web Services.

Easy Guide to Convert WordPress Categories to Custom Taxonomies

In this article, we will show you how to easily convert WordPress categories into custom taxonomies.

Why and When Do You Need to Convert Categories to Custom Taxonomies

Categories and tags are the two default taxonomies in WordPress. Taxonomies are used to sort and organize content into different topics.

Apart from the default taxonomies, WordPress also allows you to create custom taxonomies which you can use with existing post types or with custom post types. For more on this topic, see our article on when do you need a custom post type or taxonomy in WordPress.

As your website grow, you might find a need to convert your categories into a custom taxonomy. For example, let’s say that you have a category called topics with a lot of sub-categories. It would be time-consuming to edit each post and file it under your new custom taxonomy.

Wouldn’t it be nice if you could bulk convert some or all of your categories to the new custom taxonomy?

Let’s take a look at how you can easily convert categories to custom taxonomies without manually editing each post.

Converting WordPress Categories to Custom Taxonomies

First thing you need to do is install and activate Taxonomy Switcher plugin. For more details, see our step by step guide on how to install a WordPress plugin.

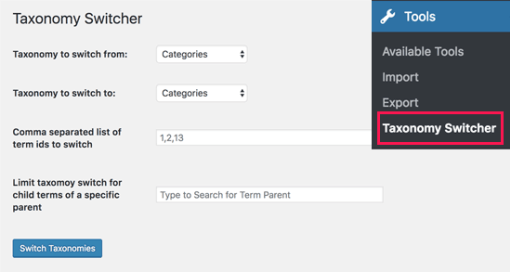
Upon activation, you need to visit Tools » Taxonomy Switcher page in your WordPress admin area to convert categories to custom taxonomies.

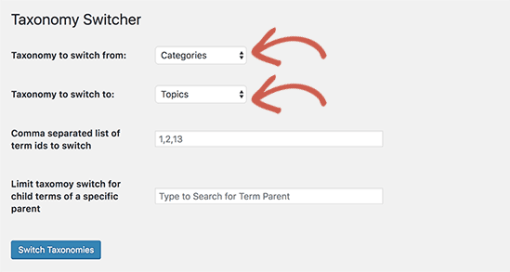
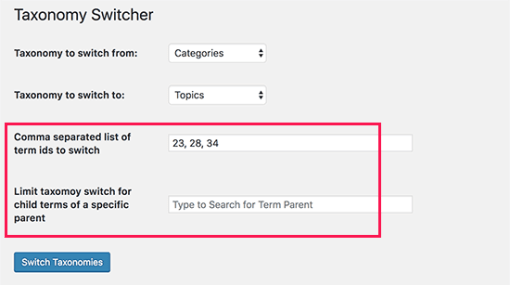
On this page, you can select the taxonomies you want to convert. For this tutorial, we will select ‘Categories’ as the taxonomy we want to switch from, and ‘Topics’ as the custom taxonomy we want to switch to.

If you want to convert all categories to a custom taxonomy, then you can go ahead and click on the ‘Switch Taxonomies’ button.

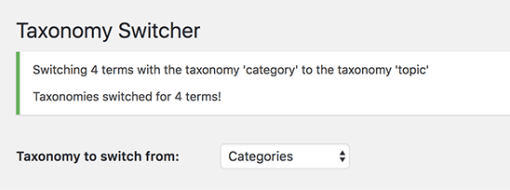
The plugin will convert all categories to your selected custom taxonomy. You will see a success message like this:

If you just want to convert specific categories, then you will need to add the IDs of those categories next to ‘Comma separated list of term ids to switch’field. See our article on how to find category IDs in WordPress for more details.

Additionally, if you want to skip child categories of a specific category, then you can add the IDs of the parent category next to ‘Limit taxonomy switch for child terms of a specific parent’ option.

Don’t forget to click on the ‘Switch Taxonomy’ button to save your changes.

Setting Up Redirects from Category to Custom Taxonomy

After you switch categories to a custom taxonomy, the category archive page will now show a 404 error page. This is nothing to be worried about if your website is not live yet.

However if your website is live, then search engines may have already crawled your category pages and indexed them. This means that those pages can appear in search results and users coming from search engines will see a 404 error page.

To fix this, you need to redirect users to the new taxonomy page for each category.

Luckily, there is an easy fix for that.

First, you will need to install and activate the Redirection plugin. For more details, see our step by step guide on how to install a WordPress plugin.

Upon activation, you need to visit Tools » Redirection page. In the Source URL field, you need to enter /category/.* and in the Target URL field you need to enter your custom taxonomy slug, e.g. /topic/$1

Next, you need check the box next to ‘Regex’ option, and then click on ‘Add Redirect’ button.

This redirect will now send all category archive traffic to your custom taxonomy. Only use this, if you don’t want to use categories at all.

If you want to redirect individual categories to a custom taxonomy page, then see our beginner’s guide on setting up redirects in WordPress with detailed step by step instructions.

We hope this article helped you learn how to convert WordPress categories to custom taxonomies.