Easy Guide to Fix Category and Comment Count in WordPress

In this tutorial, we will learn how to fix category and comments count after importing WordPress.

As you noticed in the screenshot above, after the import our comment count and category count is showing 0 instead of the actual number. Let’s take a look at how to fix it.

Lets get started

First you need to create a complete WordPress backup of your site. You should do this every time you are going to perform a major change on your site. We recommend using BackupBuddy, it is the most comprehensive WordPress backup plugin on the market.

Once you have made the backup, let’s move on to the next step.

Open a plain text editor like Notepad and simply copy and paste the following code:

<?php
include("wp-config.php");
if (!mysql_connect(DB_HOST, DB_USER, DB_PASSWORD)) {  die('Could not connect: ' . mysql_error());  }
if (!mysql_select_db(DB_NAME)) {  die('Could not connect: ' . mysql_error());  }
 
$result = mysql_query("SELECT term_taxonomy_id FROM ".$table_prefix."term_taxonomy");
while ($row = mysql_fetch_array($result)) {
  $term_taxonomy_id = $row['term_taxonomy_id'];
  echo "term_taxonomy_id: ".$term_taxonomy_id." count = ";
  $countresult = mysql_query("SELECT count(*) FROM ".$table_prefix."term_relationships WHERE term_taxonomy_id = '$term_taxonomy_id'");
  $countarray = mysql_fetch_array($countresult);
  $count = $countarray[0];
  echo $count."
";
 mysql_query("UPDATE ".$table_prefix."term_taxonomy SET count = '$count' WHERE term_taxonomy_id = '$term_taxonomy_id'");
        }
 
$result = mysql_query("SELECT ID FROM ".$table_prefix."posts");
while ($row = mysql_fetch_array($result)) {
  $post_id = $row['ID'];
  echo "post_id: ".$post_id." count = ";
  $countresult = mysql_query("SELECT count(*) FROM ".$table_prefix."comments WHERE comment_post_ID = '$post_id' AND comment_approved = 1");
  $countarray = mysql_fetch_array($countresult);
  $count = $countarray[0];
  echo $count."
";
  mysql_query("UPDATE ".$table_prefix."posts SET comment_count = '$count' WHERE ID = '$post_id'");
        }
?>

You need to replace DB_HOST, DB_USER, DB_PASSWORD with your WordPress database host (usually localhost), database username, and password.

You can find all this information by logging into your WordPress hosting cPanel or by looking at your wp-config.php file using a file manager.

Once you have replaced the information, save this file as comments-fix.phpon your desktop.

Now you will need to upload this file to your site’s root directory. You can do that by using an FTP client or by using the file manager in your web hosting control panel.

After uploading the file to your website, you need to open your web browser and go to this file:

http://example.com/comments-fix.php

Replace example.com with your site’s address.

Visiting this file in your browser will run the script which simply loops through your posts, category, tags, comments, etc and update the count.
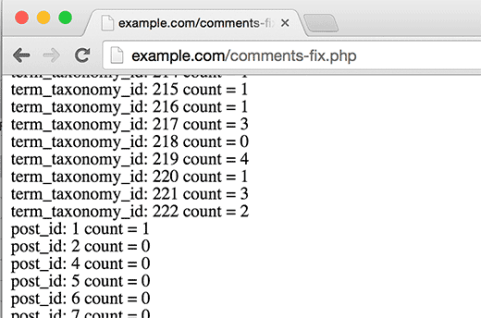
Fixing taxonomy terms and comment count numbers

Important: Once you’re done fixing your WordPress comment count, you need to delete comments-fix.php file from your server.

That’s all, we hope this tutorial helped you update comments count after importing WordPress.

Easy Guide to Add Facebook Author Tag in WordPress

In this tutorial, we will learn how add the Facebook author meta tag in WordPress.
How Does Facebook Author Tag Work?

Once you add the Facebook author tag on your site, it will display your name with a link back to your profile any time your article is shared.

This is great for both single author blogs and multi-author blogs because it bring more exposure to your personal brand.

There are several ways to add the Facebook Author tag on your site. We will show you both the plugin method as well as the code method to add Facebook Author meta tag on your WordPress site.

Add Facebook Author Tag Using Yost WordPress SEO Plugin

If you are using Yoast WordPress SEO plugin, then you are in luck because it has Facebook open graph meta data support.

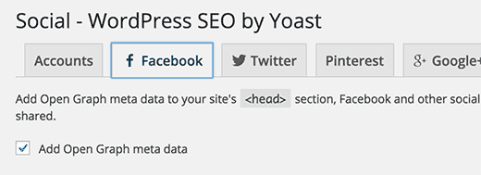
You just need to visit SEO » Social page in your WordPress admin and make sure that the box next to ‘Add Open Graph meta data’ option is checked.

Enable Facebook open graph meta data in WordPress

The next step is to add your Facebook ID in your WordPress account. Simply visit Users » Your Profile page and enter your Facebook profile URL and click on the save changes button to store your settings.

facebook author settings in wordpress

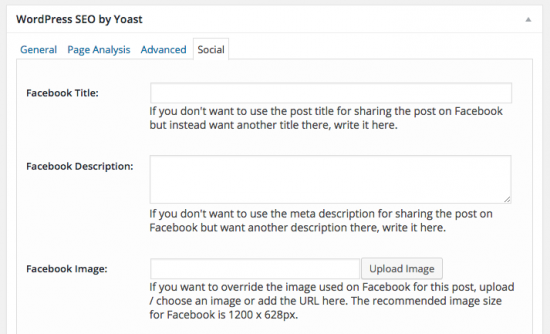
That’s all, WordPress SEO will now automatically insert Facebook author tag or published by tag when you publish an article. WordPress SEO also allows you to easily add a page title and description for Facebook, and you can even explicitly set Facebook thumbnail for your posts.

Add Facebook Author Tag in WordPress using Code

Since we already use Yoast SEO plugin on our site, it made sense for us to use the above method. However if you want to add Facebook author meta tag on your site without a plugin, then simply add the following code in your site’s <head> section.

Make sure to replace the links above with your site’s Facebook page link and your personal profile link.

We hope this tutorial helped you add Facebook author tag in your WordPress site.

Easy Guide to Create Short Amazon Affiliate Links in WordPress

In this tutorial, we will learn how to easily create short amazon affiliate links in WordPress.
Why Use Short Affiliate Links for Amazon?

By default an Amazon affiliate link is a long URL containing strings and IDs.

This link is lengthy, and it is hard to look at. It also increases your chances of accidentally making a typo and breaking the URL.

One possible solution is to cloak affiliate links in WordPress by using a plugin like ThirstyAffiliates. Using an affiliate link manager allows you to redirect users while using your own custom short URLs like this:

http://www.example.com/refer/prowp

The problem with using a cloacked URL is that users do not know where they will be taken when they click on that link. You may want to show users that they will be redirected to Amazon’s website, because Amazon is a trusted brand name.

This could potentially increase your earnings, particularly if you most recommend products from Amazon.

Amazon comes with its own short URL option that allows affiliates to easily transform any Amazon link into a short URL using amzn.com domain name.

Creating Short Amazon Affiliate Links

There are two type of short URLs that you can create for your Amazon affiliate links. The first one uses Amazon.com domain name.

You need to simply add /dp/yourproductid/?tag=youraffiliatetag.

Take a look at this example:

http://amazon.com/dp/0470560541/?tag=aff0-link

You can create an even shorter URL by using amzn.com domain name. Simply remove the /dp/ prefix and add your product id with your affiliate tag.

http://amzn.com/0470560541/?tag=aff0-link

That’s all, we hope this tutorial helped you easily create short amazon affiliate links in WordPress.
Easy Guide to Display Recent Posts in WordPress

In this tutorial, we will show you how to display recent posts in WordPress with a plugin, widget, shortcode, and the manual method with the recent post function.

Using The WordPress Recent Posts Widget

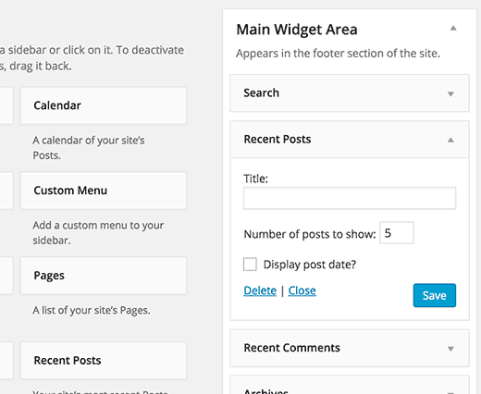
WordPress comes with a built-in default widget to display recent posts in your site’s sidebar or any widget ready area. Inside your WordPress admin, simply visit Appearance » Widgets and add Recent Posts widget to a sidebar.

Using the default WordPress recent posts widget

The built-in recent posts widget is very basic. You can provide an alternate title to the widget, show date, and add the number of posts you want to display. Next, click on the save button to store your widget settings.

Using Recent Posts Widget Extended Plugin

As you noticed that the built-in widget we mentioned above is quite limited, and it doesn’t even allow you to show thumbnails or excerpts which is often a priority for users.

What if you wanted to display thumbnails and excerpts with your recent posts? What if you wanted to limit them to specific categories or tags?

Well, that’s when Recent Posts Widget Extended plugin comes in handy.

First thing you need to do is install and activate the WordPress Recent Posts Widget Extended plugin. Upon activation, simply visit Appearance » Widgetsand add Recent Posts Extended widget to a sidebar.

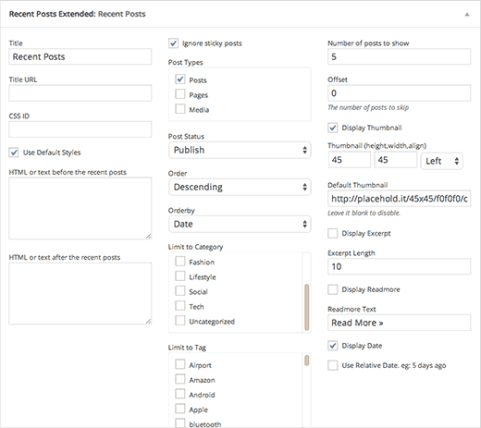
Recent posts extended widget settings

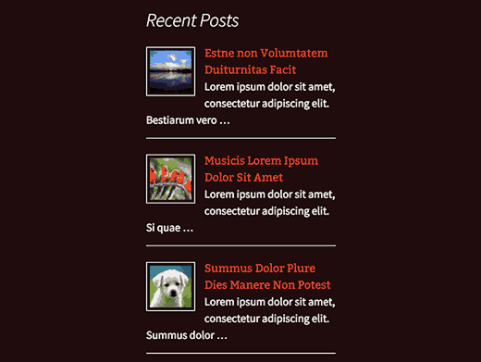
Recent Posts Extended widget comes with a lot options and gives you full control on how you want to display recent posts on your WordPress site. You can show thumbnails, excerpts, limit categories and tags, ignore sticky posts, and much more. You can even use the widget to display recent posts from any other post type on your site.

Recent posts with thumbnail and excerpt in sidebar widget

Displaying Recent Posts in WordPress Using Shortcode

Adding recent posts to a sidebar is fairly easy, but what if you wanted to show recent posts inside a WordPress post or page? The easiest way to display recent posts in WordPress posts and pages is by using shortcodes.

First thing you need to do is install and activate the Display Posts Shortcodeplugin. It works out of the box and there are no settings for you to configure.

Simply edit a post or page where you want to display your recent posts. Next, use the shortcode [display-posts] with your own parameters inside the post. The plugin offers a whole range of parameters that you can use with the shortcode. Here are some examples:

Display 5 recent posts with thumbnails and excerpt

 [display-posts posts_per_page="5" image_size="thumbnail" include_excerpt="true"]

Display recent pages instead of posts

  [display-posts posts_per_page="5" post_type="page"]

Change the order to title instead of date.

  [display-posts posts_per_page="5" orderby="title"]

Display recent pages under a specific parent page.

  [display-posts posts_per_page="5" post_type="page" post_parent="5"]

For a full list of parameters visit the plugin’s documentation.

You can also use these shortcodes inside a text widget, but first you will need to enable shortcodes in your text widgets by adding this code to your theme’s functions.php file or a site specific plugin.
add_filter(‘widget_text’, ‘do_shortcode’);

Displaying Recent Posts Manually in WordPress Theme Files

More advanced WordPress users may want to add recent posts directly in their WordPress theme files. There are multiple ways to do this, but the easiest one is to use the built-in WP_Query class. Simply add this code where you want to display the recent posts.

Define our WP Query Parameters // Start our WP Query have_posts()) : $the_query -> the_post(); ?> // Display the Post Title with Hyperlink

// Repeat the process and reset once it hits the limit

This code simply displays five most recent posts with their title and excerpt. The WP_Query class has tons of parameters that allows you to customize it any way that you like. For more information please refer to the codex.

We hope that this tutorial helped you learn how to display recent posts in WordPress.
Easy Guide to Add Content Locking in WordPress

In this tutorial, we will learn how to add content locking in WordPress without annoying users.

What is Content Locking & When You Need It?

Content Locking is a technique used by site owners. It forces users to perform an action before getting access to your content.

Content lock example

If it is not used properly, then it could annoy your users. But when it is done right, it could be very effective in generating leads and achieving your marketing goals.

The best time to use content locking is when you are offering highly valuable content such as a free course, an ebook download, or something similar.

It uses the same psychological trick as content upgrades. Users wouldn’t mind performing a little task in exchange of valuable content.

Now that you know the use case, let’s see how you can easily add content locking in WordPress like a pro.

What Do You Need for Content Locking in WordPress?

For this tutorial, we will be using OptinMonster. It is the best lead generation solution in the market. You will need a plus or pro plan of OptinMonster for content locking.

WPCademy users can get a 10% discount by using this OptinMonster coupon.

Adding Content Locking in WordPress

First thing you need to do is install and activate the OptinMonster plugin. For more details, see our step by step guide on how to install a WordPress plugin.

This plugin is just a connector between your WordPress site and your OptinMonster account.

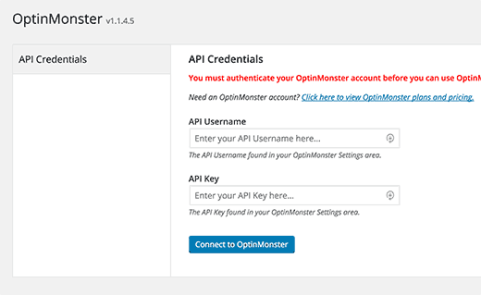
Upon activation, click on the OptinMonster menu item in your WordPress admin bar. You will be asked to provide your OptinMonster API username and key.

Authentic OptinMonster account

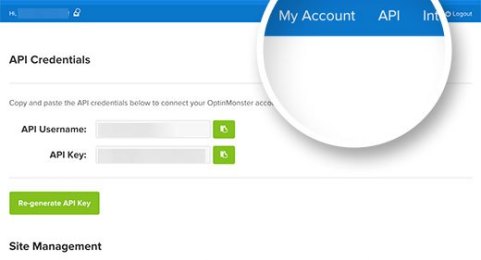
You can find the API information under your account on the OptinMonster website. Simply login and then click on the API link.

OptinMonster API Keys

Next, copy and paste the API username and key into the OptinMonster plugin page and then click on connect to OptinMonster button.

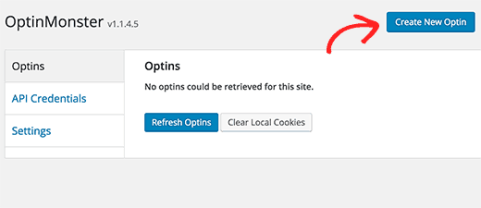
Once you are successfully connected, you need to click on the create new optin button.

New optin

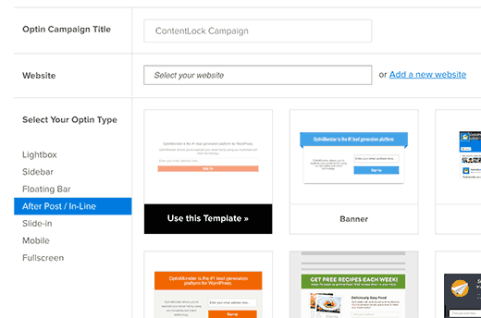
This will take you to the OptinMonster website. You need to provide a title for your optin campaign and select your website from the drop down menu.

You also need to select ‘After post / Inline’ as your optin type. This will load some ready to use templates in the right column. Click on a template to use it as a starting point.

Create new optin screen

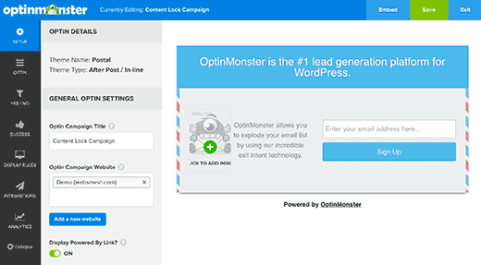
It will open OptinMonster’s form builder where you can customize the appearance of your optin and configure its settings.

Feel free to edit fonts, add text or images, change colors, etc.

OptinMonster's optin builder

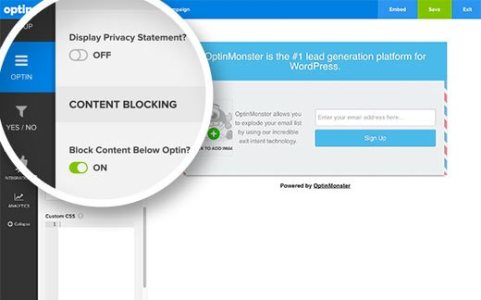
Next you need to click on the ‘Optin’ Menu and scroll down to content blocking section. Turn on content blocking for this optin by clicking on the on/off switch.

Turn on content blocking for this optin

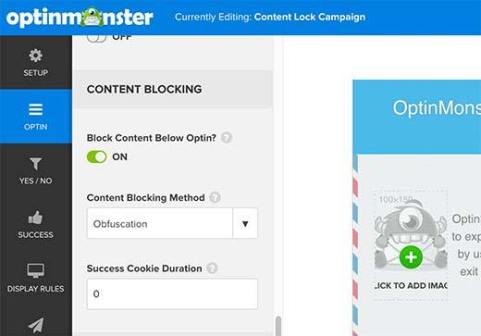
Turning it on will show you the options to determine how you want content blocking to work. First you need to choose a content blocking method.

You can use obfuscation which blurs content, or removal which totally removes the content below optin.

Content blocking options

You also need to change success cookie duration to 0. This will prevent cookie from being set until users submits the optin.

After that go through the Integration setting to connect your email marketing service and also configure the analytics setting.

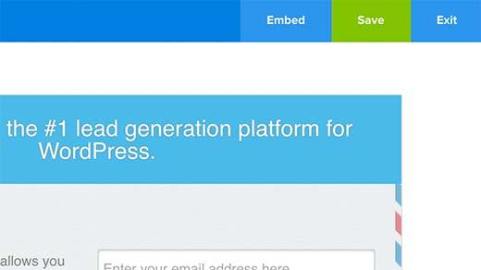
Once you are done, click on the Save button on the top right corner of the builder to save your settings.

Save your optin and get the embed code

Now you need to visit your WordPress site and click on the OptinMonster menu.

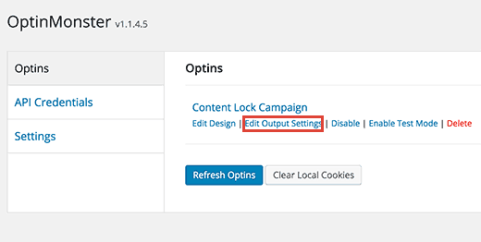
You will see your content lock optin under the list of optins. If you don’t see it, then click on refresh optins button.

Edit optin output settings

Take your mouse to the optin title and then click on ‘Edit optin output settings’ link.

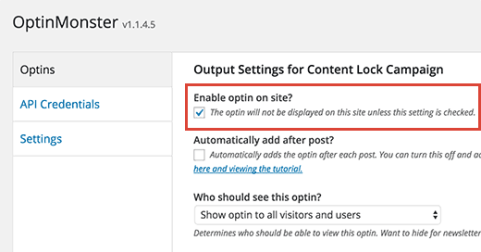
On the next page, click on the checkbox below ‘Enable optin on site’ option.

Enable optin on site

Don’t forget to click on the save settings button at the bottom of the page.

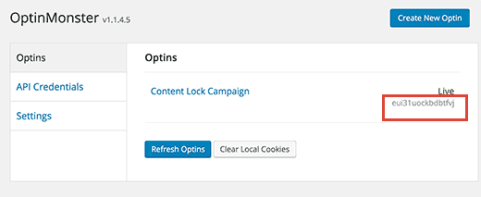
Next, you need to click on the OptinMonster menu again to go back to Optins overview page. This time you need to copy the optin slug.

Copy the optin slug

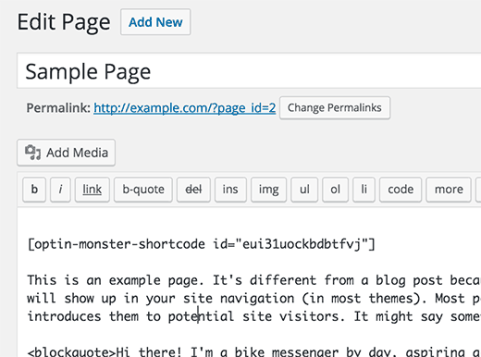
Now you need to edit the post or page where you want to enable content locking and add this shortcode before any other content in your post (or after the first paragraph).

Replace your-optin-slug with the optin slug you copied earlier.

OptinMonster Shortcode

Now you can save and publish your post or page. Visit the post or page in a new browser window to see content locking in action.

How to Add Content Lock to All WordPress Posts

If you want to automatically add content locking to all your WordPress posts, then there is an easier way to do this.

Simply install and activate the Insert Post Ads plugin.

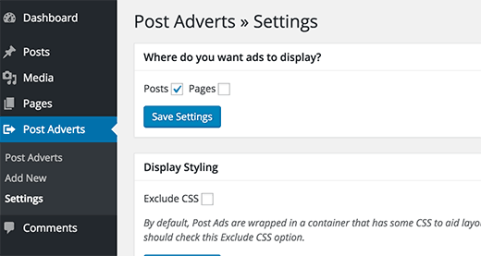
Upon activation, you need to visit Post Adverts » Settings to configure the plugin settings.

Post ad settings

Select where you want to enable post ads plugin posts or pages and then click on save settings button.

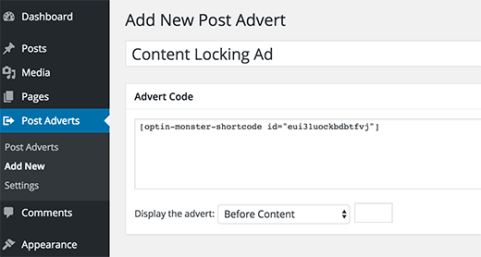
Now you need to visit Post Adverts » Add New page. Provide a title for this content locking script and then add your content lock optin shortcode in the advert code section.

Site wide content lock in WordPress

Under ‘Display the advert’ dropdown menu, you can select before the content or choose to add this after the first paragraph and click on the publish button.

That’s all, the plugin will now enable content locking for all your WordPress posts.

Pro Tip: The reason why you may want to add it after the first paragraph is because you can use the first paragraph as a teaser to tell users why they really need to read the rest.

We hope this tutorial helped you add content locking in WordPress.
Easy Guide of Inspect Element: Customizing WordPress for DIY Users

In this tutorial, we will learn the basics of inspect element and how to use it with your WordPress site.

 Inspect Element or Developer Tools

Modern web browsers like Google Chrome and Mozilla Firefox has built-in tools which allow web developers to debug errors. These tools show the HTML, CSS, and JavaScript code for a page and how the browser executes the code.

Using Inspect Element tool, you can edit HTML, CSS, or JavaSCript code for any webpage and see your changes live (only on your computer).

For a DIY website owner, these tools can help you preview how a site design would look without actually making the changes for everyone.

For writers, these tools are awesome because you can easily change personal identifying information when taking your screenshots eliminating the need to blur out items altogether.

For support agents, it’s a great way to identify the error that could be causing your galleries to not load or your sliders to not work properly.

We’re just scratching the surface of use-cases. Inspect element is really powerful.

In this article, we will be focusing on Inspect Element in Google Chrome because that’s our browser of choice. Firefox has its own developer tools which can also be invoked by selecting inspect element from browser menu.

Launching Inspect Element and Locating The Code

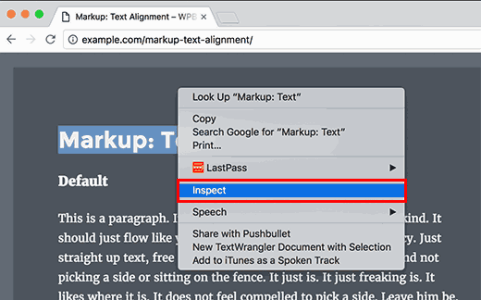
You can launch inspect element tool by pressing CTRL + Shift + I keys on your keyboard. Alternately you can click anywhere on a web page and select inspect element from browser menu.

Inspect menu

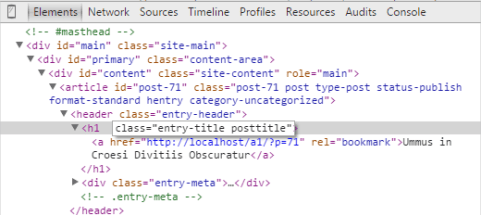
Your browser window will split into two, and the lower window will show the web page’s source code.

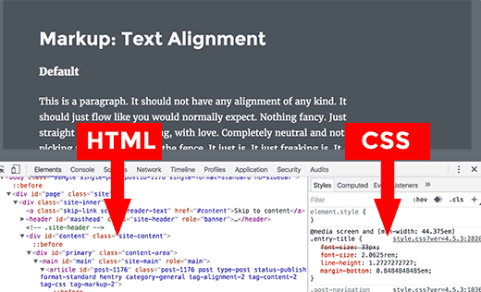
The developer tool window is further divided into two windows. On your left, you will see the HTML code for the page. On the right-hand pane, you will see the CSS rules.

HTML and CSS Panes in Inspect window

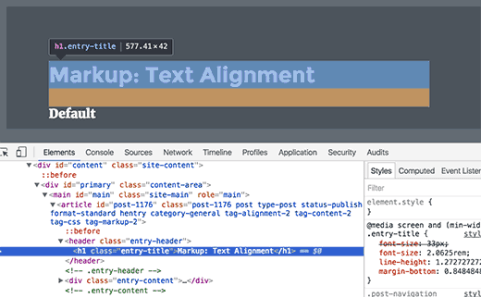
As you move your mouse over the HTML source you will see the affected area highlighted on the web page. You will also notice CSS rules change to show the CSS for the element you are viewing.

Editing a particular HTML element

You can also take the mouse pointer to an element on the web page, right click and select inspect element. The element you pointed at will be highlighted in the source code.

Editing and Debugging Code in Inspect Element

Both the HTML and CSS in the inspect element window are editable. You can double click anywhere in the HTML source code and edit the code as you like.

Editing HTML code in inspect element tool

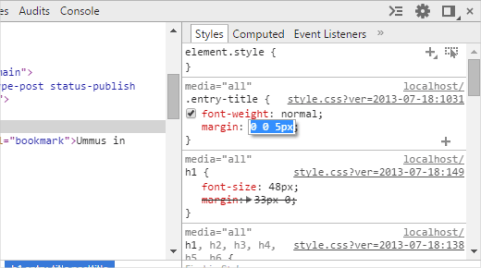
You can also double click and edit any attributes and styles in the CSS pane. To add a custom style rule click on the + icon at the top of CSS pane.

Editing CSS in the inspect element tool

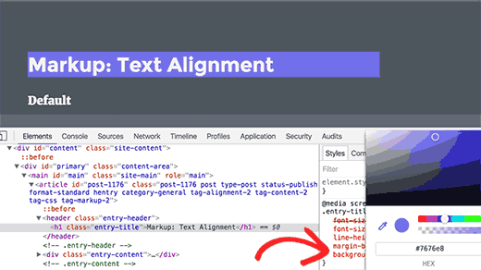
As you make changes to the CSS or HTML those changes will be reflected in the browser instantly.

Live CSS changes in the browser screen

Note, that any changes you make here are not saved anywhere. Inspect element is a debugging tool, and it does not write your changes back to the files on your server. This means that if you refresh the page, all your changes will be gone.

To actually make the changes, you will have to edit your WordPress theme’s stylesheet or relevant template to add the changes you want to save.

Before you start editing your existing WordPress theme using Inspect Element tool, make sure you that you save all your changes by creating a child theme.

Easily Find Errors On Your Site

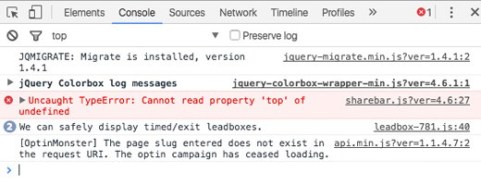
Inspect element has an area called Console which shows all the errors that exist on your website. When trying to debug an error or requesting support from plugin authors, it’s always helpful to look here to see what the errors are.

Browser Console Error

For example, if you were an OptinMonster customer wondering why your optin is not loading, then you can easily find the problem “your page slug does not match”.

If your sharebar wasn’t working properly, then you can see that there’s a JavaScript error.

Tools like the Inspect Element Console and SupportAlly help you get better customer support because the technical support team love customers who take initiative in providing detailed feedback of the issue.

We hope this tutorial helped you learn the basics of inspect element and how to use it with your WordPres site.

Easy Guide to Disable RSS Feeds in WordPress

In this  tutorial, we will learn how to disable RSS feeds in WordPress.

Method 1:  Disable RSS Feeds Using a Plugin

This method is easier and is recommended for beginners.

First thing you need to do is install and activate the Disable Feeds plugin. For more details, see our step by step guide on how to install a WordPress plugin.

The plugin works out of the box and it will start redirecting users to your website when they request an RSS feed.

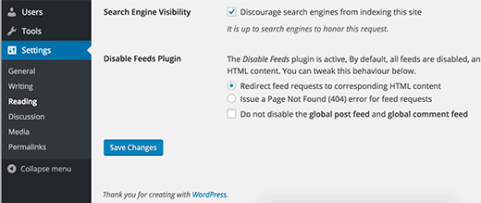
There are a few settings available for the plugin. You need to visit Settings » Reading page to configure them.

Disable Feeds plugin settings

By default, the plugin will try to redirect users to related content on your site when they request a feed. For example, users requesting a category feed will be redirected to category page. Users trying to access custom post type RSS feed will be redirected to the custom post type archive.

You can change this behavior and show users a 404 error page.

You can also select not to disable the global RSS feed and comments feed. This will allow users to still subscribe to your RSS feed, but there will be no individual category, author, or post comment feeds.

Don’t forget to click on the save changes button to store your settings.

Method 2: Manually Disable RSS Feeds in WordPress

This method requires you edit WordPress files. You can use this method if you are comfortable pasting snippets from web into WordPress.
Simply add this code to your theme’s functions.php file or a site-specific plugin.

function wpb_disable_feed() {
wp_die( __('No feed available,please visit our homepage!') );
}
 
add_action('do_feed', 'wpb_disable_feed', 1);
add_action('do_feed_rdf', 'wpb_disable_feed', 1);
add_action('do_feed_rss', 'wpb_disable_feed', 1);
add_action('do_feed_rss2', 'wpb_disable_feed', 1);
add_action('do_feed_atom', 'wpb_disable_feed', 1);
add_action('do_feed_rss2_comments', 'wpb_disable_feed', 1);
add_action('do_feed_atom_comments', 'wpb_disable_feed', 1);

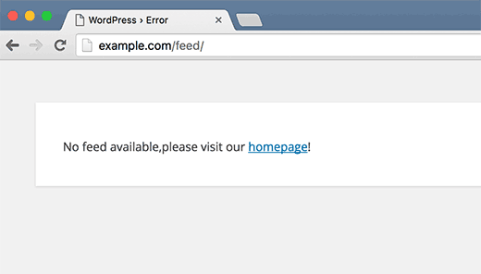
This code simply returns an error page when someone requests an RSS feed.

Feeds disabled error page in WordPress

We hope this tutorial helped you learn how to disable RSS feeds in WordPress.