How To Install Zabbix on Ubuntu 16.04 LTS

Install Zabbix on Ubuntu 16

Zabbix is an open source monitoring tool that is ideal for monitoring your cloud servers. Zabbix is very flexible, information can be retrieved using HTTP/SNMP or by installing a Zabbix agent on the machines to monitor, and allows a lot of customization.

This article assumes you have at least basic knowledge of Linux, know how to use the shell, and most importantly, you host your site on your own VPS. The installation is quite simple and assumes you are running in the root account, if not you may need to add ‘sudo’ to the commands to get root privileges. I will show you through the step by step installation Zabbix in Ubuntu 16.04 LTS Xenial Xerus.
Install Zabbix on Ubuntu 16.04 LTS Xenial Xerus

Step 1. First make sure that all your system packages are up-to-date by running these following apt-get commands in the terminal.

sudo apt-get update
sudo apt-get upgrade

Step 2. Install LAMP (Linux, Apache, MariaDB and PHP) server.

A Ubuntu 16.04 LAMP server is required. If you do not have LAMP installed, you can follow our guide here. Also install all required PHP modules:

apt-get install php7.0-readline php7.0-curl php7.0-gd php7.0-mbstring libapache2-mod-php7.0 php7.0-mcrypt php7.0-bz2 php7.0-zip

Step 3. Installing Zabbix on Ubuntu 16.04.

First thing to do is download and add the repository as shown below:

wget http://repo.zabbix.com/zabbix/3.2/ubuntu/pool/main/z/zabbix-release/zabbix-release_3.2-1+xenial_all.deb
dpkg -i zabbix-release_3.2-1+xenial_all.deb

After adding zabbix apt repository in your system, Now update package lists and install Zabbix using commands:

apt-get update
apt-get install zabbix-server-mysql zabbix-frontend-php

Step 4. Zabbix Configuration.

sudo nano /etc/zabbix/zabbix_server.conf

Adjust the following values and make a note of the password you’ve chosen. You’ll need it later too.

DBName=zabbixdb
DBUser=zabbix
DBPassword=your_chosen_password_here

Step 5. Configure MariaDB Database for Zabbix.

By default, MariaDB is not hardened. You can secure MariaDB using the mysql_secure_installation script. you should read and below each steps carefully which will set root password, remove anonymous users, disallow remote root login, and remove the test database and access to secure MySQL.

mysql_secure_installation

Configure it like this:

- Set root password? [Y/n] y
- Remove anonymous users? [Y/n] y
- Disallow root login remotely? [Y/n] y
- Remove test database and access to it? [Y/n] y
- Reload privilege tables now? [Y/n] y

Next we will need to log in to the MariaDB console and create a database for Zabbix. Run the following command:

mysql -u root -p

This will prompt you for a password, so enter your MariaDB root password and hit Enter. Once you are logged in to your database server you need to create a database for the Zabbix software:

create user 'zabbix'@'localhost' identified by 'your_chosen_password_here';
create database zabbixdb;
grant all privileges on zabbixdb.* to 'zabbix'@'localhost';
flush privileges;
exit;

After creating the zabbix database and user we need to import the zabbix initial database using the below commands:

cd /usr/share/doc/zabbix-server-mysql
zcat create.sql.gz | mysql -u root -p zabbixdb

Step 6. Configure Apache web server for Zabbix.

First, we’ll move the Zabbix apache file from the package directory:

sudo cp /usr/share/doc/zabbix-frontend-php/examples/apache.conf /etc/apache2/conf-available/zabbix.conf
sudo a2enconf zabbix.conf
sudo a2enmod alias

We should adjust php timezone as per zabbix recommended settings:

###nano /etc/zabbix/apache.conf
    php_value max_execution_time 300
    php_value memory_limit 128M
    php_value post_max_size 16M
    php_value upload_max_filesize 2M
    php_value max_input_time 300
    php_value always_populate_raw_post_data -1
    php_value date.timezone Europe/Rome

Restart the Apache and zabbix service for the changes to take effect:

systemctl restart apache2
systemctl start zabbix-server

Step 7. Accessing Zabbix.

will be available on HTTP port 80 by default. Open your favorite browser and navigate to http://yourdomain.com/zabbix or http://server-ip/zabbix and complete the required the steps to finish the installation. If you are using a firewall, please open port 80 to enable access to the control panel.
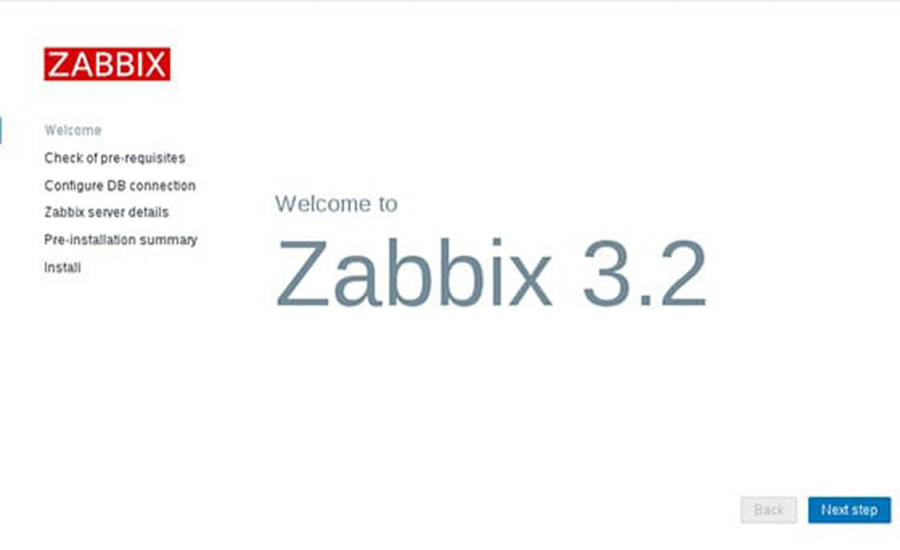
zabbix-v3-install

Congratulation’s! You have successfully installed Zabbix. Thanks for using this tutorial for installing Zabbix Monitoring Tool on your Ubuntu 16.04 LTS system. For additional help or useful information, we recommend you to check the official Zabbix web site.
How To Install Open Eshop on Ubuntu 16.04 LTS

Install Open Eshop on Ubuntu 16

Open eShop is an open source ecommerce software written in PHP which allows you to sell software, music, ebooks or anything else you may want.

This article assumes you have at least basic knowledge of Linux, know how to use the shell, and most importantly, you host your site on your own VPS. The installation is quite simple and assumes you are running in the root account, if not you may need to add ‘sudo’ to the commands to get root privileges. I will show you through the step by step installation Open eShop in Ubuntu 16.04 LTS Xenial Xerus.

Install Open Eshop on Ubuntu 16.04 LTS

Step 1. First make sure that all your system packages are up-to-date by running these following apt-get commands in the terminal.

sudo apt-get update
sudo apt-get upgrade

Step 2. Installing LAMP (Linux, Apache, MariaDB and PHP) server.

A Ubuntu 16.04 LAMP server is required. If you do not have LAMP installed, you can follow our guide here. Also install all required PHP modules:

apt-get install php7.0-readline php7.0-curl php7.0-gd php7.0-mbstring libapache2-mod-php7.0 php7.0-mcrypt php7.0-bz2 php7.0-zip

Step 3. Installing Open eShop Lite.

First, download the latest stable version of the Open Eshop installation file from their official website with the following command:

mkdir /var/www/html/openeshop
cd /var/www/html/openeshop
wget https://raw.githubusercontent.com/open-classifieds/open-eshop/master/install-eshop.php

Change the owner of the script with the following command:

chown -R www-data:www-data install-eshop.php

Step 4. Configure MariaDB Database for Open eShop.

By default, MariaDB is not hardened. You can secure MariaDB using the mysql_secure_installation script. you should read and below each steps carefully which will set root password, remove anonymous users, disallow remote root login, and remove the test database and access to secure MySQL.

mysql_secure_installation

Configure it like this:

- Set root password? [Y/n] y
- Remove anonymous users? [Y/n] y
- Disallow root login remotely? [Y/n] y
- Remove test database and access to it? [Y/n] y
- Reload privilege tables now? [Y/n] y

Next we will need to log in to the MariaDB console and create a database for Open eShop. Run the following command:

mysql -u root -p

This will prompt you for a password, so enter your MariaDB root password and hit Enter. Once you are logged in to your database server you need to create a database for the Open eShop software:

CREATE DATABASE openeshop_db;
CREATE USER 'openeshop'@'localhost' IDENTIFIED BY 'usr_strong_pwd';
GRANT ALL PRIVILEGES ON openeshop_db.* TO 'openeshop'@'localhost';
FLUSH PRIVILEGES;
EXIT;

Step 5. Configuring Apache web server for Open eShop.

Create a new virtual host directive in Apache. For example, create a new Apache configuration file named ‘openshop.conf’ on your virtual server:

sudo a2enmod rewrite
touch /etc/apache2/sites-available/openshop.conf
ln -s /etc/apache2/sites-available/openshop.conf /etc/apache2/sites-enabled/openshop.conf
nano /etc/apache2/sites-available/openshop.conf

Add the following lines:

<VirtualHost *:80>
ServerAdmin [email protected]
DocumentRoot /var/www/html/openeshop/
ServerName your-domain.com
ServerAlias www.your-domain.com
<Directory /var/www/html/openeshop/>
Options FollowSymLinks
AllowOverride All
Order allow,deny
allow from all
</Directory>
ErrorLog /var/log/apache2/your-domain.com-error_log
CustomLog /var/log/apache2/your-domain.com-access_log common
</VirtualHost>

Next step we will need to adjust the some some values in the PHP configuration files as follow:

nano /etc/php/7.0/apache2/php.ini

Update the values for post_max_size, upload_max_filesize, and short_open_tag as follows:

post_max_size = 64M
upload_max_filesize = 64M
short_open_tag = On

Now, we can restart Apache web server so that the changes take place:

systemctl restart apache2.service

Step 6. Accessing Open eShop.

Open eShop will be available on HTTP port 80 by default. Open your favorite browser and navigate to http://yourdomain.com or http://server-ip and complete the required the steps to finish the installation. If you are using a firewall, please open port 80 to enable access to the control panel.

Congratulation’s! You have successfully installed Open eShop. Thanks for using this tutorial for installing Open eShop open source software for eCommerce platforms on your Ubuntu 16.04 LTS system. For additional help or useful information, we recommend you to check the official Open eShop web site.

How To Install Erlang on Ubuntu 16.04 LTS

Install Erlang on Ubuntu 16

Erlang is a programming language used to build massively scalable soft real-time systems with requirements for high availability. The Erlang runtime system has built-in support for concurrency, distribution and fault tolerance.

This article assumes you have at least basic knowledge of Linux, know how to use the shell, and most importantly, you host your site on your own VPS. The installation is quite simple and assumes you are running in the root account, if not you may need to add ‘sudo’ to the commands to get root privileges. I will show you through the step by step installation Erlang in Ubuntu 16.04 LTS Xenial Xerus.

Install Erlang on Ubuntu 16.04 LTS

Step 1. First make sure that all your system packages are up-to-date by running these following apt-get commands in the terminal.

sudo apt-get update
sudo apt-get upgrade

Step 2. Installing Erlang.

First, download Erlang repository package from its official website and install on your system:

wget https://packages.erlang-solutions.com/erlang-solutions_1.0_all.deb 
dpkg -i erlang-solutions_1.0_all.deb

Now, you can install erlang package on your system using the following command:

apt-get update
apt-get install erlang

Step 3. Erlang Hello World Program.

Let’s start with hello world program on erlang. First create file helloworld.erl with following content:

nano helloworld.erl

Add the following content:

% hello world program
-module(helloworld).
-export([start/0]).
start() ->
io:fwrite("Hello World!\n").

Compile the hello world program using below command:

erlc helloworld.erl

Now, run your program using below command:

erl -noshell -s helloworld start -s init stop

Congratulation’s! You have successfully installed Erlang. Thanks for using this tutorial for installing Erlang on your Ubuntu 16.04 LTS system. For additional help or useful information, we recommend you to check the official Erlang web site.

How To Install WordPress on Ubuntu 17.04

Install WordPress on Ubuntu 17

WordPress is an online, open source website creation tool written in PHP. But in non-geek speak, it’s probably the easiest and most powerful blogging and website content management system (or CMS) in existence today.

This article assumes you have at least basic knowledge of Linux, know how to use the shell, and most importantly, you host your site on your own VPS. The installation is quite simple and assumes you are running in the root account, if not you may need to add ‘sudo’ to the commands to get root privileges. I will show you through the step by step installation WordPress content management systems on an Ubuntu 17.04 Zesty Zapus server.
Install WordPress on Ubuntu 17.04 Zesty Zapus

Step 1. First make sure that all your system packages are up-to-date by running these following apt-get commands in the terminal.

sudo apt-get update
sudo apt-get upgrade

Step 2. Install LAMP (Linux, Apache, MariaDB, PHP) server.

A Ubuntu 17.04 LAMP server is required. If you do not have LAMP installed, you can follow our guide here. Also install all required PHP modules:

apt-get install php7.0-mysql php7.0-curl php7.0-json php7.0-cgi php7.0 libapache2-mod-php7.0 php7.0-mcrypt php7.0-xmlrpc php7.0-gd

Step 3. Installing WordPress on Ubuntu 17.04.

First thing to do is to go to WordPress’s download page and download the latest stable version of WordPress, At the moment of writing this article it is version 4.8:

wget http://wordpress.org/latest.zip

Unpack the WordPress archive to the document root directory on your server:

unzip -q latest.zip -d /var/www/html/
cd wordpress
cp -a * ..

We will need to change some folders permissions:

chown www-data:www-data -R /var/www/html/

We need to create the upload directory manually:

mkdir -p /var/www/html/wp-content/uploads

Allow the Apache web server to write to the uploads directory. Do this by assigning group ownership of this directory to your web server which will allow Apache to create files and directories. Issue the following command:

chown www-data:www-data -R /var/www/html/wp-content/uploads

Step 4. Configuring MariaDB for WordPress.

By default, MariaDB is not hardened. You can secure MariaDB using the mysql_secure_installation script. you should read and below each steps carefully which will set root password, remove anonymous users, disallow remote root login, and remove the test database and access to secure MariaDB:

mysql_secure_installation

Configure it like this:

- Set root password? [Y/n] y
- Remove anonymous users? [Y/n] y
- Disallow root login remotely? [Y/n] y
- Remove test database and access to it? [Y/n] y
- Reload privilege tables now? [Y/n] y

Next we will need to log in to the MariaDB console and create a database for the WordPress. Run the following command:

mysql -u root -p

This will prompt you for a password, so enter your MariaDB root password and hit Enter. Once you are logged in to your database server you need to create a database for WordPress installation:

CREATE DATABASE wordpress character set utf8 collate utf8_bin;
GRANT ALL PRIVILEGES on wordpress.* to 'wpuser'@'localhost' identified by 'your_password';
FLUSH PRIVILEGES;
exit

Step 5. Configuring WordPress

In this step we will configure the main configuration file of WordPress, where we need to configure it’s basic parameters so that it can be connected with the database and user:

mv wp-config-sample.php wp-config.php

Now open it using any of your favourite editor, to make any changes in the WordPress configuration file:

nano wp-config.php

Here are the values that we need to update according to our previous database and user’s setup:

// ** MySQL settings - You can get this info from your web host ** //
/** The name of the database for WordPress */
define('DB_NAME', 'wordpress');

/** MySQL database username */
define('DB_USER', 'wpuser');

/** MySQL database password */
define('DB_PASSWORD', 'your_password');

/** MySQL hostname */
define('DB_HOST', 'localhost');

Step 6. Configuring Apache web server for WordPress.

Create a new virtual host directive in Apache. For example, create a new Apache configuration file named ‘wordpress.conf’ on your virtual server:

sudo a2enmod rewrite
touch /etc/apache2/sites-available/wordpress.conf
ln -s /etc/apache2/sites-available/wordpress.conf /etc/apache2/sites-enabled/wordpress.conf
nano /etc/apache2/sites-available/wordpress.conf

Add the following lines:

<VirtualHost *:80>
ServerAdmin [email protected]
DocumentRoot /var/www/html/
ServerName your-domain.com
ServerAlias www.your-domain.com
<Directory /var/www/html/>
Options FollowSymLinks
AllowOverride All
Order allow,deny
allow from all
</Directory>
ErrorLog /var/log/apache2/your-domain.com-error_log
CustomLog /var/log/apache2/your-domain.com-access_log common
</VirtualHost>

Next step we will need to adjust the some some values in the PHP configuration files as follow:

nano /etc/php/7.0/apache2/php.ini

Add/modify the following settings:

max_execution_time = 300
max_input_time = 600
memory_limit = 256M
post_max_size = 64M
upload_max_filesize = 64M

Now, we can restart Apache web server so that the changes take place:

systemctl restart apache2.service

Step 7. Accessing WordPress.

WordPress will be available on HTTP port 80 by default. Open your favorite browser and navigate to http://yourdomain.com or http://server-ip/ and complete the required the steps to finish the installation. If you are using a firewall, please open port 80 to enable access to the control panel.

Congratulation’s! You have successfully installed WordPress. Thanks for using this tutorial for installing WordPress CMS (Content Management Systems) on your Ubuntu 17.04. For additional help or useful information, we recommend you to check the official WordPress web site.

How To Install Bro Network Security Monitor on Ubuntu 16.04 LTS

Install Bro Network Security Monitor on Ubuntu 16

The Bro Network Security Monitor is an open source network monitoring framework. In a nutshell, Bro monitors packet flows over a network with a network tap installed with optional bonded network interfaces, and creates high-level “flow” events from them and stores the events as single tab-separated lines in a log file. You can then parse these log files to data mine for information about the network traffic on the network you are monitoring. These logs include not only a comprehensive record of every connection seen on the wire, but also application-layer transcripts such as all HTTP sessions with their requested URIs, key headers, MIME types, server responses, DNS requests with replies, SSL certificates, key content of SMTP sessions, and much more.

This article assumes you have at least basic knowledge of Linux, know how to use the shell, and most importantly, you host your site on your own VPS. The installation is quite simple and assumes you are running in the root account, if not you may need to add ‘sudo’ to the commands to get root privileges. I will show you through the step by step installation Bro Network Security Monitor in Ubuntu 16.04 LTS Xenial Xerus.

Install Bro Network Security Monitor on Ubuntu 16.04 LTS

Step 1. First make sure that all your system packages are up-to-date by running these following apt-get commands in the terminal.

sudo apt-get update
sudo apt-get upgrade

Step 2. Install Required Dependencies.

Install all the required dependencies, by executing the following command:

apt-get install cmake make gcc g++ flex git bison python-dev swig libpcap-dev libssl-dev zlib1g-dev

Step 3. Installing GeoIP Database for IP Geolocation.

You will also need to install GeoIP to your system. You can install it with the following command:

wget http://geolite.maxmind.com/download/geoip/database/GeoLiteCity.dat.gz
wget http://geolite.maxmind.com/download/geoip/database/GeoLiteCityv6-beta/GeoLiteCityv6.dat.gz
gzip -d GeoLiteCity.dat.gz
gzip -d GeoLiteCityv6.dat.gz

Now move the GeoIP files over to the default location /usr/share/GeoIP/, we need to rename them to match the location that Bro is expecting:

mv GeoLiteCity.dat /usr/share/GeoIP/GeoIPCity.dat
mv GeoLiteCityv6.dat /usr/share/GeoIP/GeoIPCityv6.dat

Step 4. Installing Bro Network Security Monitor.

First, download the latest version of the Bro source from their website. You can do this with the following command:

wget https://www.bro.org/downloads/bro-2.5.1.tar.gz
tar zxvf bro-2.5.1.tar.gz
cd bro-2.5.1
./configure
make 
make install

Once the Bro is installed, adjust your PATH environment with the following command:

export PATH=/usr/local/bro/bin:$PATH

Step 5. Configure Bro Network Security Monitor.

Bro is a powerful tool, to get started quickly we will follow the guide on the project page.

Edit the following files before starting:

$PREFIX/etc/node.cfg  -- configure network interface to monitor
$PREFIX/etc/networks.cfg -- configure local networks
$PREFIX/etc/broctl.cfg -- change MailTo address and the log rotation

To start the program simply enter broctl at a shell.

You are now in the broctl shell, from where you can give bro commands.

[BroControl] >

The first command to run, since this is a new installation is to run install. We will then run start:

[BroControl] > install
warning: cannot read '/opt/bro2/spool/broctl.dat' (this is ok on first run)
creating policy directories ... done.
installing site policies ... done.
generating standalone-layout.bro ... done.
generating local-networks.bro ... done.
generating broctl-config.bro ... done.
updating nodes ... done.
[BroControl] > start
starting bro ...
[BroControl] > status
Name       Type       Host       Status        Pid    Peers  Started              
bro        standalone localhost  running       23465  0      21 Jul 10:11:55

You now have Bro Network Security Monitor running on your system.

Congratulation’s! You have successfully installed Bro. Thanks for using this tutorial for installing Bro Network Security Monitor on your Ubuntu 16.04 LTS system. For additional help or useful information, we recommend you to check the official Bro Network Security Monitor web site.

How To Install VirtualBox on Ubuntu 17.04

VirtualBox is a free and open-source hypervisor software, allows you to create and run a guest operating systems (“virtual machines”) such as Linux and Windows on top of the host operating system.VirtualBox supports both software-based and Hardware-assisted virtualization.

This article assumes you have at least basic knowledge of Linux, know how to use the shell, and most importantly, you host your site on your own VPS. The installation is quite simple and assumes you are running in the root account, if not you may need to add ‘sudo’ to the commands to get root privileges. I will show you through the step by step installation VirtualBox on a Ubuntu 17.04 (Zesty Zapus) server.

Install VirtualBox on Ubuntu 17.04 Zesty Zapus

Step 1. First, make sure that all your system packages are up-to-date by running these following apt-get commands in the terminal.

sudo apt-get update
sudo apt-get upgrade

Step 2. Installing VirtualBox on Ubuntu 17.04.

First, run the commands below to add VirtualBox repository key:

nano /etc/apt/sources.list

Add the following line to it:

deb http://download.virtualbox.org/virtualbox/debian zesty contrib

Next, we need to download and import the Oracle GPG public key to Ubuntu system with the following command:

wget -q https://www.virtualbox.org/download/oracle_vbox_2016.asc -O- | sudo apt-key add -
wget -q https://www.virtualbox.org/download/oracle_vbox.asc -O- | sudo apt-key add -

Install the VirtualBox 5, command as follows:

apt-get update
apt-get install virtualbox-5.1

Step 4. Accessing VirtualBox.

Once it’s installed, start it from your application menu, or run the command below to start VirtualBox from terminal or find the application on your ubuntu dash and launch it.:

virtualbox

Install-VirtualBox
Congratulation’s! You have successfully installed VirtualBox. Thanks for using this tutorial for installing VirtualBox on Ubuntu 17.04 (Zesty Zapus) server. For additional help or useful information, we recommend you to check the official VirtualBox web site.

How To Install Atom Text Editor on Ubuntu 16.04 LTS

Install Atom Text Editor on Ubuntu

Atom is a free and open-source text and source code editor for macOS, Linux, and Microsoft Windows with support for plug-ins written in Node.js, and embedded Git Control, developed by GitHub. Atom is a desktop application built using web technologies. Most of the extending packages have free software licenses and are community-built and maintained. Atom is based on Electron (formerly known as Atom Shell), a framework that enables cross-platform desktop applications using Chromium and Node.js. It is written in CoffeeScript and Less. It can also be used as an integrated development environment (IDE).

This article assumes you have at least basic knowledge of Linux, know how to use the shell, and most importantly, you host your site on your own VPS. The installation is quite simple and assumes you are running in the root account, if not you may need to add ‘sudo’ to the commands to get root privileges. I will show you through the step by step installation Atom Text Editor on Ubuntu 16.04 Xenial Xerus server.
Install Atom Text Editor on Ubuntu 16.04 LTS

Step 1. First make sure that all your system packages are up-to-date by running these following apt-get commands in the terminal.

sudo apt-get update
sudo apt-get upgrade

Step 2. Installing Atom Text Editor.
First, download its debian (64bit) package from its official site. Open the terminal and use following wget command:

wget https://github.com/atom/atom/releases/download/v1.18.0/atom-amd64.deb

Install downloaded debian package along with its required dependencies:

dpkg -i atom-amd64.deb
apt-get install -f

Once installed, next you can start Atom by searching for it Unity Dash. If the app icon doesn’t show up, try logging out and logging back in.

Congratulations! You have successfully installed Atom. Thanks for using this tutorial for installing Atom Text Editor in Ubuntu 16.04 Xenial Xerus systems. For additional help or useful information, we recommend you to check the official Atom Text Editor web site.