How To Install PowerDNS on Ubuntu 14.04

install powerdns on ubuntu

PowerDNS is a MySQL-based DNS server, written in C++ and licensed under the GPL. PowerDNS can be managed through a web interface (PowerAdmin). Unlike Bind, PowerDNS can be setup using a multitude of backends such as Bind Zone Files, or various Databases.

This article assumes you have at least basic knowledge of linux, know how to use the shell, and most importantly, you host your site on your own VPS. The installation is quite simple. I will show you through the step by step installation PowerDNS on Ubuntu 14.04.

Step 1. First you need to update repository on your system.

apt-get update
apt-get upgrade

Step 2. Install MySQL.

 apt-get install mysql-server mysql-client

By default, MySQL is not hardened. You can secure MySQL using the mysql_secure_installation script. you should read and below each steps carefully which will set root password, remove anonymous users, disallow remote root login, and remove the test database and access to secure MySQL.

 mysql_secure_installation

Step 3. Configuring MySQL.

Edit /etc/mysql/my.cnf to make MySQL to listen all interfaces:

 nano /etc/mysql/my.cnf
[...]
#bind-address           = 127.0.0.1
[...]

Restart MySQL service:

 service mysql restart

Step 4. Install the PowerDNS server and MySql backend.

 apt-get install pdns-server pdns-backend-mysql

Step 5. Create PowerDNS Database and User in MySQL.

Login as a MySQL root and create a new database and tables:

 mysql -u root -p
create database powerdns;
GRANT ALL PRIVILEGES ON powerdns.* TO 'powerdns'@'localhost' IDENTIFIED BY 'powerdnsPassword';
use powerdns;

CREATE TABLE domains (
id INT auto_increment,
name VARCHAR(255) NOT NULL,
master VARCHAR(128) DEFAULT NULL,
last_check INT DEFAULT NULL,
type VARCHAR(6) NOT NULL,
notified_serial INT DEFAULT NULL,
account VARCHAR(40) DEFAULT NULL,
primary key (id)
);
CREATE UNIQUE INDEX name_index ON domains(name);

CREATE TABLE records (
id INT auto_increment,
domain_id INT DEFAULT NULL,
name VARCHAR(255) DEFAULT NULL,
type VARCHAR(6) DEFAULT NULL,
content VARCHAR(255) DEFAULT NULL,
ttl INT DEFAULT NULL,
prio INT DEFAULT NULL,
change_date INT DEFAULT NULL,
primary key(id)
);
CREATE INDEX rec_name_index ON records(name);
CREATE INDEX nametype_index ON records(name,type);
CREATE INDEX domain_id ON records(domain_id);

CREATE TABLE supermasters (
ip VARCHAR(25) NOT NULL,
nameserver VARCHAR(255) NOT NULL,
account VARCHAR(40) DEFAULT NULL
);
exit;

Step 6. Configure PowerDNS.

Remove the existing PowerDNS configuration files:

 sudo rm /etc/powerdns/pdns.d/*.*

Create file /etc/powerdns/pdns.d/pdns.local.gmysql.conf file:

 nano /etc/powerdns/pdns.d/pdns.local.gmysql.conf

Add the following lines and set the correct database name and database user which we created earlier:

launch=gmysql
gmysql-host=localhost
gmysql-user=powerdns
gmysql-password=powerdnsPassword
gmysql-dbname=powerdns

Finally, restart the PowerDNS service:

 service pdns restart

Congratulation’s! You have successfully installed PowerDNS. Thanks for using this tutorial for installing PowerDNS on Ubuntu 14.04 system.

You Might Also Like: How To Install PowerDNS on CentOS 6

How To Install Apache Solr on Ubuntu 14.04

apache solr on ubuntu

Apache Solr is an open source enterprise search platform used to easily create search engines which searches websites, files and databases. Its major features include powerful full-text search, faceted search, distributed search, hit highlighting and index replication. But before you proceed, make sure you have already installed Tomcat which is necessary to access Solr from the browser.

This article assumes you have at least basic knowledge of linux, know how to use the shell, and most importantly, you host your site on your own VPS. The installation is quite simple. I will show you through the step by step installation Apache Solr on Ubuntu 14.04.

Step 1. First, Install Java.

Because tomcat and solr are Java based softwares we need the Java environment (As it is advised in the Solr wiki : prefere a full JDK to a simple JRE.)

Add the webupd8team Java PPA repository in your system:

 sudo add-apt-repository -y ppa:webupd8team/java
sudo apt-get update
sudo aptitude -y install oracle-java8-installer

Verify installed Java version:

#java -version
java version "1.8.0_40"
Java(TM) SE Runtime Environment (build 1.8.0_40-b25)
Java HotSpot(TM) 64-Bit Server VM (build 25.40-b25, mixed mode)

Step 2. Install Apache Solr.

Ubuntu provides 3 Solr packages by default: nsolr-commo, the package that contains the actual Solr code; solr-tomcat, Solr integrated with Tomcat; and solr-jetty, which is just like solr-tomcat but with the Jetty web server. In this article, we will install solr-tomcat, so execute the following command:

 sudo apt-get -y install solr-tomcat

Then let’s start the server:

 sudo service tomcat6 start

Important: the config & index will be stored at : /usr/share/solr/

Step 3. Install tomcat management utilities.

 sudo apt-get install tomcat6-admin

Once installed, you’ll have to grant some user:

 sudo nano /etc/tomcat6/tomcat-users.xml

Paste these lines (change username and password as you whish):

<role rolename="manager"/>
<role rolename="admin"/>
<user username="tomcat" password="tomcat" roles="manager,admin"/>

Step 4. Accessing Apache Solr.

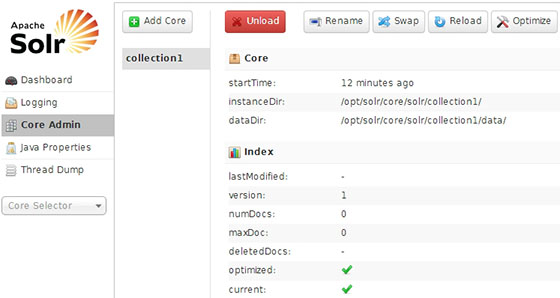
Apache Solr will be available on HTTP port 8080 by default. Open your favorite browser and navigate to http://yourdomain.com:8080/solr  or http://server-ip:8080/solr. If you are using a firewall, please open port 8080 to enable access to the control panel.

apache solr web admin

Congratulation’s! You have successfully installed Apache Solr. Thanks for using this tutorial for installing Apache Solr on Ubuntu 14.04 system.

You might also like: How To Install Apache Solr on CentOS 6

How To Install Java JDK 8 on Ubuntu 14.04

install java jdk on ubuntu

In this tutorial we will show you how to install and configuration of Java on your Ubuntu 14.04 server. There are many programs and scripts that require java to run it, but usually Java is not installed by default on VPS or Dedicated Server.

This article assumes you have at least basic knowledge of linux, know how to use the shell, and most importantly, you host your site on your own VPS. The installation is quite simple and assumes you are running in the root account, if not you may need to add ‘sudo’ to the commands to get root privileges. I will show you through the step by step installation Java JDK 8 on a Ubuntu 14.04 server.

Install Java JDK 8 on Ubuntu 14.04

Step 1. Remove the OpenJDK from the system, if you have it already installed.

 sudo apt-get remove --purge openjdk*

Step 2. Add the webupd8team Java PPA repository in your system.

 sudo add-apt-repository -y ppa:webupd8team/java

Step 3. Install Java JDK 8

After added the PPA, run commands below one by one to install Java JDK 8:

sudo apt-get update
sudo aptitude -y install oracle-java8-installer

Step 4. Verify Installed Java Version.

 java -version

Result:

java version "1.8.0_40"
Java(TM) SE Runtime Environment (build 1.8.0_40-b25)
Java HotSpot(TM) 64-Bit Server VM (build 25.40-b25, mixed mode)

Congratulation’s! You have successfully installed Java. Thanks for using this tutorial for installing Oracle Java (JDK) 8 on Ubuntu 14.04 system. For additional help or useful information, we recommend you to check the official Java web site.

How To Install Winusb on Ubuntu 14.04

install winusb ubuntu

WinUSB is simple tool allows to create bootable Windows USB install stick from Ubuntu Linux.  It comprises of both GUI and command line tool and you can decide to choose which to use based on your preference. This tool supports Windows 7, 8, Vista, XP and can use either an ISO or a DVD as a source. Currently there is no version for Ubuntu 14.04 in Ubuntu Repository. To successfully install Winusb on Ubuntu 14.04, you need to install the Saucy version and run the dependencies fix switch to fix the dependencies.

This article assumes you have at least basic knowledge of linux, know how to use the shell, and most importantly, you host your site on your own VPS. The installation is quite simple. I will show you through the step by step installation Winusb on Ubuntu 14.04.

Step 1. Download the winusb package that is compatible with your operating system’s architecture

Open the terminal and run the following commands:

##for Ubuntu 32-Bit##
wget https://launchpad.net/~colingille/+archive/freshlight/+files/winusb_1.0.11+saucy1_i386.deb

##for Ubuntu 64-Bit##
wget https://launchpad.net/~colingille/+archive/freshlight/+files/winusb_1.0.11+saucy1_amd64.deb

Step 2. Install Winusb.

 sudo dpkg -i winusb_1.0.11+saucy1*

Step 3. Fix dependencies errors.

 sudo apt-get -f install

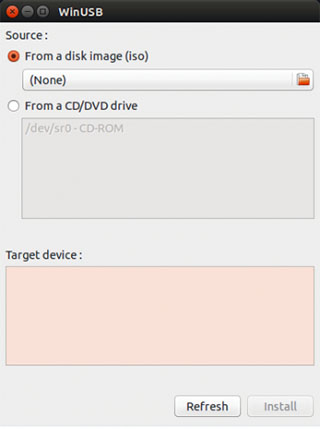
Step 4. Afterwards, you can search for WinUSB in Unity Dash and use it to create a live USB of Windows in Ubuntu 14.04.

winusb ubuntu

These three steps will install the WinUSB graphical interface and the WinUSB command line tool. The WinUSB GUI is much easier to use than the WinUSB command line tool.

Congratulation’s! You have successfully installed Winusb. Thanks for using this tutorial for installing Winusb on Ubuntu 14.04 system.

How To Install PHP 5.6 on Ubuntu 16.04 LTS

Install PHP 5.6 on Ubuntu 16

PHP (recursive acronym for PHP: Hypertext Preprocessor) is an open source, popular general-purpose scripting language that is widely-used and best suited for developing websites and web-based applications. It is a server-side scripting language that can be embedded in HTML. By default Ubuntu 16.04 (Xenial) now comes with PHP 7.0. You can install PHP 5.6 in parallel and switch between them using the following instructions.

This article assumes you have at least basic knowledge of linux, know how to use the shell, and most importantly, you host your site on your own VPS. The installation is quite simple and assumes you are running in the root account, if not you may need to add ‘sudo’ to the commands to get root privileges. I will show you through the step by step installation PHP 5.6 on a Ubuntu 16.04 (Xenial Xerus) server.

Install PHP 5.6 on Ubuntu 16.04 LTS

Step 1. First make sure that all your system packages are up-to-date

sudo apt-get update
sudo apt-get upgrade

Step 2. Installing PHP 5.6 on Ubuntu 16.04.

Use the following set of commands to enable PPA for PHP 5.6 in your Ubuntu system and install PHP 5.6:

sudo apt-get install -y software-properties-common
sudo add-apt-repository ppa:ondrej/php

Now, install PHP 5.6using the apt command:

apt-get install -y php5.6

Verify the PHP version using the following command:

php -V

Result:

PHP 5.6.32-1+ubuntu16.04.1+deb.sury.org+1 (cli)
Copyright (c) 1997-2016 The PHP Group
Zend Engine v2.6.0, Copyright (c) 1998-2016 Zend Technologies
 with Zend OPcache v7.0.6-dev, Copyright (c) 1999-2016, by Zend Technologies

Congratulation’s! You have successfully installed PHP 5. Thanks for using this tutorial for installing latest stable version of PHP 5.6 on Ubuntu 16.04 LTS (Xenial Xerus) system. For additional help or useful information, we recommend you to check the official PHP web site.