How To Install Nginx Amplify Agent on Ubuntu 16.04 LTS

Install Nginx Amplify Agent on Ubuntu 16

Nginx Amplify Agent is a Strong Nginx monitoring tool written in Python. Its function is to collect various metrics and metadata and send Them securely into the backend for storage and visualization. After appropriate Installation, it supplies you with NGINX Amplify web interface and also you Should observe real-time metrics to your monitored systems.

This article assumes you have at least basic knowledge of Linux, know how to use the shell, and most importantly, you host your site on your own VPS. The installation is quite simple and assumes you are running in the root account, if not you may need to add ‘sudo’ to the commands to get root privileges. I will show you through the step by step installation Nginx Amplify Agent monitoring tool on an Ubuntu 16.04 Xenial Xerus server.

Install Nginx Amplify Agent on Ubuntu 16.04 LTS

Step 1. First make sure that all your system packages are up-to-date by running these following apt-get commands in the terminal.

sudo apt-get update
sudo apt-get upgrade

Step 2. Installing Nginx Amplify Agent on Ubuntu 16.04.

First, add the necessary public key with the command:

curl -fs http://nginx.org/keys/nginx_signing.key | apt-key add -

Configure the repository with the command:

# codename=`lsb_release -cs` && \
os=`lsb_release -is | tr '[:upper:]' '[:lower:]'` && \
echo "deb http://packages.amplify.nginx.com/${os}/ ${codename} amplify-agent" > \
/etc/apt/sources.list.d/nginx-amplify.list

Install the Nginx Amplify Agent using apt:

apt-get update
apt-get install nginx-amplify-agent

Creating the Config File from a Template:

api_key="KEY" && \
sed "s/api_key.*$/api_key = ${api_key}/" \
/etc/amplify-agent/agent.conf.default > \
/etc/amplify-agent/agent.conf

*Where KEY is the API key is the unique key assigned to your NGINX Amplify account.

Once installed, These commands can be used to start/stop the agent:

systemctl enable amplify-agent
systemctl start amplify-agent

Step 3. Configuring the Nginx Amplify Agent.

Checklist:

stub status
extended access logging
‘warn’ level on error logging


server {
 listen [::]:80;
 server_name bmw.wpcademy.com localhost [::1] 127.0.0.1;
 keepalive_timeout 60;

location /nginx_status {
 stub_status;
 access_log off;

allow ::1;
 allow 127.0.0.1;
 deny all;
 }
}

The logging needs to be confiured to have extended information as per the documentation:

log_format  main      '$remote_addr - $remote_user [$time_local] "$request" '
                      ' $status $body_bytes_sent "$http_referer" '
                      '"$http_user_agent" "$http_x_forwarded_for" '
                      'rt=$request_time ua="$upstream_addr" '
                      'us="$upstream_status" ut="$upstream_response_time" '
                      'ul="$upstream_response_length" '
                      'cs=$upstream_cache_status' ;

Ensure warnings are logged to the error log:

error_log /var/log/nginx/error.log warn

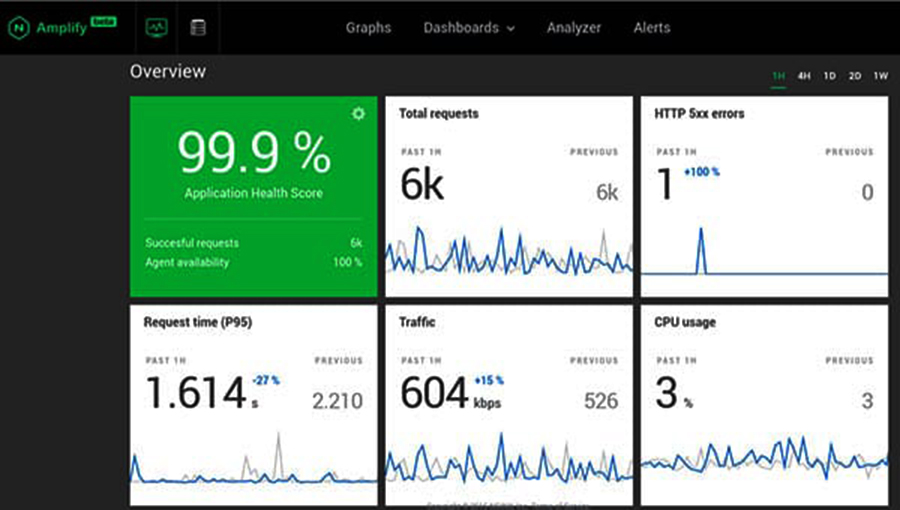
Finally steps, You can overview the status of our monitored server in the Web interface logging to your Amplify Account as in the snapshot:
nginx-amplify-agent

Congratulation’s! You have successfully installed Nginx Amplify Agent. Thanks for using this tutorial for installing Nginx Amplify Agent monitoring tool on your Ubuntu 16.04 LTS. For additional help or useful information, we recommend you to check the official Nginx Amplify Agent web site.

How To Install Nim on Ubuntu 16.04 LTS

Install Nim on Ubuntu 16

Nim is a systems and applications programming language. Statically typed and compiled, it gives unparalleled functionality in an elegant package.

This article assumes you have at least basic knowledge of linux, know how to use the shell, and most importantly, you host your site on your own VPS. The installation is quite simple and assumes you are running in the root account, if not you may need to add ‘sudo’ to the commands to get root privileges. I will show you through the step by step installation Nim programming language on a Ubuntu 16.04 (Xenial Xerus) server.

Install Nim on Ubuntu 16.04 LTS

Step 1. First make sure that all your system packages are up-to-date by running these following apt-get commands in the terminal.

sudo apt-get update
sudo apt-get upgrade

Step 2. Installing Nim.

Nim is available on Ubuntu 16.04 repository. To install Nim we can run command below:

apt-get install gcc
apt-get install nim

Now we can check Nim version installed:

### nim -v
Nim Compiler Version 0.12.0 (2017-11-02) [Linux: amd64]
Copyright (c) 2006-2015 by Andreas Rumpf

Next create sample hello world application for Nim. Create new file called hello.nim with contents below:

echo "Hello Nim! - wpcademy.com"

Compile the source code:

$ nim c hello.nim
Hint: system [Processing]
Hint: hello [Processing]
CC: hello
CC: system
Hint: [Link]
Hint: operation successful (9846 lines compiled; 0.910 sec total; 16.168MB; Debug Build) [SuccessX]

Now let’s execute the hello application:

### ./hello 
Hello Nim! - wpcademy.com

Congratulation’s! You have successfully installed Nim. Thanks for using this tutorial for installing latest stable version of Nim programming language on Ubuntu 16.04 LTS (Xenial Xerus) system. For additional help or useful information, we recommend you to check the official Nim web site.

How To Install Pghero on Ubuntu 16.04 LTS

Install Pghero on Ubuntu 16

PgHero is a performance dashboard for Postgres – health checks, suggested indexes, and more. PgHero 2.0 provides, even more, insight into your database performance with two additional features: query details and space stats. PgHero makes it easy to see the most time-consuming queries during a given time period.

This article assumes you have at least basic knowledge of Linux, know how to use the shell, and most importantly, you host your site on your own VPS. The installation is quite simple and assumes you are running in the root account, if not you may need to add ‘sudo’ to the commands to get root privileges. I will show you through the step by step installation Pghero on an Ubuntu 16.04 Xenial Xerus server.

Install Pghero on Ubuntu 16.04 LTS

Step 1. First make sure that all your system packages are up-to-date by running these following apt-get commands in the terminal.

sudo apt-get update
sudo apt-get upgrade

Step 2. Installing Pghero.

First, create pghero repo file and add pghero repo url:

wget -qO- https://dl.packager.io/srv/pghero/pghero/key | sudo apt-key add -
sudo wget -O /etc/apt/sources.list.d/pghero.list \
 https://dl.packager.io/srv/pghero/pghero/master/installer/ubuntu/14.04.repo

Install Pghero from the terminal using following command:

sudo apt-get update
sudo apt-get -y install pghero

Step 3. Configure Pghero.

We adding my local postgres database in pghero. You need to replace the user, password, port, hostname and database name with yours:

pghero config:set DATABASE_URL=postgres://user:password@hostname:5432/dbname
### pghero config:set DATABASE_URL=postgres://chedelics:wpcademy@localhost:5432/postgres ###

Start the pghero server:

sudo pghero config:set PORT=3001
sudo pghero config:set RAILS_LOG_TO_STDOUT=disabled
sudo pghero scale web=1

Use the following commands to manage the pghero:

sudo systemctl status pghero
sudo systemctl start pghero
sudo systemctl stop pghero
sudo systemctl restart pghero

Now we have start the pghero server lets check the dashboard. Go to ipaddress of your server and port 3001.

curl -v http://localhost:3001/

pghero-web-interface

Congratulation’s! You have successfully installed Pghero. Thanks for using this tutorial for installing Pghero on your Ubuntu 16.04 system. For additional help or useful information, we recommend you to check the official Pghero web site.

How To Install Vagrant on Ubuntu 16.04 LTS

Install Vagrant on Ubuntu 16

Vagrant is an open source tool for building an entire virtual development environment. Frequently, a test environment is needed for analyzing the latest release and new tools. Also, it reduces the time spent on re-building that your OS. By default, vagrant uses virtualbox for managing the Virtualization. Vagrant acts as the fundamental configuration for managing/deploying multiple reproducible virtual environments with the same configuration.

This article assumes you have at least basic knowledge of Linux, know how to use the shell, and most importantly, you host your site on your own VPS. The installation is quite simple and assumes you are running in the root account, if not you may need to add ‘sudo’ to the commands to get root privileges. I will show you through the step by step installation Vagrant virtual development environment on an Ubuntu 16.04 Xenial Xerus server.

Install Vagrant on Ubuntu 16.04 LTS

Step 1. First make sure that all your system packages are up-to-date by running these following apt-get commands in the terminal.

sudo apt-get update
sudo apt-get upgrade

Step 2. Installing VirtualBox.

Install Virtualbox from the terminal using following command:

apt-get install virtualbox
apt-get install virtualbox-dkms

Step 3. Installing Vagrant.

Install Vagrant from the terminal using following command:

apt-get install vagrant

We can verify the installation by issue command to check the installed version of Vagrant:

vagrant -v

Step 4. Deploy your development environment.

Vagrant can quickly deploy the development environment. The following command will install precise32 box from the vagrant website. A box is nothing more then a specially packaged image that can later be used to provision a server:

vagrant box add precise32 http://files.vagrantup.com/precise32.box

Create a root directory for your Project. Then create a vagrant file in this folder by calling ‘vagrant init’, which will be the central file for the project configuration:

mkdir vagrant_project_wpcademy
cd vagrant_project_wpcademy
vagrant init

Edit the Vagrantfile in this directory and replace:

config.vm.box = "precise32"

Start Environment:

vagrant up
Bringing machine 'default' up with 'virtualbox' provider...
[default] Importing base box 'precise32'...
[default] Matching MAC address for NAT networking...
[default] Setting the name of the VM...
[default] Clearing any previously set forwarded ports...
[default] Clearing any previously set network interfaces...
[default] Preparing network interfaces based on configuration...
[default] Forwarding ports...

Congratulation’s! You have successfully installed Vagrant. Thanks for using this tutorial for installing Vagrant virtual development environment on your Ubuntu 16.04 system. For additional help or useful information, we recommend you to check the official Vagrant web site.

How To Install Rocket.Chat on Ubuntu 16.04 LTS

Install Rocket.Chat on Ubuntu 16

Rocket.Chat is one of the most popular open source chat software. A fantastic alternate to both Slack and compensated live chat software. It’s free, what is unlimited and it’s a bunch of cool features like Video chat, Screen sharing, Mobile apps and more.

This article assumes you have at least basic knowledge of Linux, know how to use the shell, and most importantly, you host your site on your own VPS. The installation is quite simple and assumes you are running in the root account, if not you may need to add ‘sudo’ to the commands to get root privileges. I will show you through the step by step installation Rocket.Chat on an Ubuntu 16.04 Xenial Xerus server.

Install Rocket.Chat on Ubuntu 16.04 LTS

Step 1. First make sure that all your system packages are up-to-date by running these following apt-get commands in the terminal.

sudo apt-get update
sudo apt-get upgrade

Step 2. Installing MongoDB.

Rocket.Chat requires MongoDB for the installation. In this step, we will install MongoDB from the MongoDB repository:

apt-key adv --keyserver hkp://keyserver.ubuntu.com:80 --recv EA312927

Then add the MongoDB repository with the command below:

echo "deb http://repo.mongodb.org/apt/ubuntu xenial/mongodb-org/3.2 multiverse" | sudo tee /etc/apt/sources.list.d/mongodb-org-3.2.list

Update the repository and install MongoDB with the apt command:

apt-get update
apt-get install mongodb-org

Open MongoDB and set it to run automatically at boot time:

systemctl enable mongod
systemctl start mongod

Step 3. Configure a MongoDB ReplicaSet.

This is an optional step, but those who want performance improvements should follow it. Rocket.Chat Server uses a MongoDB replica set:

nano /etc/mongod.conf

There, add this section:
replication:

 replSetName: "001-rs"

Save, exit and restart MongoDB:

systemctl restart mongod

Next, run its shell and initiate the replica set:

# mongo
> rs.initiate()

After you run rs.initiate(), you should get the following results:

{
 "info2" : "no configuration specified. Using a default configuration for the set",
 "me" : "wpcademy.com:27017",
 "ok" : 1
}

If the value of “ok” is not 1, then something’s wrong. Please go back and follow the steps exactly as shown in this tutorial.

Step 4. Installing Node.js and npm.

Node.js and npm are required by Rocket.Chat and are both available on Ubuntu repositories:

apt-get install nodejs npm

First, install the ‘n’ package globally on the whole system:

npm install -g n

The messaging system requires Node.js 4.5+, so ensure that you choose 4.5:

n 4.5

Check if you have the right node.js version:

node --version

Step 5. Installing Rocket.Chat.

First, download the latest version of Rocket.Chat:

cd /var/www
curl -L https://rocket.chat/releases/latest/download -o rocket.chat.tgz

And extract it:

tar xzf rocket.chat.tgz

Rename the extracted folder:

mv bundle Rocket.Chat

Run the following commands to add some environment variables:

cd Rocket.Chat/programs/server
npm install
cd ../..
export ROOT_URL=http://your-host-name.com-as-accessed-from-internet:3000/
export MONGO_URL=mongodb://localhost:27017/rocketchat
export PORT=3000
node main.js

Step 6. Install LEMP (Linux, Nginx, MariaDB and PHP) server.

A Ubuntu 16.04 LEMP server is required. If you do not have LAMP installed, you can follow our guide here.

Create a new SSL directory, in which certificates will be stored:

mkdir -p /etc/nginx/ssl/

In this directory, generate a new SSL certificate file:

cd /etc/nginx/ssl
openssl req -new -x509 -days 365 -nodes -out /etc/nginx/ssl/rocketchat.crt -keyout /etc/nginx/ssl/rocketchat.key
chmod 400 rocketchat.key

Next, create a Virtual Host configuration:

nano /etc/nginx/sites-available/rocketchat

There, paste the following configuration:

# Upstreams
upstream backend {
 server 127.0.0.1:3000;
}
 
# Redirect Options
server {
 listen 80;
 server_name chat.mydomain.com;
 # enforce https
 return 301 https://$server_name$request_uri;
}
 
# HTTPS Server
server {
 listen 443;
 server_name chat.mydomain.com;
 
 error_log /var/log/nginx/rocketchat.access.log;
 
 ssl on;
 ssl_certificate /etc/nginx/ssl/rocketchat.crt;
 ssl_certificate_key /etc/nginx/ssl/rocketchat.key;
 ssl_protocols TLSv1 TLSv1.1 TLSv1.2; # dont use SSLv3 ref: POODLE
 
 location / {
 proxy_pass http://192.168.1.110:3000/;
 proxy_http_version 1.1;
 proxy_set_header Upgrade $http_upgrade;
 proxy_set_header Connection "upgrade";
 proxy_set_header Host $http_host;
 
 proxy_set_header X-Real-IP $remote_addr;
 proxy_set_header X-Forward-For $proxy_add_x_forwarded_for;
 proxy_set_header X-Forward-Proto http;
 proxy_set_header X-Nginx-Proxy true;
 
 proxy_redirect off;
 }
}

Save, exit and activate this configuration:

ln -s /etc/nginx/sites-available/rocketchat /etc/nginx/sites-enabled/rocketchat

Run:

nginx -t

And make sure there are no errors. If everything’s ok, restart Nginx:

systemctl restart nginx

Update the environment variables and run Rocket.Chat:

cd /var/www/Rocket.Chat/
export ROOT_URL=https://chat.mydomain.com
export MONGO_URL=mongodb://localhost:27017/rocketchat?replicaSet=001-rs
export PORT=3000
node main.js

Step 7. Accessing Rocket.Chat.

Rocket.Chat will be available on HTTP port 80 by default. Open your favorite browser and navigate to http://chat.mydomain.com and complete the required the steps to finish the installation. If you are using a firewall, please open port 80 to enable access to the control panel.

Congratulation’s! You have successfully installed Rocket.Chat with Docker. Thanks for using this tutorial for installing Rocket.Chat open source chat software on your Ubuntu 16.04. For additional help or useful information, we recommend you to check the official Rocket.Chat web site.

How To Install OpenVPN on Ubuntu 16.04 LTS

Install OpenVPN on Ubuntu 16

OpenVPN is an open source application which is widely used to create secure virtual private networks over the unsecured public Internet. OpenVPN is an SSL VPN solution which drains your system connection securely through the Internet. OpenVPN functions in the client server structure. All the devices connected to a virtual private network act as if they’re linked to your local area network. The packets sent through the VPN tunnel are encrypted with 256 bit AES encryption making data theft impossible.

This article assumes you have at least basic knowledge of Linux, know how to use the shell, and most importantly, you host your site on your own VPS. The installation is quite simple and assumes you are running in the root account, if not you may need to add ‘sudo’ to the commands to get root privileges. I will show you through the step by step installation OpenVPN open source virtual private network on a Ubuntu 16.04 (Xenial Xerus) server.

Install OpenVPN on Ubuntu 16.04 LTS

Step 1. First make sure that all your system packages are up-to-date by running these following apt-get commands in the terminal.

sudo apt-get update
sudo apt-get upgrade

Step 2. Installing OpenVPN on Ubuntu 16.04.

Install OpenVPN using following command:

apt-get install openvpn easy-rsa

Step 3. Setting Certificate Authority.

The OpenVPN server uses certificates to encrypt traffic between the server and various clients. Thus, we need to set up a certificate authority (CA) on the VPS to create and manage these certificates:

make-cadir ~/openvpn-ca
cd ~/openvpn-ca

We’ll be editing some variables toward the end of the file:

nano vars

Change them according to your needs:

# These are the default values for fields
# which will be placed in the certificate.
# Don't leave any of these fields blank.
export KEY_COUNTRY="US"
export KEY_PROVINCE="CA"
export KEY_CITY="NewYork"
export KEY_ORG="Fort-Funston"
export KEY_EMAIL="[email protected]"
export KEY_OU="MyOrganizationalUnit"

# X509 Subject Field
export KEY_NAME="chedelics"

If there aren’t any errors, you’ll see the following output:

source vars
NOTE: If you run ./clean-all, I will be doing a rm -rf on /home/user/openvpn-ca/keys

Now we can clean up the environment and then build up our CA:

./clean-all
./build-ca

Congratulation…..New RSA key will be created, and you’ll be asked to confirm the details you entered into the vars file earlier. Just hit Enter to confirm.

Step 4. Generating a server key and certificate.

Run the command below in the current directory:

./build-key-server server

We will also need to create a Diffie-Hellman file. Creation of this file will depends on the length of the key. For this default we will use 2048 bit key but you can always change it by editing the vars file in the easy-rsa folder:

./build-dh

Finally, you need to generate an HMAC signature to strengthen the certificate:

openvpn --genkey --secret keys/ta.key

Step 5. Create the client public/private keys.

This process will create a single client key and certificate:

source vars
./build-key client1

Step 6. Configure the OpenVPN server.

We will now configure the OpenVPN server:

cd ~/openvpn-ca/keys
cp ca.crt ca.key vpnserver.crt vpnserver.key ta.key dh2048.pem /etc/openvpn

Next, extract a sample OpenVPN configuration to the default location:

gunzip -c /usr/share/doc/openvpn/examples/sample-config-files/server.conf.gz | sudo tee /etc/openvpn/server.conf

Now edits to the configuration file:

nano /etc/openvpn/server.conf

Paste the configurations below (you may change the values of port etc.):

local 192.168.77.20
port 443
proto tcp
dev tun
tun-mtu 1500
tun-mtu-extra 32
mssfix 1450
ca /etc/openvpn/easy-rsa/2.0/keys/ca.crt
cert /etc/openvpn/easy-rsa/2.0/keys/server.crt
key /etc/openvpn/easy-rsa/2.0/keys/server.key
dh /etc/openvpn/easy-rsa/2.0/keys/dh1024.pem
server 10.8.0.0 255.255.255.0
#-ifconfig-pool-persist ipp.txt
push "redirect-gateway def1"
push "dhcp-option DNS 8.8.8.8"
push "dhcp-option DNS 4.2.2.1"
keepalive 2 30
comp-lzo
persist-key
persist-tun
status 443status.log
log-append 443log.log
verb 3

Save the file and enable and start the OpenVPN service:

systemctl enable openvpn@server
systemctl start openvpn@server

Step 7. Configure Iptables for OpenVPN.

We will need to enter some iptable rules to enable internet on the client machine:

sudo iptables -t nat -A POSTROUTING -s 10.8.0.0/24 -o venet0 -j MASQUERADE
sudo apt-get install iptables-persistent

Congratulation’s! You have successfully installed OpenVPN. Thanks for using this tutorial for installing OpenVPN server on Ubuntu 16.04 LTS (Xenial Xerus) system. For additional help or useful information, we recommend you to check the official OpenVPN web site.

How To Install IntelliJ IDEA on Ubuntu 18.04 LTS

Install IntelliJ IDEA on Ubuntu 18

IntelliJ IDEA is an integrated development environment for Java development. Notably, Google uses IntelliJ IDEA as the base for its Android Studio, an open source Android development IDE for developing Android applications. It is developed by JetBrains and is available in two editions, Community and Ultimate.

IntelliJ IDEA also supports major build automation tools such as Maven, Ant and Gradle, version controls systems such as Git and SVN. It has a built-in terminal, database tools, code completion, inline debugger. Also, it supports detecting duplicates, connecting Docker containers and application servers such as Tomcat, JBoss, etc.

This article assumes you have at least basic knowledge of Linux, know how to use the shell, and most importantly, you host your site on your own VPS. The installation is quite simple and assumes you are running in the root account, if not you may need to add ‘sudo’ to the commands to get root privileges. I will show you through the step by step installation IntelliJ IDEA on a Ubuntu 18.04 (Bionic Beaver) server.

Install IntelliJ IDEA on Ubuntu 18.04 LTS Bionic Beaver

Step 1. First, make sure that all your system packages are up-to-date by running these following apt-get commands in the terminal.

sudo apt update
sudo apt upgrade

Step 2. Installing IntelliJ IDEA on Ubuntu.

The recommended approach to install IntelliJ on Ubuntu 18.04 Linux system is to use the Snaps package. Run the following command to install the IntelliJ IDEA snap package:

### INTELLIJ IDEA COMMUNITY ###
sudo snap install intellij-idea-community --classic --edge

### INTELLIJ IDEA ULTIMATE ###
sudo snap install intellij-idea-ultimate --classic --edge

That’s it. IntelliJ IDEA has been installed on your Ubuntu desktop.

Step 3. Starting IntelliJ IDEA.

After successful instalation to start IntelliJ IDEA IDE via terminal run following command:

### INTELLIJ IDEA COMMUNITY ###
intellij-idea-community

### INTELLIJ IDEA ULTIMATE ###
intellij-idea-ultimate

Alternatively, you can start it by clicking on the IntelliJ IDEA icon (Activities -> IntelliJ IDE).

Congratulation’s! You have successfully installed IntelliJ IDEA. Thanks for using this tutorial for installing IntelliJ IDEA on your Ubuntu 18.04 system. For additional help or useful information, we recommend you to check the official IntelliJ IDEA website.