How To Install SMPlayer on Ubuntu 16.04 LTS

Install SMPlayer on Ubuntu 16

SMPlayer is an open source and free multimedia player available for Linux and MS Windows, released under GNU General Public License. Unlike other players it doesn’t require you to install codecs to play something because it carries its own all required codecs with itself. You don’t need to find and install third party codecs. SMPlayer can also play YouTube videos and it’s also available an optional plugin to search for YouTube videos.

This article assumes you have at least basic knowledge of linux, know how to use the shell, and most importantly, you host your site on your own VPS. The installation is quite simple and assumes you are running in the root account, if not you may need to add ‘sudo’ to the commands to get root privileges. I will show you through the step by step installation SMPlayer on a Ubuntu 16.04 (Xenial Xerus) server.
SMPlayer Features

Complete preferences dialog to change colors, key shortcuts and fonts of the subtitles, and many more.
Supports Multiple speed playback. You can play video at 2X, 4X and even in slow motion.
Delay adjustments for Audio and Video subtitles and allows you to sync audio and subtitles.
Provided search function to search and download subtitles from opensubtitles.org.
Included YouTube browser to download and play videos online.
Currently supports more than 30 languages, including Italian, Spanish, French, Russian, German, Chinese, Japanese.
Options to change style and icon set of the interface.

Install SMPlayer on Ubuntu 16.04 LTS
Step 1. First make sure that all your system packages are up-to-date by running these following apt-get commands in the terminal.

sudo apt-get update
sudo apt-get upgrade

Step 2. Installing SMPlayer on Ubuntu.
Open Terminal and run the following commands in Terminal to install SMPlayer on Ubuntu:

sudo add-apt-repository ppa:rvm/smplayer
sudo apt-get update
sudo apt-get install smplayer smplayer-themes smplayer-skins

Once installed, start the SMPlayer from Ubuntu Dash or by running the following command in Terminal:

smplayer

Congratulation’s! You have successfully installed SMPlayer. Thanks for using this tutorial for installing SMPlayer on Ubuntu 16.04 LTS (Xenial Xerus) system. For additional help or useful information, we recommend you to check the official SMPlayer web site.

How To Install Deb File on Ubuntu Using Gdebi

Install Deb File on Ubuntu Using Gdebi

Gdebi is a simple tool to install deb files. It lets you install local deb packages resolving and installing its dependencies. apt does the same, but only for remote (http, ftp) located packages. It can also resolve build-depends of debian/control files.

This article assumes you have at least basic knowledge of linux, know how to use the shell, and most importantly, you host your site on your own VPS or Dedicated server. The installation is quite simple and assumes you are running in the root account, if not you may need to add ‘sudo’ to the commands to get root privileges. I will show you through the step by step installation deb file on Ubuntu using Gdebi on a Ubuntu 16.04 (Xenial Xerus) server.
Install Deb File on Ubuntu Using Gdebi

Step 1. First make sure that all your system packages are up-to-date by running these following apt-get commands in the terminal.

sudo apt-get update
sudo apt-get upgrade

Step 2. Installing Gdebi.

Gdebi isn’t installed by default on Ubuntu. To use gdebi on Ubuntu, first install gdebi using the following command:

sudo apt-get install gdebi

Once gdebi is installed, it can be used to install a local deb package. The command format to install deb file using gdebi is:

sudo gdebi package_name.deb

There are many gdebi command options:

–version Show program’s version number and exit.
-h, –help Show this help message and exit.
–n, –non-interactive Run non-interactive (dangerous!).
–o APT_OPTS, –option=APT_OPTS Set an APT configuration option.
–q, –quiet Do not show progress information.
–apt-line Simulate only and print a apt-get install compatible line to stderr.
–root=ROOTDIR Use alternative root dir.

Congratulation’s! You have successfully installed Gdebi. Thanks for using this tutorial for installing deb using Gdebi on Ubuntu 16.04 LTS (Xenial Xerus) system. For additional help or useful information, we recommend you to check the official Gdebi web site.

How To Install Gitlab on Ubuntu 16.04 LTS

Install Gitlab on Ubuntu 16

Gitlab is graphical implementation of git, it is an open source repository management and version control system. GitLab is developed on Ruby on Rails. Using GitLab you can host your source code on your own server. This ensures security of the code, and gives you total freedom on the number of users as well as number of repositories and number of files. GitLab provides you with a platform to collaborate on projects and to keep track of changes in code. GitLab is widely used for software development and version control related tasks. In many ways it is similar to GitHub, except you can install it in your own server.

This article assumes you have at least basic knowledge of linux, know how to use the shell, and most importantly, you host your site on your own VPS. The installation is quite simple and assumes you are running in the root account, if not you may need to add ‘sudo’ to the commands to get root privileges. I will show you through the step by step installation Gitlab on a Ubuntu 16.04 (Xenial Xerus) server.
GitLab Features

GitLab provides you web interface to edit files, directories and create merge requests.
It is self hosted, hence you have full control over your server and the source code hosted inside.
It provides LDAP user authentication and has two factor authentication system which makes the application very secure.
You can insert your own branding in the login page and it also supports project import from GitHub and other sources to GitLab.
It has lots of features like code reviews, issue tracking, activity feeds and inbuilt wiki.
It provides a fine work flow management which gives you ability to create groups for a project, ability to fork a repository as well as it provides ability to manage large binaries with git LFS.
GitLab comes with GitLab CI for continuous integration. You can also Docker with GitLab CI.
It’s free and open source hence you won’t have to deal with any licensing issues.

Install Gitlab on Ubuntu 16.04 LTS

Step 1. First make sure that all your system packages are up-to-date by running these following apt-get commands in the terminal.

sudo apt-get update
sudo apt-get upgrade

Step 2. Install and Configure the necessary dependencies.

Before we going to install Git-lab, we have to install some prerequisites like ssh and mail services:

sudo apt-get install ca-certificates curl openssh-server postfix

Step 3. Installing GitLab.

Use following command to install GitLab packages on server:

curl -sS https://packages.gitlab.com/install/repositories/gitlab/gitlab-ce/script.deb.sh | sudo bash

The script will set up your server to use the GitLab maintained repositories. This lets you manage GitLab with the same package management tools you use for your other system packages. Once this is complete, you can install the actual GitLab application with apt:

sudo apt-get install gitlab-ce

If you are not comfortable installing the repository through a piped script, you can find the entire script here.

Step 4. Configure GitLab on Server.

Now start the configuration by using the gitlab-ctl command:

sudo gitlab-ctl reconfigure

Step 5. Accessing Gitlab.

Gitlab will be available on HTTP port 80 by default. Open your favorite browser and navigate to http://yourdomain.com/ or http://server-ip and then login with a “root” user and with initial password “5iveL!fe”. If you are using a firewall, please open port 80 to enable access to the control panel.
install-gitlab
Congratulation’s! You have successfully installed Gitlab. Thanks for using this tutorial for installing Gitlab on Ubuntu 16.04 LTS (Xenial Xerus) system. For additional help or useful information, we recommend you to check the official Gitlab web site.

How To Install SugarCRM on Ubuntu 16.04 LTS

Install SugarCRM on Ubuntu 16

SugarCRM is a popular customer relationship management system that has an open source version, SugarCRM Community Edition, with many devoted Linux users. It provides many functions such as activity management, contacts, accounts, campaigns, web-to-lead forms, dashboards, email clients and marketing, project management, bug tracking, shared calendars etc. that allow maximum management for business and client relationships.

Install SugarCRM on Ubuntu 16.04 LTS

This article assumes you have at least basic knowledge of linux, know how to use the shell, and most importantly, you host your site on your own VPS. The installation is quite simple and assumes you are running in the root account, if not you may need to add ‘sudo’ to the commands to get root privileges. I will show you through the step by step installation SugarCRM on a Ubuntu 16.04 (Xenial Xerus) server.

Step 1. First make sure that all your system packages are up-to-date by running these following apt-get commands in the terminal.

sudo apt-get update
sudo apt-get upgrade

Step 2. Install LAMP (Linux, Apache, MariaDB, PHP) server.

A Ubuntu 16.04 LAMP server is required. If you do not have LAMP installed, you can follow our guide here. Also install all required PHP modules:

apt-get install imagemagick php7.0-curl php7.0-gd php7.0-mbstring php7.0-mysql libapache2-mod-php7.0 php7.0-mcrypt php7.0-bz2 php7.0-zip php7.0-json

You’ll need to also adjust some settings in your php.ini. Open up the file and edit these two variables:

nano /etc/php/7.0/apache2/php.ini

Also, add/modify the following settings:

post_max_size = 32M
upload_max_filesize = 32M
memory_limit = 768M

The required php modules will need to be manually enabled:

phpenmod imap
phpenmod zip
phpenmod mbstring

Step 3. Installing SugarCRM.

First thing to do is to go to SugarCRM’s download page and download the latest stable version of SugarCRM, At the moment of writing this article it is version 6.5.24:

wget https://nchc.dl.sourceforge.net/project/sugarcrm/1 - SugarCRM 6.5.X/SugarCommunityEdition-6.5.X/SugarCE-6.5.24.zip

Unpack the SugarCRM archive to the document root directory on your server:

unzip SugarCE-6.5.24.zip
rm -rf /var/www/html/*
cd SugarCE-Full-6.5.24/
cp -R * /var/www/html/

We will need to change some folders permissions:

chown -R www-data:www-data /var/www/html/

Step 4. Configuring MariaDB for SugarCRM.

By default, MariaDB is not hardened. You can secure MariaDB using the mysql_secure_installation script. you should read and below each steps carefully which will set root password, remove anonymous users, disallow remote root login, and remove the test database and access to secure MariaDB:

mysql_secure_installation

Configure it like this:

- Set root password? [Y/n] y
- Remove anonymous users? [Y/n] y
- Disallow root login remotely? [Y/n] y
- Remove test database and access to it? [Y/n] y
- Reload privilege tables now? [Y/n] y

Next we will need to log in to the MariaDB console and create a database for the SugarCRM. Run the following command:

mysql -u root -p

This will prompt you for a password, so enter your MariaDB root password and hit Enter. Once you are logged in to your database server you need to create a database for SugarCRM installation:

CREATE USER sugar@localhost;
SET PASSWORD FOR 'sugar'@'localhost' = PASSWORD("sugar-password");
GRANT ALL PRIVILEGES ON sugarcrm.* TO 'sugar'@'localhost' IDENTIFIED BY 'sugar-password' WITH GRANT OPTION;
flush privileges;
exit

Step 5. Configuring Apache web server for SugarCRM.

Create a new virtual host directive in Apache. For example, create a new Apache configuration file named ‘sugarcrm.conf’ on your virtual server:

touch /etc/apache2/sites-available/sugarcrm.conf
ln -s /etc/apache2/sites-available/sugarcrm.conf /etc/apache2/sites-enabled/sugarcrm.conf
nano /etc/apache2/sites-available/sugarcrm.conf

Add the following lines:


ServerAdmin [email protected]
DocumentRoot /var/www/html/
ServerName your-domain.com
ServerAlias www.your-domain.com

Options FollowSymLinks
AllowOverride All

ErrorLog /var/log/apache2/your-domain.com-error_log
CustomLog /var/log/apache2/your-domain.com-access_log common

Save and close the file. Restart the apache service for the changes to take effects:

systemctl restart apache2

Step 6. Accessing SugarCRM.

SugarCRM will be available on HTTP port 80 by default. Open your favorite browser and navigate to http://yourdomain.com/ or http://server-ip and complete the required the steps to finish the installation. If you are using a firewall, please open port 80 to enable access to the control panel.

Congratulation’s! You have successfully installed SugarCRM. Thanks for using this tutorial for installing SugarCRM on Ubuntu 16.04 LTS (Xenial Xerus) system. For additional help or useful information, we recommend you to check the official SugarCRM web site.

How To Install TeamViewer on Ubuntu 16.04 LTS

Install TeamViewer on Ubuntu 16

TeamViewer is a proprietary computer software package for remote control, desktop sharing, online meetings, web conferencing and file transfer between computers. Versions are available for the Microsoft Windows, OS X, Desktop Linux, iOS, Android Linux, Windows RT and Windows Phone operating systems. It is also possible to access a machine running TeamViewer with a web browser. While the main focus of the application is remote control of computers, collaboration and presentation features are included.

TeamViewer features:

TeamViewer is available for Microsoft Windows, macOS, Linux, Chrome OS, iOS, Android, Windows RT, Windows Phone 8 and BlackBerry operating systems. It is also possible to access a machine running TeamViewer with a web browser. While the main focus of the application is remote control of computers, collaboration and presentation features are included.

Install TeamViewer on Ubuntu 16.04 LTS

This article assumes you have at least basic knowledge of linux, know how to use the shell, and most importantly, you host your site on your own VPS. The installation is quite simple and assumes you are running in the root account, if not you may need to add ‘sudo’ to the commands to get root privileges. I will show you through the step by step installation TeamViewer on a Ubuntu 16.04 (Xenial Xerus) server.

Step 1. First make sure that all your system packages are up-to-date by running these following apt-get commands in the terminal.

sudo apt-get update
sudo apt-get upgrade

Step 2. Installing TeamViewer.

First, Go to TeamViewer 12 beta download page and download the deb file via your Web browser:

wget https://downloadus2.teamviewer.com/download/version_12x/teamviewer_12.0.71510_i386.deb

Install gdebi command line package installer with the following command:

sudo apt install gdebi-core

Then install the TeamViewer 12 deb package with:

sudo gdebi teamviewer*.deb

Once installed, In order to use TeamViewer on Linux, the TeamViewer remote control daemon must be running. You can check out its status by executing the command below:

systemctl start teamviewerd
systemctl enable teamviewerd
systemctl status teamviewerd

Congratulation’s! You have successfully installed TeamViewer. Thanks for using this tutorial for installing TeamViewer on Ubuntu 16.04 LTS (Xenial Xerus) system. For additional help or useful information, we recommend you to check the official TeamViewer web site.

How To Install Moodle on Ubuntu 16.04 LTS

Install Moodle on Ubuntu 16

Moodle is an Open Source Course Management System (CMS), also known as a Learning Management System (LMS) or a Virtual Learning Environment (VLE). It has become very popular among educators around the world as a tool for creating online dynamic web sites for their students. Moodle brings features include assignment submission, online quizzes, wiki, grading, instant messages, discussion boards, and others. But since it’s a modular software, it can be extended via plugins to add extra functionality.

This article assumes you have at least basic knowledge of linux, know how to use the shell, and most importantly, you host your site on your own VPS. The installation is quite simple and assumes you are running in the root account, if not you may need to add ‘sudo’ to the commands to get root privileges. We will show you through the step by step installation Moodle on a Ubuntu 16.04 (Xenial Xerus) server.
Install Moodle on Ubuntu 16.04 LTS

Step 1. First make sure that all your system packages are up-to-date by running these following apt-get commands in the terminal.

sudo apt-get update
sudo apt-get upgrade
sudo apt-get install git-core

Step 2. Install LAMP (Linux, Apache, MariaDB, PHP) server.

A Ubuntu 16.04 LAMP server is required. If you do not have LAMP installed, you can follow our guide here. Also install all required PHP modules:

apt-get install imagemagick php7.0-curl php7.0-gd php7.0-mbstring php7.0-mysql libapache2-mod-php7.0 php7.0-mcrypt php7.0-bz2 php7.0-zip php7.0-json

Step 3. Installing Moodle.

First thing to do is to go to Moodle’s download page and download the latest stable version of Moodle, At the moment of writing this article it is version 3.2. You can also get the latest package of Moodle using Git. To do so we will be using the below command in ‘/opt’ directory:

cd /opt/
git clone git://git.moodle.org/moodle.git

Change to the newly created Moodle repository that will appear after the cloning process in the main directory /opt:

cd moodle

The different versions of Moodle are stored in branches within this Git repository. This means that multiple versions of the Moodle code exist, with each version being known as a Git “branch.” To retrieve a list of all branches that are available on the remote code source, use:

git branch -a

After fetching the branch list, setup your local repository to track the specific branch you want on the remote repository, in this case MOODLE_32_STABLE:

git branch --track MOODLE_32_STABLE origin/MOODLE_32_STABLE

Finally, Check out the Moodle version specified:

git checkout MOODLE_32_STABLE

Now we will have to place the contents into the document root directory of Apache web server and then give it the right permissions by using the below commands:

cp -R /opt/moodle /var/www/html/
mkdir /var/moodledata
chown -R www-data /var/moodledata
chmod -R 777 /var/moodledata
chmod -R 0755 /var/www/html/moodle

Step 4. Configuring MySQL for Moodle.

By default, MySQL is not hardened. You can secure MySQL using the mysql_secure_installation script. you should read and below each steps carefully which will set root password, remove anonymous users, disallow remote root login, and remove the test database and access to secure MySQL:

mysql_secure_installation

Configure it like this:

- Set root password? [Y/n] y
- Remove anonymous users? [Y/n] y
- Disallow root login remotely? [Y/n] y
- Remove test database and access to it? [Y/n] y
- Reload privilege tables now? [Y/n] y

Next we will need to log in to the MySQL console and create a database for the Moodle. Run the following command:

mysql -u root -p

This will prompt you for a password, so enter your MySQL root password and hit Enter. Once you are logged in to your database server you need to create a database for Moodle installation:

CREATE DATABASE moodle DEFAULT CHARACTER SET utf8 COLLATE utf8_unicode_ci;
GRANT SELECT,INSERT,UPDATE,DELETE,CREATE,CREATE TEMPORARY TABLES,DROP,INDEX,ALTER ON moodle.* TO moodle_user@localhost IDENTIFIED BY 'YoUrPaSsWoRd';
FLUSH PRIVILEGES;
q

In MySQL server setup first we will configure the default storage engine to innodb by opening the ‘my.cnf’ file:

nano /etc/mysql/my.cnf

With the file open, locate the [mysqld] section and find “Basic Settings.” Under the last statement, add the following lines before saving and closing the file:

default_storage_engine = innodb
innodb_file_per_table = 1
innodb_file_format = Barracuda

Now, we can restart MySQL web server so that the changes take place:

systemctl restart mysql.service

Step 5. Configuring Apache web server for Moodle.

Create a new virtual host directive in Apache. For example, create a new Apache configuration file named ‘moodle.conf’ on your virtual server:

sudo a2enmod rewrite
rm /etc/apache2/sites-enabled/000-default.conf
touch /etc/apache2/sites-available/moodle.conf
ln -s /etc/apache2/sites-available/moodle.conf /etc/apache2/sites-enabled/moodle.conf
nano /etc/apache2/sites-available/moodle.conf

Add the following lines:


ServerAdmin [email protected]
DocumentRoot /var/www/html/moodle
ServerName yourdomain.com
ServerAlias www.yourdomain.com

Options Indexes FollowSymLinks MultiViews
AllowOverride All
Order allow,deny
allow from all

ErrorLog /var/log/httpd/yourdomain.com-error_log
CustomLog /var/log/httpd/yourdomain.com-access_log common

Now, we can restart Apache web server so that the changes take place:

systemctl restart apache2.service

Step 6. Accessing Moodle.

Moodle will be available on HTTP port 80 by default. Open your favorite browser and navigate to http://yourdomain.com or http://server-ip.

Step 1: Select language
Step 2: Enter the “Data directory (moodledata) path, in our case it is /var/moodledata
Step 3: Choose database driver, MySQL.
Step 4: Enter the Database settings.

Once Moodle is completely installed on your Ubuntu 16.04, you will need to set up a cron job. Here is a typical cron entry:

* * * * * /usr/bin/php /var/www/html/moodle/admin/cli/cron.php >/dev/null

Congratulation’s! You have successfully installed Moodle. Thanks for using this tutorial for installing Moodle on Ubuntu 16.04 LTS (Xenial Xerus) system. For additional help or useful information, we recommend you to check the official Moodle web site.

You Might Also Like: How To Install LAMP Stack on Ubuntu

How To Install Cacti Monitoring on Ubuntu 16.04 LTS

Install Cacti Monitoring on Ubuntu 16

Cacti is an open-source, web-based network monitoring and graphing tool designed as a front-end application for the open-source, industry-standard data logging tool RRDtool. It is used by IT businesses and stores all of the necessary information about bandwidth, hard disk usage, CPU usage, load average, RAM statistics etc in a MySQL database. Cacti creates graphs and populates them with data. It offers SNMP support, 3rd party templates and plugins and has built in user authentications and user permission features.

Install Cacti Monitoring on Ubuntu 16.04 LTS

This article assumes you have at least basic knowledge of linux, know how to use the shell, and most importantly, you host your site on your own VPS. The installation is quite simple and assumes you are running in the root account, if not you may need to add ‘sudo’ to the commands to get root privileges. I will show you through the step by step installation Cacti Monitoring on a Ubuntu 16.04 (Xenial Xerus) server.

Step 1. First make sure that all your system packages are up-to-date by running these following apt-get commands in the terminal.

sudo apt-get update
sudo apt-get upgrade

Step 2. Install LAMP (Linux, Apache, MariaDB, PHP) server.

A Ubuntu 16.04 LAMP server is required. If you do not have LAMP installed, you can follow our guide here. Cacti only supports MySQL 5.6, whereas the current version in the Ubuntu default repository is MySQL 5.7. In order to install this older version of MYSQL, you will need to add this repository and grab it from there:

nano /etc/apt/sources.list
deb http://archive.ubuntu.com/ubuntu trusty universe
apt-get update

Now install the following packages for Cacti setup on your Ubuntu server with the help of given below command:

apt-get install apache2 mysql-server-5.6 php libapache2-mod-php -y

Start the web server and MySQL server. Set them to automatically start up on server boot:

systemctl start apache2.service
systemctl enable apache2.service
systemctl start mysql.service
systemctl enable mysql.service

Step 3. Installing the Cacti packages.

Install SNMP and SNMP and RRDtools:

apt-get install snmp snmpd rrdtool -y

Now use the following command to install Cacti:

apt-get install cacti cacti-spine -y

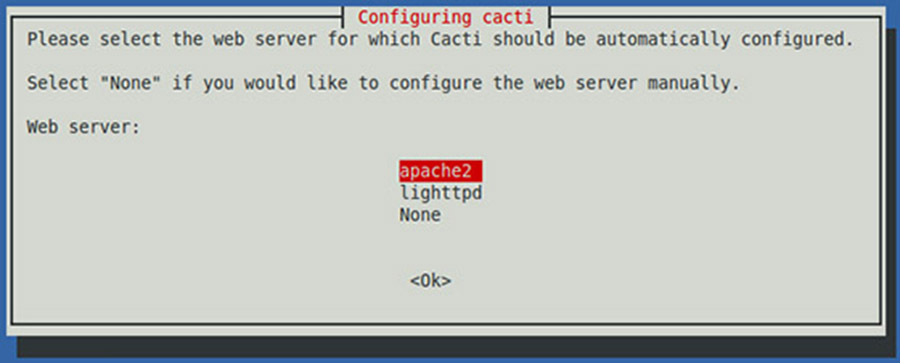
During the installation process you will be prompted to configure Cacti with few options to select from available options. First of all Choose the web server that you wish to use for configure with Cacti like we are using Apache and then press ‘OK’ key to continue:
Install Cacti Monitoring on Ubuntu 16
Now it will ask you for a webserver that you will use it, we choose Apache2 since that’s what we installed in the dependencies.
Install Cacti Monitoring on Ubuntu 16-2
Next it will ask to configure the Cacti database, select Yes
cacti-installation-ubunut-3
Now it will ask for your root password of MySQL/MariaDB database.
cacti-installation-ubunut-4
Once the installation process is complete, you will have to restart all services to reflect the changes made:

systemctl restart apache2.service
systemctl restart mysql.service
systemctl restart snmpd.service

Step 3. Accessing cacti.

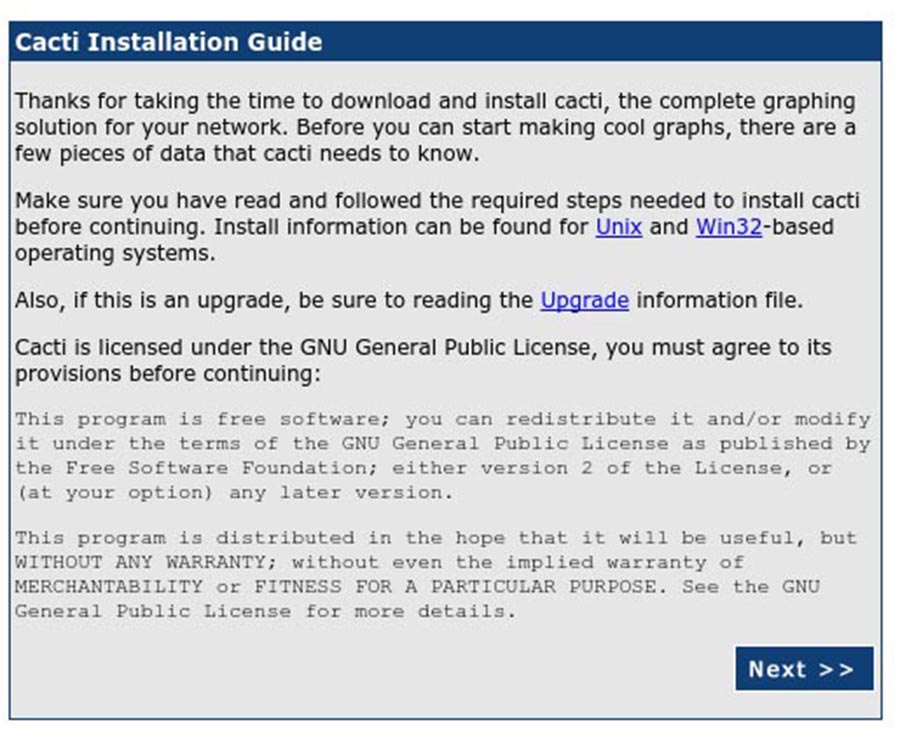
Cacti will be available on HTTP port 80 by default. Open your favorite browser and navigate to http://yourdomain.com/cacti or http://server-ip/cacti and complete the required the steps to finish the installation. You will get the “Cacti Installation Guide” on screen. Click on ‘Next’ button.
Cacti-installing-1
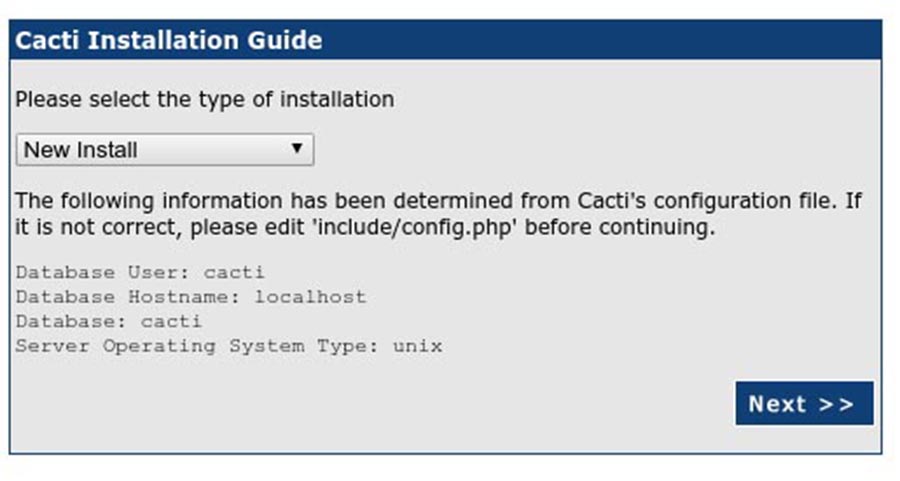
In next screen, you will get drop down button. Because this fresh installation select ‘New Install’ and click ‘Next’ button.
Cacti_installing-2
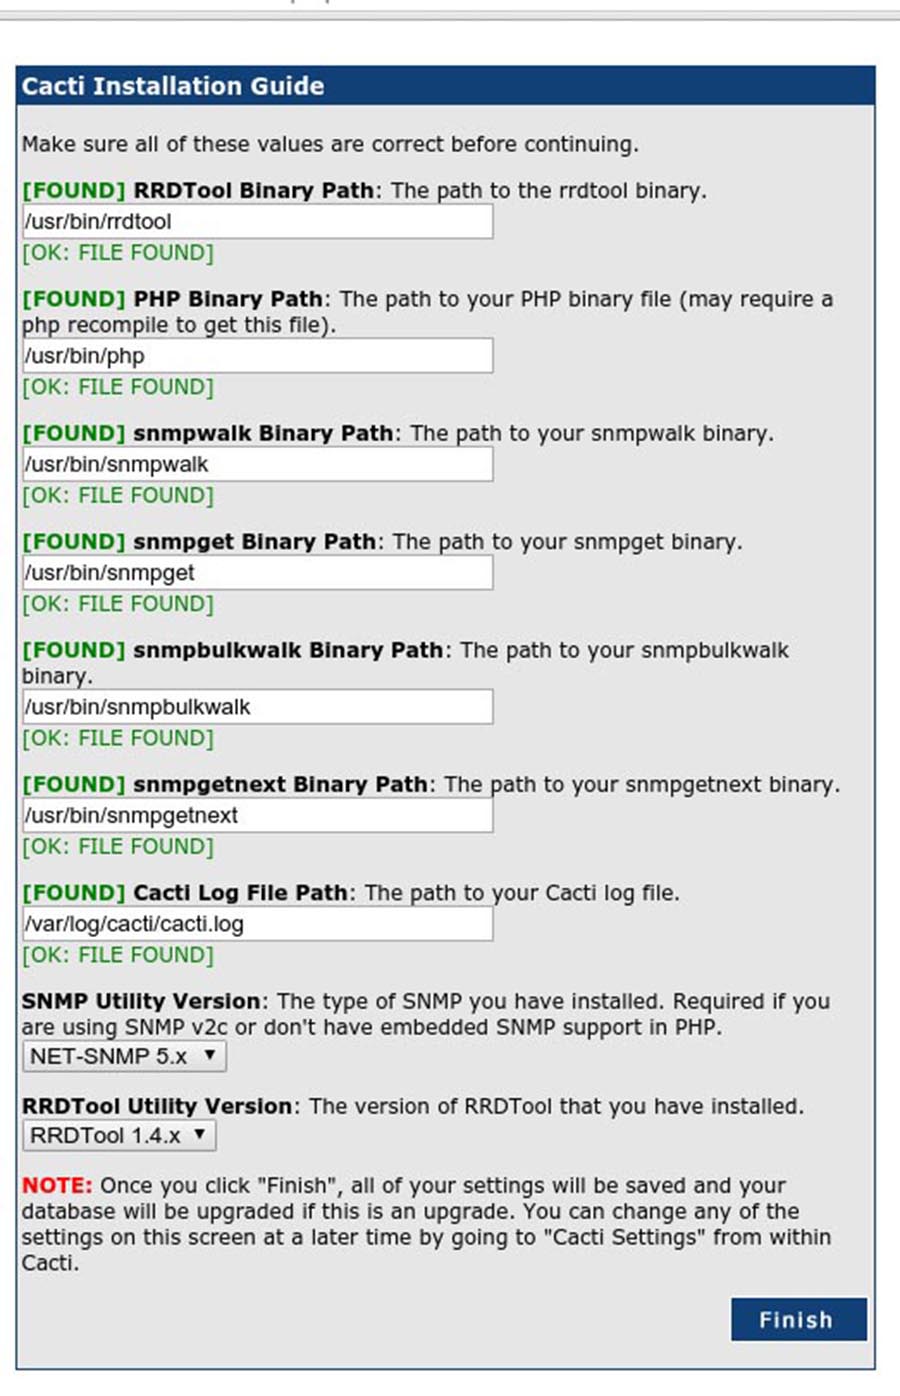
acti will now check for the packages it needs to run properly. Make sure all the checks appear with an “OK” status, and then click Finish.
Cacti_installing-3
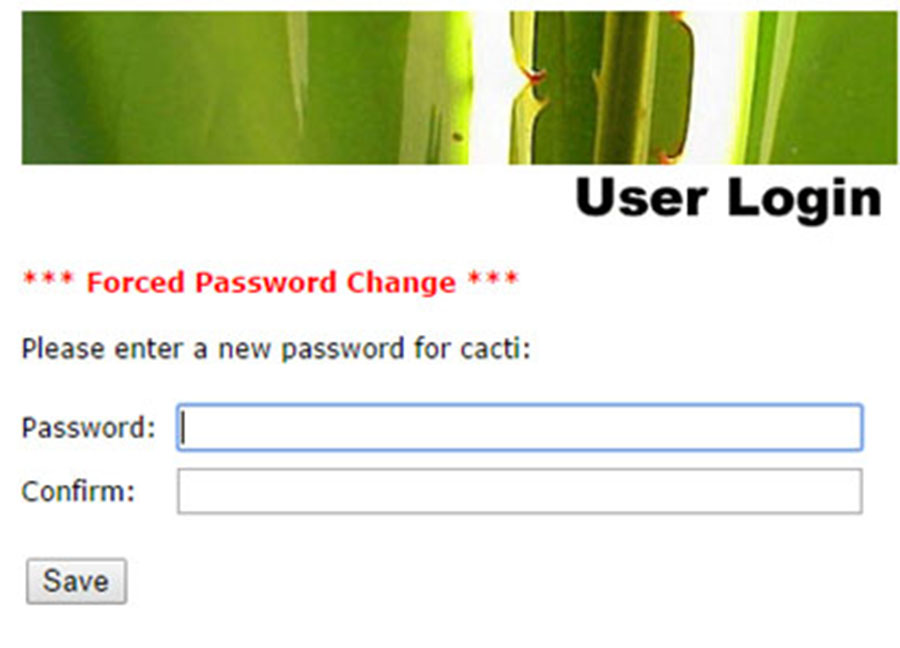
The next page is the login page. The first time you log into Cacti, use admin as username and password
Cacti-installing-4
Congratulation’s! You have successfully installed Cacti. Thanks for using this tutorial for installing Apache Cassandra on Ubuntu 16.04 LTS (Xenial Xerus) system. For additional help or useful information, we recommend you to check the official Cacti Monitoring web site.