How To Install Foxit Reader on Ubuntu 16.04

Install Foxit Reader on Ubuntu 16

Foxit PDF Reader can be used to view, create, edit, organize, sign, scan, and OCR. It can easily export PDF files to office, PDF/A/E/X, and more. Users can collaborate, share, sign, protect, and secure documents using Foxit Reader.

This article assumes you have at least basic knowledge of linux, know how to use the shell, and most importantly, you host your site on your own VPS. The installation is quite simple and assumes you are running in the root account, if not you may need to add ‘sudo’ to the commands to get root privileges. I will show you through the step by step installation Foxit PDF Reader on a Ubuntu 16.04 (Xenial Xerus) server.
Foxit PDF Reader features

Open multiple PDFs at the same time in tabs.
Open password protected PDF files.
View PDF files in single page, continuous, facing, or facing continuous mode.
Support page rotation, text search.
Print PDF documents to physical printers.
Microsoft RMS support.
Annotate PDF support.
Many more.

Install Foxit Reader on Ubuntu 16.04

Step 1. First make sure that all your system packages are up-to-date by running these following apt-get commands in the terminal.

sudo apt-get update
sudo apt-get upgrade

Step 2. Installing Foxit PDF Reader.

You need to download the last stable release of Foxit Reader, choose 64 bits or 32 bits according to your OS architecture:

### 32-Bit ###
wget http://cdn01.foxitsoftware.com/pub/foxit/reader/desktop/linux/2.x/2.1/en_us/FoxitReader2.1.0805_Server_x86_enu_Setup.run.tar.gz
### 64-Bit ###
wget http://cdn01.foxitsoftware.com/pub/foxit/reader/desktop/linux/2.x/2.1/en_us/FoxitReader2.1.0805_Server_x64_enu_Setup.run.tar.gz

Extract the tarball into the current directory:

tar xzvf FoxitReader*.tar.gz

Next, run the following command to make script executable:

sudo chmod a+x FoxitReader*.run

Now is the time to run the script file to install Foxit Reader and wait until fully installed:

./FoxitReader.*.run

To install it in system-wide mode, execute the .run file with root privileges:

sudo ./FoxitReader.*.run

Congratulation’s! You have successfully installed Foxit Reader. Thanks for using this tutorial for installing Foxit PDF Reader on Ubuntu 16.04 LTS (Xenial Xerus) system. For additional help or useful information, we recommend you to check the official Foxit Reader web site.

How To Install Seafile on Ubuntu 16.04 LTS

Install Seafile on Ubuntu 16

Seafile is a open source cloud storage software. It offers file sharing and syncing for individual users and groups, it provides client side encryption and easy access from mobile devices. Also easily integrated with local services such as LDAP and WebDAV or can be deployed using advanced network services and databases like MySQL, SQLite, PostgreSQL, Memcached, Nginx or Apache Web Server.

This article assumes you have at least basic knowledge of linux, know how to use the shell, and most importantly, you host your site on your own VPS. The installation is quite simple and assumes you are running in the root account, if not you may need to add ‘sudo’ to the commands to get root privileges. I will show you through the step by step installation Seafile open source secure cloud storage on a Ubuntu 16.04 (Xenial Xerus) server.
Install Seafile on Ubuntu 16.04 LTS Xenial Xerus

Step 1. First make sure that all your system packages are up-to-date by running these following apt-get commands in the terminal.

sudo apt-get update
sudo apt-get upgrade

Step 2. Install LEMP (Linux, Nginx, MariaDB, PHP) server.

A Ubuntu 16.04 LAMP server is required. If you do not have LEMP installed, you can follow our guide here. Also install all required PHP modules:

apt-get install php7.0-curl php7.0-gd php7.0-mbstring php7.0-mysql libapache2-mod-php7.0 php7.0-mcrypt php7.0-zip

Installing Python modules:

apt-get install python2.7 libpython2.7 python-setuptools python-imaging python-ldap python-mysqldb python-memcache python-urllib3

Step 3. Configure the MariaDB database for Seafile.

By default, MariaDB is not hardened. You can secure MariaDB using the mysql_secure_installation script. You should read and below each steps carefully which will set root password, remove anonymous users, disallow remote root login, and remove the test database and access to secure MariaDB.

mysql_secure_installation

Configure it like this:

- Set root password? [Y/n] y
- Remove anonymous users? [Y/n] y
- Disallow root login remotely? [Y/n] y
- Remove test database and access to it? [Y/n] y
- Reload privilege tables now? [Y/n] y

Next we will need to log in to the MariaDB console and create a database for the Seafile. Run the following command:

mysql -u root -p

This will prompt you for a password, so enter your MariaDB root password and hit Enter. Once you are logged in to your database server you need to create a database for Seafile installation:

MariaDB [(none)]> create database ccnet_db character set = 'utf8'; MariaDB [(none)]> create database seafile_db character set = 'utf8'; MariaDB [(none)]> create database seahub_db character set = 'utf8';
MariaDB [(none)]> create user seacloud@localhost identified by 'password';
MariaDB [(none)]> grant all privileges on ccnet_db.* to seacloud@localhost identified by 'password'; MariaDB [(none)]> grant all privileges on seafile_db.* to seacloud@localhost identified by 'password'; MariaDB [(none)]> grant all privileges on seahub_db.* to seacloud@localhost identified by 'password';
MariaDB [(none)]> flush privileges; MariaDB [(none)]> exit

Step 4. Installing Seafile on Server.

You need to download the last stable release of Seafile:

wget https://bintray.com/artifact/download/seafile-org/seafile/seafile-server_6.0.6_x86-64.tar.gz

Extract the tarball into the current directory:

tar -xvzf seafile-server_6.0.6_x86-64.tar.gz
mv seafile-server_6.0.6 seafile-server

Install Seafile:

Run this script which will create the required databases and directories for the Seafile server and and answer all questions using the following configuration options, after the script verifies the existence of all Python required modules:

./setup-seafile-mysql.sh

After Seafile server successfully installs, it will generate some useful information such as what ports needs to be open on your Firewall to allow external connection and what scripts to handle in order to start the server.

Step 5. Starting the Seafile services.

Create startup script for the Seafile server like this:

nano /lib/systemd/system/seafile.service

Add the following lines:

[Unit]
Description=Seafile Server
After=network.target mariadb.service[Service]
Type=oneshot
ExecStart=/home/seafile/seafile-server/seafile.sh start
ExecStop=/home/seafile/seafile-server/seafile.sh stop
RemainAfterExit=yes
User=seafile
Group=seafile[Install]
WantedBy=multi-user.target

Save the file and create a new service file for seahub:

[Unit]
Description=Seafile Hub
After=network.target seafile.target[Service]
Type=oneshot
ExecStart=/home/seafile/seafile-server/seahub.sh start-fastcgi
ExecStop=/home/seafile/seafile-server/seahub.sh stop
RemainAfterExit=yes
User=seafile
Group=seafile[Install]
WantedBy=multi-user.target

Now try using the service and command to start a new Seafile server instance:

systemctl daemon-reload 
systemctl start seafile
systemctl start seahub

Step 6. Configuring Nginx web server for Seafile.

*Note: A static IP address 192.168.77.21 configure on your server.

First, create a new virtual host file with name seafile.conf:

nano /etc/nginx/sites-available/seafile.conf

Add the following lines:

server {
    listen 80;
    server_name 192.168.77.21;proxy_set_header X-Forwarded-For $remote_addr;# Reverse proxy for seafile
    location / {
        fastcgi_pass    127.0.0.1:8000;
        fastcgi_param   SCRIPT_FILENAME     $document_root$fastcgi_script_name;
        fastcgi_param   PATH_INFO           $fastcgi_script_name;fastcgi_param    SERVER_PROTOCOL        $server_protocol;
        fastcgi_param   QUERY_STRING        $query_string;
        fastcgi_param   REQUEST_METHOD      $request_method;
        fastcgi_param   CONTENT_TYPE        $content_type;
        fastcgi_param   CONTENT_LENGTH      $content_length;
        fastcgi_param   SERVER_ADDR         $server_addr;
        fastcgi_param   SERVER_PORT         $server_port;
        fastcgi_param   SERVER_NAME         $server_name;
        fastcgi_param   REMOTE_ADDR         $remote_addr;access_log      /var/log/nginx/seahub.access.log;
        error_log       /var/log/nginx/seahub.error.log;
        fastcgi_read_timeout 36000;
    }# Reverse Proxy for seahub
    location /seafhttp {
        rewrite ^/seafhttp(.*)$ $1 break;
        proxy_pass http://127.0.0.1:8082;
        client_max_body_size 0;
        proxy_connect_timeout  36000s;
        proxy_read_timeout  36000s;
        proxy_send_timeout  36000s;
        send_timeout  36000s;
    }#CHANGE THIS PATH WITH YOUR OWN DIRECTORY
    location /media {
        root /home/seafile/seafile-server/seahub;
    }
}

Save the file and restart nginx:

systemctl restart nginx

Step 7. Accessing Seafile.

Seafile cloud storage will be available on HTTP port 80 by default. Open your favorite browser and navigate to http://yourdomain.com or http://192.168.77.21. Enter the admin email id and password to login which you have created at the time of installation. If you are using a firewall, please open port 8000 to enable access to the control panel.
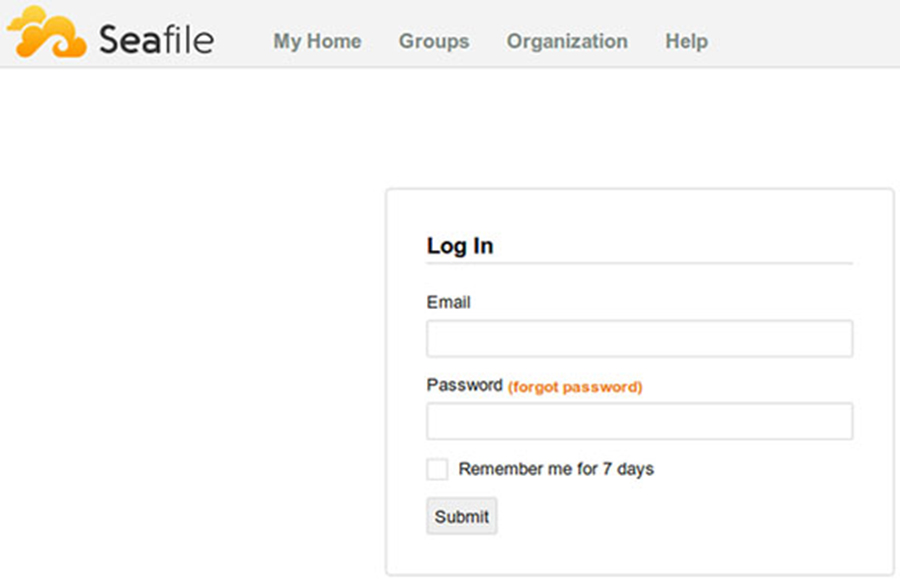
seafile-web-interface-login

Congratulation’s! You have successfully installed Seafile. Thanks for using this tutorial for installing Seafile open source secure cloud storage on Ubuntu 16.04 LTS (Xenial Xerus) system. For additional help or useful information, we recommend you to check the official Seafile web site.

How To Install Ubuntu 17.04 Server Zesty Zapus

Install Ubuntu 17.04 Server

Ubuntu 17.04 Zesty Zapus is the first release of the year 2017 for one of the most popular Linux distribution in the world. Let’s learn how to install it in 10 easy steps.

This article assumes you have at least basic knowledge of Linux, know how to use the shell, and most importantly, you host your site on your own VPS. The installation is quite simple and assumes you are running in the root account, if not you may need to add ‘sudo’ to the commands to get root privileges. I will show you through the step by step installation ubuntu 17.04 server Zesty Zapus.
Install Ubuntu 17.04 Server Zesty Zapus

Step 1. First, get the mini.iso image for your machine.

Step 2. Insert your Ubuntu install CD into your system and boot from it. When you install the OS in a virtual machine like I do it here, then you should be able to select the downloaded ISO file as source for the CD/DVD drive in VMWare and Virtualbox without burning it on CD first.

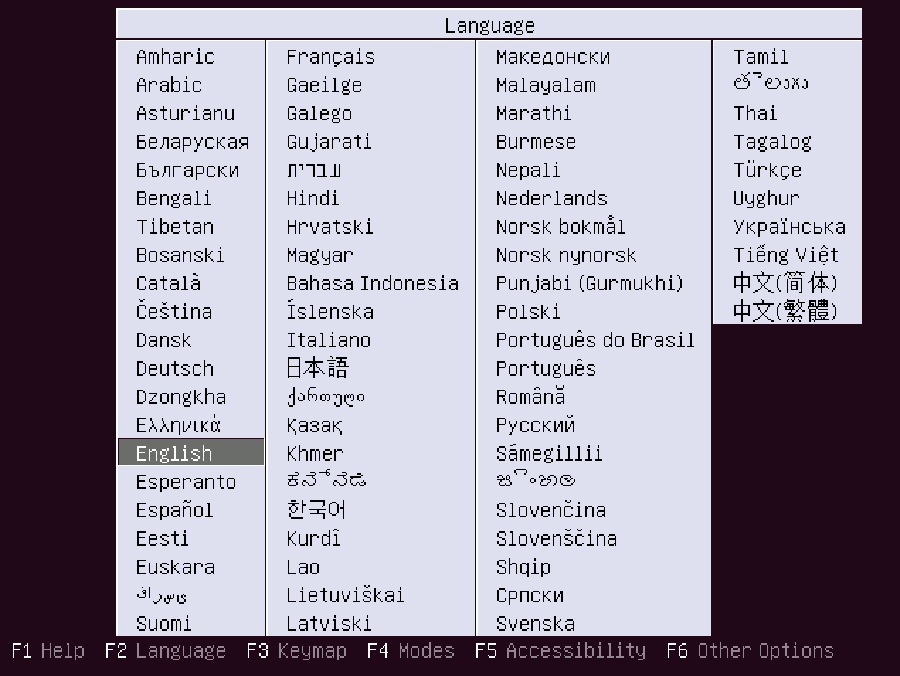
Step 3. The first screen will show the language selector. In this case, we’ll choose English.

install-ubuntu-17-04-server
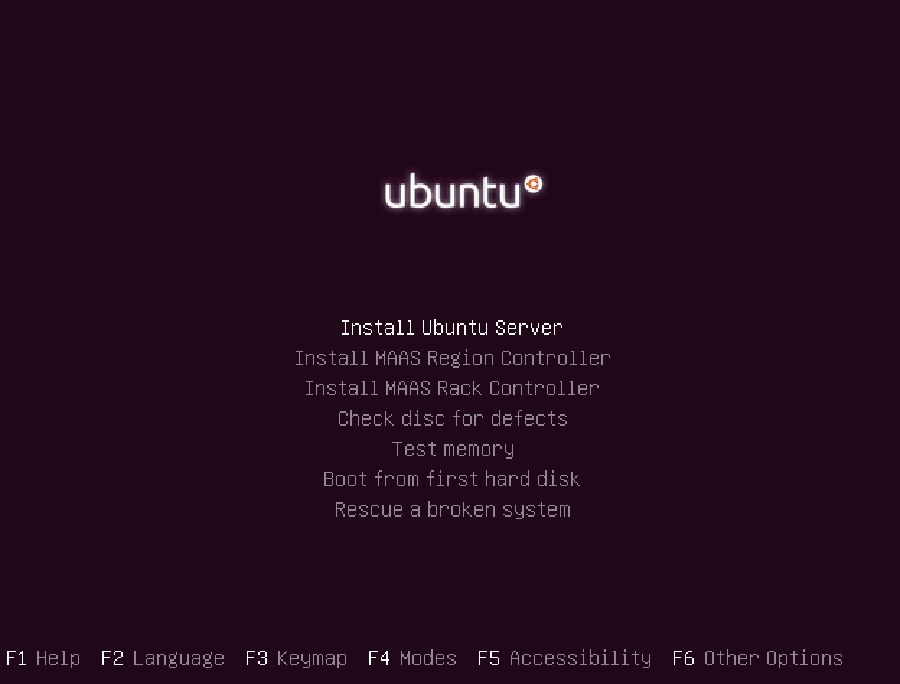
Step 4. Then choose the option Install Ubuntu Server.
install-ubuntu-17-04-server-1
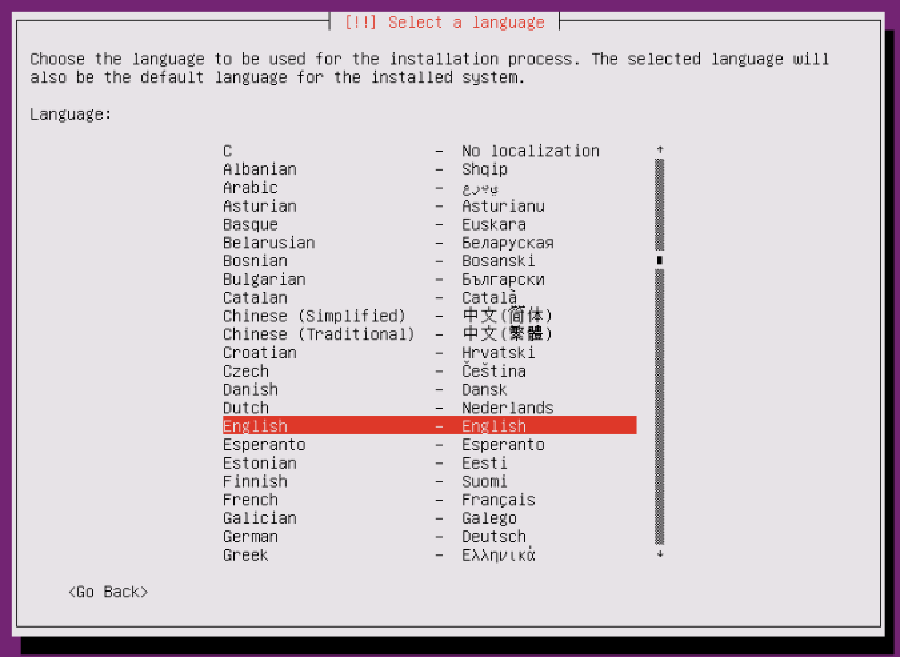
Step 5. Select your language again, we have to specify the language that will be used during the installation process. We’ll continue using English.
install-ubuntu-17-04-server-2
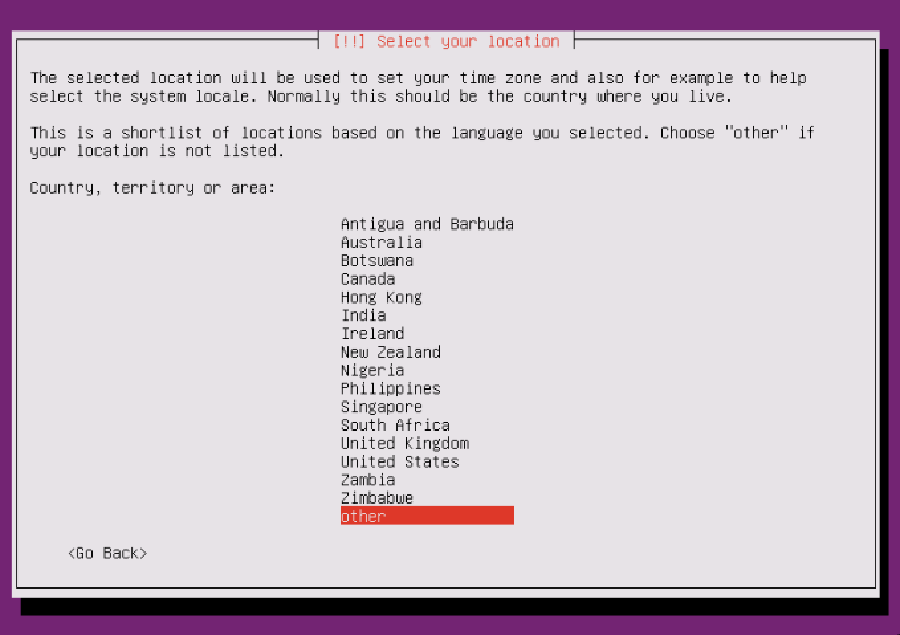
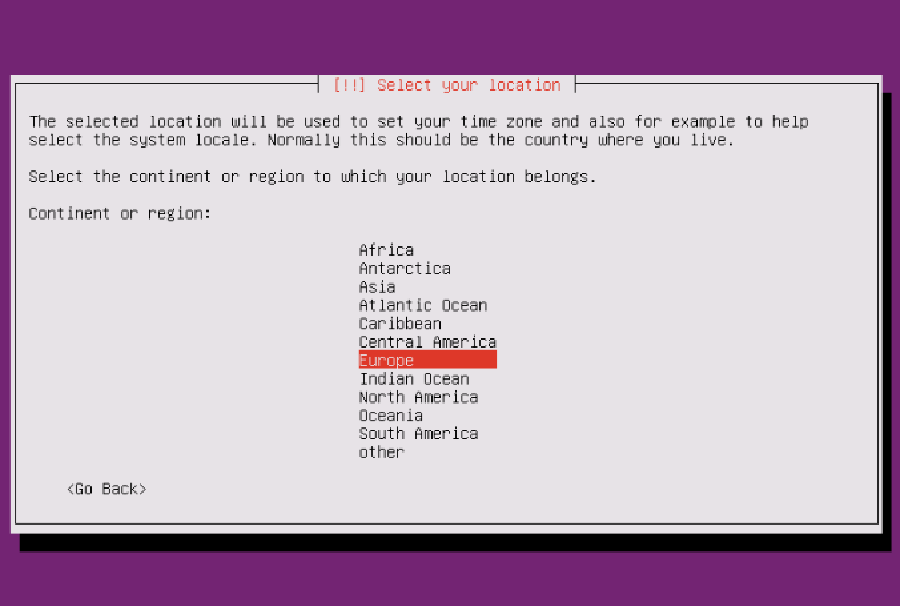
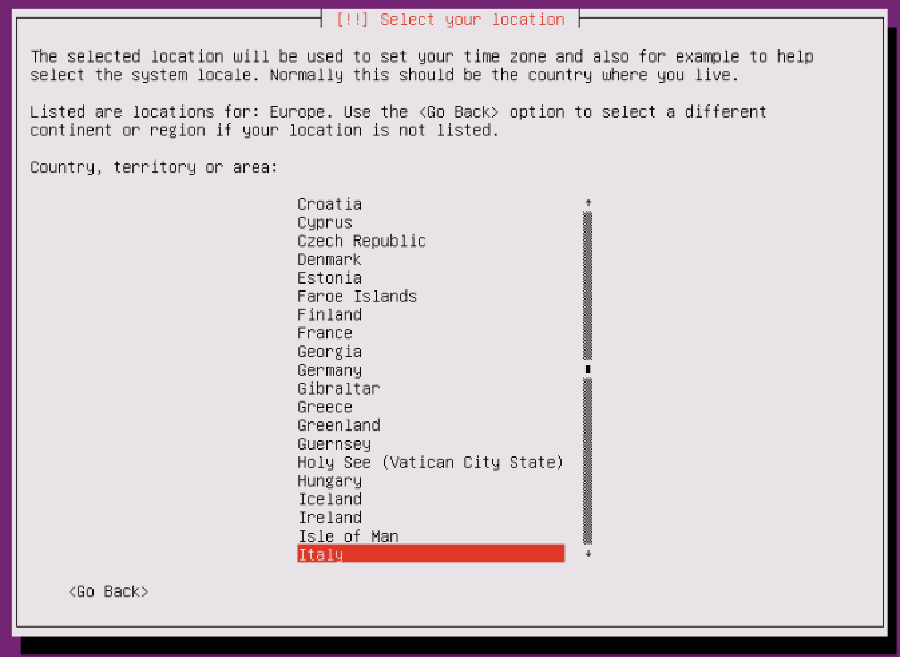
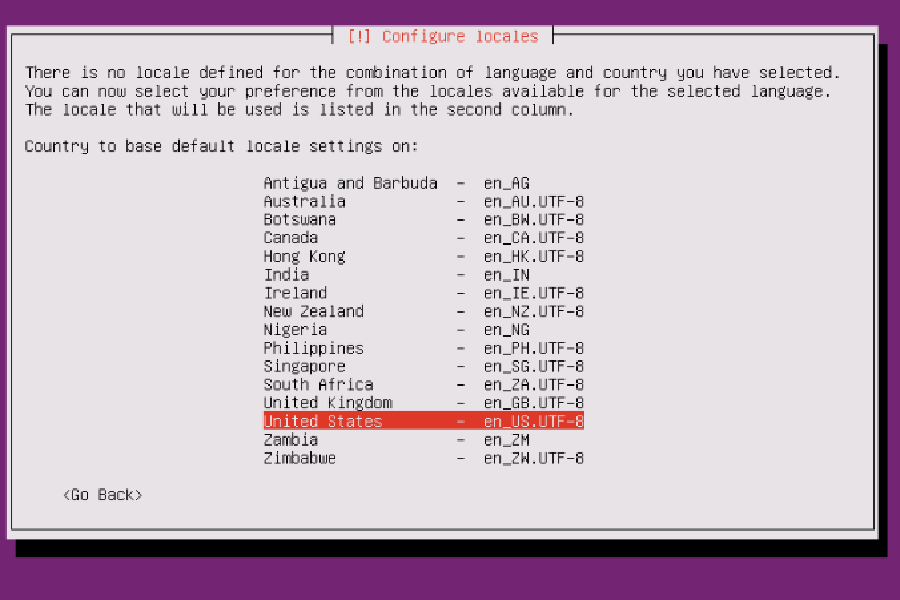
Step 6. Then choose your location. We need to tell Ubuntu where we are located. In our case, we’ll select other/Europe/Italy.
install-ubuntu-17-04-server-3
install-ubuntu-17-04-server-4install-ubuntu-17-04-server-5
install-ubuntu-17-04-server-6

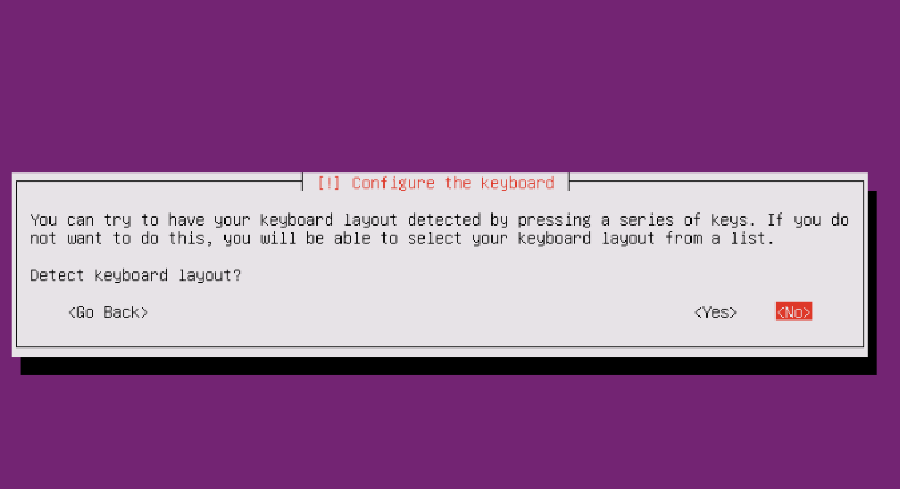
Step 7. Choose a keyboard layout. First of all, the installer will ask if it can detect the layout. We’ll select No here.
install-ubuntu-17-04-server-7
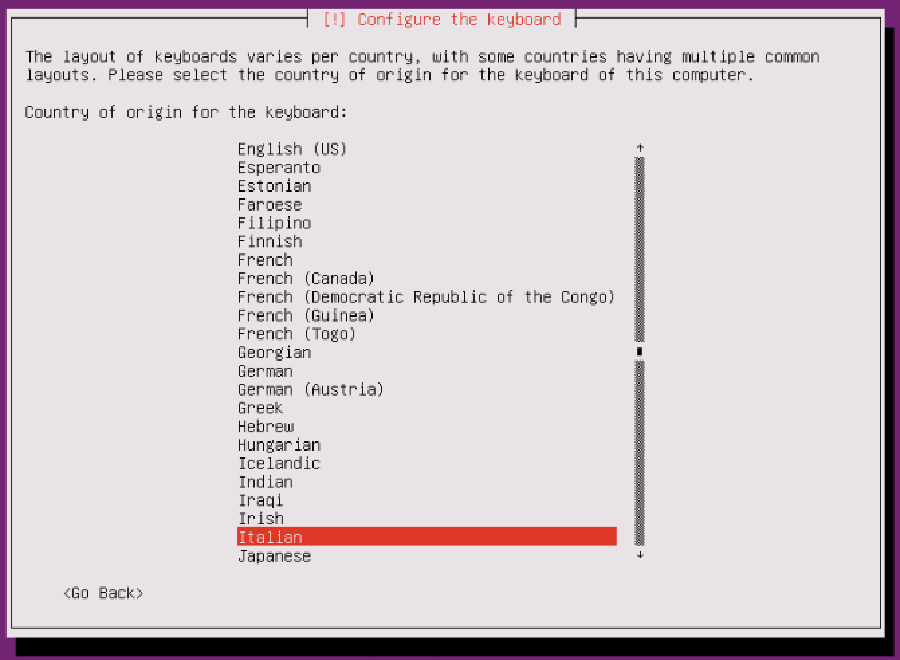
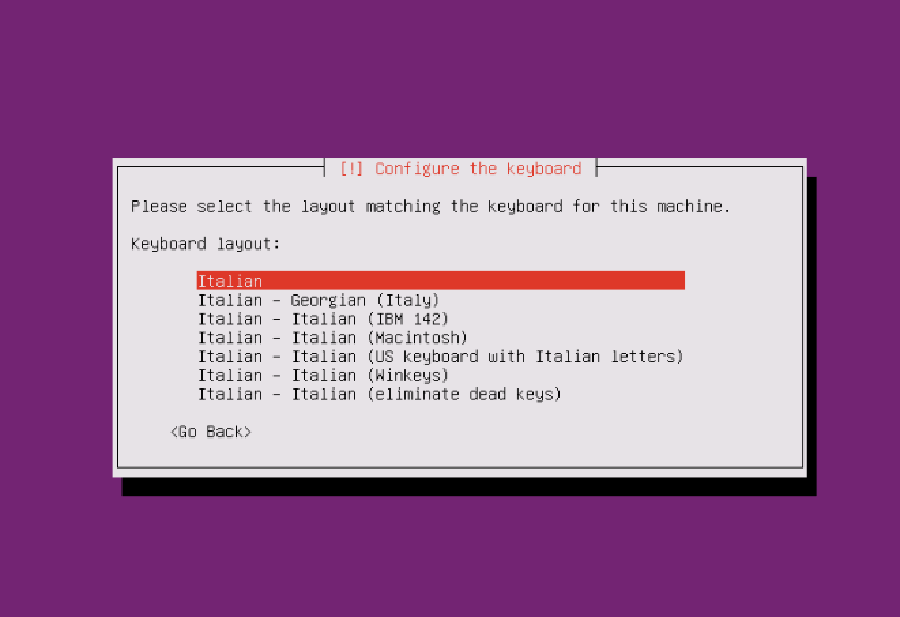
Next step, we’ll choose the Italian layout:
install-ubuntu-17-04-server-8
install-ubuntu-17-04-server-9
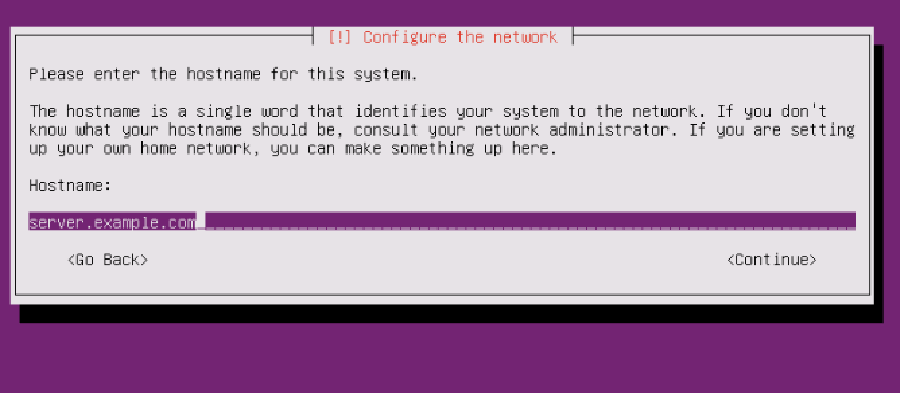
Step 8. Enter the hostname of the system. We’ll use server.example.com.
install-ubuntu-17-04-server-10
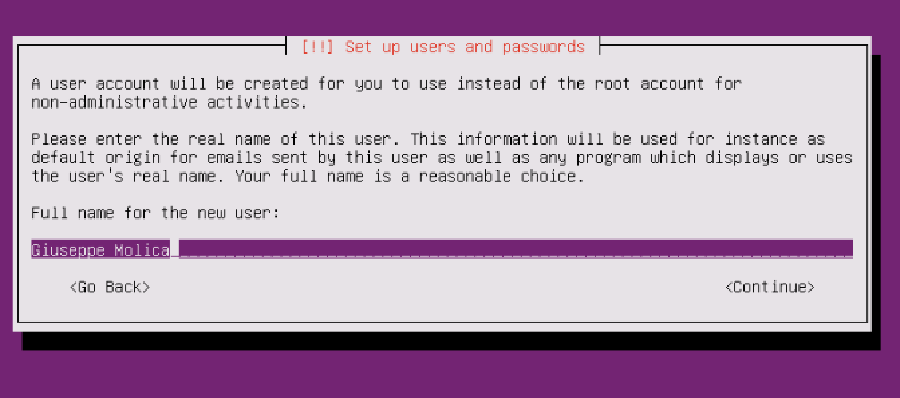
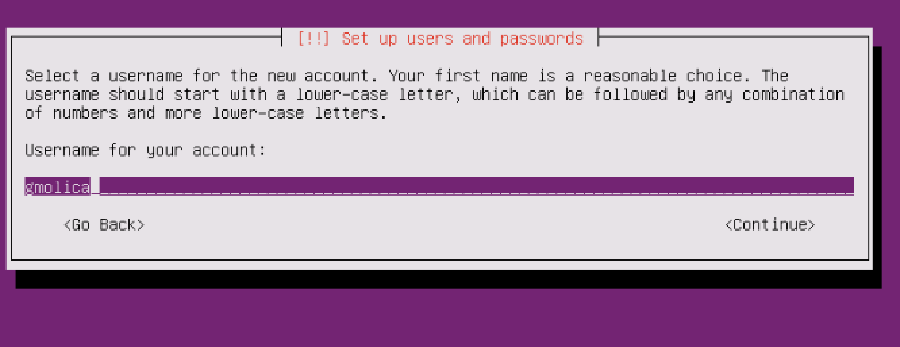
Step 9. The next step is to create a new user account. You’ll need to fill in the forms with your data. Ubuntu does not let you log in as root user directly. Therefore, we create a new system user here for the initial login.
install-ubuntu-17-04-server-11
install-ubuntu-17-04-server-12
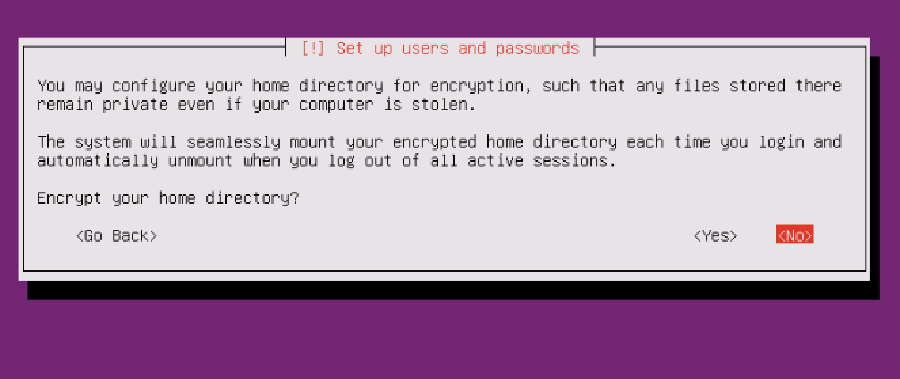
I don’t need an encrypted private directory, so I choose No here:
install-ubuntu-17-04-server-13
Step 10. Please check if the installer detected your time zone correctly. If so, select Yes, otherwise No.

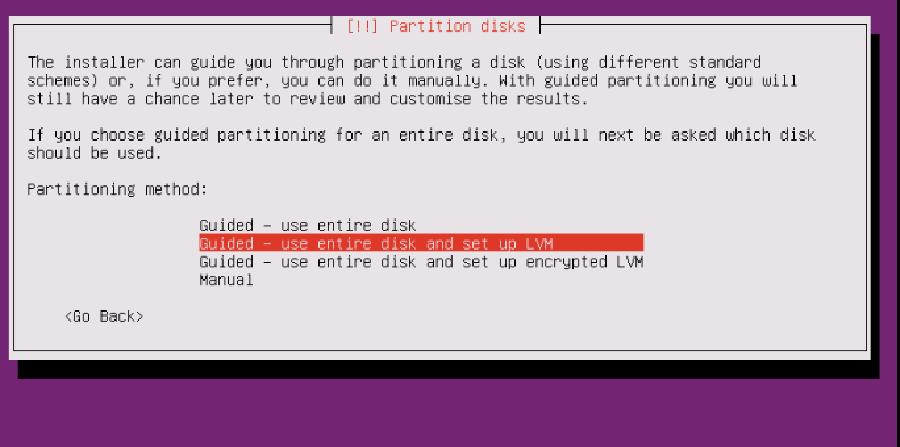
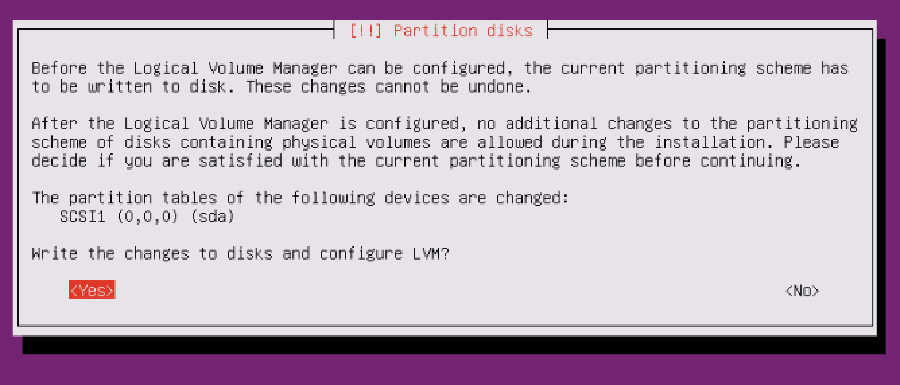
Step 11. Now you have to partition your hard disk. For simplicity’s sake I select Guided – use entire disk and set up LVM, this will create one volume group with two logical volumes, one for the / file system and another one for swap.
install-ubuntu-17-04-server-14
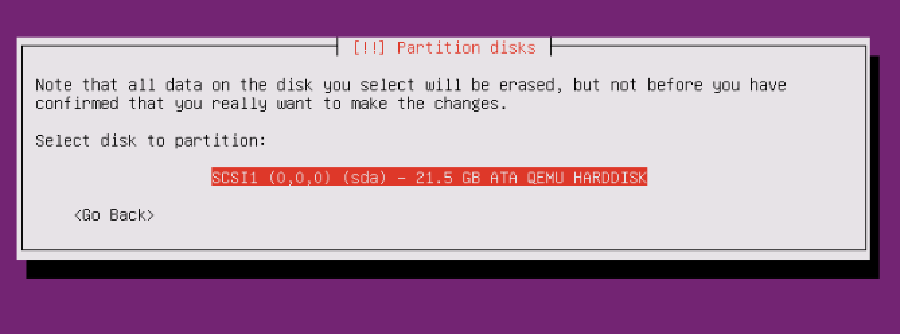
Select the disk that will be partitioned:
install-ubuntu-17-04-server-15

install-ubuntu-17-04-server-16
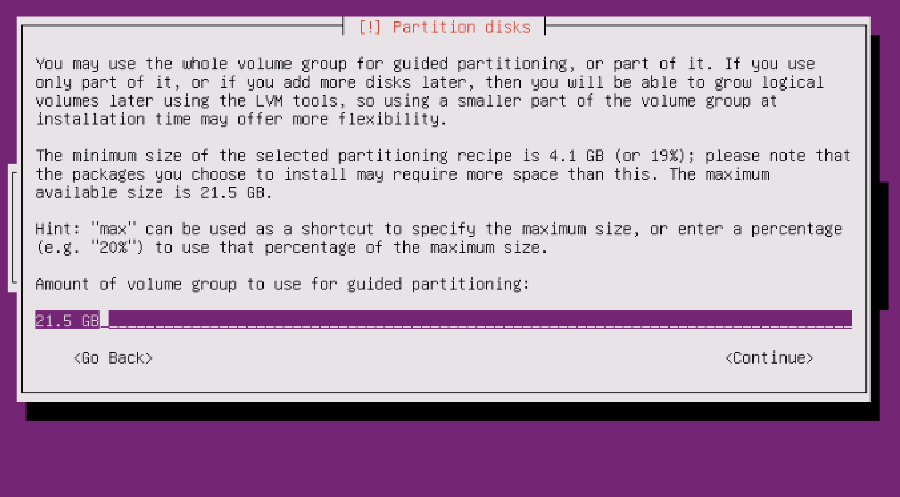
Select the ‘amount of volume group’. Of course, there are different options here, but we’ll keep it easy and choose the maximum size:
install-ubuntu-17-04-server-17
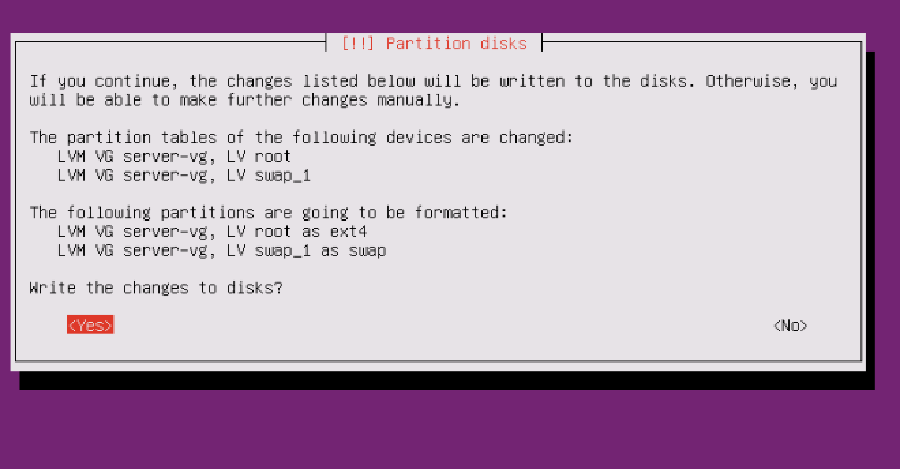
Check one last time and then allow the installer to write changes to disk:
install-ubuntu-17-04-server-18
install-ubuntu-17-04-server-19
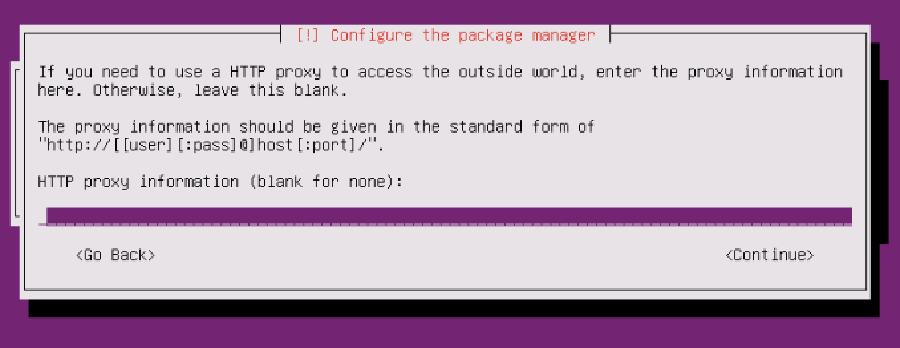
Step 12. Now the package manager “apt” gets configured. Leave the HTTP proxy line empty unless you’re using a proxy server to connect to the Internet:
install-ubuntu-17-04-server-20
install-ubuntu-17-04-server-21
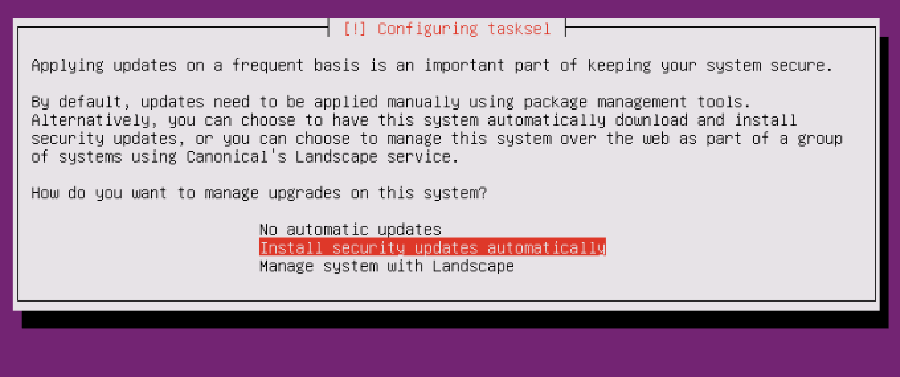
Step 13. Configure updates, It is possible to install security updates automatically, or choose to do everything manually. I like to update my servers automatically.
install-ubuntu-17-04-server-22
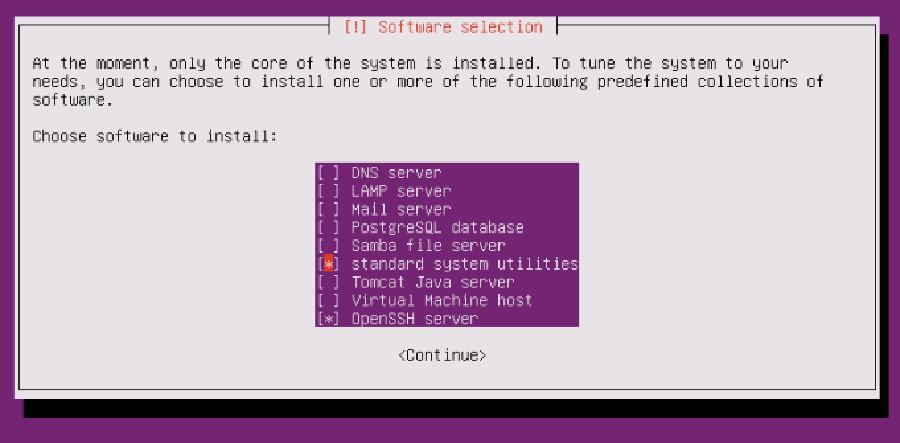
This tutorial is about a basic server, so we will just select standard system utilities and OpenSSH server:
install-ubuntu-17-04-server-23
install-ubuntu-17-04-server-24
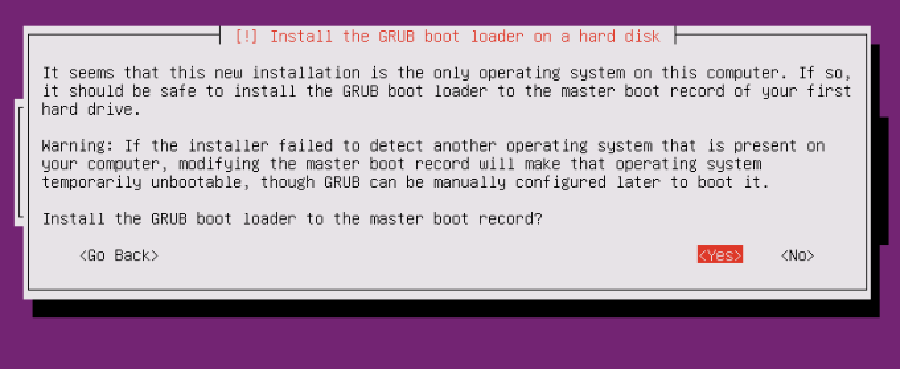
Step 14. Installing the boot loader
install-ubuntu-17-04-server-25
Select Yes when you are asked Install the GRUB boot loader to the master boot record?:

install-ubuntu-17-04-server-26
Step 15. The installer now finished the Ubuntu installation.

At the end the installer will ask you to remove the installation media. Select Continue and your machine will reboot:
install-ubuntu-17-04-server-27
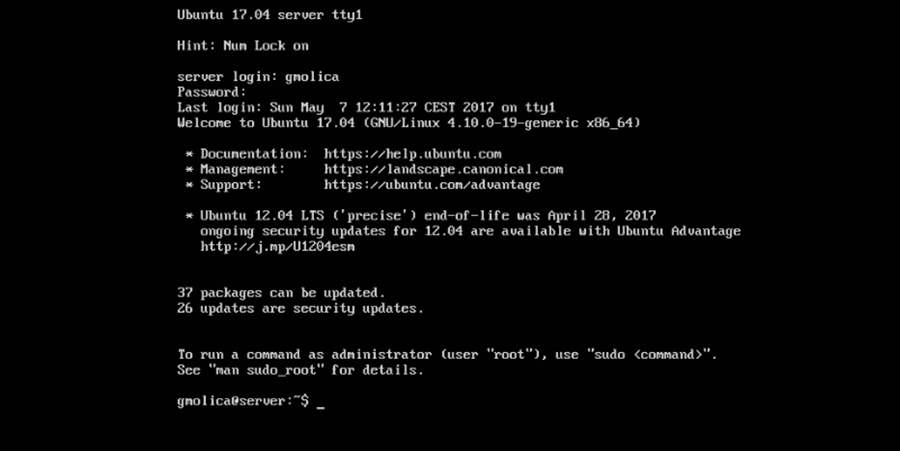
Finally, select continue to reboot the machine after the installation. When you restart, your computer will prompt you for a username and password:
install-ubuntu-17-04-server-28

Congratulation’s! You have successfully installed Ubuntu 17.04. Thanks for using this tutorial for installing Ubuntu 17.04 Server Zesty Zapus system. For additional help or useful information, we recommend you to check the official Ubuntu web site.

How To Install Open Visual Traceroute on Ubuntu 16.04 LTS

Install Open Visual Traceroute on Ubuntu 16

Open visual traceroute is a free and open-source graphical traceroute tool, available for Linux, Mac OS X and Windows and licensed under LGPL v3.. It can also perform packet sniffer and Whois lookup. Data is presented in a 3D map which can be exported to an image file and text file. The gantt view is useful to analyze network bottlenecks.

This article assumes you have at least basic knowledge of Linux, know how to use the shell, and most importantly, you host your site on your own VPS. The installation is quite simple and assumes you are running in the root account, if not you may need to add ‘sudo’ to the commands to get root privileges. I will show you through the step by step installation Open Visual Traceroute on Ubuntu 16.04 Xenial Xerus server.
Install Open Visual Traceroute on Ubuntu 16.04 LTS

Step 1. First, make sure that all your system packages are up-to-date by running these following apt-get commands in the terminal.

sudo apt-get update
sudo apt-get upgrade
sudo apt-get install gdebi

Step 2. Installing Oracle Java 8 on Ubuntu.

Before starting, Oracle Java is required to run Open Visual Traceroute. By default Oracle JDK 8 is not available in Ubuntu repository so you will need to add Webupd8 team PPA repository to your system:

add-apt-repository ppa:webupd8team/java
apt-get update
apt-get install java-common oracle-java8-installer

Step 3. Installing Open Visual Traceroute.

First thing to do is to go to Open Visual Traceroute’s download page and download the latest stable version of Open Visual Traceroute, At the moment of writing this article it is version 1.6.5:

### 32-bits ###
wget http://heanet.dl.sourceforge.net/project/openvisualtrace/1.6.5/ovtr_1.6.5-1_i386.deb
### 64-bits ###
wget https://sourceforge.net/projects/openvisualtrace/files/1.6.5/ovtr_1.6.5-1_amd64.deb

Once the download is completed, run the following command to install Open Visual Traceroute:

sudo dpkg -i ovtr_*.deb

Once installed, next you can start Open Visual Traceroute by searching for it Unity Dash. If the app icon doesn’t show up, try logging out and logging back in.

Congratulations! You have successfully installed open visual traceroute. Thanks for using this tutorial for installing Open visual traceroute in Ubuntu 16.04 Xenial Xerus systems. For additional help or useful information, we recommend you to check the official Open Visual Traceroute web site.

How To Install Vesta Control Panel on Ubuntu 16.04 LTS

Install Vesta Control Panel on Ubuntu 16

KDE is a well-known desktop environment for the Unix-Like systems designed for users who wants to have a nice desktop environment for their machines, It is one of the most used desktop interfaces out there.

This article assumes you have at least basic knowledge of Linux, know how to use the shell, and most importantly, you host your site on your own VPS. The installation is quite simple and assumes you are running in the root account, if not you may need to add ‘sudo’ to the commands to get root privileges. I will show you through the step by step installation Vesta Control Panel on a Ubuntu 16.04 (Xenial Xerus) server.
Install Vesta Control Panel on Ubuntu 16.04 LTS

Step 1. First make sure that all your system packages are up-to-date by running these following apt-get commands in the terminal.

sudo apt-get update
sudo apt-get upgrade

Step 2. Installing Vesta Control Panel.

Download the Vesta Control panel install script with the following command:

curl -O http://vestacp.com/pub/vst-install.sh
bash vst-install.sh

In additon, you can customize the installation using the advanced install settings at https://vestacp.com/install/ and generate install command to install nginx, php-fpm, proftpd, exim, dovecot, spamassassin, named, iptables, MySQL and use file system quota:

bash vst-install.sh --nginx yes --phpfpm yes --apache no --named yes --remi no --vsftpd no --proftpd yes --iptables yes --fail2ban no --quota yes --exim yes --dovecot yes --spamassassin yes --clamav no --mysql yes --postgresql no --hostname your-domain.com --email [email protected] --password Y0ur_PaSSwD

If everything is OK, you should receive an output like this:

Vesta Control Panel

Following software will be installed on your system:
   - Nginx Web Server
   - PHP-FPM Application Server
   - Bind DNS Server
   - Exim mail server + Antispam
   - Dovecot POP3/IMAP Server
   - MySQL Database Server
   - ProFTPD FTP Server
   - Iptables Firewall

Would you like to continue [y/n]:

Once the installation is complete, you will get a screen that has the control panel login:

Congratulations, you have just successfully installed Vesta Control Panel

    https://your_server_IP:8083
    username: admin
    password: Y0ur_PaSSwD

Step 4. Access Vesta Control Panel.

Once the installer finishes installing, it will show you the url, Username and Password. Just open that url in web browser and login using the username and password.

https://ip.add.re.ss:8083/

Congratulation’s! You have successfully installed Vesta CP. Thanks for using this tutorial for installing Vesta Control Panel on Ubuntu 16.04 LTS (Xenial Xerus) system. For additional help or useful information, we recommend you to check the official Vesta Control Panel web site.
How To Install Caddy Web Server on Ubuntu 16.04 LTS

Install Caddy Web Server on Ubuntu 16

Caddy is a modern, general-purpose, multi-platform web server which supports Virtual hosting, HTTP/2, IPv6, Markdown, WebSockets, FastCGI, automatic HTTPS via Let’s Encrypt, templates and more.

This article assumes you have at least basic knowledge of Linux, know how to use the shell, and most importantly, you host your site on your own VPS. The installation is quite simple and assumes you are running in the root account, if not you may need to add ‘sudo’ to the commands to get root privileges. I will show you through the step by step installation Caddy Web Server on a Ubuntu 16.04 Xenial Xerus server.

Install Caddy Web Server on Ubuntu 16.04 LTS

Step 1. First make sure that all your system packages are up-to-date by running these following apt-get commands in the terminal.

sudo apt-get update
sudo apt-get upgrade

Step 2. Installing Caddy Web Server.

Install Caddy is quick and easy with run the following command:

curl https://getcaddy.com | bash

Once the installation is completed, we need to add the cap_net_bind_servicecapability to the Caddy binary:

sudo setcap cap_net_bind_service=+ep /usr/local/bin/caddy

Step 3. Setting Up Necessary Directories.

Next, create the directories where we will store the Caddy configuration file Caddyfile and SSL certificates:

sudo mkdir /etc/caddy
sudo chown -R root:www-data /etc/caddy
sudo mkdir /etc/ssl/caddy
sudo chown -R www-data:root /etc/ssl/caddy
sudo chmod 0770 /etc/ssl/caddy
sudo touch /etc/caddy/Caddyfile
sudo mkdir /var/www
sudo chown www-data: /var/www

Step 4. Installing Caddy as a System Service.

We also need to create a new SystemD configuration script:

nano /lib/systemd/system/caddy.service

Add following line:

[Unit]
Description=Caddy HTTP/2 web server
Documentation=https://caddyserver.com/docs
After=network-online.target
Wants=network-online.target

[Service]
Restart=on-failure
StartLimitInterval=86400
StartLimitBurst=5

User=www-data
Group=www-data
; Letsencrypt-issued certificates will be written to this directory.
Environment=CADDYPATH=/etc/ssl/caddy

ExecStart=/usr/local/bin/caddy -log stdout -agree=true -conf=/etc/caddy/Caddyfile -root=/var/tmp
ExecReload=/bin/kill -USR1 $MAINPID

LimitNOFILE=1048576
LimitNPROC=64

PrivateTmp=true
PrivateDevices=true
ProtectHome=true
ProtectSystem=full
ReadWriteDirectories=/etc/ssl/caddy

; The following additional security directives only work with systemd v229 or later.
; They further retrict privileges that can be gained by caddy. Uncomment if you like.
; Note that you may have to add capabilities required by any plugins in use.
;CapabilityBoundingSet=CAP_NET_BIND_SERVICE
;AmbientCapabilities=CAP_NET_BIND_SERVICE
;NoNewPrivileges=true
[Install]
WantedBy=multi-user.target

Execute the following commands to enable Caddy to run on boot:

systemctl enable caddy.service
systemctl restart caddy.service

Step 5. Creating Test Web Page and a Caddyfile.

For testing purposes, we will create a test HTML file:

mkdir -p /var/www/wpcademy.com
echo "Caddy" > /var/www/wpcademy.com/index.html
chown -R www-data: /var/www/my-domain.com

Next, add our domain to the Caddy configuration file:

nano /etc/caddy/Caddyfile

Add following line:

my-domain.com {
    root /var/www/wpcademy.com
}

Save the file and exit the editor. To apply the changes, restart Caddy:

systemctl restart caddy.service

Now, with a web browser, just go to https://wpcademy.com, and you will see our test page!

Congratulation’s! You have successfully installed Caddy. Thanks for using this tutorial for installing Caddy web server in Ubuntu 16.04 Xenial Xerus system. For additional help or useful information, we recommend you to check the official Caddy web server web site.

How To Install OpenShot Video Editor on Ubuntu 16.04 LTS

Install OpenShot Video Editor on Ubuntu 16

OpenShot is a free, open-source video editor that allows you to take videos, photos, and music files and create a movie you have always dreamed of. You can easily add sub-titles, transitions, and effects, and then export your film to DVD, YouTube, Vimeo, Xbox 360, and many other formats.

This article assumes you have at least basic knowledge of Linux, know how to use the shell, and most importantly, you host your site on your own VPS. The installation is quite simple and assumes you are running in the root account, if not you may need to add ‘sudo’ to the commands to get root privileges. I will show you through the step by step installation OpenShot video editor on Ubuntu 16.04 Xenial Xerus server.

Features OpenShot Video Editor

Transform Tool – A new transform tool, which allows real-time transformations in the video preview window.
Zooming Improvements – Zooming in and out of the timeline, in order to increase precision of your edits, has been greatly improved. When zooming the timeline, it now centers on your mouse position, similar to image editing applications.
Razor Tool – Click on the Razor toolbar button to switch to razor mode. Now click on any clip or transition to quickly cut them (holding CTRL and SHIFT modify the razor to only keep the left or right side). Alternatively, you can cut a clip at the Playhead position by right clicking and choosing “Slice”, by using CTRL+K, or by grabbing the edge of the clip and dragging.
Improved Title Editors – Both editors now display a grid of thumbnails, to make finding the right title easier. Save dialogs are no longer used, and instead title files are saved directly into your project folder. New “Edit Title” and “Duplicate Title” menus have been added, to assist in quickly making changes to titles.
New Preview Window – Previewing files now have its own dedicated video player, which allows for multiple video preview windows at the same time. Also, audio files render a waveform by default. The speed of previewing files is also improved.

Install OpenShot Video Editor on Ubuntu 16.04 LTS

Step 1. First make sure that all your system packages are up-to-date by running these following apt-get commands in the terminal.

sudo apt-get update
sudo apt-get upgrade

Step 2. Installing OpenShot Video Editor.

First, you’ll need to add OpenShot’s PPA (personal package archive) to your system:

sudo add-apt-repository ppa:openshot.developers/ppa
sudo apt-get update

Next install the OpenShot package by executing the following command:

sudo apt-get install openshot-qt

Once installed, next you can start OpenShot by searching for it Unity Dash. If the app icon doesn’t show up, try logging out and logging back in.

Congratulations! You have successfully installed OpenShot. Thanks for using this tutorial for installing OpenShot video editor in Ubuntu 16.04 Xenial Xerus systems. For additional help or useful information, we recommend you to check the official OpenShot web site.