Easy Guide to Fix the WordPress 429 Too Many Requests Error

In this tutorial we will show you how to easily fix the WordPress 429 too many requests error.


What Causes WordPress 429 Too Many Requests Error?

The most common reason for the 429 too many requests error is when a user, bot, or a script tries to make too many requests to the servers. It is a measure to prevent DDOS attacks on websites.

However if it is not properly configured, then it may end up preventing search engines or other APIs to run properly. This would cause unexpected behavior on your website.


Sometimes the error is caused when a script on your website is making too many requests to another website or service using an API. In that case, the API would respond back with a 429 error code.

That being said, let’s take a look at how to easily troubleshoot and fix 429 too many requests error in WordPress.

Fixing 429 Too Many Requests Error in WordPress

This error can be caused by a number of factors. We will show you multiple ways to troubleshoot and fix the 429 too many request error.

Find and Deactivate Misbehaving Plugin

The most common culprit of 429 error is usually a bad plugin on your website. Plugins can sometimes make subsequent requests to your website which may be rejected by the server with a 429 error code.

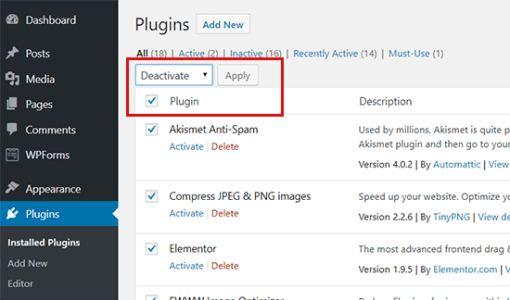
First thing you need to do is deactivate all WordPress plugins on your website. You can do this by visiting the plugins page in your WordPress admin area and selecting all plugins. After that, select ‘Deactivate’ under the bulk actions drop box and click apply.

If you are unable to access the WordPress admin area, then see our guide on how to deactivate all WordPress plugins via FTP.

Now check your website again to see if you can reproduce the 429 too many requests error again. If you can’t, then this means a plugin was causing this issue.

You can now turn on your plugins one by one and check your website after activating each plugin. This way you will be able to find the plugin causing the error.

Once you find the plugin causing the error, you can replace it with an alternative plugin or try reaching out to the plugin author to let them know about the error.

Switch to a Default WordPress Theme

More and more WordPress themes include functionality that normally comes with plugins. Such themes may also cause 429 error too many requests on your website.

The easiest way to find out is by switching to a default WordPress theme like Twenty Seventeen. If this resolves the 429 error issue, then you can find another WordPress theme or report the problem to the theme developer and they may be able to fix it.

Ask Your Hosting Provider

A lot of times, you will see a 429 too many requests error in third-party services that need access to your website. This could be search engines, crawlers, and other web apps.

If you are seeing the error in Google Search console or any third-party service, then most likely they are sending too many requests to your website. In that case, you need to ask your WordPress hosting provider to not block those requests.

We hope this article helped you fix the WordPress 429 error too many requests on your website. You may also want to see our list of most common WordPress errors and how to fix them.

If you liked this article, then please subscribe to our YouTube Channel for WordPress video tutorials. You can also find us on Twitter and Facebook.

Easy Guide to Create a Micro-Job Website Like Fiverr with WordPress

In this article, we will show you how to easily create a micro-job website like fiverr with WordPress without any coding knowledge.

Staring a Micro-Job Website using WordPress

There are plenty of ways to make money online using WordPress. One of them is to build a job board with WordPress.

First you need to make sure is that you are using the right platform. To build a micro-job website, you will need a self-hosted WordPress.org website (see: WordPress.com vs WordPress.org for more details).

To start a WordPress site, you will need the following things:

  • A domain name (This will be your website’s address. For example, wpbeginner.com)
  • A WordPress hosting account (This is where your website’s files are stored)
  • SSL Certificate (You need this to accept online payments)
  • A Micro-Job addon and theme

The set up will take less than 40 minutes, and we will walk you through every step.

Normally a domain name costs $14.99 / year, SSL certificate $69.99 / year, and WordPress hosting would cost you $7.99 / month.

This sounds like a lot of money if you are just starting out.

Bluehost is one of the largest web hosting companies in the world and an officially recommended WordPress hosting provider.

Once you have purchased hosting, head over to our guide on how to make a website for step by step setup instructions.

That being said, now let’s see how to create a micro-job website with WordPress.

Setting up a Micro-Job Website with WordPress

First thing you need to do is install and activate the Microjob Engine theme. For detailed instructions, see our beginner’s guide on how to install a WordPress theme.

Once you have activated the theme, you will be redirected to the theme’s welcome page. On this screen, you will need to enter your license key which you can find under your EngineThemes’ account.


Next, you need to click on the ‘Install Demo’ button to import and setup a demo website. This will allow you to quickly setup the website to look exactly like the demo. You can then replace the content with your own.

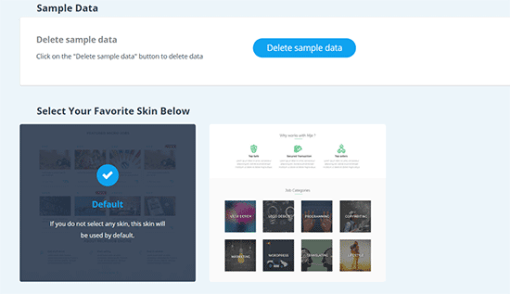
MicrojobEngine comes with two skins to choose from. Once you have imported the demo data, you can select one of the skins to use on your website.

Your website is now set up just like the theme demo. You can visit your website to see it in action.

Selecting Payment Methods and Packages

Microjob Engine works with PayPal and 2Checkout out of the box. You can purchase addons to add other payment gateways like Authorize.net, PayU, PayStack, and Stripe.

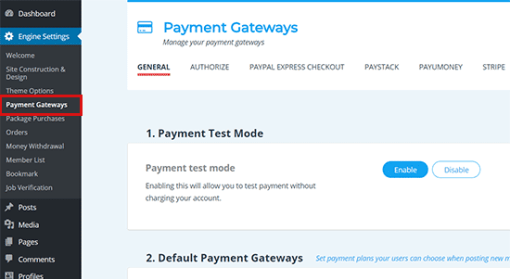
You can setup your preferred payment gateway by visiting the Engine Settings » Payment Gateways page in your WordPress admin area.

Packages Explained

Microjob engine allows you to earn money in two ways:

  1. You can get comission when a job is finished
  2. You can sell packages allowing users to submit gigs for a certain amount.

Setting a payment barrier right from the beginning may prevent some users from signing up, but it will also help keep the spam away.

On the other hand, enabling free job posting will help you attract more freelancers to your website.

You can always change the settings once your website starts getting enough attention from both freelancers and employers.

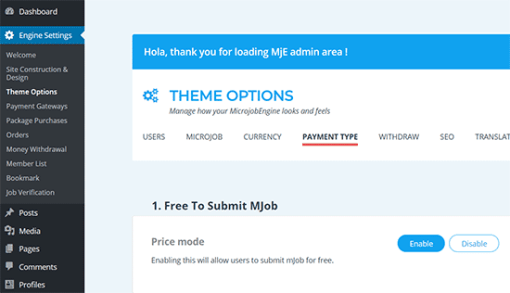
To set up these options, you need to visit the Engine Settings » Theme Options page and click on the Payment Type tab.

From here, you can enable or disable free posting. If you disable free posting, then you can add packages that freelancers can purchase to submit their offers.

Changing Branding and Website Content

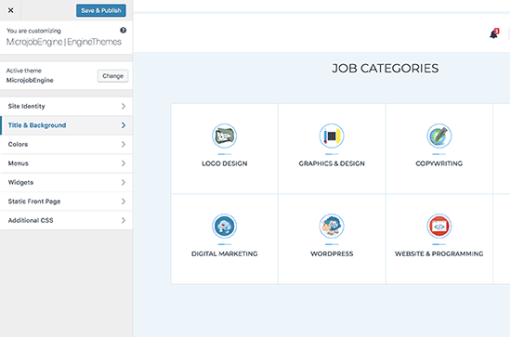
Next, you would want to change the branding and content to make it your own. You can do this by going to Appearance » Customize page where you can change the theme settings with a live preview.

Take your time and go through the different options and adjust them to your liking. Don’t forget to click on the Publish button at the top to save your changes before exiting the customizer.

Testing Your Micro-Job Website

Once you have set up your theme, it is time to thoroughly test every corner of your website.

Open your website in a new tab and try to use it like your users. Start by posting an ad, and then as an employer by hiring a service.

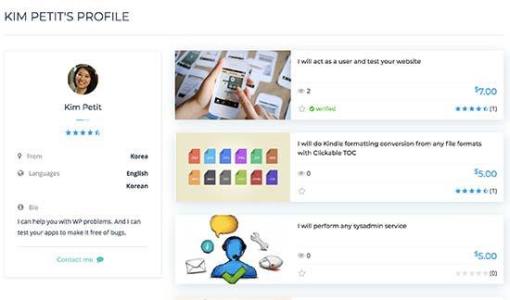
Each user on your website whether freelancer or employer will get their own profile page. Freelancer profiles will show their details, bio, recent gigs, and ratings.

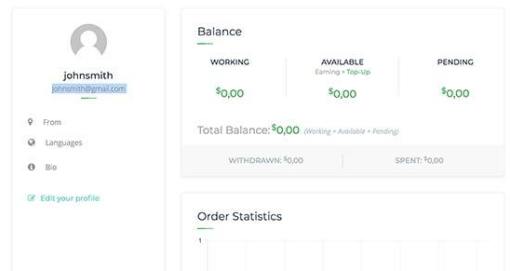
Each user will also be able to manage their account from a custom dashboard. This is where all their chats, messages, and jobs are displayed.

You may also want to make sure that you and your users can receive email notifications from your website. Sometimes WordPress sites run into an email deliverability issues. You can check out our guide on how to fix WordPress not sending email issue.

Managing Your Micro-Job Site

Even though, your users (both freelancers and employers) wouldn’t need to visit the WordPress admin area, you will still manage all aspects of your website from WordPress dashboard.

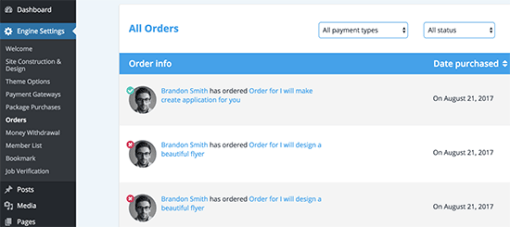
You can see all orders placed on your micro-job site by visiting Engine Settings » Orders.

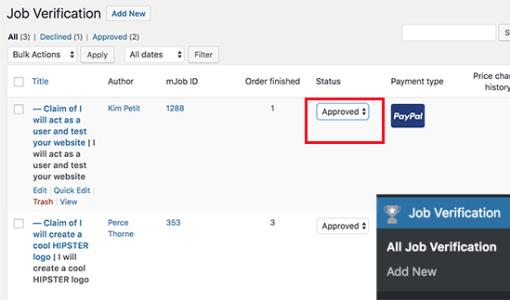
You can also see all completed jobs that need to be verified by visting Jobs Verification page. From here you can approve, keep pending, decline, or verify a job status.

Once approved, the freelancer will be able to withdraw their money.

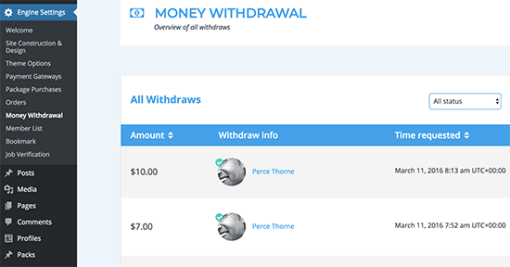
To view all withdrawl activity, you need to visit Engine Settings » Money Withdrawl tab. On this page, you will see a list of freelancers who have withdrawn their earnings.

You can manage all site functions from the admin area of your WordPress site, and you can even peek into conversations between your users.

This helps make sure that freelancers are not insisting clients to use other unverifiable payment methods. It also helps during the dispute resolution between freelancers and employers.

More Resources

Microjob Engine is a powerful app theme with tons of cool features. However as your website grows, it can be quite heavy on your servers. To make sure your site performs well, see our guide on how to improve WordPress speed and performance.

Even then, as your site grows you will run out of shared hosting resources. In that case, you will need to upgrade to a managed WordPress hosting or VPS hosting.

We hope this article helped you learn how to easily create a micro-job site in WordPress. You may also want to see our guide on bringing more traffic to your new WordPress site.

If you liked this article, then please subscribe to our YouTube Channel for WordPress video tutorials. You can also find us on Twitter and Facebook.

Easy Guide to Add Custom Post Status for Blog Posts in WordPress

In this article, we will show you how to easily add custom post status to blog posts in WordPress.


What is Post Status in WordPress and Why Do You Need it?

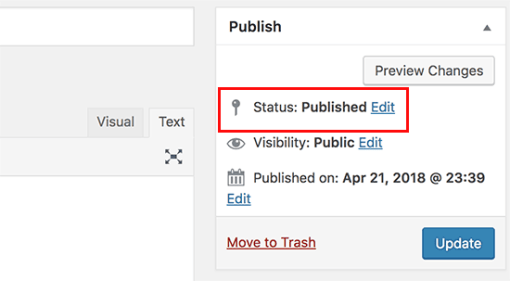
Post status is an editorial tool that tells WordPress the stage of a blog post during editing. For example, posts that are incomplete are saved with the post status labeled ‘Draft’. When you publish an article, the status changes to ‘Published’.

Post status helps WordPress choose how to handle and display blog posts on your website. For example, it will automatically exclude posts labeled draft from your homepage and other publicly viewable areas of your website.

By default, WordPress comes with the following post status that you can use:

  • Draft – An item that is saved but incomplete and not yet published
  • Auto draft – WordPress has an auto-save feature that automatically saves a draft as revision.
  • Pending review – Items that are complete and submitted for review but not yet published.
  • Future – Posts scheduled to be published later.
  • Private – Items marked as private
  • Trash – Items that are trashed
  • Inherit – Child pages that automatically inherit status of their parent page.

Apart from these default post statuses, you can also create your own custom post statuses to improve your editorial workflow. For example, you can add a label ‘Not suitable’ for posts that are complete but not suitable for publication.

Having said that, let’s take a look at how to easily create custom post statuses in WordPress.

Method 1. Create Custom Post Status Using a Plugin

This method is easier and recommended for most users. It allows you to create custom post statuses as well as efficiently manage editorial workflowon your multi-author WordPress blog.

The first thing you need to do is install and activate the Edit Flow plugin. For more details, see our step by step guide on how to install a WordPress plugin.

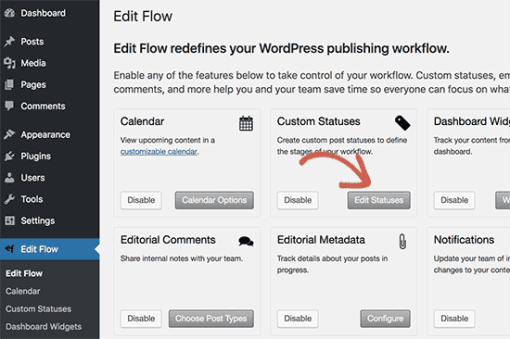
Upon activation, the plugin will add a new menu item labeled ‘Edit Flow’ to your WordPress admin menu. Clicking on it will take you to the plugin’s settings page.

Edit Flow comes with a lot of useful features, and you can turn them On/Off from this screen. Go ahead and click on the ‘Edit Statuses’ button under ‘Custom Statuses’ box to continue.

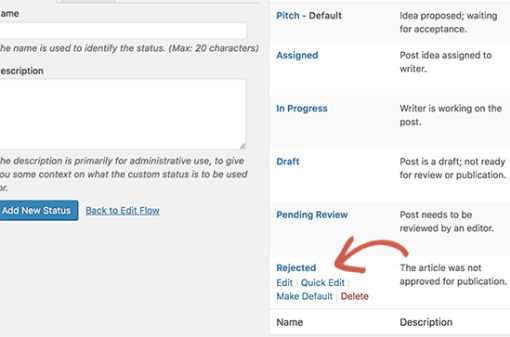
Edit Flow automatically creates the following custom post statuses:

  • Pitch – Used to pitch new article ideas and this status also becomes the default post status of every new post.
  • Assigned – You can select an author and mark an article as assigned so that the author can work on it.
  • In progress – Writer is working on the post but is not yet available as a readable draft.

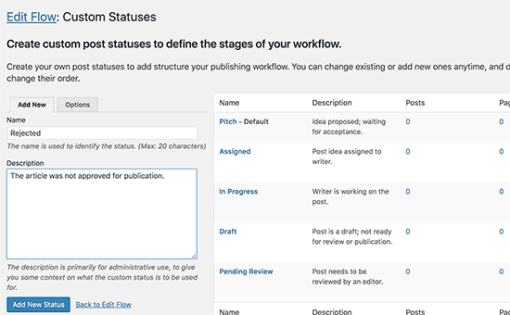
You can create your own custom status by providing a name and description in the left column. Once you are done, click on the ‘Add new status’ button to save your changes.

Your custom status will now appear in the right-hand column, so you can edit or delete it at any time.

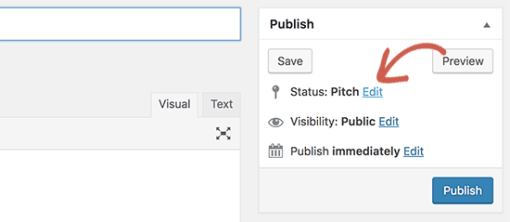
Next, you need to go to Posts » Add New page to create a new post. On the post edit screen, click on the ‘Edit’ link next to status option under the ‘Publish’ meta box.

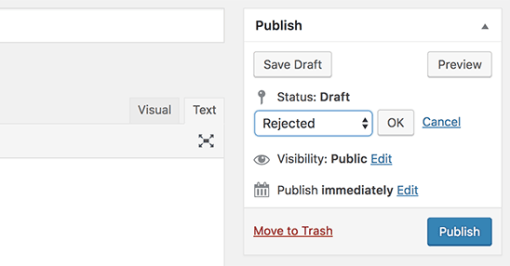
This will reveal a drop-down menu showing all post statuses that you can select including the custom post status you just created.

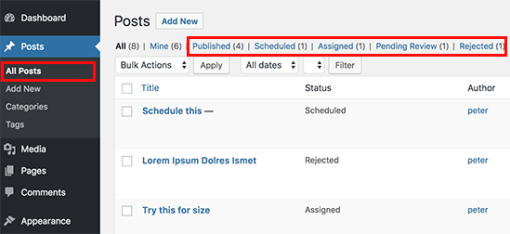
You can also see all articles filed under different post statuses by visiting Posts » All Posts page.

Method 2. Create Custom Post Status Using Code

WordPress has a known bug in the API used to register custom post statuses. It allows you to create custom post status, but you cannot use it in the admin panel. This means that the coding method can get the job done, but it is not as clean, and you will need to change it after it is officially fixed.

However if you still want to do it manually, then you can continue reading.

This method requires you to add code to your WordPress site. If you haven’t done this before, then take a look at our guide on how to copy and paste code in WordPress.

First, you need to add the following code to your theme’s functions.php file or a site-specific plugin.

// Registering custom post status
function wpb_custom_post_status(){
    register_post_status('rejected', array(
        'label'                     => _x( 'Rejected', 'post' ),
        'public'                    => false,
        'exclude_from_search'       => false,
        'show_in_admin_all_list'    => true,
        'show_in_admin_status_list' => true,
        'label_count'               => _n_noop( 'Rejected <span class="count">(%s)</span>', 'Rejected <span class="count">(%s)</span>' ),
    ) );
}
add_action( 'init', 'wpb_custom_post_status' );
 
// Using jQuery to add it to post status dropdown
add_action('admin_footer-post.php', 'wpb_append_post_status_list');
function wpb_append_post_status_list(){
global $post;
$complete = '';
$label = '';
if($post->post_type == 'post'){
if($post->post_status == 'rejected'){
$complete = ' selected="selected"';
$label = '<span id="post-status-display"> Rejected</span>';
}
echo '
<script>
jQuery(document).ready(function($){
$("select#post_status").append("<option value=\"rejected\" '.$complete.'>Rejected</option>");
$(".misc-pub-section label").append("'.$label.'");
});
</script>
';
}
}

Don’t forget to replace all instances of the word rejected with your own custom post status.

This code registers a custom post status and after that, it uses jQuery to add it to the admin panel. You can now edit a WordPress post, and you will be able to see it in the status drop-down menu.

We hope this article helped you add custom post status to blog posts in WordPress. You may also want to see our list of 55+ most wanted WordPress tips, tricks, and hacks.

If you liked this article, then please subscribe to our YouTube Channel for WordPress video tutorials. You can also find us on Twitter and Facebook.

Easy Guide to Display Popular Posts by Day, Week, and Month in WordPress

In this article, we will show you how to display popular posts by day, week, month, and all time in WordPress.


Why Display Popular Posts in WordPress?

When you start a WordPress blog, you don’t have much content, which allows you to manually display selected posts in a sidebar widget.

However as your website grows, you will notice that older articles on your website don’t get much exposure. By showcasing your top content, you allow new users to quickly discover the best articles on your website. This boosts user engagement on your website and increases your page views.

Now the problem is that if you are showing your all time popular articles, then a very limited set of articles get repeated exposure. You can diversify it by displaying popular posts by day, week, or month as well.

Let’s take a look at how to easily display popular posts in WordPress by day, week, month, or all time.

Creating Popular Posts By Day, Week, Month, and All Time Widgets

First, you will need to install and activate the WordPress Popular Posts plugin. For more details, see our step by step guide on how to install a WordPress plugin.

WordPress Popular Posts plugin is the best popular posts plugin for WordPress. It offers tons of options like time range, excerpt, featured images, views count, and more.

Upon activation, you need to head over to Appearance » Widgets page to drag and drop the WordPress Popular Posts widget to any sidebar.

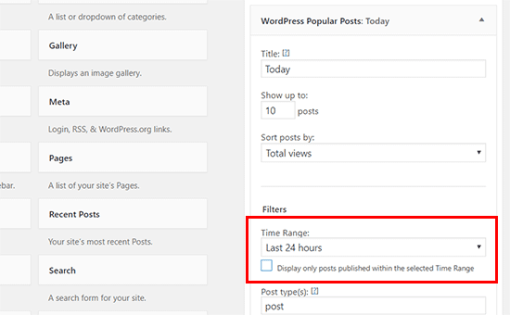
You can name this widget ‘Today’ and under the time range field select last 24 hours. After that you can review other widget options and set them to your liking. Don’t forget to click on the save button to store your widget settings.

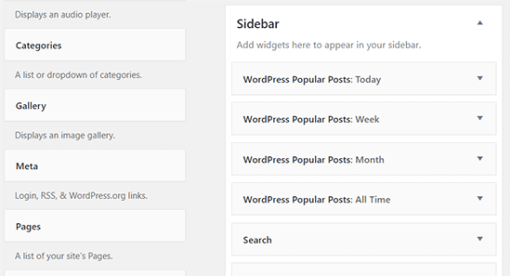
Next, you need to add another popular posts widget and name it ‘Week’. In the widget settings, you need to select ‘7 days’ under time range field and then click on the save button.

Repeat the process to add monthly and all time popular posts widgets as well.

Don’t worry about the widget placement at this time because we will adjust them in the next step.

Creating a Tabbed Widget for Popular Posts

In this part of the tutorial, we will create a tabbed widget for our WordPress sidebar. This will allow us to show our popular posts widgets inside a single widget with tabs.

First, you need to install and activate the Ultimate Tabbed Widget plugin. For more details, see our step by step guide on how to install a WordPress plugin.

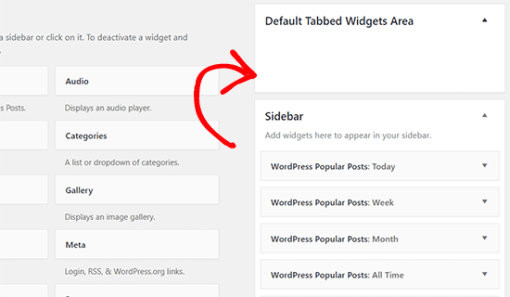
Upon activation, head over to Appearance » Widgets page, and you will notice a new widget ready area labeled ‘Default Tabbed Widget Area’.

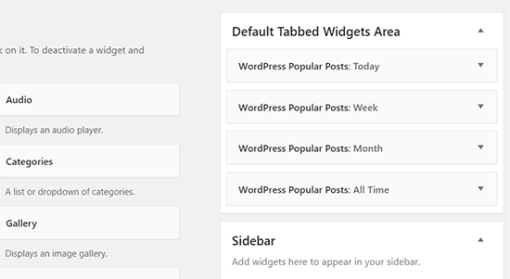
You will need to move all your popular post widgets into this particular widget area.

Next, you need to locate the ‘Ultimate Tabbed Widgets’ in the available widgets and add it to your website’s sidebar where you want to display popular posts.

In the widget settings, provide a title for your popular posts widget. Under widget area field, you need to select ‘Default tabbed widget area’, and select tabs for template field.

Don’t forget to click on the ‘Save’ button to store your changes.

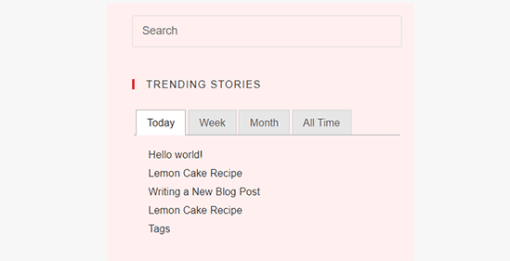
You can now visit your website to see your popular posts widget showing top articles by day, week, month and all time tabs.

You can rearrange the tab order by simply moving widgets up and down in the ‘Default tabbed widget area’.

We hope this article helped you display popular posts by day, week, month, and all time in WordPress. You may also want to see these actionable tips to drive traffic to your WordPress blog.

If you liked this article, then please subscribe to our YouTube Channel for WordPress video tutorials. You can also find us on Twitter and Facebook.

How to Create an Online Marketplace using WordPress

Create an Online Marketplace

In this article, we will show you how to easily create an online marketplace using WordPress.


What Do You Need to Start an Online Marketplace using WordPress?

First you need to make sure that you are using the right website platform, and since you’re reading this article, you’re in the right place.

There are two types of WordPress available: WordPress.com vs WordPress.org. One is a limited blog hosting service while the other is known as the self-hosted WordPress which you’ve likely heard tons about. See the full comparison between WordPress.com vs WordPress.org.

We recommend using WordPress.org because it gives you the freedom and access to all WordPress features out of the box.

To start an online marketplace using self-hosted WordPress you will need the following:

  • A domain name (For example, wpcademy.com)
  • Web hosting account (This is where your website’s files are stored)
  • SSL Certificate (To securely accept online payments)
  • WooCommerce (best WordPress eCommerce addon)
  • Online marketplace addon

The entire setup can take up to 40 minutes, and we will walk you through every step one by one.

Ready? Let’s get started.

Step 1. Setting up Your Ecommerce Platform

First step is to buy a domain name and a web hosting account. You don’t just need a web hosting, but you will need a service that specializes in WooCommerce hosting because this is the software that we will be using as our eCommerce platform.

Typically a domain name costs $14.99/year, web hosting 7.99/month, and SSL certificate 69.99/year.

Now this seems like a lot of money if you are just starting out.

Fortunately, Bluehost an officially recommended WordPress and WooCommerce hosting provider has agreed to offer our users free domain + SSL and discount on their cloud WordPress hosting.

Basically, you can get started for $6.95 / month.

→ Click Here to Claim This Exclusive Bluehost Offer ←

Once you have purchased hosting, then follow our step by step tutorial on how to start an online store for complete setup instructions.

You would now have a WordPress website with WooCommerce installed on it. However, by default WooCommerce assumes that your website is a single vendor website, so it is not possible for other users to add their own products to your website.

Let’s change this.

Step 2. Turn Your WooCommerce Site into an Online Marketplace

First you need to install and activate the WC Vendors plugin. For more details, see our step by step guide on how to install a WordPress plugin.

Upon activation, head over to WooCommerce » WC Vendors page to configure marketplace settings.
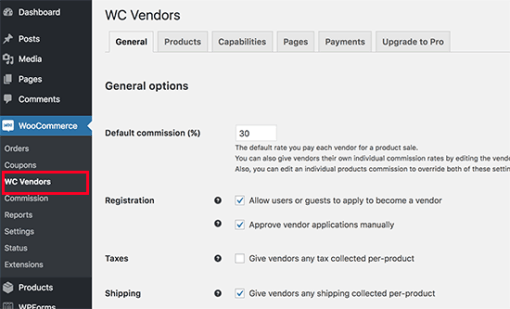
On this screen, you need to set a commission rate that you will pay to each vendor. This rate could also be overridden for individual products or vendors.

The default settings on the page will work for most sites, but you can review and change them as needed.

Don’t forget to click on the ‘Save General changes’ button to store your settings.

Next, you need to switch to the products page. On this screen, you can choose which items to hide from vendors when they are adding a product.
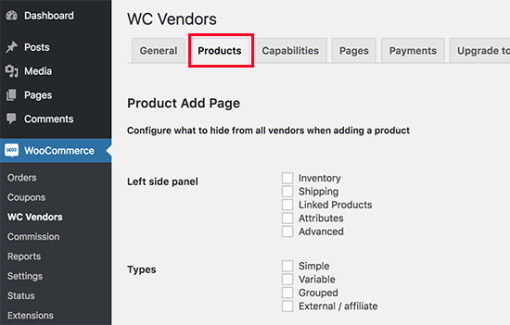
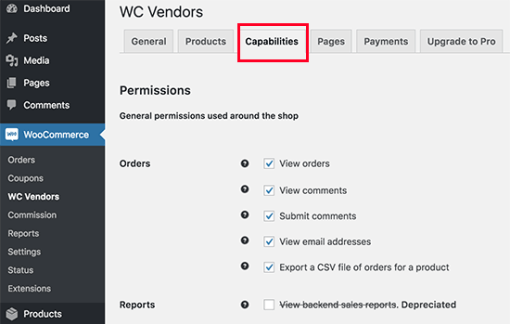
WC Vendors allows you to setup vendor capabilities and permissions. Head over to the Capabilities tab on the WC Vendors settings page.
Next item on the WC Vendors settings page is to setup pages.

The plugin will automatically create pages to use for vendor dashboard, shop settings, and orders page. You can use a different page if you would like by using the shortcodes shown below each page.
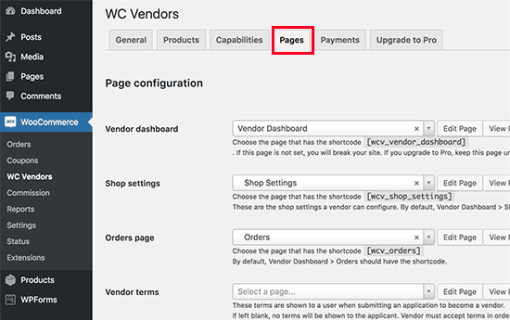
One page that is not automatically created by the plugin is the terms page. These are the terms that a vendor has to agree to when submitting their application.

To create a terms page, you can simply create a new page in WordPress and add the terms and conditions in plain text describing what vendors can sell, how they will get paid, how to settle disputes, etc.

Once you have created a terms page, you can return back to this section and select your newly created page here.

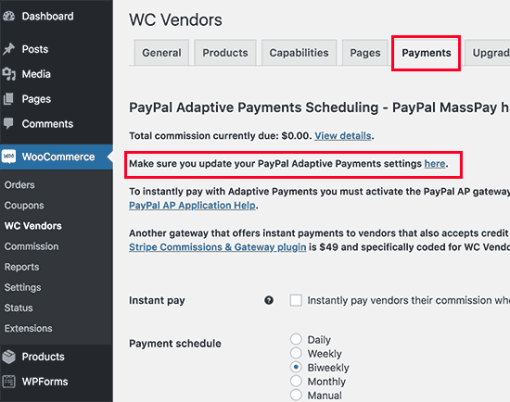
The final item on WC Vendors settings page is the most important one, the Payments. By default, WC Vendors uses PayPal Adaptive Payments to pay vendors.

You will see a link to setup PayPal adaptive payments. After you have set it up, you can choose when you want to pay the vendors.
Now that WC Vendors is all set up, let’s setup WooCommerce for a multi-vendor environment.

Step 3. Enable Account Management in WooCommerce

First you need to visit WooCommerce » Settings page and click on the ‘Accounts’ tab. From here you need to check the boxes next to customer registration option.
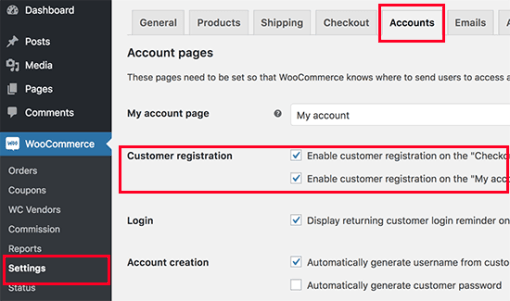
Don’t forget to save your changes.

Step 4. Setting Up Navigation Menus

Now that your multi-vendor marketplace setup is finished. It is time to make it easy for your users to find their way around your website.

To do that, you need to visit Appearance » Menus page. You will need to add your user account and checkout pages to the navigation menu.
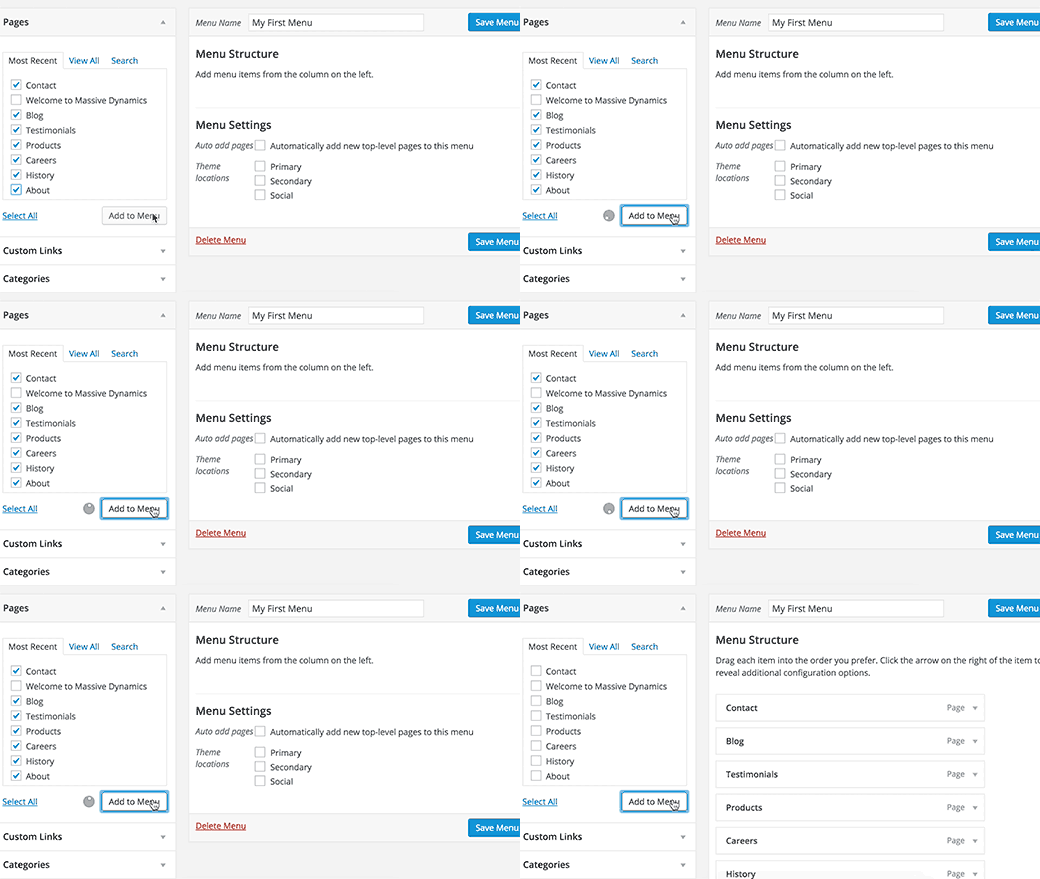
adding-menu-items

Don’t forget to click on the ‘Save Menu’ button to store your changes. For more detailed instructions, see our guide on how to add navigation menus in WordPress.

If you don’t have a My Account page, then simply create a new page in WordPress and add the following shortcode in the post editor.

[woocommerce_my_account]

Step 5. Testing Your Marketplace Website

Your online marketplace website is now ready for testing. You can visit your website in a new browser window and create a new account by clicking on the My Account link at the top.

testsite

From here, both customers and vendors can login to their accounts as well as create a new account.
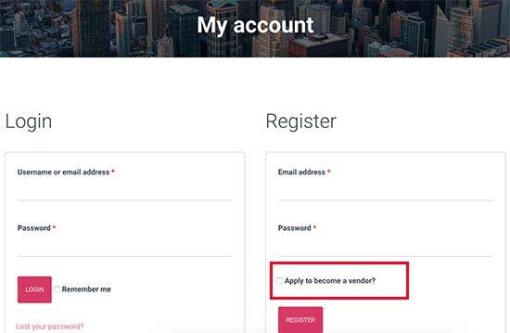
Once users create a new account, you will recieve an email notification. If you are unable to recieve email notifications, then take a look at our guide on how to fix WordPress not sending email issue.

You can also view new vendor applications by visiting Users » All Users page. You will see all new vendor requests as ‘pending vendor’, and you can approve or deny applications by clicking the link under their username.
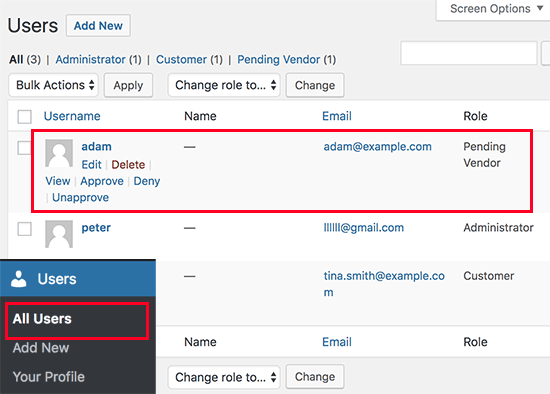
Approve vending vendors

Once approved, these vendors can log in to their accounts and add their products by visiting their vendor dashboard. They can also view their orders and sales reports.
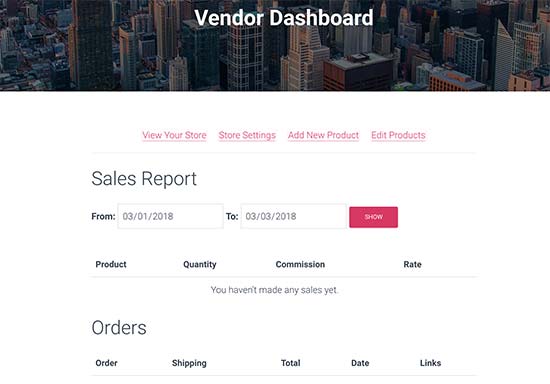
Vendor dashboard

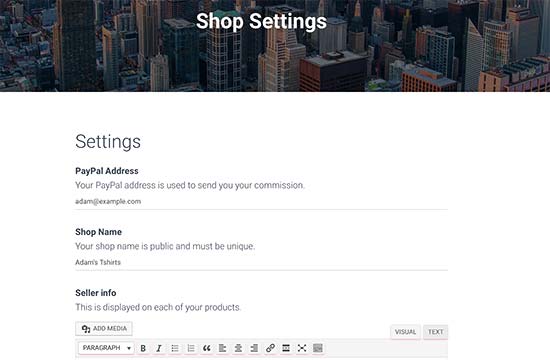
The first thing your vendors need to do is to setup their shop settings by clicking on ‘Store Settings’ link.
Shop settings

They will need to provide their PayPal email address to recieve payments. After that they can enter their shop name and description.

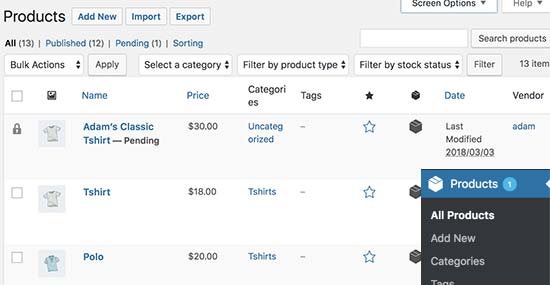
Once a vendor adds a new product, you will get a notification email and see an icon next to the products menu. You can then edit a product, approve it, or delete it.
Pending products

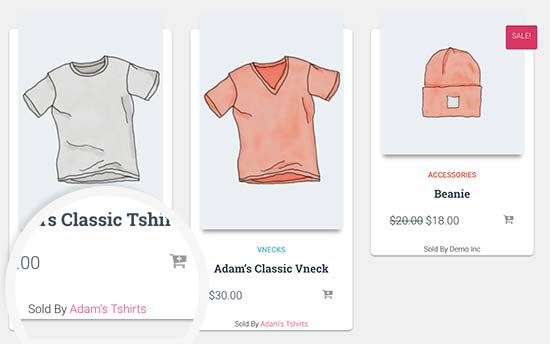
Your shop page will clearly show the products sold by vendor’s shop name.
Sold by vendor

We hope this article helped you learn how to create an online marketplace using WordPress. You may also want to see our pick of the best WooCommerce themes, best WooCommerce plugins, and the ultimate WordPress SEO guide for beginners.

If you liked this article, then please subscribe to our YouTube Channel for WordPress video tutorials. You can also find us on Twitter and Facebook.
Easy Guide to Add YouTube Subscribe Button in WordPress

In this article, we will show you how to add a YouTube subscribe button in WordPress.


Method 1: Manually Adding YouTube Subscribe Button Code

The first thing you need to do is visit the YouTube subscribe button page on the Google Developer’s website.


On this page, you will need to enter your YouTube channel’s name, select a layout, theme, and subscriber count option. It will display a live preview of how your button will look on the website. Once you are satisfied, simply scroll down to copy the embed code.

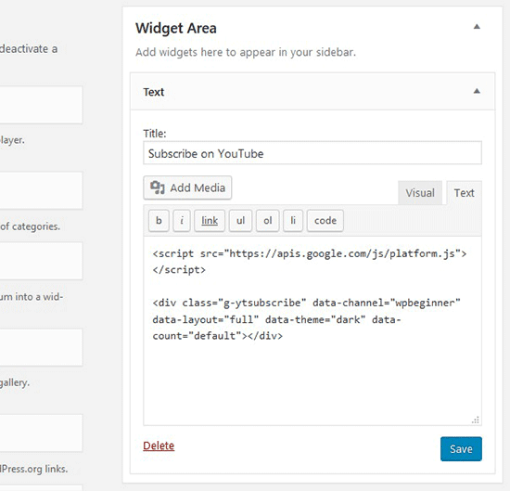
Next, you need to login to the WordPress admin area of your site and go to Appearance » Widgets. There you will need to drag and drop a text widget to your widget area, and paste the YouTube subscribe button code inside the widget.

Once you are done, don’t forget to save your changes and visit your website to see the YouTube subscribe button in action.


Method 2: Using Plugin to Add a YouTube Subscribe Bar

Another way to add a YouTube subscribe button on your website is by adding it below every YouTube video on your site. This offers additional exposure and can help you significantly increase your subscribers.

First you need to install and activate the YouTube Subscribe Bar plugin.

Upon activating the plugin, you need to go to Settings » YouTube Subscribe Bar to add your YouTube channel ID. You will also need to style the button layout, choose a button theme, and show subscribers count.

The YouTube subscribe bar plugin allows you to add some text before the button and edit its styling. You can use this area to add a call to action like “Subscribe to My Channel”.

Once you are done, make sure to click on the Save Changes button to save your settings.

This plugin will automatically display your YouTube Subscribe bar below every YouTube video on your site. The YouTube Subscribe bar will appear on the videos from your channel and third-party channels, so you can share useful video content on your site and get more subscribers on your YouTube channel.


Note: The YouTube subscribe bar plugin only works with oEmbed videos. It will not work with videos embedded via iFrame.

We hope this article helped you add the YouTube subscribe button in WordPress. You may also want to check out our guide on how to track user engagement on your WordPress site.

If you liked this article, then please subscribe to our YouTube Channel for WordPress video tutorials. You can also find us on Twitter and Facebook.

Easy Guide to Modify the Help Dropdown Text in WordPress Admin Area

Modify the Help Dropdown Text in WordPress Admin Area

Each WordPress admin screen has a Help button. This area drop downs and contains text that helps the user understand the features of the specific page. When creating a custom site for your clients or a plugin, then you may find a need to modify the Help Dropdown text. In this article, we will show you how to modify the help dropdown text in WordPress admin area.

First open your theme’s functions.php file and paste the following code:

1
2
3
4
5
6
7
8
9
10
add_action('load-page-new.php','custom_help_page');
add_action('load-page.php','custom_help_page');
function custom_help_page() {
  add_filter('contextual_help','custom_page_help');
}
function custom_page_help($help) {
  // echo $help; // Uncomment if you just want to append your custom Help text to the default Help text
  echo "<h5>Custom Help text</h5>";
  echo "<p> HTML goes here.</p>";
}

This code above will add custom help text on every Add New Page screen. You can do this for your posts page, or any other screen. This is something that we will be utilizing for our plugins that we have intentions of creating.

Source: Sixrevisions Blog