Easy Guide to Easily Create a Coupon Site in WordPress

In this tutorial, we will show you how to create a coupon site in WordPress without any code knowledge.


Before we start, we want to let you know that we built our deals section using custom post types and custom taxonomies. Since that requires code and is difficult for beginners, we’re going to show an easier way to build a coupon site that doesn’t require any HTML or CSS knowledge.

The first method we are going to cover will use a WordPress coupon theme that allows you to create a dedicated coupons site in WordPress. This will be similar to RetailMeNot and FatWallet.

The second method we are going to cover will use a WordPress coupon plugin that allows you to add a coupons section to an existing WordPress site similar to the WPCademy deals concept.

Let’s get started.

Creating a Coupon Site in WordPress

If your primary goal is to create a dedicated coupon site like RetailMeNot and monetize it with affiliate links, then using a WordPress coupon theme is the best solution for you.

We’re going to assume that you already have WordPress hosting and installed WordPress. If you haven’t, then you need to do that first.

We recommend SiteGround. They’re a user favorite and offer an exclusive 60% discount for WPCademy users. You also get a free domain too!

Once you have installed WordPress, you would need to install and activate the Clipper theme which is the best WordPress coupon theme.

It is a premium WordPress theme that costs $99 for a single site license and $159 for developer license.

Clipper coupons theme for WordPress

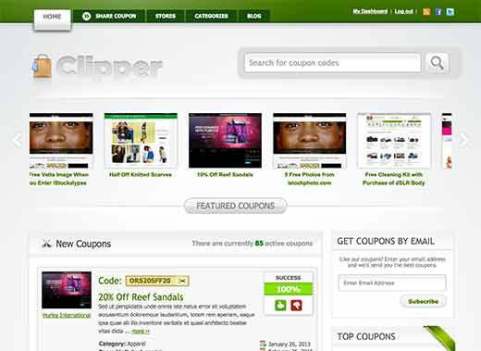
We usually don’t recommend installing themes to add functionality to your WordPress site, but we are making an exception in this case. Why? Because Clipper does an excellent job in handling the appearance as well as functionality to create a complete coupons site in less than an hour.

It comes with a custom write panel, advanced link cloaking and tracking feature, ability to allow users to submit coupons, advertising support to allow you to charge companies to post their coupons, custom email templates, dedicated store and category pages, subscription features, and basically everything you need to build a coupon site.

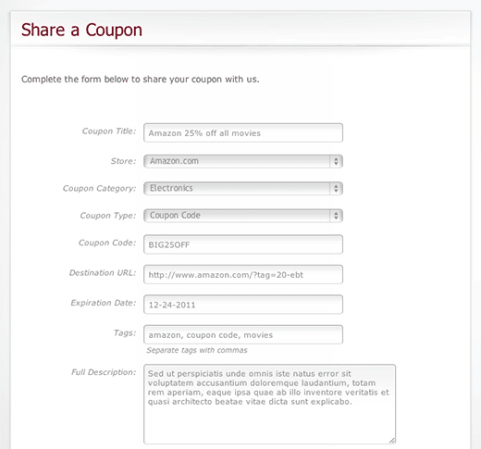
Once you have it installed, simply go to Coupons » Add New to add your first coupon.

You would need to provide a title for your coupon along with other details in the post editor. Once you are done entering coupon information, simply click on the publish button.

Clipper comes with multiple color choices, so you can make sure that your site looks the way you want. There are also some ready to use child themes for Clipper which you can buy from AppThemes website.

You can also Clipper to accept coupons submitted by registered users. Once a coupon is submitted to the site, you can review and publish it.

Share a coupon

You can also create dedicated stores and category pages to showcase coupons from specific stores or categories.

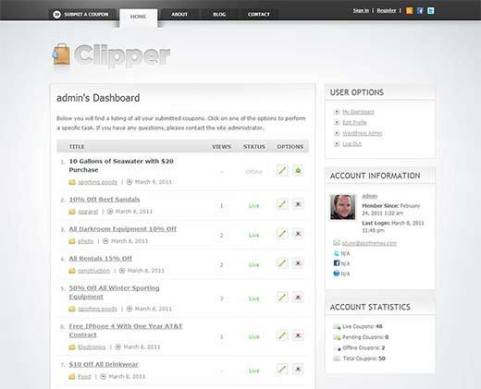
Clipper has basic stats for the coupons, and how each one of them is performing on your site. Registered users who are submitting coupons can see how their coupons are performing on your site.

User dashboard in Clipper WordPress theme for coupons

Overall, Clipper coupon theme is the best solution for building a dedicated coupon site in WordPress for affiliate marketers.

Adding a Coupons Section to an Existing WordPress Site

If you have an established WordPress site, then you may not want to change your theme. In that case, you will need to use a WordPress coupon plugin to add a coupons section to your existing site that matches your design.

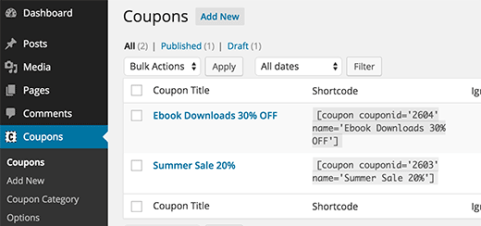
First thing you need to do is install and activate the Coupon Creator plugin. Upon activation, simply go to Coupons » Add New to create your first coupon.

Creating coupon in Coupon Creator plugin

You can add coupon details, terms and condition, choose colors, and set an expiration date for your coupon. Once you are done, simply click the publish button to save your coupon.

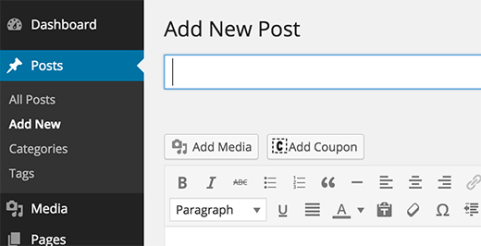
Next, you can add the coupon into a post or page by using the Add Coupon button above the post editor.

Adding coupons into WordPress posts

You can also add coupons using the shortcodes. You can see all your coupons and their shortcodes listed on the coupons page in your admin area.

Coupon shortcodes to use in your WordPress posts and pages

If you want to create a dedicated coupons section on your site, then create a new WordPress page and click on the Add Coupon button.

This will bring up the shortcode generator where you need to select Coupon Loop in the dropdown. You can also select the coupon category and align option. Once you are done, click the Insert Coupon button and Publish the page.

Display all coupons on a page

That’s all, we hope that this tutorial helped you create a WordPress coupon website.

Easy Guide to Create Invoices for Clients Using WordPress

In this tutorial, we will learn how to create invoices for clients using WordPress.

Use WP-Invoice WordPress Plugin

Another way to handle invoices is by using the WP-Invoice plugin. This way your WordPress website becomes the hub of your invoices and payments.

First thing you need to do is install and activate the WP-Invoice plugin. Upon activation, the plugin will add a new ‘Invoice’ menu item in your WordPress admin. You need to visit Invoice » Settings to configure the plugin.

Configuring WP-Invoice settings

First you need to enter your business name as you want it to appear on the invoices. Next, you need to select a page to display invoices. We recommend you to create a new WordPress page titled Invoices and select that page here. This page will be used to display your invoices.

WP-Invoices comes with multiple payment options (see our list of 5 PayPal alternatives for freelancers to collect payments in WordPress. You need to choose a default payment system from Stripe, 2CheckOut, PayPal, Credit Card, or Interkassa payment gateways. You can selectively enable or disable payment gateways and allow your users to choose their preferred payment method.

When you choose a payment method, you will notice a new tab under the settings to configure that particular payment gateway. Each payment gateway has different settings which you will need to configure by logging into your account on that gateway and getting your API keys.

configuring payment gateways for your invoices

After configuring your payment gateways, click on Save All Settings button to store your changes.

Creating a New Invoice

To create and send a new invoice to a client, simply go to Invoices » Add New. You will be asked to provide client’s email address.

Enter the email address of your client

After entering the email address, the plugin will load the Invoice Editor screen. You will notice different meta boxes on the edit screen along with the familiar Title and Post Editor boxes. Just below the post editor box, you will notice a metabox to add the items you are including in this invoice.

Adding items to your invoice

Simply enter an item, quantity and price. The plugin will calculate the total amount and will display it as balance. You can click on the toggle description link to add description for an item in the list. You can also click on the ‘Add Discount’ button to deduct discounted amount based on percentage or a fixed amount.

Below the invoice items box, you will notice the payments gateway box. This will be showing your default payment and all the payment methods you have enabled on your site. You can change these settings for an invoice if you want, or you can leave it to use the default options you set in the plugin settings.

Setting payment options for a single invoice

On your right hand, you will see the user information metabox. It will be showing the client’s email address. You can fill in rest of the information. In case you don’t have all the information, you can leave it blank and the client can fill it in when making the payment.

In the publish metabox, there are options to publish this invoice as a quote, allow partial payments, or make it a recurring bill. Clicking on the Toggle Advance link will allow you to add a due date for the invoice and enter tax information.

Publishing your invoice

After publishing the invoice, your clients will receive an email notification with a link to the invoice page on your WordPress site. If your clients are not getting email notifications, then you should take a look at our guide on how to fix WordPress not sending email issue. The will see the invoice, with a link to print out the PDF version before making the payment. Clients can also change their personal information on the page.

Clients will be able to view the invoice on your site

Viewing Invoices and Reports

All the invoices you create can be accessed from Invoices » View All. You can sort and filter your invoices using the menu on your right hand side.

To get a bird’s eye view of your earnings and invoices, you need to visit Invoices » Reports. There you will be able to see graphs and charts for all invoices.

Fine Tuning Your Invoices  and Payments

The settings page for invoices will change after you save your initial settings. Now if you visit Invoices » Settings, you will be able to see many other options that you can configure. For example, you can tweak the email templates, create multiple templates, add line items which allows you to quickly add items into an invoice. You can even import/export your invoice data into XML file.

Advanced options for your WordPress Invoice system

Pros and Cons of WP-Invoice

Using WP-Invoice, you get a free plugin that fits right into your website. You don’t need to rely on a third party service to manage your clients and payments. You can setup automatic WordPress backups on a cloud storage to make sure that your data is safe.

That’s all, we hope this tutorial helped you create invoices for clients using WordPress.

Easy Guide to Clone a WordPress Site in 7 Easy Steps

In this tutorial, we will learn how to clone a WordPress site in 7 easy steps.

What Is Cloning, and Why Use It?

The idea behind cloning a WordPress site is simple: you make an exact copy or duplicate of one WordPress site and apply it to another site.

One practical scenario is when you are moving a WordPress site to a new web host or a new domain name. Cloning a site will save you hours of work.

Another possible use is when you are developing a site for a client. Once the project is done you can clone the WordPress site to the client site.

Lastly, you can clone a live WordPress site to your local server for testing and development purposes.

Cloning a WordPress site is not that difficult at all, here is how you can do it with these simple steps.

Using BackupBuddy To Clone A WordPress Website

BackupBuddy

For this article, we will be using BackupBuddy plugin. BackupBuddy is a WordPress backup plugin which allows you to not only just backup your WordPress site, it also allows you to easily restore your site from a backup. We will show you how to use this site restoration tool to easily clone any WordPress site.

1. Installing and Setting up BackupBuddy

First thing you need to install and activate the BackupBuddy plugin. Upon activation, the plugin will add a new menu item labeled ‘BackupBuddy’ in your WordPress admin bar. Clicking on it will take you to BackupBuddy setup wizard.

BackupBuddy Setup Wizard

The setup wizard is very straight forward. First you need to provide an email address. After that you need to enter a password.

This password will be used when you restore your site. The next option is to choose a location where you want to store your WordPress backups. The last option allows you to set up automatic backups.

BackupBuddy allows you to store your backups on cloud services like Stash, Amazon, Rackspace, and Dropbox. You can also store your backups on your own server or email them to yourself.

Once you are done with the setup wizard, click on save settings button to continue.

2. Backup Your WordPress Site

BackupBuddy will automatically initiate the backup process when you finish the setup wizard. Upon completion it will show you the option to download your backup or send the backup to a remote destination.

Backup process initiated and completed

You can always create a fresh backup by visiting the BackupBuddy » Backup page.

Creating new backups in BackupBuddy

3. Preparing To Clone Your WordPress Site

BackupBuddy provides a very easy site cloning / migration tool. Simply visit the BackupBuddy » Restore/Migrate page to begin the cloning process.

First you need to download the importbuddy.php file to your computer.

Download importbuddy.php file to your computer

After that, you need to download the backup zip file from your existing backups shown on the same page.

Download the backup zip file to your computer

4. Upload Backup and Importbuddy to New Location

Now that you have a complete backup of your site in a zip format and your importbuddy.php file, the next step is to upload them to the new location.

This new location can be a live website, or a site on your local server. If it is a site on your local server, then you just need to copy and paste the files into a subfolder inside your htdocs or www folder, like this:

C:\wamp\www\mynewsite\

If it is a live site, then you need to upload these files to the root directory using an FTP client.

No matter where you are copying the files, you need to make sure that the folder is completely empty and has no other files or folders inside it except importbuddy.php file and your backup zip file.

5. Running The Import Script

After uploading both files, you need to visit the importbuddy.php file in a web browser. It will be located at a URL like this:

http://www.example.com/importbuddy.php

Replace example.com with your own domain name.

Importbuddy password

You will be asked to enter your importbuddy password. This the password you created during step 1 or the password you entered when downloading importbuddy file during step 3.

After entering your password, you will notice that importbuddy has already found your backup zip file. Simply click on the Next Step button to continue.

Backup found and selected

Importbuddy will now extract your backup file when it is done, you need to click on the next button.

You will now reach the URL and database settings section.

Database and URL settings section

Importbuddy will automatically guess your new URL. It will also show your previous URL. Below that, you need to enter the new database settings. Enter the new database name, database username and password.

If you have not created a new database yet, then you can always login to your hosting account and create a database using cPanel. If you are moving the site to local server then you can create a new database using phpmyAdmin.

After entering your database information, click on the test database settings button. If you entered all information correctly, then you will see test results like this:

Test database settings

Click on the next step button to continue. Importbuddy will now import your WordPress database and show you the success message. After that you can click on the next step button.

Importbuddy will run some tests and show your new cloned site’s URL to verify that everything is working fine.

6. Test Your Cloned Site

Test your new site by visiting the link shown on the last step of importbuddy process. Check that your single posts links are working fine. Visit the WordPress admin area to see if you can perform all administration tasks.

If you run into any issues check out our guide on how to fix common WordPress errors.

7. Delete Temporary Files

On the import buddy screen, click on the cleanup and remove temporary files button. This will delete import buddy and all temporary files it created during the cloning process.

That’s all, you have successfully cloned your WordPress site.

10 Most Wanted Twitter Hacks and Plugins for WordPress

In this tutorial, we will show you the most wanted Twitter hacks and plugins for WordPress.

1. Floating Social Bar

Floating social bar adds social buttons on top of your content including Twitter’s tweet button. Unlike other plugins, Floating social bar does not slow down your website. It asynchronously loads how many times your article has been tweeted and shows it in the button. We use a slightly customized version of the same plugin on all our websites to boost our social shares. See how to add Floating Social Bar in WordPress.

Floating social bar

2. Schedule Your Tweets with Buffer

Buffer is one of the must use tools for every blogger. It allows you to schedule your tweets and other social media updates. You can even use it to schedule your WordPress posts for social media.

The best part is that you can schedule for days and even weeks in advance if you really want to.

Buffer

3. How to Add Twitter Follow Button

Many WordPress themes and plugins allow you to add social buttons to your website. However most of them just show the Twitter logo. The official Twitter follow button also displays your follower count which can help you gain even more followers.

You can easily generate a code for your username and then paste it in a widget or in your child theme.

4. How to Add the Official Tweet Button

If you are using Floating Social Bar, then you will not need this because Floating social bar already comes with Tweet button. However if you would rather do it on your own, then you can grab the code and paste it.

Simply visit the Twitter website and generate a code for your user account. You can place this code in a text widget or child theme. It can automatically detect the link a user is trying to share.

Generating the code for the official Tweet button

5. Embed Actual Tweets in Your WordPress Blog Posts

WordPress allows you to embed an actual Tweet into your blog posts. All you have to do is copy the link of the tweet and paste it inside your posts, pages, or even in widgets.

WordPress will automatically fetch the Tweet and will display it just like it appears on Twitter. It will also show any photos or videos attached to the tweet. Also your users can reply, retweet, and favorite that tweet right from your website.

6. How to Add Twitter Cards in WordPress

Twitter cards allow you to display a summary and thumbnail from your article whenever someone tweets a link to your site. Twitter will display a link labeled ‘View Summary’ next to your Tweet which will expand the tweet to show the summary like this.

7. Display Recent Tweets in WordPress

Twitter is the discussion hub of the web. By displaying your recent tweets, you can provide your users a chance to jump into the conversation right from your website.

The easiest way to display your recent tweets in WordPress sidebar is by using the official Twitter widget. It allows you to display your recent tweets, and your users can tweet to you directly from your website.


8. Show Selective Tweets in WordPress

Don’t want to show your recent tweets? No problem. You can easily show tweets on specific topic in your WordPress blog.

Using the official Twitter widget, you can generate the code to display tweets on any search keyword or hashtag. Simply copy the code and then paste in a text widget, post, or page in WordPress.

9. Auto Publish Your Tweets as Blog Posts in WordPress

Ever wanted to publish your Tweets as posts in WordPress?

You can do that by using the Twitter Tools plugin. It integrates your WordPress blog with Twitter and allows you to automatically fetch your latest tweets and add them as new posts to your WordPress blog.

You can choose to post each tweet as its own post, or combine posts in a daily digest.

Twitter tools archiving your tweets as posts in WordPress

10. Adding a Pay With Tweet Button in WordPress

A great way to build a following on Twitter is to ask your readers to follow you in return of some exclusive download. You can set it up by using Pay with a Tweet plugin.

You will need to connect the plugin to your Twitter account by creating an app which is a fairly straight forward process explained very clearly in our tutorial. After the setup, you can create a new button and set up the tweet you want users to send.

Pay with a tweet button preview

We hope this tutorial helped you discover the best WordPress twitter plugins and hacks.

Easy Guide to Add SSL and HTTPS in WordPress

In this tutorial, we will show you how to add SSL and HTTPS in WordPress.

Don’t worry, if you have no idea what SSL or HTTPS is. We’re going to explain that as well.

What is HTTPS and SSL?


Every day we share our personal information with different websites whether it’s making a purchase or simply logging in.

In order to protect the data transfer, a secure connection needs to be created.

That’s when SSL and HTTPS come in.

HTTPS or Secure HTTP is an encryption method that secures the connection between users’ browser and your server. This makes it harder for hackers to eavesdrop on the connection.

Each site is issued a unique SSL certificate for identification purposes. If a server is pretending to be on HTTPS, and it’s certificate doesn’t match, then most modern browsers will warn the user from connecting to the site.

Now you are probably wondering, why would you ever need to move from HTTP to HTTPS and install a SSL certificate?

Why do you need HTTPS and SSL?

If you are running an eCommerce website, then you absolutely need a SSL certificate specially if you are collecting payment information.

Most payment providers like Stripe, PayPal Pro, Authorize.net, etc will require you to have a secure connection using SSL.

Recently, Google also announced that they will be using HTTPS and SSL as a ranking signal in their search results. This means that using HTTPS and SSL will help improve your site’s SEO.

We already use SSL for our eCommerce sites like OptinMonster, Soliloquy, and Envira Gallery. We will also switch all content sites to SSL as well. We just added SSL for Syed Balkhi’s blog (our founder).

We’re often asked wouldn’t SSL and HTTPS slow down my WordPress website? In reality, the difference in speed is negligible, so you should not worry about that.

Requirements for using HTTPS/SSL on a WordPress Site

The requirements for using SSL in WordPress is not very high. All you need to do is purchase a SSL certificate.

Some WordPress hosting providers offer free SSL with their plans. Siteground, one of our favorite providers, offer a one year free SSL certificate with their “grow big” plan).

If your hosting provider does not offer a free SSL certificate, then you can ask them if they sell third party SSL Certificates. Most hosting providers like Bluehost sell them around $50-$200.

You can also buy SSL from providers like Godaddy.

Once you have purchased a SSL Certificate, you would need to ask your web hosting provider to install it on your server.

This is a fairly straight forward process.

How to Setup WordPress to Use SSL and HTTPS

If you are starting a new site and/or want to use HTTPS everywhere on your site, then you need to update your site URL.

You can do this by going to Settings » General and updating your WordPress and site URL address fields.

Setup WordPress to Use SSL and HTTPS

Now if you’re adding SSL to your existing site, then you need to setup WordPress SSL redirect from HTTP to HTTPS.

You can do this by adding the following code in your .htaccess file:

RewriteEngine On
RewriteCond %{SERVER_PORT} 80 
RewriteRule ^(.*)$ https://www.yoursite.com/$1 [R,L]

Don’t forget to replace yoursite.com with your site URL.

If you are on nginx servers (most users are not), you would add the following to redirect from HTTP to HTTPS:

server {
listen 80;
server_name yoursite.com www.yoursite.com;
return 301 https://yoursite.com$request_uri;
}

By following these steps, you will avoid the WordPress HTTPS not working error because all your site URL and content will be on SSL.

If you want to add SSL and HTTPS on your WordPress multi-site admin area or login pages, then you need to configure SSL in wp-config.php file.

Simply add the following code above the “That’s all, stop editing!” line in your wp-config.php file:

 define('FORCE_SSL_ADMIN', true);

This wp-config.php SSL trick works for single sites as well as multi-sites.

Setup SSL and WordPress HTTPS on Exclusive Pages

Now if for some reason, you only want to add HTTPS and SSL on specific pages of your site, then you would need the plugin called WordPress HTTPS (SSL).

First thing you need to do is install and activate the WordPress HTTPS (SSL) plugin.

Please note that this plugin hasn’t been updated for a while, but it works fine and is safe to use. See our guide on installing plugins not tested with your WordPress version for more information.

Upon activation the plugin will add a new menu item labeled HTTPS in your WordPress admin. You can click it to visit the plugin’s settings page.

menu item labeled HTTPS

The first option of the settings page asks you to enter your SSL host. Mostly it is your domain name. However, if you are configuring the site on a subdomain and the SSL certificate you got is for your main domain name, then you will enter the root domain. If your using a shared SSL certificate provided by your web host, then you will need to enter the host information they provided instead of your domain name.

In some cases if you are using a non-traditional SSL host and need to use a different port, then you can add it in the port field.

Force SSL Administration setting forces WordPress to use HTTPs on all admin area pages. You need to check this box to make sure that all traffic to your WordPress admin area is secure.

The next option is to use Force SSL Exclusively. Checking this box will only use SSL on pages where you have checked the Force SSL option. All other traffic will go to the normal HTTP url.

This works if you only want to use SSL on specific pages like shopping cart, checkout, user account pages, etc.

Click on the save changes button to store your plugin settings.

If you want to use HTTPS just for specific pages, then you need to edit those pages and check the Force SSL checkbox.

use HTTPS just for specific pages

Once done, visit your page to ensure that you have all green light in Chrome and other browsers.

all green light in Chrome and other browsers

That’s all, we hope this tutorial helped you add HTTPS and SSL in WordPress.

Easy Guide to Cloak Affiliate Links on Your WordPress Site

In this tutorial, we will explain what is link cloaking, and how you can cloak affiliate links in WordPress.

What is Link Cloaking and When do you need it?

Link cloaking is a technique used to make long affiliate links into a shorter and more branded link.

Often affiliate links are lengthy, hard to remember, and show your affiliate username or ID like this:

http://www.affiliatesite.com/products/?product_id=123&affiliate=123

Link cloaking allows you to shorten these lengthy ugly link into branded URLs like these:

http://www.yoursite.com/refer/productname

You can use anything as base URL. We use refer in our cloaked links on WPCademy. Some other popular URL bases are out, go, recommends, etc.

If you are someone who uses affiliate links in your blogs to make money, then you should to cloak links. Many site owners cloak links to properly manage their affiliate links.

Link cloaking allows you to create easy to understand URLs for your outgoing affiliate links. It can also help you add an additional layer of click tracking to ensure you are getting paid for every sale you refer.

You can also protect your affiliate links from getting hijacked by using link cloaking. Lastly, cloaked links allow you to easily manage your affiliate links from your WordPress admin interface.

How to Cloak Affiliate Links in WordPress

Since affiliate marketing is an important source of income for many bloggers, there are many WordPress plugins available that allows you to cloak your affiliate links and easily manage them.

We have hand-picked some of the best WordPress link cloaking plugins for you.

You can use any one of these plugins to easily add your affiliate links into WordPress and cloak them to get maximum benefits.

1. ThirstyAffiliates

ThirstyAffiliates is one of the best affiliate link manager and link cloaking plugin for WordPress. It allows you to easily add your affiliate links in WordPress and manage them from one single dashboard.

You can insert your affiliate links in any WordPress posts or pages from the buttons on the post editor screen.

Another great feature is that you can automatically replace selected keywords with affiliate links. Aside from that you can choose the base URL, automatically nofollow links, A/B test your offers, geo-target your offers, get stats, and so much more.

We use ThirstyAffiliates on WPCademy. See our guide on how to add affiliate links in WordPress using ThirstyAffiliates.

2. Pretty Link Lite

Pretty Link Lite

Pretty Link Lite is another WordPress link cloaking plugin. It allows you to easily manage your affiliate links. You can auto add nofollow tag to affiliate links, shorten links, and redirect them properly.

Pretty Link Lite also provides analytics with an easier way to purge older hits from your database. This ensures that these hit logs don’t take too much space on your database and backup files.

3. Easy Affiliate Links

Easy Affiliate Links settings

Easy Affiliate Links is an easy to use link cloaking plugin for affiliate marketers. It allows you to cloak links, add and manage all your affiliate links from a single dashboard.

Basically it has all the features that you would want from a link management plugin with a nicer and easier interface.

4. WP Wizard Cloak

WP Wizard Cloak

WP Wizard Cloak is another WordPress affiliate link management plugin. It comes with all the whistles and bells you would need from an affiliate link management tool.

It provides URL shortening and link cloaking with easy to use tools to add and manage your affiliate links in WordPress.

5. Links Auto Replacer

Link Auto Replacer

Links Auto Replacer is a bit different than most other plugins in the list. As the name suggests, its main use is to automatically add links for certain keywords. You can manage your links and add new links just like any other link management plugin.

6. WooCommerce Cloak Affiliate Links

WooCommerce Cloak Affiliate Links

As the name suggests, WooCommerce Cloak Affiliate Links plugin is for eCommerce sites built on WooCommerce platform.

This plugin cloaks all external links on a WooCommerce site automatically. You can choose a URL slug by visiting Settings » Permalinks page. You can also change the redirect type. But that’s about it, this plugin is not a link manager so you cannot use it to add or manage your affiliate links.

7. Affiliate Link Manager

Affiliate link manager

Affiliate Link Manager plugin takes a different approach for link cloaking. It does not add a URL base like most other plugins in the list. Instead it allows you to use a keyword as the URL slug for the cloaked link. In terms of features it is very limited, but it does the job. It also offers some basic stats for your cloaked link views.

We hope this tutorial helped you learn how to cloak links on your WordPress site.

Easy Guide to Limit Comment Length in WordPress

In this tutorial, we will show you how to limit comment length in WordPress, so you can set both minimum and maximum comment length limit for your WordPress site.

Why limit comment length in WordPress?


In our experience of moderating online discussions for the past decade, we have found that most helpful comments are above 60 characters and below 5000 characters in length.

When a person writes a one-word comment, it usually is not very helpful. In most cases, it is spam because the author is simply trying to earn a back link from your site.

However when a person writes a comment above 5000 characters, its usually a rant / complaint that in most cases is not relevant to that particular article.

By setting comment length limits in WordPress, you can improve the quality of your comments.

There are two methods to limit comment length in WordPress. The first method requires you to install a plugin. The second method uses a simple code snippet that you can add to your site.

Method 1: Limiting Comment Lenght Using a Plugin

First thing you need to do is install and activate Control Comment Lengthplugin. Upon activation, simply go to Settings » Control Comment Length to configure the plugin settings.

Controlling comment length in WordPress using a plugin

The plugin’s user interface is in German with English. You can set both minimum and maximum number of characters a comment can have. We recommend using 60 for minimum and 5000 for maximum character count.

You can also add messages that will be visible to users when there comments are either too short or too long. The plugin only provides these messages in the German language. You can replace it with your own message.

Method 2: Limit Comment Length Using Code Snippet

The second method is for users who don’t mind dealing with code code. We will add a filter hook to preprocess_comment. This filter is run before WordPress saves any comments to database or runs any other pre-processing on submitted comments. We will use it to check the comment length. If it is above or below the set comment length parameters, then we will show users an error message.

Simply add this code to your theme’s functions.php file or a site-specific plugin.

add_filter( 'preprocess_comment', 'wpb_preprocess_comment' );
 
function wpb_preprocess_comment($comment) {
    if ( strlen( $comment['comment_content'] ) > 5000 ) {
        wp_die('Comment is too long. Please keep your comment under 5000 characters.');
    }
if ( strlen( $comment['comment_content'] ) < 60 ) {
        wp_die('Comment is too short. Please use at least 60 characters.');
    }
    return $comment;
}

Comment too long error

We hope this tutorial helped you limit comment length in WordPress.