Easy Guide to Add Title Attribute in WordPress Navigation Menus

In this tutorial, we will learn how to add title attribute in WordPress navigation menus.

Why Use Title Attribute in Menus?

Title attribute is an HTML attribute that can be added to any element, but it is most commonly used with links and images.

It allows you to provide additional information about the link or the image. See our guide on the difference between what’s the difference between image alt text vs title.

Title Attribute in WordPress

Typically web browsers display the title attribute on mouseover. This allows users to see where this link will take them before they click on it.

Screen readers may also read title attribute, but many screen readers will ignore it and will only read the anchor text.

Some SEO experts believe that it is not useful while others claim it is useful for SEO as it allows you to provide more context.

WordPress removed title attribute from insert link popup in version 4.2. However, you can easily add the title and rel=nofollow options in insert link popup.

Adding Title Attribute in WordPress Navigation Menu Items

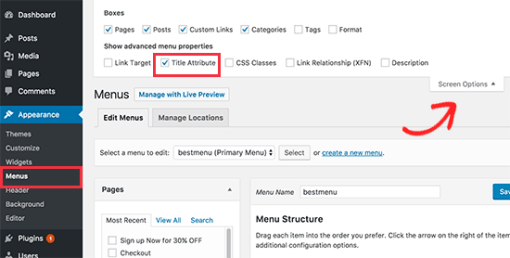
First you need to visit Appearance » Menus page and click on the ‘Screen Options‘ tab in the top right corner of the screen.

Title Attribute in WordPress

This will bring down a menu where you need to click on the check box next to Title Attribute option.

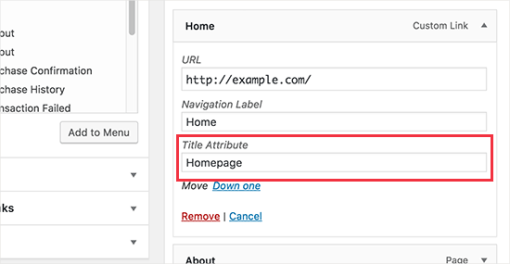
After that, simply scroll down and click on any menu item in your existing menu to expand it. You will now see the title attribute field.

Title Attribute in WordPress

You can now add the text you want to use as title and then repeat it for all menu items in your navigation menu.

Don’t forget to click on the save menu button to store your changes.

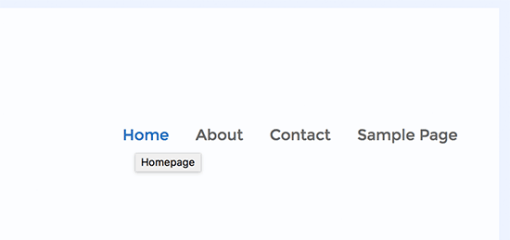
You can now visit your website and take your mouse to a link in navigation menu. You will see the title attribute displayed as tooltip.

Title Attribute in WordPress

You can take title attributes even further with jQuery by adding fancy tooltips on mouseover effect.

We hope this tutorial helped you learn how to add title attribute in WordPress navigation menus.

Easy Guide to Move WordPress to a New Host or Server With No Downtime

In this tutorial, we will learn how to properly migrate your WordPress site to a new host with no downtime.

Step 1: Choose Your New WordPress Host

If you are stuck with a slow web host even after optimizing WordPress speedand performance, then it’s time to move your WordPress site to a new host that can handle your growing traffic.

Step 2: Set Up Duplicator for Easy Migration

The first thing you need to do is install and activate the free Duplicator plugin on the website that you want to move. For more details, see our step by step guide on how to install a WordPress plugin.

Duplicator is a free plugin that we highly recommend. You can also use it to move your website to a new domain name without losing SEO.

However, in this article we will walk you through how to use it to migrate your WordPress site to a new hosting provider with zero downtime.

Once you have installed and activated Duplicator, go to the Duplicator » Packages page in your WordPress admin area.

Next, you need to click the ‘Create New’ button in the top right corner.
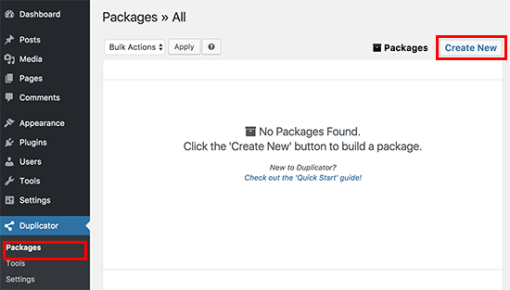
Move WordPress to a New Host

After that, click the Next button and follow the steps to create your package.
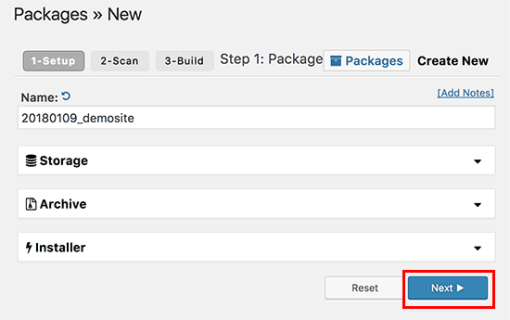
Move WordPress to a New Host

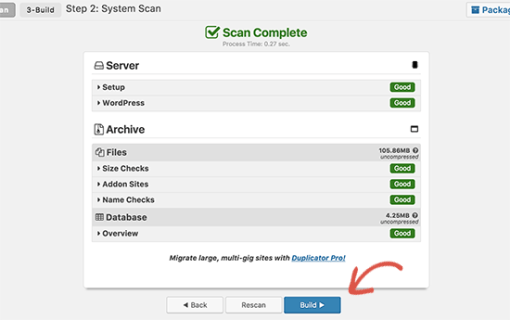
Make sure that your scan results check out (everything should say “Good”), and then click the Build button.
Move WordPress to a New Host

The process may take several minutes to complete, so leave the tab open as it works.

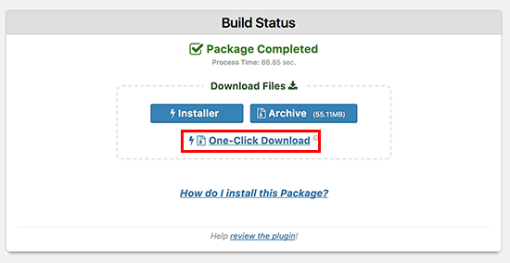
Once the process is complete, you will see download options for Installer and the Archive package. You need to click on the ‘One click download’ link to download both files.
Move WordPress to a New Host

The archive file is a copy of your site, and the installer file will automate the installation process for you.

Step 3: Import Your WordPress Site to Your New Host

Now that you have downloaded both the archive and installer files, the next step is to upload them to your new web host.

You can do this by connecting to your new web host using FTP. If you’ve never done this before, check out our beginner’s guide to uploading files via FTP to WordPress.

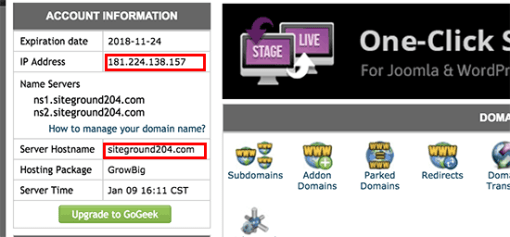
Normally, you would enter your website’s domain name as host when connecting your FTP client. However, since your domain name is still poiting to your old host, you’ll need to connect by entering your server’s IP address or server host name. You can find this information from your new hosting account’s cpanel dashboard.
Move WordPress to a New Host account info

If you are unable to find this information, then ask support at your new web host and they will help you out.

Using your FTP client, upload both installer.php file and your archive .zip file to the root directory of your website. This is usually /username/public_html/folder. Again, if you are not sure, then ask your web hosting company.

Make sure that your root directory is completely empty. Some web hosting companies automatically install WordPress when you sign up. If you have WordPress installed in your root directory, then you need to delete WordPress first.

Now you need to upload both the archive zip file and installer.php file to your site’s root directory.

Step 4: Change The Hosts File to Prevent Downtime

Once you’ve uploaded both files to your new host, you need to access the installer.php file in a browser.

The file can be accessed using a URL like this:

http://www.example.com/installer.php

However, this URL will take you to your old web host, and you will get a 404 error. This is because your domain name is still pointing to your old web host.

Normally, folks will tell you to change your domain nameservers and point to your new host. However, that will result in your users seeing a broken website as you migrate it.

We’ll show you how you can access your new site temporarily on your computer, without affecting your old site.

This is done with a hosts file on your computer.

The hosts file can be used to map domain names to specific IP addresses. In this step, we will show you how to add an entry for your domain name in the hosts file so that it points to your new host, but only when using your computer.

Making these changes will allow you to access the files on your new host using your own domain name, while the rest of the world will still be accessing your site from the old host. This ensures 100% uptime.

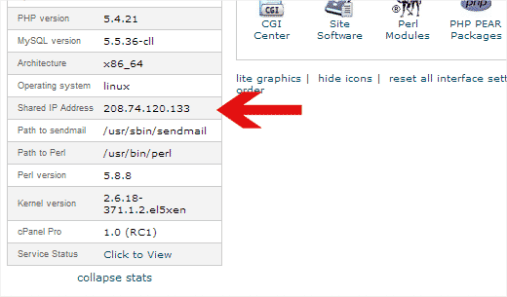
The first thing you need to do is find the IP address of your new web hosting server. To find this, you need to log into your cPanel dashboard and click on expand stats link in the left-hand sidebar. Your server’s address will be listed as Shared IP Address.

On some web hosting companies you will find this information under ‘Account Information’ heading.
new ip after wp dublication

In the next step, Windows users need to go to Programs » All Programs » Accessories, right click on Notepad and select Run as Administrator. A Windows UAC prompt will appear, and you need to click on Yes to launch Notepad with administrator privileges.

On the Notepad screen, go to File » Open and then go to C:\Windows\System32\drivers\etc. Select hosts file and open it.

Mac users will need to open the Terminal app and enter this command to edit hosts file:

sudo nano /private/etc/hosts

For both Windows and Mac users, at the bottom of the hosts file, you need to enter the IP address you copied and then enter your domain name. Like this:

192.168.1.22 www.example.com

Make sure that you replace the IP address with the one you copied from cPanel, and example.com with your own domain name. Save your changes, and you can now access your files on the new host using your domain name on your computer.

Important: Don’t forget to undo the changes you made to hosts file after you have finished the migration (step 6).

Step 5: Creating MySQL Database on Your New Host

Before we run the installer on the new host, first we need to create a MySQL database on your new hosting account. If you have already created a MySQL database then you can jump to the next step.

Creating a Database in cPanel

Go to your new hosting account’s cPanel dashboard, scroll down to Databases section and click on MySQL databases icon.

select database

You will see a field to create a new database. Enter a name for your database, and click “Create Database” button.

new database create from cpanel

After creating MySQL database, scroll down to MySQL Users section. Now provide a username and password for your new user and click on the ‘Create a user’ button.

Next, you need to add user to the database. This will give the username you just created, all the permissions to work on your database.

Scroll down to ‘Add User to a Database’ section. Select the database user you created from the dropdown menu next to user, then select database, and click on the add button.

Your database is now ready to be used with WordPress. Be sure to make note of the database username and password.

Step 6: Begin the Duplicator Migration Process

Now we’re ready to run the installer. Navigate to this address in your browser window, replacing example.com with your domain name:

http://www.example.com/installer.php
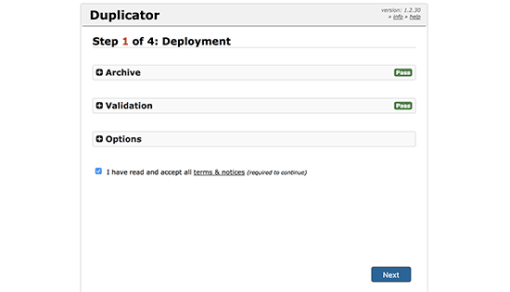
The installer will run a few tests and will show you ‘Pass’ next to archive and validation tests. Check the terms and conditions checkbox and continue by clicking on the next button.

Next, you will be asked to enter your MySQL host, database name, username, and password. Host is typically localhost, after that you will enter the details of database you created in previous step.
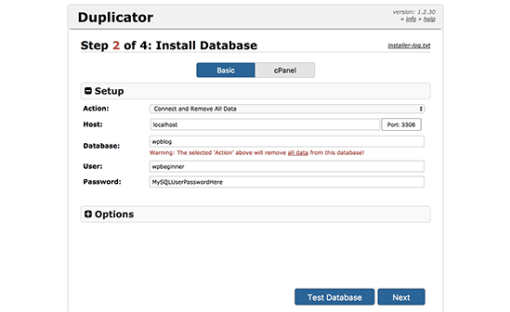
Move WordPress to a New Host duplicator

You can click on the ‘Test Database’ button to make sure you entered correct information. If duplicator is able to connect, you will see a string starting with Pass. Otherwise, you will see the database connection error details.

Click on the next button to continue.

Duplicator will now import your WordPress database from the archive zip into your new database.

Next, it will ask you to update site URL or Path. Since you are not changing domain names, you DON’T need to change anything here.

Click on the next button to continue.

Duplicator will run the final steps and will show you the login button.
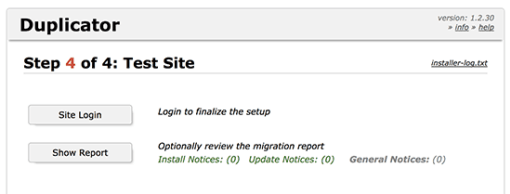
You can now login to your WordPress site on the new host to make sure that everything is working as expected.

Step 7: Update Your Domain

At this point, you’ve created a complete copy of your WordPress database and files on your new hosting server. But your domain still points to your old web hosting account.

To update your domain, you need to switch your DNS nameservers. This ensures that your users are taken to the new location of your website when they type your domain into their browsers.

If you registered your domain with your hosting provider, then it’s best to transfer the domain to the new host. If you used a domain registrar like Godaddy, Namecheap, etc, then you need to update your nameservers.

You will need the nameserver information from your new web host. This is usually a couple of URLs that look like this:

ns1.hostname.com
ns2.hostname.com

For the sake of this guide, we will be showing you how to change DNS nameservers with GoDaddy. Depending on your domain registrar or web host, the screenshots may not reflect the setup on your registrar or web host. However the basic concept is the same.

Just look for domain management area and then look for nameservers. If you need assistance with updating your nameservers, you can ask your web hosting company.

First you need to login to your Godaddy account and then click on Domains. After that click on the manage button next to the domain name you want to change.
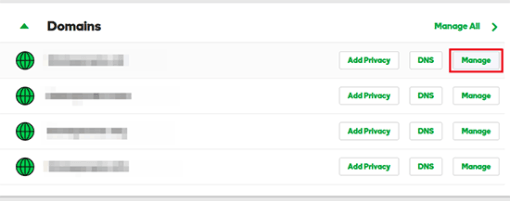
Move WordPress to a New Host

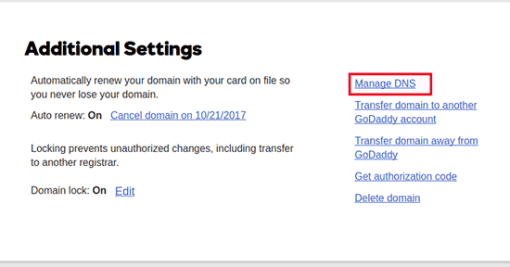
Under ‘Additional Settings’ section, click on ‘Manage DNs’ to continue.
Move WordPress to a New Host

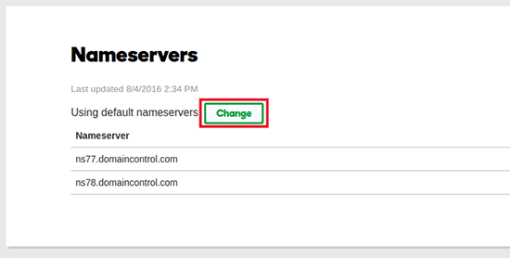
Now you need to scroll down to the Name servers section and click on the change button.
change domain nameserver

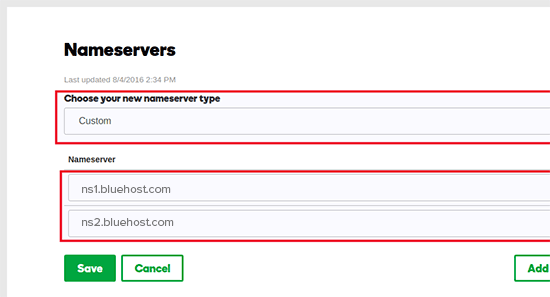
First you will need to switch the nameserver type dropdown from ‘Default’ to ‘Custom’ and under Nameservers fill in the your new hosting provider’s information.
Updating nameserver

Don’t forget to click on the save button to store your changes.

You have successfully changed the nameservers. DNS changes can take 4 – 48 hours to propagate for all users.

Now since you have the same content on your old host and the new host, your users wouldn’t see any difference. Your WordPress migration will be seamless with absolutely no downtime.

To be on the safe side, you can wait to cancel your old hosting account until 7 days after your migration.

We hope that this step by step guide helped you move WordPress to your new host with no downtime whatsoever.
Easy Guide to Properly Setup Google AMP on Your WordPress Site

In this tutorial, we will learn how to set up Google AMP in WordPress.

What is Google AMP?

Google AMP stands for Accelerated Mobile Pages. It is an open source initiative supported by technology companies like Google and Twitter. The goal of the project is to make web content load faster for mobile users.
For many mobile users, reading on the web is often slow. Most content rich pages take several seconds to load despite all efforts taken by site owners to speed up their website.

Accelerated Mobile Pages or AMP uses bare minimal HTML and limited Javascript. This allows the content to be hosted on Google AMP Cache. Google can then serve this cached version to users instantly when they click on your link in the search results.

It is very similar to Facebook Instant Articles. However, Instant Articles are limited only to Facebook’s platform, more specifically to their mobile app.

Accelerated Mobile Pages are platform-agnostic and can be used by any app, browser, or web viewer. Currently it is used by Google, Twitter, LinkedIn, Reddit, and others.

Pros and Cons of Google AMP (Accelerated Mobile Pages)

SEO experts claim that Accelerated Mobile Pages will help you rank higher in Google, and it improves the user experience for mobile users on slow internet connections. However, they are several challenges for website owners, bloggers, and marketers.

AMP uses limited set of HTML, JavaScript, and CSS. This means you cannot add certain widgets and features to your mobile AMP website. This limits your ability to add smart email optin forms, facebook like boxes, and other dynamic scripts.

While Google AMP supports Google Analytics, it does not support many other analytics platforms. Same goes for advertising options which are limited to select few advertising platforms.

Despite its limitations, Google is pushing AMP pages by giving them a boost in mobile search.

If significant chunk of your traffic comes from mobile searches, then you may benefit from adding AMP support to improve and maintain your SEO.

Note: There have been a few complaints about Google AMP by bloggers.

First is by Alex Kras who claim that you can potentially lose mobile traffic if you enable Google AMP. Read the article thoroughly because that’s a huge problem, and despite what the Google Tech Lead for AMP project has said, there aren’t any good solutions that address the issue in our opinion.

Second is by Terrence Eden which highlights the difficulties of switching back from Google AMP should you change your mind in the future. We don’t believe this is a major issue because you can do a 301 redirect which several have pointed out in the comment section of his blog posts, but nonetheless it is something you need to think about.

For the reasons above, we are not switching WPCademy to Google AMP just yet.

Setting up Accelerated Mobile Pages or AMP in WordPress

First thing you need to do is install and activate the AMP plugin. For more details, see our step by step guide on how to install a WordPress plugin.

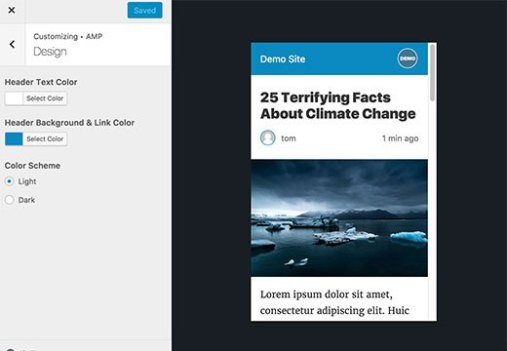
Upon activation, you can head over to Appearance » AMP page to see how your site looks on mobile devices using AMP.

Google AMP in WP

You can change the header background and text color on this page. The header background color you choose will also be used for links.

The plugin will also use your site’s icon or logo if your theme supports it. See our guide on how to add a favicon or site icon in WordPress for detailed instructions.

Don’t forget to click on the save button to store your changes.

You can now visit any single post on your website and add /amp/ at the end of the URL. Like this:

http://example.com/2016/10/my-blog-post/amp/

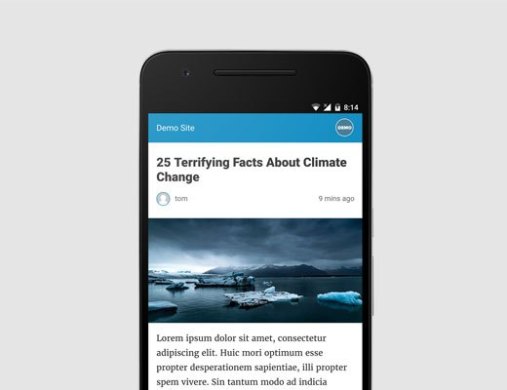
This will show you a stripped down AMP version of the same post.

Google AMP in wordpress

If you view the source code of the original post, you will find this line in the HTML:

<link rel="amphtml" href="http://example.com/2016/10/my-blog-post/amp/" />

This line tells search engines and other AMP consuming apps/services where to look for the AMP version of the page.

Troubleshooting:

If you see a 404 error when trying to view the amp version, then here is what you need to do.

Visit Settings » Permalinks page in your WordPress admin and click on the ‘Save Changes’ button. Remember, don’t change anything here, just press the save button. This will refresh your website’s permalink structure.

View Accelerated Mobile Pages in Google Search Console

Want to know how your Accelerated Mobile Pages are doing in Google Search? You can easily check this using the Google Search Console.

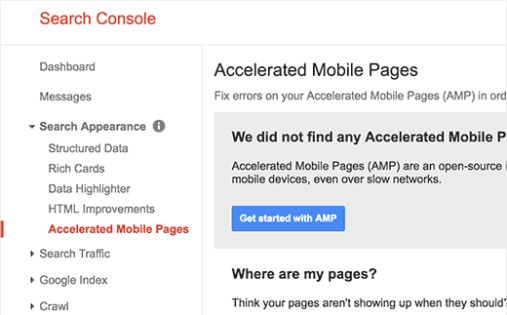
Log in to your Google Search Console dashboard and then click on Search Appearance » Accelerated Mobile Pages.

accelerated mobile pages in wp

Don’t worry if you don’t see your AMP results right away. It may take a while for Google to index your Accelerated Mobile Pages and then show data in Search Console.

Extending and Customizing Your Accelerated Mobile Pages

The AMP plugin for WordPress comes with very limited customization options. However you can use some other WordPress plugins to add few more customizations.

If you are already using Yoast SEO, then you need to install and activate the Glue for Yoast SEO & AMP.

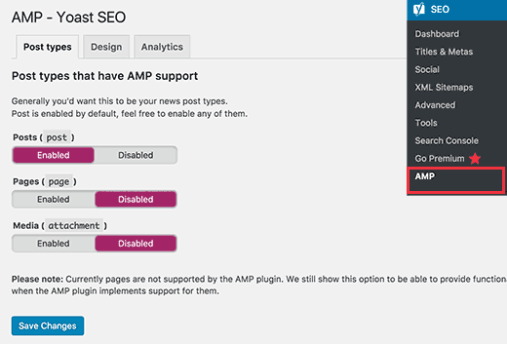
It is an add-on plugin for Yoast SEO and AMP plugins. Upon activation, you need to visit SEO » AMP page to configure plugin settings.

Google AMP yoast seo

The plugin allows you to enable AMP support for other post types.

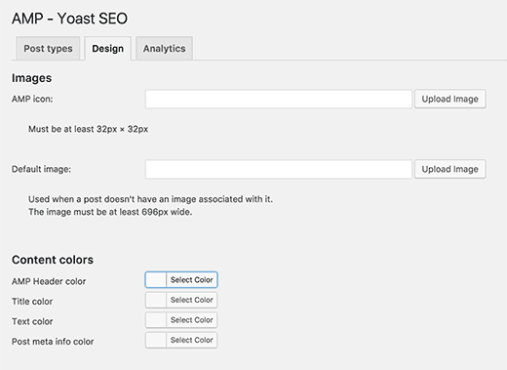
On the design tab, you can choose colors and design options. You can also upload a logo and a default header image which will be used when a post does not have its own featured image.

Google AMP yoast seo setup

You can switch to the Analytics tab to add your Google Analytics ID.

Don’t forget to click on the save settings button to store your changes.

There are many more plugins which will allow you to add related posts, footer widgets, and even social media icons to your AMP pages.

However, you need to make sure to validate your AMP pages after you install any addon plugins.

We hope this tutorial, helped you learn how to set up Accelerated Mobile Pages (AMP) on WordPress.

Easy Guide to Add Post Type Archive in WordPress Navigation Menus

In this tutorial, we will learn how to add post type archive in WordPress navigation menus.

Custom Post Type Archives in WordPress

In WordPress, the term ‘Archives’ is used for a list of entries from a post type or taxonomy (like categories and tags).

If archives are enabled for a custom post type, then you can display them on your website. Typically, the URL of your custom post type archive page is in this format:

http://example.com/post-type-slug/

Post type slug is the nice name for your custom post type.

For example, we have a custom post type called ‘Deals’, and you can view its archive page at a URL like this:

https://www.wpcademy.com/deals/

You can place a link to the archive page of your custom post type in your site’s navigation menus. This will allow your users to see all past entries posted in that post type on a single page.

Having said that, let’s see how to add a link to your custom post type archive page in WordPress navigation menus.

Adding Link to Custom Post Type Archive page in Navigation Menus

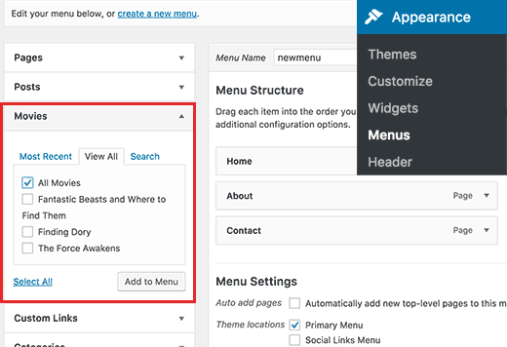
First, you need to visit Appearance » Menus page. You will notice a tab for each of your custom post type in the left column.

Post Type Archive in WordPress

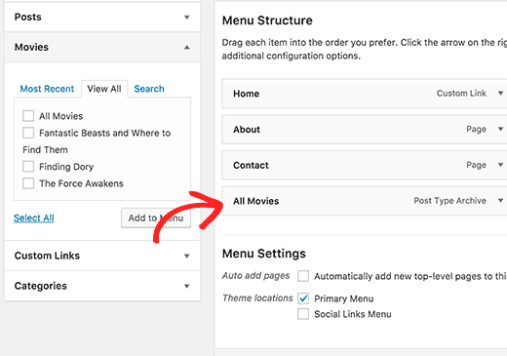
You need to click on the name of your custom post type to expand it and then click on the ‘View all’ tab.

You will see an option for your post type archives. Check the box next to it and then click on the Add to Menu button.

Your custom post type archive will now appear as a menu item in the right column.

Post Type Archive in WordPress

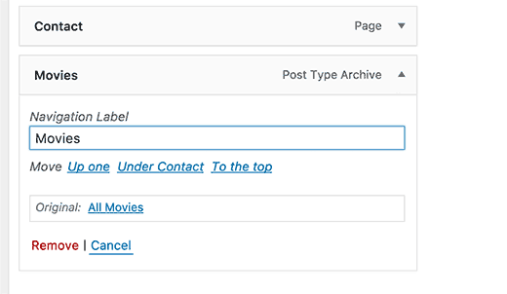
By default, it will use your custom post type name with the word archives for the link label.

You may want to change this into something easier. Click on the menu item to edit it and then change its navigation label.

Post Type Archive in WordPress

Don’t forget to click on the save menu button to store your changes.

You can now visit your website to see the custom post type archive link in your navigation menu.

Post Type Archive in WordPress

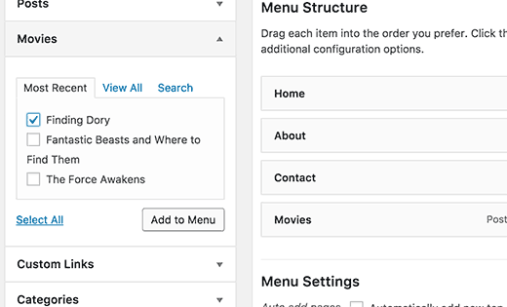
Just like posts and pages, you can also add a single entry from your post type to navigation menus.

Simply select an entry and then click on add to menu button.

Post Type Archive in WordPress

Don’t forget to click on the save menu button to store your changes.

My Custom Post Type Doesn’t Appear on Menus Screen

Custom post types need to match some requirements in order to be displayed on Appearance » Menus page.

First you need to make sure that an archive page exists for your custom post type. Typically it is a URL like this:

http://example.com/movies/

Replace example.com with your own domain name and movies with your post type.

If you can see entries from your post type on this page, then this means your post type supports archives but does not support other requirements.

Good news is that you can still add your custom post type archive page as a custom link.

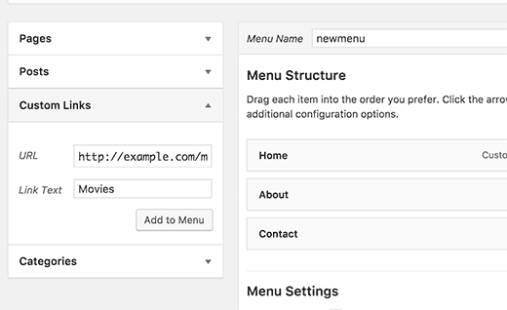
Visit Appearance » Menus page and then click on the ‘Custom Link’ tab to expand it.

Post Type Archive in WordPress

Enter the URL of your custom post type archive page in the URL field and add the label you want to display in the link field.

Next, click on the add to menu button, and you will notice the custom link appear in the right column.

Post Type Archive in WordPress

You can now click on the save menu button to store your changes.

We hope this tutorial helped you learn how to add post type archive in WordPress navigation menus.

Easy Guide to Disable Automatic Update Email Notification in WordPress

In this tutorial, we will learn how to easily disable automatic update email notification in WordPress.

About Automatic Updates in WordPress

WordPress is an open source software which is maintained by a community of developers. It is regularly updated to fix security issues, bugs, and to add new features.

Disable Automatic Update Email Notification

This is why you should always use the latest version of WordPress to make sure that your website is safe and up to date.

WordPress automatically installs minor updates as soon as they are available. After the update, your WordPress site sends a notification to the WordPress admin email address.

The purpose of this email notification is just to inform you that your WordPress site is updated.

If you maintain multiple WordPress sites, then you will get an email from each website. This can be a bit annoying.

Let’s see how to easily turn off the automatic update email notification in WordPress.

Method 1: Disable Automatic Update Email Notification Using Plugin

This method is simpler and does not require you to add any code to your WordPress site.

First thing you need to do is install and activate the Disable WordPress Core Update Email. For more details, see our step by step guide on how to install a WordPress plugin.

The plugin works out of the box, and there are no settings for you to configure.

Upon activation, it simply disables email notification sent after WordPress automatic update.

Method 2: Disable Automatic Update Email Notification Using Code

This method requires you to add code to your WordPress files. If you haven’t done this before, then take a look at our beginner’s guide on pasting snippets from web into WordPress.

You will need to add this code to your theme’s functions.php file or a site-specific plugin.

add_filter( 'auto_core_update_send_email', 'wpb_stop_auto_update_emails', 10, 4 );
  
function wpb_stop_update_emails( $send, $type, $core_update, $result ) {
if ( ! empty( $type ) && $type == 'success' ) {
return false;
}
return true;
}

This code simply adds a filter to disable email notification after automatic core update.

Managing Notifications and Updates in WordPress

By default, WordPress does not allow you to automatically install updates. Many site owners find it a bit annoying to update themes and plugins, especially if they maintain multiple WordPress sites.

Luckily, there are plugins that allow you to more efficiently manage WordPress updates.

Similarly, WordPress by default has no unified interface to manage notification emails. It may not even send email notifications and you wouldn’t notice it.

There are plugins that allow you to manage and control emails sent by WordPress. You can even customize default WordPress emails. For detailed instructions take a look at our guide on how to add better custom notifications in WordPress.

That’s all, we hope this tutorial helped you learn how to disable automatic update email notification in WordPress.

Easy Guide to Add Custom Admin Notices in WordPress

In this tutorial, we will learn how you can add admin notices in WordPress.

Why and When to Use Admin Notices in WordPress?

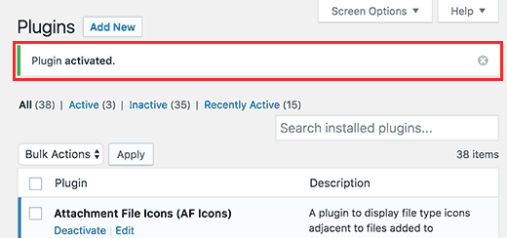
WordPress uses admin notices to alert users about errors, warnings, and success messages.

Custom Admin Notices in WordPress

Individual site owners, plugin authors, and theme developers can also use admin notices.

If you are working on a website for clients who are not familiar with WordPress, then you can add admin notices to display helpful information across their WordPress admin area.

Custom admin notices can also be helpful if you run a multi-author WordPress site. You can add notices to guide new authors and help them find their way around.

However, we recommend using admin notices carefully. They can be really annoying and may ruin the WordPress experience for your users.

Having said that, let’s take a look at how you can add your own custom admin notices in WordPress.

Method 1: Add Custom Notices in WordPress Manually

This method requires you to add code to your WordPress site. If you have never added code before, then take a look at our guide on pasting snippets from the web into WordPress.

Let’s get started.

First you need to add this code to your theme’s functions.php file or a site-specific plugin.

function general_admin_notice(){
    global $pagenow;
    if ( $pagenow == 'options-general.php' ) {
         echo '
‘; } } add_action(‘admin_notices’, ‘general_admin_notice’);

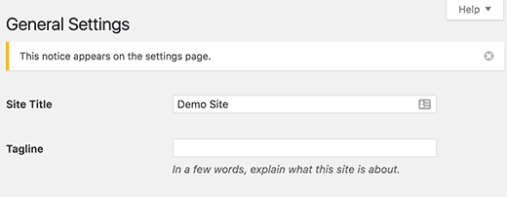
This code displays a notice on the settings page with a yellow border and a button to close the notice. This is how it will appear on your site:

Custom Admin Notices in WordPress

If you study the code, you will notice that we have used $pagenow variable to detect the current page.

After that we added the condition that checks if the current page meets the page where we want to display the notice.

If it does, then we show the notice wrapped in a <div> element. This div element uses CSS classes already defined in the WordPress admin stylesheet for different type of notices.

You need to use notice class and then you can add notice-errornotice-warningnotice-success, or notice-info.

Optionally, you can use is-dismissible class which adds a button to close the notice.

Apart from checking the current page, you can add all kind of conditions to show notices matching different scenarios.

For example, you want to display a notice only to users with the author user role.

Here is how you will do that:

function author_admin_notice(){
    global $pagenow;
    if ( $pagenow == 'index.php' ) {
    $user = wp_get_current_user();
    if ( in_array( 'author', (array) $user->roles ) ) {
    echo '
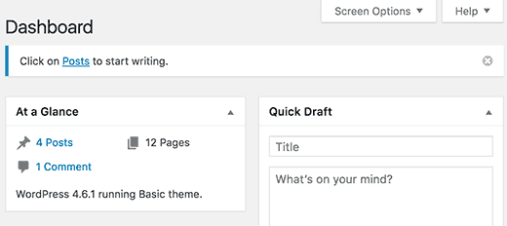
  Click on Posts to start writing.

‘; } } } add_action(‘admin_notices’, ‘author_admin_notice’);

As you can see that we have added an extra check to detect the user role in our function.

This is how it will appear on your site.

Custom Admin Notices in WordPress

Feel free to practice with different conditions, filters, and hooks to play with admin notices.

Method 2: Add Admin Notices Using a WordPress Plugin

This method is simpler as it does not require you to add code. However, it is not as flexible as the custom code method.

First thing you need to do is install and activate the KJM Admin Notices plugin. For more details, see our step by step guide on how to install a WordPress plugin.

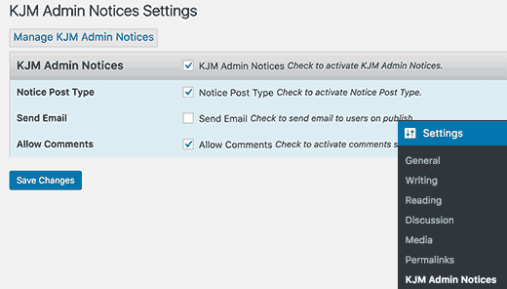
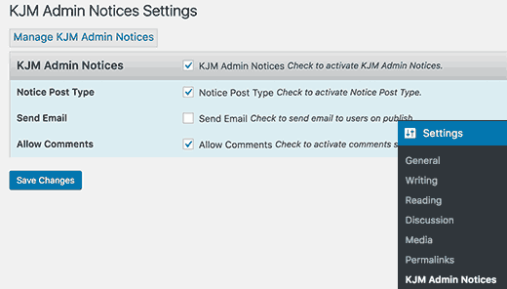
Upon activation, you need to visit Settings » KJM Admin Notices page to configure plugin settings.

Custom Admin Notices in WordPress

First, you need to check the option to enable KJM Admin Notices. The second option adds a custom post type where you can add and edit your custom admin notices.

The plugin also allows you to send an email to registered users when you publish a new notice. You can check the box next to ‘Send Email’ option if you want to use this feature.

You can also enable comments for your notices which will allow users to respond to notices by adding comments. To enable this feature, check the box next to ‘Allow Comments’ option.

Don’t forget to click on the save changes button to store your settings.

You will now see a new menu item labeled notices in your WordPress admin bar. This is where you can add and edit your custom admin notices.

Let’s create your first admin notice.

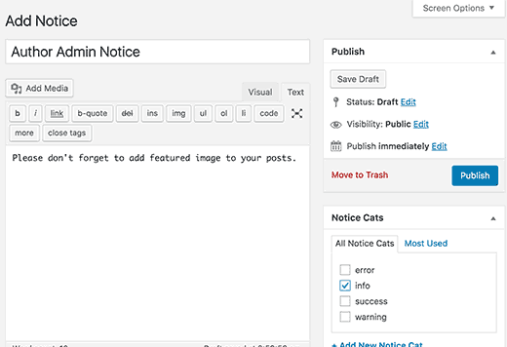
Visit Notices » Add Notice page. You will see a screen much like the WordPress post edit screen.

Custom Admin Notices in WordPress

Start by adding a title for your notice, then add the actual notice in the post editor. You can select the notice category from the box on your right hand.

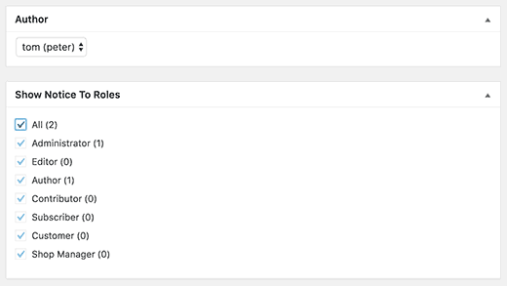
Next you need to select the user roles which will see this notice.

Custom Admin Notices in WordPress

You can optionally show or hide title, author and date, and the button to dismiss notice.

Once you are finished, click on the publish button and your custom admin notice will go live.

Custom Admin Notices in WordPress

KJM Admin Notices allows you to manage your custom admin notices without writing any code. You can delete or unpublish notices that you don’t want to display any more.

Using the email feature, you can also use it to alert all your users even if they don’t log in to check notices.

Having problems sending emails? See our guide on how to fix WordPress not sending email issue.

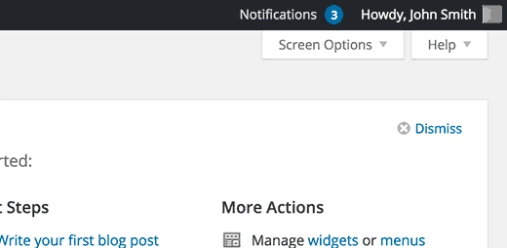
You may also want to take a look at WP Notification Center plugin. It adds a Facebook-like notification center in WordPress. Users can click on the notification icon to see their notifications.

Custom Admin Notices in WordPress

That’s all. We hope this article helped you learn how to add custom admin notices in WordPress. You may also want to see our guide on how to create a custom user registration form in WordPress.

Easy Guide to Show Total Number of Registered Users in WordPress

In this tutorial, we will learn how to show total number of registered users in WordPress.

Method 1: Show Registered User Count Using a WordPress Plugin

First thing you need to do is install and activate the Simple Blog Stats plugin. For more details, see our step by step guide on how to install a WordPress plugin.

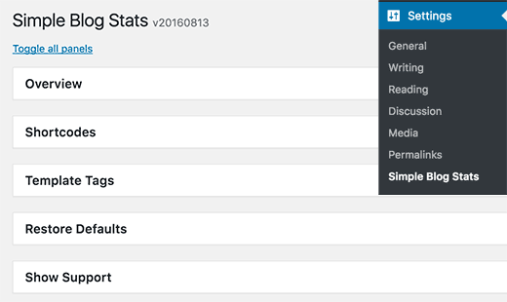
Upon activation, you need to visit Settings » Simple Blog Stats page to configure plugin settings.

Total Number of Registered Users in WordPress

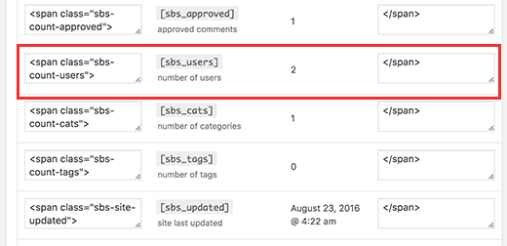
This plugin allows you to show different stats from your WordPress site. You need to click on the shortcodes tab to expand it and then scroll down to the ‘number of users’ row.

Total Number of Registered Users in WordPress

You will see the shortcode [sbs_users] with two text fields on both sides. These text fields contain HTML the plugin will add before and after the number of users.

By default, the shortcode will output HTML like this:

856

If you are unsure, then just copy the shortcode [sbs_users] and click on the save settings button.

You can now add this shortcode to any WordPress post or page. You can also add it to a sidebar widget. If the shortcode does not work in the widget, then follow instructions in our guide on how to use shortcodes in your WordPress sidebar widget.

Method 2: Manually Show Number of Registered Users in WordPress with Code

This method requires you to add code to your WordPress site. If you haven’t done this before, then see our beginner’s guide on pasting snippets from web into WordPress.

You need to add the following code to your theme’s functions.php file or a site-specific plugin.

// Function to return user count
function wpb_user_count() { 
$usercount = count_users();
$result = $usercount['total_users']; 
return $result; 
} 
// Creating a shortcode to display user count
add_shortcode('user_count', 'wpb_user_count');

This code creates shortcode [user_count] which you can use in your WordPress posts, pages, or a sidebar widget to display the user count.

The function does not add any HTML formatting to the user count and simply returns the number. You may want to wrap the shortcode around HTML to use CSS or basic HTML formatting. For example:

Join [user_count] other users who share your interest:

Here is how it looked on our demo site:

Total Number of Registered Users in WordPress

Note: We added a free signup button that redirected to a custom WordPress user registration page.

That’s all, we hope this tutorial helped you learn how to show the total number of registered users in WordPress.