10 Most Wanted Twitter Hacks and Plugins for WordPress

In this tutorial, we will show you the most wanted Twitter hacks and plugins for WordPress.

1. Floating Social Bar

Floating social bar adds social buttons on top of your content including Twitter’s tweet button. Unlike other plugins, Floating social bar does not slow down your website. It asynchronously loads how many times your article has been tweeted and shows it in the button. We use a slightly customized version of the same plugin on all our websites to boost our social shares. See how to add Floating Social Bar in WordPress.

Floating social bar

2. Schedule Your Tweets with Buffer

Buffer is one of the must use tools for every blogger. It allows you to schedule your tweets and other social media updates. You can even use it to schedule your WordPress posts for social media.

The best part is that you can schedule for days and even weeks in advance if you really want to.

Buffer

3. How to Add Twitter Follow Button

Many WordPress themes and plugins allow you to add social buttons to your website. However most of them just show the Twitter logo. The official Twitter follow button also displays your follower count which can help you gain even more followers.

You can easily generate a code for your username and then paste it in a widget or in your child theme.

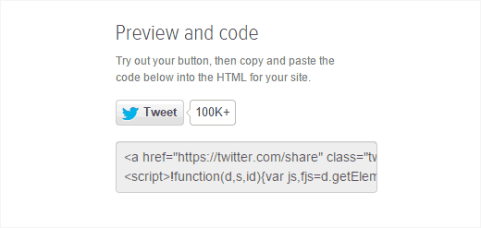
4. How to Add the Official Tweet Button

If you are using Floating Social Bar, then you will not need this because Floating social bar already comes with Tweet button. However if you would rather do it on your own, then you can grab the code and paste it.

Simply visit the Twitter website and generate a code for your user account. You can place this code in a text widget or child theme. It can automatically detect the link a user is trying to share.

Generating the code for the official Tweet button

5. Embed Actual Tweets in Your WordPress Blog Posts

WordPress allows you to embed an actual Tweet into your blog posts. All you have to do is copy the link of the tweet and paste it inside your posts, pages, or even in widgets.

WordPress will automatically fetch the Tweet and will display it just like it appears on Twitter. It will also show any photos or videos attached to the tweet. Also your users can reply, retweet, and favorite that tweet right from your website.

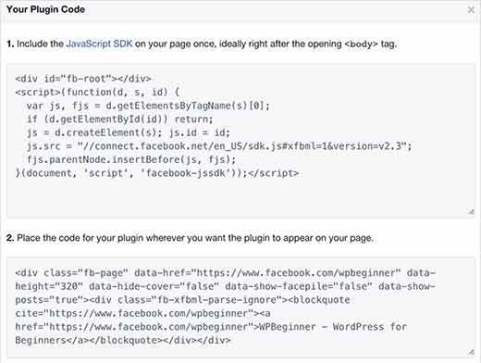
6. How to Add Twitter Cards in WordPress

Twitter cards allow you to display a summary and thumbnail from your article whenever someone tweets a link to your site. Twitter will display a link labeled ‘View Summary’ next to your Tweet which will expand the tweet to show the summary like this.

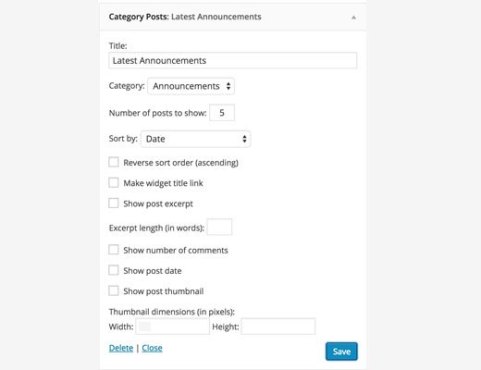
7. Display Recent Tweets in WordPress

Twitter is the discussion hub of the web. By displaying your recent tweets, you can provide your users a chance to jump into the conversation right from your website.

The easiest way to display your recent tweets in WordPress sidebar is by using the official Twitter widget. It allows you to display your recent tweets, and your users can tweet to you directly from your website.


8. Show Selective Tweets in WordPress

Don’t want to show your recent tweets? No problem. You can easily show tweets on specific topic in your WordPress blog.

Using the official Twitter widget, you can generate the code to display tweets on any search keyword or hashtag. Simply copy the code and then paste in a text widget, post, or page in WordPress.

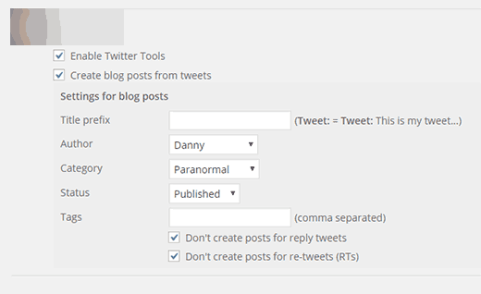
9. Auto Publish Your Tweets as Blog Posts in WordPress

Ever wanted to publish your Tweets as posts in WordPress?

You can do that by using the Twitter Tools plugin. It integrates your WordPress blog with Twitter and allows you to automatically fetch your latest tweets and add them as new posts to your WordPress blog.

You can choose to post each tweet as its own post, or combine posts in a daily digest.

Twitter tools archiving your tweets as posts in WordPress

10. Adding a Pay With Tweet Button in WordPress

A great way to build a following on Twitter is to ask your readers to follow you in return of some exclusive download. You can set it up by using Pay with a Tweet plugin.

You will need to connect the plugin to your Twitter account by creating an app which is a fairly straight forward process explained very clearly in our tutorial. After the setup, you can create a new button and set up the tweet you want users to send.

Pay with a tweet button preview

We hope this tutorial helped you discover the best WordPress twitter plugins and hacks.

Easy Guide to Add SSL and HTTPS in WordPress

In this tutorial, we will show you how to add SSL and HTTPS in WordPress.

Don’t worry, if you have no idea what SSL or HTTPS is. We’re going to explain that as well.

What is HTTPS and SSL?


Every day we share our personal information with different websites whether it’s making a purchase or simply logging in.

In order to protect the data transfer, a secure connection needs to be created.

That’s when SSL and HTTPS come in.

HTTPS or Secure HTTP is an encryption method that secures the connection between users’ browser and your server. This makes it harder for hackers to eavesdrop on the connection.

Each site is issued a unique SSL certificate for identification purposes. If a server is pretending to be on HTTPS, and it’s certificate doesn’t match, then most modern browsers will warn the user from connecting to the site.

Now you are probably wondering, why would you ever need to move from HTTP to HTTPS and install a SSL certificate?

Why do you need HTTPS and SSL?

If you are running an eCommerce website, then you absolutely need a SSL certificate specially if you are collecting payment information.

Most payment providers like Stripe, PayPal Pro, Authorize.net, etc will require you to have a secure connection using SSL.

Recently, Google also announced that they will be using HTTPS and SSL as a ranking signal in their search results. This means that using HTTPS and SSL will help improve your site’s SEO.

We already use SSL for our eCommerce sites like OptinMonster, Soliloquy, and Envira Gallery. We will also switch all content sites to SSL as well. We just added SSL for Syed Balkhi’s blog (our founder).

We’re often asked wouldn’t SSL and HTTPS slow down my WordPress website? In reality, the difference in speed is negligible, so you should not worry about that.

Requirements for using HTTPS/SSL on a WordPress Site

The requirements for using SSL in WordPress is not very high. All you need to do is purchase a SSL certificate.

Some WordPress hosting providers offer free SSL with their plans. Siteground, one of our favorite providers, offer a one year free SSL certificate with their “grow big” plan).

If your hosting provider does not offer a free SSL certificate, then you can ask them if they sell third party SSL Certificates. Most hosting providers like Bluehost sell them around $50-$200.

You can also buy SSL from providers like Godaddy.

Once you have purchased a SSL Certificate, you would need to ask your web hosting provider to install it on your server.

This is a fairly straight forward process.

How to Setup WordPress to Use SSL and HTTPS

If you are starting a new site and/or want to use HTTPS everywhere on your site, then you need to update your site URL.

You can do this by going to Settings » General and updating your WordPress and site URL address fields.

Setup WordPress to Use SSL and HTTPS

Now if you’re adding SSL to your existing site, then you need to setup WordPress SSL redirect from HTTP to HTTPS.

You can do this by adding the following code in your .htaccess file:

RewriteEngine On
RewriteCond %{SERVER_PORT} 80 
RewriteRule ^(.*)$ https://www.yoursite.com/$1 [R,L]

Don’t forget to replace yoursite.com with your site URL.

If you are on nginx servers (most users are not), you would add the following to redirect from HTTP to HTTPS:

server {
listen 80;
server_name yoursite.com www.yoursite.com;
return 301 https://yoursite.com$request_uri;
}

By following these steps, you will avoid the WordPress HTTPS not working error because all your site URL and content will be on SSL.

If you want to add SSL and HTTPS on your WordPress multi-site admin area or login pages, then you need to configure SSL in wp-config.php file.

Simply add the following code above the “That’s all, stop editing!” line in your wp-config.php file:

 define('FORCE_SSL_ADMIN', true);

This wp-config.php SSL trick works for single sites as well as multi-sites.

Setup SSL and WordPress HTTPS on Exclusive Pages

Now if for some reason, you only want to add HTTPS and SSL on specific pages of your site, then you would need the plugin called WordPress HTTPS (SSL).

First thing you need to do is install and activate the WordPress HTTPS (SSL) plugin.

Please note that this plugin hasn’t been updated for a while, but it works fine and is safe to use. See our guide on installing plugins not tested with your WordPress version for more information.

Upon activation the plugin will add a new menu item labeled HTTPS in your WordPress admin. You can click it to visit the plugin’s settings page.

menu item labeled HTTPS

The first option of the settings page asks you to enter your SSL host. Mostly it is your domain name. However, if you are configuring the site on a subdomain and the SSL certificate you got is for your main domain name, then you will enter the root domain. If your using a shared SSL certificate provided by your web host, then you will need to enter the host information they provided instead of your domain name.

In some cases if you are using a non-traditional SSL host and need to use a different port, then you can add it in the port field.

Force SSL Administration setting forces WordPress to use HTTPs on all admin area pages. You need to check this box to make sure that all traffic to your WordPress admin area is secure.

The next option is to use Force SSL Exclusively. Checking this box will only use SSL on pages where you have checked the Force SSL option. All other traffic will go to the normal HTTP url.

This works if you only want to use SSL on specific pages like shopping cart, checkout, user account pages, etc.

Click on the save changes button to store your plugin settings.

If you want to use HTTPS just for specific pages, then you need to edit those pages and check the Force SSL checkbox.

use HTTPS just for specific pages

Once done, visit your page to ensure that you have all green light in Chrome and other browsers.

all green light in Chrome and other browsers

That’s all, we hope this tutorial helped you add HTTPS and SSL in WordPress.

Easy Guide to Cloak Affiliate Links on Your WordPress Site

In this tutorial, we will explain what is link cloaking, and how you can cloak affiliate links in WordPress.

What is Link Cloaking and When do you need it?

Link cloaking is a technique used to make long affiliate links into a shorter and more branded link.

Often affiliate links are lengthy, hard to remember, and show your affiliate username or ID like this:

http://www.affiliatesite.com/products/?product_id=123&affiliate=123

Link cloaking allows you to shorten these lengthy ugly link into branded URLs like these:

http://www.yoursite.com/refer/productname

You can use anything as base URL. We use refer in our cloaked links on WPCademy. Some other popular URL bases are out, go, recommends, etc.

If you are someone who uses affiliate links in your blogs to make money, then you should to cloak links. Many site owners cloak links to properly manage their affiliate links.

Link cloaking allows you to create easy to understand URLs for your outgoing affiliate links. It can also help you add an additional layer of click tracking to ensure you are getting paid for every sale you refer.

You can also protect your affiliate links from getting hijacked by using link cloaking. Lastly, cloaked links allow you to easily manage your affiliate links from your WordPress admin interface.

How to Cloak Affiliate Links in WordPress

Since affiliate marketing is an important source of income for many bloggers, there are many WordPress plugins available that allows you to cloak your affiliate links and easily manage them.

We have hand-picked some of the best WordPress link cloaking plugins for you.

You can use any one of these plugins to easily add your affiliate links into WordPress and cloak them to get maximum benefits.

1. ThirstyAffiliates

ThirstyAffiliates is one of the best affiliate link manager and link cloaking plugin for WordPress. It allows you to easily add your affiliate links in WordPress and manage them from one single dashboard.

You can insert your affiliate links in any WordPress posts or pages from the buttons on the post editor screen.

Another great feature is that you can automatically replace selected keywords with affiliate links. Aside from that you can choose the base URL, automatically nofollow links, A/B test your offers, geo-target your offers, get stats, and so much more.

We use ThirstyAffiliates on WPCademy. See our guide on how to add affiliate links in WordPress using ThirstyAffiliates.

2. Pretty Link Lite

Pretty Link Lite

Pretty Link Lite is another WordPress link cloaking plugin. It allows you to easily manage your affiliate links. You can auto add nofollow tag to affiliate links, shorten links, and redirect them properly.

Pretty Link Lite also provides analytics with an easier way to purge older hits from your database. This ensures that these hit logs don’t take too much space on your database and backup files.

3. Easy Affiliate Links

Easy Affiliate Links settings

Easy Affiliate Links is an easy to use link cloaking plugin for affiliate marketers. It allows you to cloak links, add and manage all your affiliate links from a single dashboard.

Basically it has all the features that you would want from a link management plugin with a nicer and easier interface.

4. WP Wizard Cloak

WP Wizard Cloak

WP Wizard Cloak is another WordPress affiliate link management plugin. It comes with all the whistles and bells you would need from an affiliate link management tool.

It provides URL shortening and link cloaking with easy to use tools to add and manage your affiliate links in WordPress.

5. Links Auto Replacer

Link Auto Replacer

Links Auto Replacer is a bit different than most other plugins in the list. As the name suggests, its main use is to automatically add links for certain keywords. You can manage your links and add new links just like any other link management plugin.

6. WooCommerce Cloak Affiliate Links

WooCommerce Cloak Affiliate Links

As the name suggests, WooCommerce Cloak Affiliate Links plugin is for eCommerce sites built on WooCommerce platform.

This plugin cloaks all external links on a WooCommerce site automatically. You can choose a URL slug by visiting Settings » Permalinks page. You can also change the redirect type. But that’s about it, this plugin is not a link manager so you cannot use it to add or manage your affiliate links.

7. Affiliate Link Manager

Affiliate link manager

Affiliate Link Manager plugin takes a different approach for link cloaking. It does not add a URL base like most other plugins in the list. Instead it allows you to use a keyword as the URL slug for the cloaked link. In terms of features it is very limited, but it does the job. It also offers some basic stats for your cloaked link views.

We hope this tutorial helped you learn how to cloak links on your WordPress site.

Easy Guide to Limit Comment Length in WordPress

In this tutorial, we will show you how to limit comment length in WordPress, so you can set both minimum and maximum comment length limit for your WordPress site.

Why limit comment length in WordPress?


In our experience of moderating online discussions for the past decade, we have found that most helpful comments are above 60 characters and below 5000 characters in length.

When a person writes a one-word comment, it usually is not very helpful. In most cases, it is spam because the author is simply trying to earn a back link from your site.

However when a person writes a comment above 5000 characters, its usually a rant / complaint that in most cases is not relevant to that particular article.

By setting comment length limits in WordPress, you can improve the quality of your comments.

There are two methods to limit comment length in WordPress. The first method requires you to install a plugin. The second method uses a simple code snippet that you can add to your site.

Method 1: Limiting Comment Lenght Using a Plugin

First thing you need to do is install and activate Control Comment Lengthplugin. Upon activation, simply go to Settings » Control Comment Length to configure the plugin settings.

Controlling comment length in WordPress using a plugin

The plugin’s user interface is in German with English. You can set both minimum and maximum number of characters a comment can have. We recommend using 60 for minimum and 5000 for maximum character count.

You can also add messages that will be visible to users when there comments are either too short or too long. The plugin only provides these messages in the German language. You can replace it with your own message.

Method 2: Limit Comment Length Using Code Snippet

The second method is for users who don’t mind dealing with code code. We will add a filter hook to preprocess_comment. This filter is run before WordPress saves any comments to database or runs any other pre-processing on submitted comments. We will use it to check the comment length. If it is above or below the set comment length parameters, then we will show users an error message.

Simply add this code to your theme’s functions.php file or a site-specific plugin.

add_filter( 'preprocess_comment', 'wpb_preprocess_comment' );
 
function wpb_preprocess_comment($comment) {
    if ( strlen( $comment['comment_content'] ) > 5000 ) {
        wp_die('Comment is too long. Please keep your comment under 5000 characters.');
    }
if ( strlen( $comment['comment_content'] ) < 60 ) {
        wp_die('Comment is too short. Please use at least 60 characters.');
    }
    return $comment;
}

Comment too long error

We hope this tutorial helped you limit comment length in WordPress.

Easy Guide to Add the New Facebook Page Plugin in WordPress

In this tutorial, we will show you how to add the Facebook page plugin in WordPress.

What is Facebook Page Plugin?


Facebook page plugin is the replacement of what was previously known as the Facebook Like box. It allowed you to promote your Facebook page on your website. The new Facebook Page plugin does the exact same thing.

It has a new and improved look which now displays your Facebook cover photo as well. It comes with two buttons. Users can Like your page, and they can also share it. You have the option to show users which of their friends have already liked your page. You can also display recent posts from your Facebook page.

How to Add The New Facebook Page Plugin in WordPress

First you need to visit Facebook’s Page Plugin website. You will find the options to configure the appearance of your Facebook page embed.

Simply provide the URL of your Facebook page. Next you will need to enter the width and height for the box. Alternatively, you can leave it blank, and Facebook will try to automatically adjust it.

You can show your cover photo, posts, and friend’s faces in the page plugin. Once you are satisfied with the appearance, click on the Get Code button to continue.

Facebook will now show you two code snippets. Copy the first code snippet and paste it in your theme or child theme‘s header.php file right after the <body> tag.

Next, copy the second code snippet and paste it anywhere you want to display the page like box. You can also paste this code snippet into a text widget by going to Appearance » Widgets.

We hope this tutorial helped you add Facebook Page plugin to your WordPress site.

Easy Guide to Add an iframe Border Around a Video Embed

Adding Border Around iframe Videos in WordPress

First thing you need to do is to open a post or page containing your iframe video embed code. A typical iframe embed code should looks something like this:

[youtube https://www.youtube.com/watch?v=qzOOy1tWBCg&w=560&h=315]

You can add a border around it by adding inline style to the code like this:

[youtube https://www.youtube.com/watch?v=qzOOy1tWBCg&w=560&h=315]


Simply change the width of the border as well as the color, and you’re done.

While adding an iframe border works, there is actually a better way to add a border around videos in WordPress. That’s by using oEmbed.

Adding Border Around oEmbed Videos in WordPress

WordPress comes with built-in oEmbed support. Basically WordPress allows you to paste the link of the video, and it will automatically get the embed code for them. Now this only works for oEmbed enabled sites such as YouTube, Vimeo, DailyMotion, Hulu, etc. (See: how to easily add videos in WordPress using oEmbed)

Now that you know how to add a video with oEmbed, here is how you can add a border around oEmbed videos in WordPress.

When adding a video using oEmbed, simply wrap the URL in span tag with inline style parameters, like this:

<span style="border:3px solid #EEE;">http://www.youtube.com/watch?v=qzOOy1tWBCg</span>

If you want to add a same border around all video iframes, then it would be best to add a CSS class to your theme’s stylesheet.

.frame-border { 
border:3px solid #EEE; 
}

Now you can use the CSS class in your iframe embed code like this:

[youtube https://www.youtube.com/watch?v=qzOOy1tWBCg&w=560&h=315]

You can also use the same CSS class in the span tag around your oEmbed video URLs, like this:

<span class="frame-border">http://www.youtube.com/watch?v=qzOOy1tWBCg</span>

The benefit of using a single CSS class is that if you change themes later, then you can easily change the colors with one click vs going back and editing each video individually.

We hope this tutorial helped you add an iframe border around a video embed in WordPress.

Easy Guide to Show Recent Posts by Category in WordPress

In this tutorial, we will cover how to show recent posts by category in your WordPress sidebar.


Display Recent Posts by Category (Plugin Method)

First thing you need to do is install and activate the Category Posts Widgetplugin.

Upon activation, you need to visit Appearance » Widgets, there you will notice the new Category Posts widget in the list of available widgets.

Simply drag and drop Category Posts widget to a sidebar where you want to display recent posts by category.

visit Appearance » Widgets

The widget options are quite self explanatory. First you need to provide a title for the category posts section and choose a category. After that you can choose other display options like number of posts, excerpts, featured image, etc.

Once you are done, click the save button to store your widget settings. You can now visit your site to see recent posts by category in action.

Display Recent Posts by Category without a Plugin (Code Snippet)

In this method, we will use a code snippet to display recent posts from a category.

First you need to add this code in your theme’s functions.php file or a site-specific plugin.

function wpb_postsbycategory() {
// the query
$the_query = new WP_Query( array( 'category_name' => 'announcements', 'posts_per_page' => 10 ) ); 
 
// The Loop
if ( $the_query->have_posts() ) {
    $string .= '


Make sure that you replace 'announcements' with your own category slug.

This code simply queries WordPress to retrieve 10 posts from a specified category. It then displays the posts in a bulleted list. If a post has a featured image (post thumbnail), then it will show the featured image as well.

In the end, we created a shortcode 'categoryposts' and enabled shortcode in text widgets.

There are three ways of displaying the recent posts by category using this code snippet.

First, you can simply paste the following code anywhere in your desired template file location (such as footer.php, single.php, etc).


Second and third method relies on using the shortcode in the widget area or inside your posts / pages.

Simply visit Appearance » Widgets and add a text widget to your sidebar. Next add [categoryposts] shortcode in the text widget and save it. You can now preview your website to see recent posts by category in the sidebar.

If you want to show recent posts by categories on specific post or pages, then simply paste the shortcode in the post content area.

By default, your list may not look very good. You will need to use CSS to style the category posts list. You can use the code below as an starting point in your theme or child theme’s stylesheet.

ul.postsbycategory {
list-style-type: none;
}
 
.postsbycategory img {
float:left; 
padding:3px;
margin:3px;
border: 3px solid #EEE;
}

use CSS to style the category posts list

That’s all, we hope this tutorial helped you display recent posts by category in WordPress sidebar.