What is a SEO Friendly URL/ Permalinks in WordPress

Permalinks are the permanent URLs to your individual weblog posts, as well as categories and other lists of weblog postings. A permalink is what another weblogger will use to link to your article (or section), or how you might send a link to your story in an e-mail message. The URL to each post should be permanent, and never change — hence permalink. In this tutorial, we will learn about WordPress SEO friendly URLs, and how you can customize your WordPress permalinks.

What is a SEO Friendly URL?

Before we go too deep into WordPress permalinks, it’s important that we define what is a SEO Friendly URL.

SEO Friendly URLs contain keywords that explain the article, and they’re easy to read by both humans and search engines. They also improve your chances to rank higher in search engines.

Example of a SEO friendly URL:

http://www.example.com/how-to-install-wordpress/

So what does a non-SEO friendly URL look like?

http://www.example.com/?p=10467

By default, WordPress now uses the post name in the URL which is the most SEO friendly URL structure.

So why do beginners still ask us for best permalink structure?

That’s because in the past, WordPress did not use pretty URLs also known as permalinks. The default used to be the non-SEO friendly example that we shared above.

This was changed in WordPress 4.2. If you recently installed WordPress, then your site URLs are SEO friendly.

You can easily verify your permalink settings in your WordPress admin area.

The Permalink Settings Page Explained

In WordPress, links are called Permalinks (short for permanent links). You’ll see the term permalink structure and URL structure being used interchangeably.

First thing you need to do is to visit the Permalinks settings page in your WordPress admin area.

Simply click on Settings link in the admin menu and then click on Permalinks. This will take you to a page that looks like this:
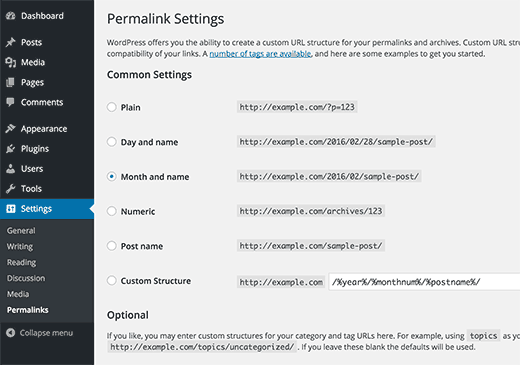
permalins settings in wordpress

As you can see there are number of choices available.

  • Plain
    https://www.wpcademy.com/?p=123
  • Day and name
    https://www.wpcademy.com/2016/01/22/sample-post/
  • Month and name
    https://www.wpcademy.com/2016/01/sample-post/
  • Numeric
    https://www.wpcademy.com/archives/123
  • Post name
    https://www.wpcademy.com/sample-post/
  • Custom Structure
    Choose your own URL structure using available tags.

Let us explain these options a bit, and how useful they are for users and SEO.

The first option which is called plain used to be the default WordPress URL structure. This is not an SEO friendly option.

The day and name option is somewhat SEO friendly as it has the post name in it. However, with dates, the URL becomes too lengthy. But more importantly after some time your content seems outdated, even if you regularly update it. Similarly, the month and name option also runs the risk of being dated.

However if you’re a news publication, then you want to have the dates in your URL to show the recency and improve the user experience.

In our opinion, those two structures are only good for news sites. Business sites that are hoping to create ever-green content should avoid it.

Post name option is the most SEO friendly because it is short and pretty.

If you are running a larger publication, then you can use a custom structure that can also be SEO friendly.

At WPCademy, We use a custom permalink structure that adds a category name along with the post name in the URL. Because our site is large and contain thousands of articles, it suits us very well. You will see larger publications follow a similar URL structure.

In order to use a custom URL structure, you will need to add special tags in the custom structure box. For example, we use:

/%category%/%postname%/

Notice how each tag is wrapped between percent signs. Also notice the trailing slashes / before, after, and between the tags.

Creating Custom URL Structure with Available Tags

For the best results, we recommend using the options we mentioned above. You can copy the URL structure we use on WPCademy or choose the post name as your URL structure.

However, there are plenty of other combinations you can create using tags. Here is a list of tags that you can use to create your own custom URL structure:

  • %year% – The year of the post, four digits, for example 2016.
  • %monthnum% – Month of the year, for example 05
  • %day% – Day of the month, for example 28
  • %hour% – Hour of the day, for example 15
  • %minute% – Minute of the hour, for example 43
  • %second% – Second of the minute, for example 33
  • %postname% – A sanitized version of the title of the post (post slug field on Edit Post/Page panel). For example, if your post title is This Is A Great Post! It would become this-is-a-great-post in the URL.
  • %post_id% – The unique ID # of the post, for example 423
  • %category% – A sanitized version of the category name (category slug field on New/Edit Category panel). Nested sub-categories appear as nested directories in the URI.
  • %author% – A sanitized version of the author name.

Don’t forget to click on the save changes button after choosing your permalink structure.

As soon as you press the save changes button, WordPress will automatically update your site’s .htaccess file and your site will immediately start using the new URL structure.

Warning: Important Note for Established Sites

If your site has been running for more than 6 months, then please don’t change your permalink structure.

You don’t have to use the same structure that we used.

By changing your permalink structure on an established site, you will lose all of your social media share count and run the risk of losing your existing SEO ranking.

If you must change your permalink structure, then hire a professional, so they can setup proper redirects. You’ll still lose your social share counts on the pages.

There’s only one exception to this rule. If your site is using the plain URLs, then no matter how old it is, you should update the URL structure for better SEO. Yes, you will still lose social share counts, but the benefits far outweigh that.

We hope this tutorial helped you create a SEO friendly URL structure for your WordPress site.

Easy Guide to Hide Password Protected Posts From WordPress Loop

In this tutorial, we will learn how to hide password protected posts from the WordPress loop.

Why Hide Password Protected Posts in WordPress?

By default, WordPress displays the password protected post with its title and a ‘protected’ prefix. Users will need to enter the password to view the content of the post.

Password protected posts displayed on homepage and in widgets

This post title is visible on the homepage, archives, recent posts widget, etc. If you want to keep some content completely private, then this is not a ideal.

Not only users who don’t have password can see the post title, they can also try to enter passwords. As we all know, passwords can be cracked.

Having said that, let’s take a look at how to hide your password protected posts from WordPress loop so that other users cannot see them.

Hiding Password Protected Posts in WordPress

Simply add this code to your theme’s functions.php file or a site-specific plugin.

function wpb_password_post_filter( $where = '' ) {
    if (!is_single() && !is_admin()) {
        $where .= " AND post_password = ''";
    }
    return $where;
}
add_filter( 'posts_where', 'wpb_password_post_filter' );

This code simply modifies the query sent to the WordPress by using the posts_where filter. It asks WordPress to fetch all posts that do not have a password.

Visit your website and you will see that password protected posts are no longer visible on homepage, archives, or in widgets like recent posts.

Before and after hiding protected posts in WordPress

You can still visit the post by accessing it through a direct URL to the post itself.

The example above, hides password protected posts from all users. What if you ran a multi-author WordPress site and wanted protected-posts to be viewable by users with the capability to edit private posts?

Simply modify the above code with another conditional tag, like this:

function wpb_password_post_filter( $where = '' ) {
   if (!is_single() && !current_user_can('edit_private_posts') && !is_admin()) {
        $where .= " AND post_password = ''";
    }
    return $where;
}
add_filter( 'posts_where', 'wpb_password_post_filter' );

In this example, we check if a user cannot edit the password protected posts, then only show the posts that don’t have password. Doing so all users with user roles of administrator and editor will see the password protected posts on the front end of your site.

We hope this tutorial helped you hide password protected posts from WordPress loop on your site.

Easy Guide to Install and Configure Facebook Retargeting Pixel in WordPress

In this tutorial, we will learn how to install Facebook retargeting pixel in WordPress.

Why Use Facebook Retargeting Pixel to Boost Your Social Reach?

When you boost Facebook page posts using Facebook ads, you can select a wide range of target audience. Retargeting allows you to narrow your audience and get better results with less spending.

You can show your ads to people who are already interested in your website. These people are much more likely to respond to your boosted posts and advertisements on Facebook.

What is a Facebook Retargeting Pixel?

Have you noticed that after you visit a website, you start seeing their ads on Facebook? This is called retargeting.

Those websites use Facebook’s retargeting technology, commonly known as Facebook Pixel.

The retargeting pixel does not add anything visible on your website. It simply sends a browser cookie to your visitors.

This allows Facebook to retarget users visiting your website on Facebook.

Let’s take a look at how you can add a Facebook retargeting pixel to your WordPress site.

Creating a Facebook Retargeting Pixel

To make it easy, we have created a video tutorial on how to install a WordPress plugin that you can watch below.

However if you just want to follow text-instructions, then you can follow our step by step tutorial on how to How to Install Facebook’s Retargeting Pixel in WordPress.

First, you need to login to your Facebook account and visit Ads Manager. Next, click on Tools » Pixels to create your Facebook pixel.

Tools » Pixels 

When you click on the create pixel button, it will show you a popup. Simply enter a name for your pixel which can be a name of your business or product, and then press the create pixel button to continue.

e create pixel button

You will see a success message with the unique ID of your pixel.

If someone else manages the technical things on your website, then you can email them the pixel code. Otherwise, click on ‘Install Pixel Now’ button to install it yourself.

email them the pixel code

Facebook will now show you the Pixel code that you need to install on your WordPress site. Simply copy the pixel code, and we will show you how to install it in WordPress.

Facebook will now show you the Pixel code

Installing Facebook Pixel in WordPress

You need to add the Facebook Pixel code just before the </head> in your WordPress theme.

The easiest way to do this is by using the Insert Headers and Footers plugin. After installing and activating the plugin, you need to go to the Settings » Insert Headers and Footers page.

Settings » Insert Headers and Footers page.

You can paste your Facebook Pixel code in the header section and click on the save button to store your changes. See our guide on how to add header and footer code in WordPress for detailed instructions.

That’s all, you have successfully installed Facebook Pixel on your WordPress website.

Bonus Step: Creating Custom Audiences Using Facebook Pixel

Now that you have successfully installed Facebook Pixel on your WordPress site. The next step is to create custom audiences for your retargeting campaigns on Facebook.

Custom Audiences allow you to target users you already know for your Facebook ads. These users can be your website visitors, users who like your page, or users who signed up for your mailing list.

Here is how you can create custom audiences in Facebook.

Simply visit Facebook Ads Manager dashboard and go to Tools » Audiencessection.

ools » Audiencessection.

This will bring up a popup where you need to choose the kind of audience you want to target on Facebook.

You can choose a customer list, website traffic, or app activity. For the sake of this tutorial, we are going to choose website traffic.

website traffic, or app activity

Now Facebook will ask you which website audience you want to target. You can choose all website visitors, people who visit specific pages, people who don’t visit specific pages, and so on. You can also create custom combinations.

visit specific pages

Next you need to choose a duration in number of days. Lastly, you need to provide an audience name. Use something that helps you easily identify this audience in your insights.

Once you are done, click on the create audience button to finish creating your first custom audience.

Repeat the process to create more custom audiences by Facebook retargeting.

Showing Your Ads to Custom Audiences Using Facebook Retargeting Pixel

The real fun begins with engaging your custom audiences by using Facebook ads.

Start by creating a new ad in Facebook. You can run different kind of ads for different objectives. Like boosting your page posts, sending traffic to your website, increase conversion, and so on.

Depending on what objective you choose, you will be able to select the target audience at some point during the ad creation.

In the same audience selection, Facebook will show you custom audience, and you can select it to be targeted with your ad campaign.

Remote MySQL in cPanel

We hope this tutorial helped you install Facebook retargeting pixel in WordPress.

Easy Guide to Restrict Content to Registered Users in WordPress

In this tutorial, we will learn how to restrict content to registered users in WordPress.

We will be using Restrict Content Pro which is an awesome plugin to create a full fledged membership website with paid subscriptions.

Why Use Restrict Content Pro?

Restrict Content Pro is the premium version of an awesome free plugin with the same name Restrict Content.

If you do not want to purchase the pro version, then you can simply download the free version which has limited support and features.

Here is why we have chosen Restrict Content for this guide:

  • Restrict Content Pro is extremely easy to install, set up and use.
  • The code behind the plugin is clean and poetic.
  • You can create unlimited subscription packages with multiple levels
  • You can accept payments using PayPal, Stripe, Braintree, and 2Checkout.
  • It allows you to easily create login, signup, user account pages.
  • You can create unlimited number of discount codes.
  • The easy to use reporting shows you how your site is performing.

Setting up Restrict Content Pro in WordPress

First thing you need to do is install and activate Restrict Content Pro. Upon activation, this plugin adds a new menu item labeled ‘Restrict’ in your WordPress admin sidebar.

Before we move on to plugin settings, lets start by creating a sign in, register, and manage subscriptions pages in WordPress.

First page you need to create is the login page.

Simply go Pages » Add New to create a new WordPress page. You can give your page any title that you want and enter [login_form] shortcode in the content area. After that, go ahead and publish your page.

Repeat the procedure to create a registration page with [register_form]shortcode in it.

When a user signs up for a subscription plan, they will be redirected to a confirmation page. This could be any page on your website with any content. You can simply create a page thanking users for signing up on your website. This page does not need any shortcode.

Lastly, you need to create a page where users will be able to see their subscription plan and account details. Create a page with the shortcode [subscription_details] to display user subscription details.

Once you have created the required pages, it is time to set up Restrict Content Pro settings.

Go to Restrict » Settings, and you will land on the plugin’s General settings page.

Restrict Content Pro - General settings page

The first option here is to provide your plugin license key which is required for plugin updates and support.

Next, you need to select your registration, success, account management, and billing update pages.

After that, you need to click on the payments tab to configure your payment gateway. You will be asked to choose a currency and then select your payment gateways. Yes, you can have more than one.

You will see a checkbox to enable sandbox mode. Keep it checked until your site is ready for launch and accept payments.

Setting up payments in Restrict Content Pro

Each payment gateway has different configuration settings. You will need to provide your PayPal email address for PayPal Standard. You will need API keys if you are using PayPal Pro or Express. Similarly, you will need API keys for other gateways too. You can obtain these keys by logging into your account on your payments service provider.

The emails tab on the settings page allows you to modify the emails sent out by the plugin. If you are having trouble recieving emails, then check out our guide on how to fix WordPress not sending emails issue.

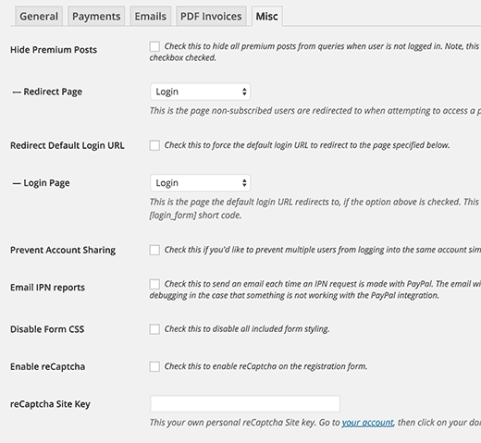
Misc settings

There are some important options available under the Misc tab on settings page. You can setup login page redirects, disable account sharing, Form CSS, send IPN emails, and setup reCAPTCHA for registration form to prevent spam registrations.

Creating Subscription Levels in Restrict Content Pro

Now we are ready to create Subscription levels for your restricted content. As the name suggest, it allows you to create different level of subscriptions for your content.

For example, you can create a subscription level ‘Premium’ and set a price for it. When you are restricting content on your website, you will be able to choose the subscription level a user must have in order to access the restricted content.

Adding new subscription level in Restrict Content Pro

Creating a subscription level in Restrict Content Pro is simple. Give your subscription level a title, description and set a price for it. You can set the price to zero if you want to create a subscription level for registered non-paying users.

You can choose the duration of a subscription level or set it to 0 to make the duration unlimited. Lastly, you need to set the status to Active, so this subscription plan is active and available on sign up form. Like this:

Registration page with your Restrict Content Pro subscription levels

Restricting Content in WordPress using Restrict Content Pro

Restrict Content Pro allows you to restrict content on a post by post basis. Under each new post, custom post type, or page, you will see a Restrict this content box with options to control who can see that particular post.

Restricting content for a post in WordPress

You can choose to restrict content based on user’s role, access, or subscription level. You can even hide contents within a post using the restrict shortcode like this:

[restrict] Your restricted content goes here... [/restrict]

Managing Memberships in Restrict Content Pro

To manage memberships in Restrict Content Pro, go to Restrict » Members. You can click on each member to view their membership details, payments received, and the status of their account.

You can also deactivate a member’s subscription at any time. This will not delete their account from your website however their subscription will be canceled, and they will be required to renew it.

Manage members in Restrict Content Pro

You can manage payments by going to Restrict » Payments. This will show you the payments you have received. With each payment, you will see the user name, their subscription plan, amount and date. All the payment data can also be exported in CSV format under Restrict » Export page.

Payments overview

Adding Discount Codes For Subscriptions with Restrict Content Pro

Restrict Content Pro allows you to offer discount codes for your promotional activity to increase user signups.

Adding a discount code is very simple. Go to Restrict » Discount Codes and simply fill in the form to create a new discount code. You can offer a flat amount discount, or a percentage discount. You can also set an expiration date for each discount code you create, and even limit the number of times a discount code can be used.

Offering discount codes in Restrict Content Pro

We hope that this tutorial helped you restrict content to registered users with WordPress and Restrict Content Pro.

Easy Guide to Disable JSON REST API in WordPress

In this tutorial, we will learn how to easily disable the JSON REST API in WordPress.

Why You Need to Disable JSON REST API in WordPress?

There is no denying that the API will bring lots of benefits for WordPress developers. The API makes it super easy to retrieve data using GET requests, which is useful for those building apps with WordPress.

However, most site owners may not be needing those features at all.

Having that said, this could potentially open your website to a new front of DDoS attacks. It can be resource intensive and slow down your website.

It is similar to disabling XML-RPC, which many site admins disable on their WordPress sites just to be on the safe side.

Disabling JSON REST API in WordPress

First thing you need to do is install and activate the Disable REST API plugin. For more details, see our step by step guide on how to install a WordPress plugin.

The plugin works out of the box and there are no settings for you to configure.

It will now forcibly return an authentication error to any API requests from sources who are not logged into your website.

This will effectively prevent unauthorized requests from using the REST API to get information from your website.

You can test this by visiting http://example.com/wp-json page. Make sure you logout of WordPress admin area first or switch your browser to incognito mode.

Don’t forget to replace example.com with your own domain name. You will see this message, indicating that REST API requests are blocked.

REST API Disabled

That’s all, you have successfully disabled unauthorized REST API requests on your WordPress site.

We hope this tutorial helped you learn how to Disable JSON API in WordPress.

Easy Guide to Create a WordPress TinyMCE Plugin

In this tutorial, we will learn how to create a TinyMCE plugin in WordPress.

Requirements

This tutorial is intended for advanced users. If you are a beginner level user who just wants to extend visual editor, then please check out TinyMCE Advanced plugin or take a look at these tips on using WordPress visual editor.

For this tutorial, you will need basic coding skills, access to a WordPress installwhere you can test it out.

It is a bad practice to develop plugins on a live website. A minor mistake in the code can make your site inaccessible. But if you must do it on a live site, then at least backup WordPress first.

Creating Your First TinyMCE Plugin

We will begin by creating a WordPress plugin to register our custom TinyMCE toolbar button. When clicked, this button will allow user to add a link with a custom CSS class.

The source code will be provided in full at the end of this article, but until then, let’s create the plugin step-by-step.

First, you need to create a directory in wp-content/plugins folder of your WordPress install. Name this folder tinymce-custom-link-class.

From here, we’ll begin adding our plugin code.

The Plugin Header

Create a new file in the plugin directory we just created and name this file tinymce-custom-link-class.php. Add this code to the file and save it.

/**
 * Plugin Name: TinyMCE Custom Link Class
 * Plugin URI: http://wpbeginner.com
 * Version: 1.0
 * Author: WPBeginner
 * Author URI: http://www.wpbeginner.com
 * Description: A simple TinyMCE Plugin to add a custom link class in the Visual Editor
 * License: GPL2
 */

This is just a PHP comment, which tells WordPress the name of the plugin, as well as the author and a description.

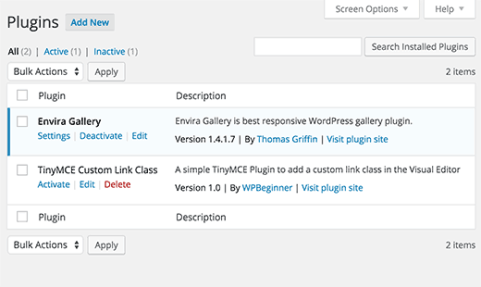
In the WordPress admin area, activate your new plugin by going to Plugins > Installed Plugins, and then clicking Activate beside the TinyMCE Custom Link Class plugin:

Installed plugin

Setting Up Our Plugin Class

If two WordPress plugins have functions with the same name, then this would cause an error. We will avoid this problem by having our functions wrapped in a class.

class TinyMCE_Custom_Link_Class {
     
    /**
    * Constructor. Called when the plugin is initialised.
    */
    function __construct() {
         
    }
 
}
 
$tinymce_custom_link_class = new TinyMCE_Custom_Link_Class;

This creates our PHP class, along with a construct, which is called when we reach the line $tinymce_custom_link_class = new TinyMCE_Custom_Link_Class;.

Any functions we add inside this class shouldn’t conflict with other WordPress plugins.

Start Setting Up Our TinyMCE Plugin

Next, we need to tell TinyMCE that we might want to add our custom button to the Visual Editor‘s toolbar. To do this, we can use WordPress’ actions – specifically, the init action.

Add the following code inside your plugin’s __construct() function:

if ( is_admin() ) {
    add_action( 'init', array(  $this, 'setup_tinymce_plugin' ) );
}

This checks if we are in the WordPress Administration interface. If we are, then it asks WordPress to run the setup_tinymce_plugin function inside our class when WordPress has finished its initial loading routine.

Next, add the setup_tinymce_plugin function:

/**
* Check if the current user can edit Posts or Pages, and is using the Visual Editor
* If so, add some filters so we can register our plugin
*/
function setup_tinymce_plugin() {
 
// Check if the logged in WordPress User can edit Posts or Pages
// If not, don't register our TinyMCE plugin
     
if ( ! current_user_can( 'edit_posts' ) && ! current_user_can( 'edit_pages' ) ) {
            return;
}
 
// Check if the logged in WordPress User has the Visual Editor enabled
// If not, don't register our TinyMCE plugin
if ( get_user_option( 'rich_editing' ) !== 'true' ) {
return;
}
 
// Setup some filters
add_filter( 'mce_external_plugins', array( &$this, 'add_tinymce_plugin' ) );
add_filter( 'mce_buttons', array( &$this, 'add_tinymce_toolbar_button' ) );
         
    }

This checks if the current logged in WordPress user can edit Posts or Pages. If they can’t, there’s no point in registering our TinyMCE Plugin for that User, as they’ll never see the Visual Editor.

We then check if the user is using the Visual Editor, as some WordPress users turn this off via Users > Your Profile. Again, if the user is not using the Visual Editor, we return (exit) the function, as we don’t need to do anything else.

Finally, we add two WordPress Filters – mce_external_plugins and mce_buttons, to call our functions which will load the required Javascript file for TinyMCE, and add a button to the TinyMCE toolbar.

Registering the Javascript File and Button to the Visual Editor

Let’s go ahead and add the add_tinymce_plugin function:

/**
* Adds a TinyMCE plugin compatible JS file to the TinyMCE / Visual Editor instance
*
* @param array $plugin_array Array of registered TinyMCE Plugins
* @return array Modified array of registered TinyMCE Plugins
*/
function add_tinymce_plugin( $plugin_array ) {
 
$plugin_array['custom_link_class'] = plugin_dir_url( __FILE__ ) . 'tinymce-custom-link-class.js';
return $plugin_array;
 
}
    

This function tells TinyMCE that it needs to load the Javascript files stored in the $plugin_array array. These Javascript files will tell TinyMCE what to do.

We also need to add some code to the add_tinymce_toolbar_buttonfunction, to tell TinyMCE about the button we’d like to add to the toolbar:

/**
* Adds a button to the TinyMCE / Visual Editor which the user can click
* to insert a link with a custom CSS class.
*
* @param array $buttons Array of registered TinyMCE Buttons
* @return array Modified array of registered TinyMCE Buttons
*/
function add_tinymce_toolbar_button( $buttons ) {
 
array_push( $buttons, '|', 'custom_link_class' );
return $buttons;
}

This pushes two items onto the array of TinyMCE buttons: a separator (|), and our button’s programmatic name (custom_link_class).

Save your plugin, and then edit a Page or Post to view the Visual Editor. Chances are, the toolbar isn’t displaying right now:

wordpress-tinymce-plugin-missing-toolbar

Don’t worry – if we use our web browser’s inspector console, we’ll see that a 404 error and notice have been generated by TinyMCE, telling us that it can’t find our Javascript file.

wordpress-tinymce-plugin-js-404

That’s good – it means we’ve successfully registered our TinyMCE custom plugin, and now need to create the Javascript file to tell TinyMCE what to do.

Creating the Javascript Plugin

Create a new file in your wp-content/plugins/tinymce-custom-link-class folder, and name it tinymce-custom-link-class.js. Add this code in your js file:

(function() {
    tinymce.PluginManager.add( 'custom_link_class', function( editor, url ) {
         
    });
})();

This calls the TinyMCE Plugin Manager class, which we can use to perform a number of TinyMCE plugin related actions. Specifically, we’re adding our plugin to TinyMCE using the add function.

This accepts two items; the name of the plugin (custom_link_class) and an anonymous function.

If you’re familiar with the concept of functions in coding, an anonymous function is simply a function with no name. For example, function foobar() { ... } is a function that we could call somewhere else in our code by using foobar().

With an anonymous function, we can’t call that function somewhere else in our code – it’s only being called at the point the add() function is invoked.

Save your Javascript file, and then edit a Page or Post to view the Visual Editor. If everything worked, you’ll see the toolbar:

wordpress-tinymce-plugin-visual-editor-toolbar

Right now, our button hasn’t been added to that toolbar. That’s because we’ve only told TinyMCE that we are a custom plugin. We now need to tell TinyMCE what to do – that is, add a button to the toolbar.

Update your Javascript file, replacing your existing code with the following:

(function() {
    tinymce.PluginManager.add( 'custom_link_class', function( editor, url ) {
        // Add Button to Visual Editor Toolbar
        editor.addButton('custom_link_class', {
            title: 'Insert Button Link',
            cmd: 'custom_link_class',
        }); 
    });
})();

Notice our anonymous function has two arguments. The first is the editorinstance – this is the TinyMCE Visual Editor. In the same way we can call various functions on the PluginManager, we can also call various functions on the editor. In this case, we’re calling the addButton function, to add a button to the toolbar.

Save your Javascript file, and go back to your Visual Editor. At a first look, nothing seems to have changed. However, if you hover your mouse cursor over to the right of the top row’s rightmost icon, you should see a tooltip appear:

wordpress-tinymce-plugin-button-noicon

We’ve successfully added a button to the toolbar, but it needs an image. Add the following parameter to the addButton function, below the title: line:

image: url + '/icon.png',

url is the URL to our plugin. This is handy if we want to reference an image file within our plugin folder, as we can append the image file name to the URL. In this case, we’ll need an image called icon.png in our plugin’s folder. Use the below icon:
icon

Reload our Visual Editor, and you’ll now see your button with the icon:
wordpress-tinymce-plugin-button-icon

Defining a Command to Run

Right now, if you click the button, nothing will happen. Let’s add a command to TinyMCE telling it what to do when our button is clicked.

In our Javascript file, add the following code below the end of the editor.addButton section:

// Add Command when Button Clicked
editor.addCommand('custom_link_class', function() {
    alert('Button clicked!');
});

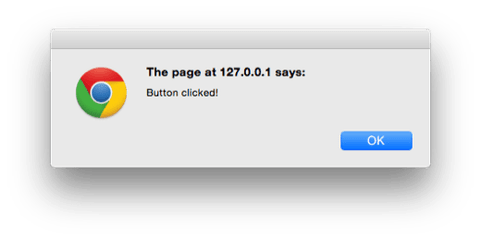
Reload our Visual Editor, click the button and an alert will appear confirming we just clicked the button:

wordpress-tinymce-plugin-alert-button-clicked

Let’s replace the alert with a prompt, asking the user for the link they want to wrap around the selected text in the Visual Editor:

// Add Command when Button Clicked
editor.addCommand('custom_link_class', function() {
    // Check we have selected some text that we want to link
    var text = editor.selection.getContent({
        'format': 'html'
    });
    if ( text.length === 0 ) {
        alert( 'Please select some text to link.' );
        return;
    }
 
    // Ask the user to enter a URL
    var result = prompt('Enter the link');
    if ( !result ) {
        // User cancelled - exit
        return;
    }
    if (result.length === 0) {
        // User didn't enter a URL - exit
        return;
    }
 
    // Insert selected text back into editor, wrapping it in an anchor tag
    editor.execCommand('mceReplaceContent', false, '' + text + '');
});

This block of code performs a few actions.

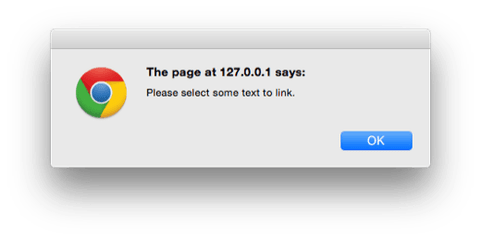
First, we check if the user selected some text to be linked in the Visual Editor. If not, they’ll see an alert telling them to select some text to link.

wordpress-tinymce-plugin-alert-select-text

Next, we ask them to enter a link, again checking if they did. If they cancelled, or didn’t enter anything, we don’t do anything else.


Finally, we run the execCommand function on the TinyMCE editor, specifically running the mceReplaceContent action. This replaces the selected text with our HTML code, which comprises of an anchor link with class=”button”, using the text the user selected.

If everything worked, you’ll see your selected text is now linked in the Visual Editor and Text views, with the class set to button:

wordpress-tinymce-plugin-link-visual

Summary

We’ve successfully created a WordPress plugin which adds a button to the TinyMCE visual editor in WordPress. This tutorial has also covered some of the basics of the TinyMCE API and WordPress filters available for TinyMCE integrations.

We added code so that when a user clicks our custom button, they’re prompted to select some text in the Visual Editor, which they can then link to a URL of their choice. Finally, our plugin then replaces the selected text with a linked version that contains a custom CSS class called button.

We hope this tutorial helped you learn how to create a WordPress TinyMCE plugin.

Easy Guide to Move from LiveJournal to WordPress

In this tutorial, we will learn how to move your blog from LiveJorunal to WordPress.

Issues in Moving LiveJournal to WordPress

Unlike other platforms, LiveJournal does not allow you to setup redirects. This means that users visiting your old LiveJournal site will not be automatically redirected to your self hosted WordPress.org site.

Your only hope is to delete your LiveJournal account and wait for search engines to crawl and rank your new site. Even if you delete your old LiveJournal account, search engines will keep showing it in results for some time.

Another issue is that WordPress importer will not import your images. You can either download your images from LiveJournal and upload them manually, or you can follow instructions in our tutorial on how to import external images in WordPress.

Why you Should Move From LiveJournal to WordPress?

First, let’s make it clear that when we say WordPress, we mean self-hosted WordPress.org site and not the free WordPress.com blog. Please take a look at our guide on the difference between WordPress.com vs WordPress.org site.

LiveJournal comes with features like protected posts, friends, communities, etc. However, it is very limited in terms of how you display or control your journal. The basic free plan is even more limited than the paid plans.

On the other hand, WordPress allows you to create password protected posts(journal entries are called posts in WordPress). It has nested comments just like LiveJournal. It does not have communities feature, but you can connect your WordPress site to other online communities and even run your own using a WordPress forum plugin.

WordPress is open source and free (as in freedom). You own your content, and you can do whatever you want with it. You are free to extend your journal in any way you want. You can even make money out of your WordPress site.
Still not convinced? See our guide on why you should use WordPress for more reasons to switch.

Before You Start

To get started with WordPress, the first thing you would need is a good WordPress hosting company and your own domain name. We highly recommend Bluehost because they will give you a free domain and 50% off their hosting plan (special for WPCademy users). Bluehost is also an officially recommended hosting provider of WordPress.

If you want a Bluehost alternative, then take a look at Siteground who also offer the same special offer to WPCademy users.

Once you have signed up for WordPress hosting and set up your domain name, the next step is to install WordPress on your hosting account. We have a step by step tutorial on how to install WordPress. Once you have installed WordPress, it is time to move your content from LiveJournal to WordPress.

Importing Content From LiveJournal to WordPress

WordPress comes with a nifty import tool that automatically imports your LiveJournal entries, comments, and tags into WordPress. Simply visit Tools » Import page and click on LiveJournal.

LiveJournal Import tool in WordPress

WordPress will now show you a popup to install the LiveJournal importer plugin. You may see a warning about the plugin not tested with your version of WordPress. You can safely ignore this and click on Install Now button.

Install LiveJournal Importer

The LiveJournal Importer plugin will now be installed on your WordPress site. You will need to click on activate plugin and run importer link.

Activate and run LiveJournal importer

You will now see the LiveJournal Importer page where you need to enter your LiveJournal username and password. This allows your WordPress site to access your content on LiveJournal.

LiveJournal Importer settings

If you have password protected posts on your LiveJournal site, then you will need to enter a password which will be used on all protected posts.

Once you are done, click on the ‘Connect to LiveJournal and Import’ button. WordPress will now start importing your content. The process is divided into different steps and may take a long time if you have many entries and comments. If it fails abruptly during the import, then you can safely retry again. The importer is smart enough to avoid duplicate entries.

You will see a success message when the importer has finished its job.

Import finished

You can now visit Posts section to see all your posts.

Customizing WordPress

The first customization that most beginners want to try is WordPress Themes. There are thousands of free and paid WordPress themes that you can install on your website. See our guide on selecting the perfect theme for WordPress.

The real power of WordPress lies in the plugins. There are thousands of free WordPress plugins that you can install on your WordPress site right away. See our expert-pick of 20 must have WordPress plugins for 2015 or take a look at the plugins we are using in WPCademy’s Blueprint.

We understand that most beginners will need help with the new platform. WPCademy is the largest unofficial WordPress resource site on the planet. We have free tutorials, guides, and videos to help you quickly learn WordPress. See how you to make the most out of WPCademy’s free resources.

We hope this tutorial helped you move from LiveJournal to WordPress.