phpMyAdmin is web-based client written in php for managing MySQL and MariaDB databases. It provides a user friendly web interface to access and manage your databases. To ease usage to a wide range of people, phpMyAdmin is being translated into 72 languages and supports both LTR and RTL languages.
This article assumes you have at least basic knowledge of linux, know how to use the shell, and most importantly, you host your site on your own VPS. The installation is quite simple and assumes you are running in the root account, if not you may need to add ‘sudo’ to the commands to get root privileges. I will show you through the step by step installation phpMyAdmin on a Ubuntu 16.04 LTS (Xenial Xerus) server.
Install phpMyAdmin on Ubuntu 16.04
Step 1. First make sure that all your system packages are up-to-date by running these following apt-get commands in the terminal.
sudo apt-get update
sudo apt-get upgrade
Step 2. Install LAMP server.
A Ubuntu 16.04 LAMP server is required. If you do not have LAMP installed, you can follow our guide here. Also install required PHP modules:
sudo apt-get install php5 php5-mysql php5-gd php5-mcrypt php-pear
Next, run the commands below to enable php5-mcrypt for Apache2:
sudo php5enmod mcrypt
Step 3. Install phpMyAdmin on Ubuntu 16.04 LTS (Xenial Xerus).
To installing phpMyAdmin quickly on Ubuntu 16.04 by running the following command:
apt-get install phpmyadmin php-mbstring php-gettext
Important, this step will ask you to select the web server where the application would be installed, it is mandatory that you select with the spacebar “Apache” Server or your designate, not doing this will cause the files wont’t be copied correctly and then can not find the installed application.
The only thing we need to do is explicitly enable the PHP mcrypt and mbstring extensions, which we can do by typing:
sudo phpenmod mcrypt
sudo phpenmod mbstring
Now, we can restart Apache so that the changes take place:
sudo systemctl restart apache2
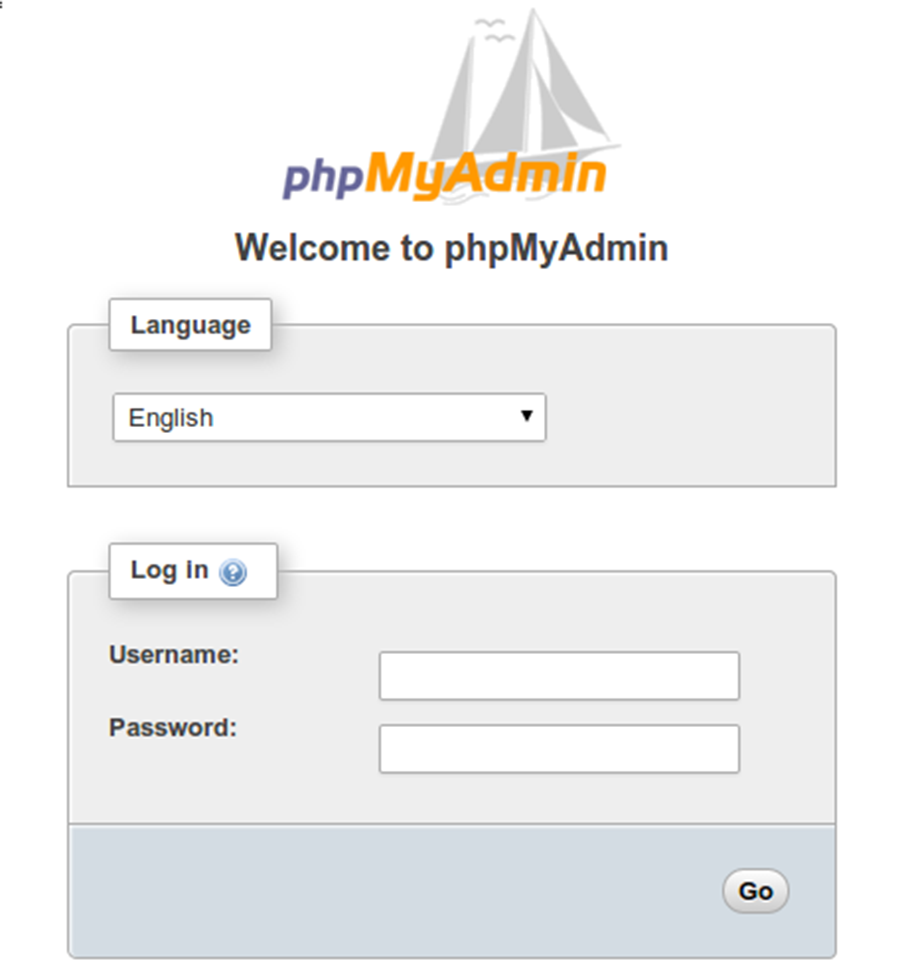
Step 4. Accessing phpMyAdmin.
Now open your browser and surf to http://youripaddress/phpmyadmin and your phpmyadmin will ask you for user and password of your mysql installation, you can use root as user and the root mysql password, or any other mysql user/password. If you are using a firewall, please open port 80 to enable access to the control panel.
Congratulation’s! You have successfully installed phpMyAdmin. Thanks for using this tutorial for installing phpMyAdmin on Ubuntu 16.04 system. For additional help or useful information, we recommend you to check the official phpMyAdmin web site.