How To Install Android Studio on CentOS 7

Android Studio on CentOS 7

Android Studio is the official Integrated Development Environment (IDE) for Android app development, based on IntelliJ IDEA. On top of IntelliJ’s powerful code editor and developer tools, Android Studio offers even more features that enhance your productivity when building Android apps

Table of Contents

Step 1. First let’s start by ensuring your system is up-to-date.

Step 2. Installing Java 8 on CentOS.

Step 3. Install Android Studio on CentOS.

Prerequisites

This article assumes you have at least basic knowledge of Linux, know how to use the shell, and most importantly, you host your site on your own VPS. The installation is quite simple and assumes you are running in the root account, if not you may need to add ‘sudo’ to the commands to get root privileges. I will show you through the step by step install Android Studio on CentOS 7 server.

Install Android Studio on CentOS 7


Step 1. First let’s start by ensuring your system is up-to-date.

yum clean all
yum -y update

Step 2. Installing Java 8 on CentOS.

First you need to make sure that your CentOS is equipped with JAVA. For the installation you can download the latest version of Java:

rpm -ivh jdk-8u162-linux-x64.rpm

Once installed we need to set Java environment variables such as JAVA_HOME on CentOS 7:

export JAVA_HOME=/usr/java/jdk1.8.0_25/
export PATH=$PATH:$JAVA_HOME

Checking Installed java version:

### java -version
java version "1.8.0_65"
Java(TM) SE Runtime Environment (build 1.8.0_65-b17)
Java HotSpot(TM) 64-Bit Server VM (build 25.65-b01, mixed mode)

Step 3. Install Android Studio on CentOS.

Next, install studio by downloading the ide file from Android site and unzipping the same:

unzip android-studio-ide-171.4443003-linux.zip

Move android-studio directory to /opt directory:

mv /tmp/android-studio/ /opt/

Then, create a symlink to the studio executable to quickly start it whenever you need it:

ln -s /opt/android-studio/bin/studio.sh /usr/local/bin/android-studio

Now launch the studio from a terminal:

studio

Congratulation’s! You have successfully installed Android Studio on CentOS 7. Thanks for using this tutorial for installing Android Studio on CentOS 7 systems. For additional help or useful information, we recommend you to check the official Android Studio web site.

How To Install ELK Stack on CentOS 7

ELK Stack on CentOS 7

ELK stack is a popular, open source log management platform. It is used as a centralized management for storing, analyzing and viewing of logs. Centralized management makes it easier to study the logs & identify issues if any for any number of servers.

Table of Contents

Step 1. First let’s start by ensuring your system is up-to-date.

Step 2. Installing Java.

Step 3. Installing Elasticsearch.

Step 4. Installing Kibana.

Step 5. Configure ELK stack.

Step 6. Configure Logstash.

Prerequisites

This article assumes you have at least basic knowledge of Linux, know how to use the shell, and most importantly, you host your site on your own VPS. The installation is quite simple and assumes you are running in the root account, if not you may need to add ‘sudo’ to the commands to get root privileges. I will show you through the step by step install ELK Stack (Elasticsearch, Logstash and Kibana) on CentOS 7 server.
Install ELK Stack on CentOS 7

Step 1. First let’s start by ensuring your system is up-to-date.

yum clean all
yum -y update

Step 2. Installing Java.

You need a Java Runtime Environment (JRE) because Elasticsearch is written in Java programming language, you can install OpenJDK package that includes JRE:

yum install java-1.8.0-openjdk.x86_64

Verify the Java version:

[[email protected] ~]# java -version
openjdk version "1.8.0_131"
OpenJDK Runtime Environment (build 1.8.0_131-b12)
OpenJDK 64-Bit Server VM (build 25.131-b12, mixed mode)

Step 3. Installing Elasticsearch.

Elasticsearch can be installed with a package manager by adding Elastic’s package repository:

wget https://artifacts.elastic.co/downloads/elasticsearch/elasticsearch-5.0.0.rpm

Then install the RPM package that you just downloaded:

rpm -ivh elasticsearch-5.0.0.rpm

Start and enable the service:

systemctl enable elasticsearch
systemctl start elasticsearch

Now run the following command from the terminal to check if the elasticsearch is working properly:

curl -X GET http://localhost:9200

You should get the following output:

{
"name" : "idroot.net",
"cluster_name" : "elasticsearch",
"cluster_uuid" : "k27ZZFJPTaOtwg6_pyzEiw",
"version" : {
"number" : "5.5.0",
"build_hash" : "2cfe0df",
"build_date" : "2017-05-29T16:05:51.443Z",
"build_snapshot" : false,
"lucene_version" : "6.5.1"
},
"tagline" : "You Know, for Search"
}

Step 4. Installing Kibana.

Install Kibana is very simple, you can easily install it using an RPM package:

wget https://artifacts.elastic.co/downloads/kibana/kibana-5.5.0-x86_64.rpm

Now just execute the following command so you can start the Kibana service:

systemctl daemon-reload
systemctl start kibana

Kibana is now installed and working on our system. To check the web-page, open the web browser & go to the URL mentioned below (use the IP address for your ELK host):

http://localhost:5601

Step 5. Configure ELK stack.

First, we need to create an SSL certificate. This certificate will be used for securing communication between logstash & filebeat clients. Before creating a SSL certificate, we will make an entry of our server IP address in openssl.cnf:

nano /etc/ssl/openssl.cnf

Look for section with ‘subjectAltName’ & add your server IP to it:

subjectAltName = IP:10.20.30.100

Now change the directory to /etc/ssl and create SSL certificate:

cd /etc/ssl
openssl req -x509 -days 365 -batch -nodes -newkey rsa:2048 -keyout logstash-forwarder.key -out logstash_frwrd.crt

Step 6. Configure Logstash.

We will now create a configuration file for logstash under the folder ‘/etc/logstash/conf.d‘:

[[email protected] ~]# nano /etc/logstash/conf.d/logstash.conf

# input section
input {
 beats {
 port => 5044
 ssl => true
 ssl_certificate => "/etc/ssl/logstash_frwrd.crt"
 ssl_key => "/etc/ssl/logstash-forwarder.key"
 congestion_threshold => "40"
 }
}

Next section i.e. ‘filter section’ will parse the logs before sending them to elasticsearch:

# Filter section
filter {
if [type] == "syslog" {
 grok {
 match => { "message" => "%{SYSLOGLINE}" }
 }
 date {
match => [ "timestamp", "MMM d HH:mm:ss", "MMM dd HH:mm:ss" ]

}
 }
}

Last section is ‘output section’ & it defines the location for the storage of logs:

# output section
output {
 elasticsearch {
 hosts => localhost
 index => "%{[@metadata][beat]}-%{+YYYY.MM.dd}"
 }
stdout {
 codec => rubydebug
 }
}

Now save the file and exit. Now start the logstash service & enable it at boot time:

systemctl start logstash
systemctl enable logstash

Step 7. Installing Filebeat on Clients.

Now to be able to communicate with the ELK stack, Filebeat needs to installed on all the client machines:

### nano /etc/yum.repos.d/filebeat.repo
[beats]
name=Elastic Beats Repository
baseurl=https://packages.elastic.co/beats/yum/el/$basearch
enabled=1
gpgkey=https://packages.elastic.co/GPG-KEY-elasticsearch
gpgcheck=1

Now install filebeat using following command:

yum install filebeat

After the filebeat has been installed, copy the ssl certificate from the ELK stack server to ‘/etc/ssl’. Next we will make changes to filebeat configuration file to connect the client to ELK server:

nano /etc/filebeat/filebeat.yml

Make the following changes to file:

. . .
paths:
– /var/log/*.log
. . .

. . .
document_type: syslog
. . .

. . .
output:
logstash:
hosts: [“10.20.30.100:5044”]
tls:
certificate_authorities: [“/etc/ssl/logstash_frwrd.crt”]
. . .

Now start the service and enable it at boot time:

systemctl restart filebeat
systemctl enable filebeat

Configurations on both server end and client end are now complete. We can now login to the kibana web interface to look for analysed logs.

http://your-ip-address:5601/

Congratulation’s! You have successfully installed ELK Stack on CentOS 7. Thanks for using this tutorial for installing ELK Stack (Elasticsearch, Logstash and Kibana) on CentOS 7 systems. For additional help or useful information, we recommend you to check the official ELK Stack web site.

How To Install FreeIPA on CentOS 7

FreeIPA on CentOS 7

FreeIPA is an open source identity management system for Linux/Unix environments which provides centralized account management and authentication, like Microsoft Active Directory or LDAP.

Table of Contents

Step 1. First let’s start by ensuring your system is up-to-date.

Step 2. Installing FreeIPA.

Step 3. Configuring FreeIPA.

Step 4. Configure firewall for FreeIPA.

Step 5. Accessing FreeIPA.

Prerequisites

FreeIPA has many components, including Kerberos, NTP, DNS, and Dogtag (a certificate system) in order to provide security on your CentOS 7 server. The full FreeIPA package essentially provides Linux systems with the abilities for centralized authentication, authorization and account information by storing data about users, groups, hosts and all the other objects that are needed to manage security for networks.

This article assumes you have at least basic knowledge of Linux, know how to use the shell, and most importantly, you host your site on your own VPS. The installation is quite simple and assumes you are running in the root account, if not you may need to add ‘sudo’ to the commands to get root privileges. I will show you through the step by step install FreeIPA open source identity management system on CentOS 7 server.
Install FreeIPA on CentOS 7

Step 1. First let’s start by ensuring your system is up-to-date.

yum clean all
yum -y update

Step 2. Installing FreeIPA.

The first thing that we are going to do is to prepare the CentOS 7 server to run FreeIPA. In order to do this, we are going to set the IP address on the system, In our case the host IP is 192.168.1.2/24:

hostnamectl set-hostname ipa.wpcademy.com
echo "192.168.1.2 ipa.wpcademy.local ipa" >> /etc/hosts

Next, Install the package dependencies required for our setup with the following commands if they are not already installed:

yum install bind-dyndb-ldap ipa-server-dns sssd-client sssd-common sssd-common-pac sssd-ldap sssd-proxy python-sssdconfig authconfig authconfig-gtk

Then, install FreeIPA using following command:

yum install ipa-server -y

Step 3. Configuring FreeIPA.

The setup process for FreeIPA can take a long time to complete depending on the server specifications. Begin the setup process with the following command:

ipa-server-install --setup-dns

Here is how this configuration will look by running the previous command:

[[email protected] ~]# ipa-server-install --setup-dns

The log file for this installation can be found in /var/log/ipaserver-install.log
==============================================================================
This program will set up the IPA Server.

This includes:
* Configure a stand-alone CA (dogtag) for certificate management
* Configure the Network Time Daemon (ntpd)
* Create and configure an instance of Directory Server
* Create and configure a Kerberos Key Distribution Center (KDC)
* Configure Apache (httpd)
* Configure DNS (bind)

To accept the default shown in brackets, press the Enter key.

Enter the fully qualified domain name of the computer
on which you're setting up server software. Using the form
.
Example: master.example.com.


Server host name [ipa.wpcademy.local]: [ENTER]

Warning: skipping DNS resolution of host ipa.idroot.local
The domain name has been determined based on the host name.

Please confirm the domain name [wpcademy.local]:[ENTER]
The kerberos protocol requires a Realm name to be defined.
This is typically the domain name converted to uppercase.

Please provide a realm name [IDROOT.LOCAL]: [ENTER]
Certain directory server operations require an administrative user.
This user is referred to as the Directory Manager and has full access
to the Directory for system management tasks and will be added to the
instance of directory server created for IPA.
The password must be at least 8 characters long.

Directory Manager password: [ENTER PASSWORD]
Password (confirm): [ENTER PASSWORD]

 . . . . .

After the FreeIPA installation, authenticate to the Kerberos realm to ensure that the administrator is configured correctly:

kinit admin

Next, this we are going to use authconfig to guarantee that the user directories are created and enable sssd:

authconfig --enablemkhomedir --update
chkconfig sssd on

Step 4. Configure firewall for FreeIPA.

These commands are used to allow FreeIPA services in the case the the security daemon Firewalld is running on your system:

firewall-cmd --permanent --add-service={ntp,http,https,ldap,ldaps,kerberos,kpasswd,dns}
firewall-cmd --reload

Step 5. Accessing FreeIPA.

FreeIPA will be available on HTTP port 80 by default. Open your favorite browser and navigate to https://ipa.wpcademy.local/ and complete the required the steps to finish the installation.

Congratulation’s! You have successfully installed FreeIPA on CentOS 7. Thanks for using this tutorial for installing FreeIPA open source identity management on CentOS 7 systems. For additional help or useful information, we recommend you to check the official FreeIPA web site.

How To Install Apache Zeppelin on CentOS 7

Apache Zeppelin on CentOS 7

Apache Zeppelin is an online open source laptop and collaborative application for interactive data ingestion, discovery, analytics, and visualization. Zeppelin supports 20+ languages, including Apache Spark, SQL, R, Elasticsearch and many more. Apache Zeppelin allows you to make beautiful data-driven documents and see the results of your analytics.

Table of Contents

Step 1. First let’s start by ensuring your system is up-to-date.

Step 2. Installing Java.

Step 3. Installing Zeppelin.

Step 4. Configure Systemd service for Apache Zeppelin.

Step 5. Configure Reverse Proxy Nginx.

Step 6. Accessing Apache Zeppelin.


Prerequisites

This article assumes you have at least basic knowledge of Linux, know how to use the shell, and most importantly, you host your site on your own VPS. The installation is quite simple and assumes you are running in the root account, if not you may need to add ‘sudo’ to the commands to get root privileges. I will show you through the step by step install Apache Zeppelin on CentOS 7 server.
Install Apache Zeppelin on CentOS 7

Step 1. First let’s start by ensuring your system is up-to-date.

yum clean all
yum -y update

Step 2. Installing Java.

At the time of writing this tutorial, the latest Java JDK version was JDK 8u45. First, let us download the latest Java SE Development Kit 8 release from its official download page or use following commands to download from shell:

cd /opt/
wget --no-cookies --no-check-certificate --header "Cookie: gpw_e24=http%3A%2F%2Fwww.oracle.com%2F; oraclelicense=accept-securebackup-cookie" "http://download.oracle.com/otn-pub/java/jdk/8u45-b14/jdk-8u45-linux-x64.tar.gz"
tar xzf jdk-8u45-linux-x64.tar.gz

After extracting archive file use alternatives command to install it. alternatives command is available in chkconfig package:

cd /opt/jdk1.8.0_45/
alternatives --install /usr/bin/java java /opt/jdk1.8.0_45/bin/java 2
alternatives --config java
There are 3 programs which provide 'java'.

  Selection    Command
-----------------------------------------------
*  1           /opt/jdk1.7.0_71/bin/java
 + 2           /opt/jdk1.8.0_25/bin/java
   3           /opt/jdk1.8.0_45/bin/java

Enter to keep the current selection[+], or type selection number: 3

At this point JAVA 8 (JDK 8u45) has been successfully installed on your system. We also recommend to setup javac and jar commands path using alternatives:

alternatives --install /usr/bin/jar jar /opt/jdk1.8.0_45/bin/jar 2
alternatives --install /usr/bin/javac javac /opt/jdk1.8.0_45/bin/javac 2
alternatives --set jar /opt/jdk1.8.0_45/bin/jar
alternatives --set javac /opt/jdk1.8.0_45/bin/javac

Checking Installed java version:

[email protected] ~# java -version
java version "1.8.0_45"
Java(TM) SE Runtime Environment (build 1.8.0_45-b14)
Java HotSpot(TM) 64-Bit Server VM (build 25.45-b02, mixed mode)

We can easily set the environment variables using the export command as shown below:

Setup JAVA_HOME Variable:

export JAVA_HOME=/opt/jdk1.8.0_45

Setup JRE_HOME Variable:

export JRE_HOME=/opt/jdk1.8.0_45/jre

Setup PATH Variable:

export PATH=$PATH:/opt/jdk1.8.0_45/bin:/opt/jdk1.8.0_45/jre/bin.

Step 3. Installing Zeppelin.

First, download the Zeppelin binary on your system. You can always find the latest version of the application on Zeppelin download page:

wget http://www-us.apache.org/dist/zeppelin/zeppelin-0.7.3/zeppelin-0.7.3-bin-all.tgz
tar xf zeppelin-*-bin-all.tgz -C /opt

Rename the directory for sake of convenience:

mv /opt/zeppelin-*-bin-all /opt/zeppelin

Step 4. Configure Systemd service for Apache Zeppelin.

We will set up a Systemd unit file for the Zeppelin application:

adduser -d /opt/zeppelin -s /sbin/nologin zeppelin

Provide ownership of the files to the newly created Zeppelin user:

chown -R zeppelin:zeppelin /opt/zeppelin

Next, Create a new Systemd service unit file:

### nano /etc/systemd/system/zeppelin.service
[Unit]
Description=Zeppelin service
After=syslog.target network.target

[Service]
Type=forking
ExecStart=/opt/zeppelin/bin/zeppelin-daemon.sh start
ExecStop=/opt/zeppelin/bin/zeppelin-daemon.sh stop
ExecReload=/opt/zeppelin/bin/zeppelin-daemon.sh reload
User=zeppelin
Group=zeppelin
Restart=always

[Install]
WantedBy=multi-user.target

Then, Start the application:

systemctl start zeppelin
systemctl enable zeppelin

Step 5. Configure Reverse Proxy Nginx.

By default, the Zeppelin server listens to localhost on port 8080. In this tutorial, we will use Nginx as a reverse proxy so that the application can be accessed via standard HTTP and HTTPS ports:

yum install certbot
yum install nginx

Start Nginx and enable it to automatically start at boot time:

sudo systemctl start nginx
sudo systemctl enable nginx

Next, Generate the SSL certificates:

certbot certonly --webroot -w /usr/share/nginx/html -d zeppelin.wpcademy.com

The generated certificates are likely to be stored in /etc/letsencrypt/live/zeppelin.wpcademy.com/. The SSL certificate will be stored as fullchain.pem and private key will be stored as privkey.pem.

Set up auto-renewal of the certificates Let’s Encrypt using cron jobs:

sudo crontab -e
30 5 * * * /usr/bin/certbot renew --quiet

Next steps, create a new server block file for the Zeppelin site:

nano /etc/nginx/conf.d/zeppelin.wpcademy.com.conf
upstream zeppelin {
server 127.0.0.1:8080;
}
server {
 listen 80;
 server_name zeppelin.wpcademy.com;
 return 301 https://$host$request_uri;
}

server {
 listen 443;
 server_name zeppelin.wpcademy.com;

ssl_certificate /etc/letsencrypt/live/zeppelin.wpcademy.com/fullchain.pem;
 ssl_certificate_key /etc/letsencrypt/live/zeppelin.wpcademy.com/privkey.pem;

ssl on;
 ssl_session_cache builtin:1000 shared:SSL:10m;
 ssl_protocols TLSv1 TLSv1.1 TLSv1.2;
 ssl_ciphers HIGH:!aNULL:!eNULL:!EXPORT:!CAMELLIA:!DES:!MD5:!PSK:!RC4;
 ssl_prefer_server_ciphers on;

access_log /var/log/nginx/zeppelin.access.log;

location / {
 proxy_pass http://zeppelin;
 proxy_set_header X-Real-IP $remote_addr;
 proxy_set_header X-Forwarded-For $proxy_add_x_forwarded_for;
 proxy_set_header Host $http_host;
 proxy_set_header X-NginX-Proxy true;
 proxy_redirect off;
 }
location /ws {
 proxy_pass http://zeppelin/ws;
 proxy_http_version 1.1;
 proxy_set_header Upgrade websocket;
 proxy_set_header Connection upgrade;
 proxy_read_timeout 86400;
 }
 }

Restart Nginx so that the changes can take effect:

systemctl restart nginx

Step 6. Accessing Apache Zeppelin.

Apache Zeppelin will be available on HTTP port 80 by default. Open your favorite browser and navigate to https://zeppelin.wpcademy.com and complete the required the steps to finish the installation. If you are using a firewall, please open port 80 to enable access to the control panel.

Congratulation’s! You have successfully installed Apache Zeppelin on CentOS 7. Thanks for using this tutorial for installing Apache Zeppelin on CentOS 7 systems. For additional help or useful information, we recommend you to check the official Apache Zeppelin web site.

How To Install Apache ZooKeeper on CentOS 7

Apache ZooKeeper on CentOS 7

Zookeeper is brief is a distributed state manager that may be employed by many clusters to keep state across its clusters. Like HBase can utilize Zookeeper to keep state across its own set of clusters without having to have cluster country within it.

Table of Contents

Step 1. First let’s start by ensuring your system is up-to-date.

Step 2. Installing Java.

Step 3. Install Apache ZooKeeper.


Prerequisites

This article assumes you have at least basic knowledge of Linux, know how to use the shell, and most importantly, you host your site on your own VPS. The installation is quite simple and assumes you are running in the root account, if not you may need to add ‘sudo’ to the commands to get root privileges. I will show you through the step by step install Apache ZooKeeper on CentOS 7 server.
Install Apache ZooKeeper

Step 1. First let’s start by ensuring your system is up-to-date.

yum clean all
yum -y update

Step 2. Installing Java.

At the time of writing this tutorial, the latest Java JDK version was JDK 8u45. First, let us download the latest Java SE Development Kit 8 release from its official download page or use following commands to download from shell:

cd /opt/
wget --no-cookies --no-check-certificate --header "Cookie: gpw_e24=http%3A%2F%2Fwww.oracle.com%2F; oraclelicense=accept-securebackup-cookie" "http://download.oracle.com/otn-pub/java/jdk/8u45-b14/jdk-8u45-linux-x64.tar.gz"
tar xzf jdk-8u45-linux-x64.tar.gz

After extracting archive file use alternatives command to install it. alternatives command is available in chkconfig package:

cd /opt/jdk1.8.0_45/
alternatives --install /usr/bin/java java /opt/jdk1.8.0_45/bin/java 2
alternatives --config java
There are 3 programs which provide 'java'.

  Selection    Command
-----------------------------------------------
*  1           /opt/jdk1.7.0_71/bin/java
 + 2           /opt/jdk1.8.0_25/bin/java
   3           /opt/jdk1.8.0_45/bin/java

Enter to keep the current selection[+], or type selection number: 3

At this point JAVA 8 (JDK 8u45) has been successfully installed on your system. We also recommend to setup javac and jar commands path using alternatives:

alternatives --install /usr/bin/jar jar /opt/jdk1.8.0_45/bin/jar 2
alternatives --install /usr/bin/javac javac /opt/jdk1.8.0_45/bin/javac 2
alternatives --set jar /opt/jdk1.8.0_45/bin/jar
alternatives --set javac /opt/jdk1.8.0_45/bin/javac

Checking Installed java version:

[email protected] ~# java -version
java version "1.8.0_45"
Java(TM) SE Runtime Environment (build 1.8.0_45-b14)
Java HotSpot(TM) 64-Bit Server VM (build 25.45-b02, mixed mode)

We can easily set the environment variables using the export command as shown below:

Setup JAVA_HOME Variable:

export JAVA_HOME=/opt/jdk1.8.0_45

Setup JRE_HOME Variable:

export JRE_HOME=/opt/jdk1.8.0_45/jre

Setup PATH Variable:

export PATH=$PATH:/opt/jdk1.8.0_45/bin:/opt/jdk1.8.0_45/jre/bin

Step 3. Install Apache ZooKeeper.

First, install ZooKeeper framework on your machine, visit the following link and download the latest version of ZooKeeper:

cd opt/
tar -zxf zookeeper-3.4.11.tar.gz
cd zookeeper-3.4.6
mkdir data

Next, Open the configuration file named conf/zoo.cfg and all the following parameters to set as starting point:

### nano conf/zoo.cfg

tickTime = 2000
dataDir = /path/to/zookeeper/data
clientPort = 2181
initLimit = 5
syncLimit = 2

Then, start ZooKeeper server:

bin/zkServer.sh start

After executing this command, you will get a response as follows:

JMX enabled by default
Using config: /Users/../zookeeper-3.4.11/bin/../conf/zoo.cfg
Starting zookeeper ... STARTED

Next step, Start CLI type the following command:

bin/zkCli.sh

After typing the above command, you will be connected to the ZooKeeper server and you should get the following response:

Connecting to localhost:2181
................
................
................
Welcome to ZooKeeper!
................
................
WATCHER::
WatchedEvent state:SyncConnected type: None path:null
[zk: localhost:2181(CONNECTED) 0]

After connecting the server and performing all the operations, you can stop the zookeeper server by using the following command:

bin/zkServer.sh stop

Congratulation’s! You have successfully installed Apache ZooKeeper on CentOS 7. Thanks for using this tutorial for installing Apache ZooKeeper on CentOS 7 systems. For additional help or useful information, we recommend you to check the official Apache ZooKeeper web site.

How To Install Let’s Encrypt SSL using DirectAdmin

Let’s Encrypt SSL using DirectAdmin

Let’s Encrypt is a free open certificate authority (CA) that provides free certificates for websites and other services. The service, which is backed by the Electronic Frontier Foundation, Mozilla, Cisco Systems, and Akamai. Unfortunately, LetsEncrypt.org certificates currently have a 3 month lifetime. This means you’ll need to renew your certificate quarterly for now.

Table of Contents

Step 1. First let’s start by ensuring your system is up-to-date.

Step 2. Login to your DirectAdmin VPS via SSH as user root.

Step 3. Get the latest Let’s Encrypt script

Step 4. Configure DirectAdmin.


Prerequisites

This article assumes you have at least basic knowledge of Linux, know how to use the shell, and most importantly, you host your site on your own VPS. The installation is quite simple and assumes you are running in the root account, if not you may need to add ‘sudo’ to the commands to get root privileges. I will show you through the step by step install Let’s Encrypt SSL using DirectAdmin on CentOS 7 server.
Install Let’s Encrypt SSL using DirectAdmin

Step 1. First let’s start by ensuring your system is up-to-date.

yum clean all
yum -y update

Step 2. Login to your DirectAdmin VPS via SSH as user root.

First, Login to your DirectAdmin VPS:

ssh root@Your_IP_Adress -p Port_number

Step 3. Get the latest Let’s Encrypt script

Next, we will clean the software list and make sure we’ve got the latest Let’s Encrypt script:

cd /usr/local/directadmin/custombuild/
./build clean all
./build update
./build letsencrypt

Then, rewrite the configuration files:

./build rewrite_confs

Step 4. Configure DirectAdmin.

In order to enable Let’s Encrypt support on DirectAdmin, open the DirectAdmin configuration file:

nano /usr/local/directadmin/conf/directadmin.conf
letsencrypt=1

You should also make sure that SNI is enabled in DirectAdmin by adding/modifying this line:

enable_ssl_sni=1

Save the file and restart DirectAdmin for the changes to take effect:

echo "action=directadmin&value=restart" >> /usr/local/directadmin/data/task.queue; /usr/local/directadmin/dataskq d2000

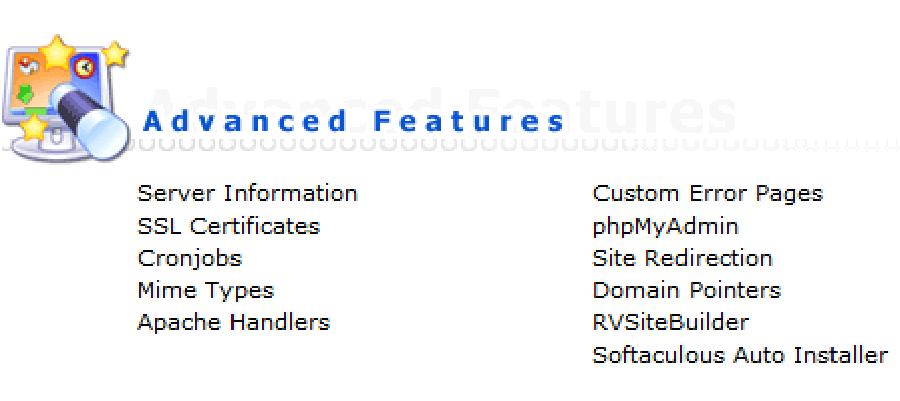
With this step Let’s Encrypt is enabled in DirectAdmin and we can proceed with the installation. Login to the control panel at https://yourdomain:2222 with your username and go to ‘SSL Certificates’ under ‘Advanced Features’:
DirectAdmin-SSL-2
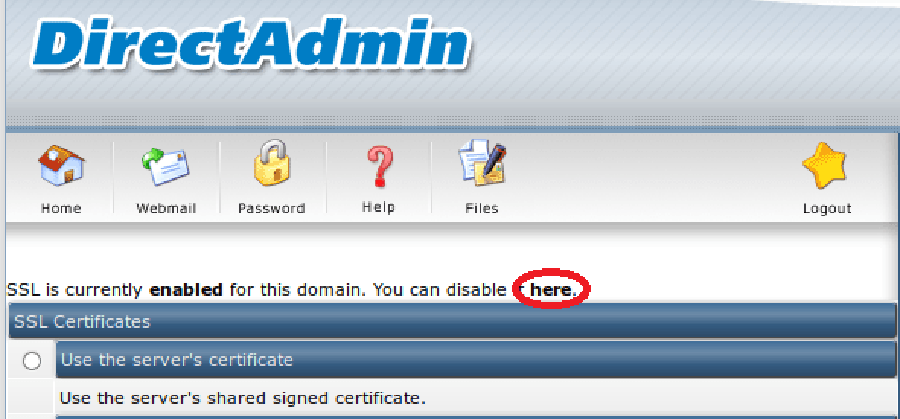
If the SSL option is disabled for the selected domain as shown in the screenshot below, you need to enable it by clicking ‘here’:
DirectAdmin-SSL
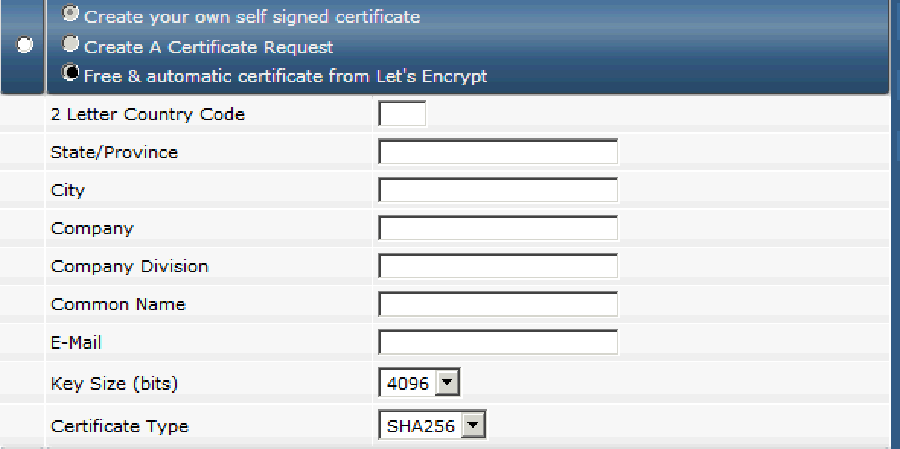
If you properly enabled Let’s Encrypt, you will see the ‘Free and automatic certificate from Let’s Encrypt’ option. Check the check-box next to the Let’s Encrypt option and enter all necessary details for your domain below:
DirectAdmin-SSL-1
Then click the ‘Save’ button and a free Let’s Encrypt SSL certificate will be automatically installed.

Finally Restart the web server for the changes to take effect:

systemctl restart httpd

Congratulation’s! You have successfully installed Install Let’s Encrypt SSL DirectAdmin on CentOS 7. Thanks for using this tutorial for installing Let’s Encrypt SSL using DirectAdmin on CentOS 7 systems. For additional help or useful information, we recommend you to check the official Apache Zeppelin web site.

How To Install Vue.JS on CentOS 7

Vue

Vue.JS is a JavaScript progressive front-end framework for building User Interfaces (UI). Vue is a monolithic framework and designed to be incrementally adoptable. The core library is concentrated on the view layer only and is easy to pick up and incorporate with other libraries or present projects, Additionally Vue.JS is perfectly capable of developing complicated Single-Page Software (SPA).

Table of Contents

Step 1. First let’s start by ensuring your system is up-to-date.

Step 2. Installing Node.Js and NPM.

Step 3. Installing Vue.JS.

Prerequisites

This article assumes you have at least basic knowledge of Linux, know how to use the shell, and most importantly, you host your site on your own VPS. The installation is quite simple and assumes you are running in the root account, if not you may need to add ‘sudo’ to the commands to get root privileges. I will show you through the step by step install Vue.JS on CentOS 7 server.
Install Vue.JS on CentOS 7

Step 1. First let’s start by ensuring your system is up-to-date.

yum clean all
yum -y update

Step 2. Installing Node.Js and NPM.

First of all, we need to install Node.JS and NPM:

curl --silent --location https://rpm.nodesource.com/setup_8.x | sudo bash -

Next, install Node.js and NPM with the following command:

yum install nodejs

You can check and verify your Node.js and NPM that you have installed using the following commands:

node -v
npm -v

Step 3. Installing Vue.JS.

NPM is the recommended installation method when building large scale applications with Vue. It pairs nicely with module bundlers such as Webpack or Browserify. Vue also provides accompanying tools for authoring Single File Components:

npm install -g vue-cli

Now you can switch to a directory where you want to store your project, and then install Vue.js files with the command below:

vue init webpack first-project

Then, switch to your project directory to install dependencies:

cd first-project
npm install

Now you have installed Vue.JS completely and you can start developing and testing it right away, executing the following command will start serving your project:

npm run dev

Finally, you can see that your project is now running on:

http://localhost:8081

Congratulation’s! You have successfully installed Vue.JS on CentOS 7. Thanks for using this tutorial for installing Vue.JS on CentOS 7 systems. For additional help or useful information, we recommend you to check the official Vue.JS web site.