How To Install Redis on Ubuntu 18.04 LTS

Install Redis on Ubuntu 18

Redis is a in memory key-value data structure store mainly used as a database, message broker or as a cache. Redis supports wide languages with flexibility and high performance. It supports different data structures like strings, lists, sets, maps, spatial indexes, and bitmaps.

This article assumes you have at least basic knowledge of Linux, know how to use the shell, and most importantly, you host your site on your own VPS. The installation is quite simple and assumes you are running in the root account, if not you may need to add ‘sudo’ to the commands to get root privileges. I will show you through the step by step installation Redis on an Ubuntu 18.04 bionic beaver.

Install Redis on Ubuntu 18.04 LTS Bionic Beaver

Step 1. First, make sure that all your system packages are up-to-date by running these following apt-get commands in the terminal.

sudo apt update
sudo apt upgrade

Step 2. Installing Redis on Ubuntu.

The Redis packages are available under the default apt repository. For the installation of Redis on an Ubuntu. Run below command from the terminal to install Redis on your machine:

sudo apt install redis-server

Redis provide php extension to work with php. Here we will cover installation of Redis Extension of php from source compilation and using apt repository. Following command will install and setup redis extension with php:

sudo apt install php-redis

Once the installation is completed, Redis service will start automatically. To check the status of the service enter the following command:

sudo systemctl status redis-server

Step 3. Configure Redis Cache.

To configure Redis as a cache you need to edit the /etc/redis/redis.conf file:

sudo nano /etc/redis/redis.conf
# IF YOU ARE SURE YOU WANT YOUR INSTANCE TO LISTEN TO ALL THE INTERFACES
# JUST COMMENT THE FOLLOWING LINE.
# ~~~~~~~~~~~~~~~~~~~~~~~~~~~~~~~~~~~~~~~~~~~~~~~~~~~~~~~~~~~~~~~~~~~~~~~~
bind 0.0.0.0 ::1
1
2
3
4

# IF YOU ARE SURE YOU WANT YOUR INSTANCE TO LISTEN TO ALL THE INTERFACES
# JUST COMMENT THE FOLLOWING LINE.
# ~~~~~~~~~~~~~~~~~~~~~~~~~~~~~~~~~~~~~~~~~~~~~~~~~~~~~~~~~~~~~~~~~~~~~~~~
bind0.0.0.0::1

Restart the Redis service for changes to take effect:
sudo systemctl restart redis-server
1

sudosystemctlrestartredis-server

We will now test the Redis instance with some commands:
$ redis-cli
127.0.0.1:6379> ping
PONG
127.0.0.1:6379> set test "Redis Working!"
OK
127.0.0.1:6379> get test
"Redis Working!"
127.0.0.1:6379> exit

Congratulation’s! You have successfully installed Redis. Thanks for using this tutorial for installing Redis in Ubuntu 18.04 bionic beaver system. For additional help or useful information, we recommend you to check the official Redis website.

How To Install Vtiger CRM on Ubuntu 18.04 LTS

Install Vtiger CRM on Ubuntu 18

Vtiger CRM is a cloud-based Customer Relationship Management (CRM) platform that aids interactions between the company and its customers. It provides an intuitive customer experience and delivers outstanding performance for marketing, sales, and support teams which in return provides better customer retention for the company.

This article assumes you have at least basic knowledge of Linux, know how to use the shell, and most importantly, you host your site on your own VPS. The installation is quite simple and assumes you are running in the root account, if not you may need to add ‘sudo’ to the commands to get root privileges. I will show you through the step by step installation Vtiger on an Ubuntu 18.04 bionic beaver.

Install Vtiger CRM on Ubuntu 18.04 LTS Bionic Beaver

Step 1. First, make sure that all your system packages are up-to-date by running these following apt-get commands in the terminal.

sudo apt update
sudo apt upgrade

Step 2. Install LAMP (Linux, Apache, MariaDB and PHP) server.

An Ubuntu 18.04 LAMP server is required. If you do not have LAMP installed, you can follow our guide here. Also install all required PHP modules:

apt-get install php7.2 libapache2-mod-php7.2 php7.2-common php7.2-mbstring php7.2-xmlrpc php7.2-soap php7.2-gd php7.2-xml php7.2-intl php7.2-mysql php7.2-cli php7.2-zip php7.2-curl

Step 3. Installing vTiger CRM on Ubuntu.

Now download the latest stable version of Vtiger CRM, At the moment of writing this article it is version 7.1.0:

cd /var/www/
wget https://cfhcable.dl.sourceforge.net/project/vtigercrm/vtiger%20CRM%207.1.0/Core%20Product/vtigercrm7.1.0.tar.gz

After the download has been successfully completed, we can then extract the GZ file using the following command:

tar -xvzf vtigercrm7.1.0.tar.gz

We will need to change some folders permissions:

chown -R www-data:www-data /var/www/vtigercrm/
chmod 755 /var/www/vtigercrm/

Step 4. Configuring MariaDB.

By default, MariaDB is not hardened. You can secure MySQL using the mysql_secure_installation script. you should read and below each steps carefully which will set root password, remove anonymous users, disallow remote root login, and remove the test database and access to secure MariaDB.

mysql_secure_installation

Next we will need to log in to the MariaDB console and create a database for the vTiger. Run the following command:

mysql -u root -p

This will prompt you for a password, so enter your MariaDB root password and hit Enter. Once you are logged in to your database server you need to create a database for vTiger installation:

MariaDB > CREATE DATABASE vtiger;
MariaDB > CREATE USER 'vtiger_user'@'localhost' IDENTIFIED BY 'PaSsWoRd';
MariaDB > GRANT ALL PRIVILEGES ON `vtiger`.* TO 'vtiger_user'@'localhost';
MariaDB > FLUSH PRIVILEGES;
MariaDB > \q

Now, let’s tweak some of your PHP settings so you can later complete the VTiger installation:

nano /etc/php/7.2/apache2/php.ini

Modify the following lines:

max_execution_time = 120
max_input_vars = 2000
memory_limit = 256M
post_max_size = 32M
upload_max_filesize = 64M
file_uploads = On
allow_url_fopen = On
display_errors = On
short_open_tags = Off
log_errors = Off
error_reporting = E_WARNING & ~E_NOTICE & ~E_DEPRECATED & ~E_STRICT

Save and close the file. Restart the apache service for the changes to take effects:

systemctl restart apache2.service

Step 5. Configuring Apache web server for vTiger.

Create a new virtual host directive in Apache. For example, create a new Apache configuration file named ‘vtiger.conf’ on your virtual server:

touch /etc/apache2/sites-available/vtiger.conf
ln -s /etc/apache2/sites-available/vtiger.conf /etc/apache2/sites-enabled/vtiger.conf
nano /etc/apache2/sites-available/vtiger.conf

Add the following lines:

ServerAdmin [email protected]
DocumentRoot /var/www/vtigercrm
ServerName your-domain.com
ServerAlias www.your-domain.com

Options FollowSymLinks
AllowOverride All

ErrorLog /var/log/apache2/your-domain.com-error_log
CustomLog /var/log/apache2/your-domain.com-access_log common

Save and close the file. Restart the Apache service for the changes to take effect:

sudo a2ensite vtiger.conf
sudo a2enmod rewrite
sudo phpenmod mbstring
sudo a2enmod headers
sudo systemctl restart apache2

Step 5. Accessing Vtiger CRM.

Vtiger CRM will be available on HTTP port 80 by default. Open your favorite browser and navigate to http://yourdomain.com/vtigercrm or http://server-ip/vtigercrm and complete the required the steps to finish the installation. If you are using a firewall, please open port 80 to enable access to the control panel.

Congratulation’s! You have successfully installed vTiger. Thanks for using this tutorial for installing vTiger Customer Relationship Management on your Ubuntu 18.04 system. For additional help or useful information, we recommend you to check the official vTiger website.

How to Install Linux Kernel 5.0 on Ubuntu 18.04 LTS

Install Linux Kernel 5.0 on Ubuntu 18

Linus Torvalds the creator and the principal developer of the Linux kernel announced the release of Linux kernel version 5.0. This release increases the major kernel version number to 5. from 4.x. The new change does not mean anything and does not affect programs in any way.

This article assumes you have at least basic knowledge of Linux, know how to use the shell, and most importantly, you host your site on your own VPS. The installation is quite simple and assumes you are running in the root account, if not you may need to add ‘sudo’ to the commands to get root privileges. I will show you through the step by step installation Linux Kernel 5.0 on an Ubuntu 18.04 bionic beaver.

Install Linux Kernel 5.0 on Ubuntu 18.04 LTS Bionic Beaver

Step 1. First, make sure that all your system packages are up-to-date by running these following apt-get commands in the terminal.

sudo apt update
sudo apt upgrade

Step 2. Installing Linux Kernel 5.0 on Ubuntu.

First, download and install the kernel binaries via terminal commands:

### 64-bit OS ###
cd /tmp/
wget -c https://kernel.ubuntu.com/~kernel-ppa/mainline/v5.0/linux-headers-5.0.0-050000_5.0.0-050000.201903032031_all.deb
wget -c https://kernel.ubuntu.com/~kernel-ppa/mainline/v5.0/linux-headers-5.0.0-050000-generic_5.0.0-050000.201903032031_amd64.deb
wget -c https://kernel.ubuntu.com/~kernel-ppa/mainline/v5.0/linux-image-unsigned-5.0.0-050000-generic_5.0.0-050000.201903032031_amd64.deb
wget -c https://kernel.ubuntu.com/~kernel-ppa/mainline/v5.0/linux-modules-5.0.0-050000-generic_5.0.0-050000.201903032031_amd64.deb
sudo dpkg -i *.deb
### 32-bit OS ###
cd /tmp/
wget -c https://kernel.ubuntu.com/~kernel-ppa/mainline/v5.0/linux-headers-5.0.0-050000_5.0.0-050000.201903032031_all.deb
wget -c https://kernel.ubuntu.com/~kernel-ppa/mainline/v5.0/linux-headers-5.0.0-050000-generic_5.0.0-050000.201903032031_i386.deb
wget -c https://kernel.ubuntu.com/~kernel-ppa/mainline/v5.0/linux-image-5.0.0-050000-generic_5.0.0-050000.201903032031_i386.deb
wget -c https://kernel.ubuntu.com/~kernel-ppa/mainline/v5.0/linux-modules-5.0.0-050000-generic_5.0.0-050000.201903032031_i386.deb
sudo dpkg -i *.deb

After installation is finished, reboot your ubuntu system:

sudo reboot

And check linux kernel version:

uname -a

Congratulation’s! You have successfully installed Linux Kernel. Thanks for using this tutorial for installing Linux Kernel on Ubuntu system. For additional help or useful information, we recommend you to check the official Linux Kernel website.

How To Install Apache CouchDB on Ubuntu 18.04 LTS

Install Apache CouchDB on Ubuntu 18

CouchDB is an open source project and NoSQL, document oriented database server. It has a document-oriented NoSQL database architecture and is implemented in the concurrency-oriented language Erlang; it uses JSON to store data, JavaScript as its query language using MapReduce, and HTTP for an API.

This article assumes you have at least basic knowledge of Linux, know how to use the shell, and most importantly, you host your site on your own VPS. The installation is quite simple and assumes you are running in the root account, if not you may need to add ‘sudo’ to the commands to get root privileges. I will show you through the step by step installation Apache CouchDB on a Ubuntu 18.04 (Bionic Beaver) server.

Install Apache CouchDB on Ubuntu 18.04 LTS Bionic Beaver

Step 1. First, make sure that all your system packages are up-to-date by running these following apt commands in the terminal.

sudo apt update
sudo apt upgrade

Step 2. Installing Apache CouchDB on Ubuntu.

First, Add the official CouchDB PPA repository using add-apt-repository command:

curl -L https://couchdb.apache.org/repo/bintray-pubkey.asc | sudo apt-key add -
echo "deb https://apache.bintray.com/couchdb-deb bionic main" | sudo tee -a /etc/apt/sources.list

Now that the repository is enabled update the packages list and install CouchDB:

sudo apt update
sudo apt install couchdb

During hte installation, you should see messages to select some option:

┌──────────────────────────┤ Configuring couchdb ├──────────────────────────┐
│ │
│ Please select the CouchDB server configuration type that best meets your
│ needs.
│
│ For single-server configurations, select standalone mode. This will set
│ up CouchDB to run as a single server.
│
│ For clustered configuration, select clustered mode. This will prompt for
│ additional parameters required to configure CouchDB in a clustered
│ configuration.
│
│ If you prefer to configure CouchDB yourself, select none. You will then
│ need to edit /opt/couchdb/etc/vm.args and /opt/couchdb/etc/local.d/*.ini
│ yourself. Be aware that this will bypass *all* configuration steps,
│ including setup of a CouchDB admin user - leaving CouchDB in "admin
│
│
│ │
└───────────────────────────────────────────────────────────────────────────┘

Next, select standalone option and continue:

┌─────────┤ Configuring couchdb ├─────────┐
│ General type of CouchDB configuration: │
│ │
│ standalone │
│ clustered │
│ none │
│ │
│ │
│ │
│ │
└─────────────────────────────────────────┘

Next, type in the interface IP address and continue:

┌─────────────────────────┤ Configuring couchdb ├──────────────────────────┐
│ A CouchDB node must bind to a specific network interface. This is done │
│ via IP address. Only a single address is supported at this time. │
│ │
│ The special value '0.0.0.0' binds CouchDB to all network interfaces. │
│ │
│ The default is 127.0.0.1 (loopback) for standalone nodes, and 0.0.0.0 │
│ (all interfaces) for clustered nodes. In clustered mode, it is not │
│ allowed to bind to 127.0.0.1. │
│ │
│ CouchDB interface bind address: │
│ │
│ 127.0.0.1_______________________________________________________________ │
│ │
│ │
│ │
└──────────────────────────────────────────────────────────────────────────┘

Once the installation is finished. Start CouchDB and enable it to start on boot time using the following command:

sudo systemctl start couchdb
sudo systemctl enable couchdb

Step 3. Accessing Apache CouchDB.

Apache CouchDB will be available on HTTP port 80 by default. Open your favorite browser and navigate to http://your_IP:5984/_utils/ and complete the required the steps to finish the installation.

Congratulation’s! You have successfully installed CouchDB. Thanks for using this tutorial for installing Apache CouchDB on Ubuntu 18.04 systems. For additional help or useful information, we recommend you to check the official CouchDB website.

How To Install KDE Plasma on Ubuntu 18.04 LTS

Install KDE Plasma on Ubuntu 18

KDE is a well-known desktop environment for the Unix-Like systems designed for users who wants to have a nice desktop environment for their machines, It is one of the most used desktop interfaces out there.

This article assumes you have at least basic knowledge of Linux, know how to use the shell, and most importantly, you host your site on your own VPS. The installation is quite simple and assumes you are running in the root account, if not you may need to add ‘sudo’ to the commands to get root privileges. I will show you through the step by step installation KDE Plasma desktop environment on an Ubuntu 18.04 bionic beaver.

Install KDE Plasma on Ubuntu 18.04 LTS Bionic Beaver

Step 1. First, make sure that all your system packages are up-to-date by running these following apt-get commands in the terminal.

sudo apt update
sudo apt upgrade

Step 2. Installing Tasksel.

The tasksel CLI tool for Ubuntu helps you in installing multiple related packages as a collective task. Ubuntu 18.04 does not have this utility installed by default. Please use the following command as sudo in order to install it on your system as we will later be using it to install Kubuntu Desktop:

sudo apt install tasksel

Step 3. Installing Kubuntu Desktop.

Now uses Tasksel to install all of KDE Plasma’s dependencies on Ubuntu:

tasksel install kubuntu-desktop

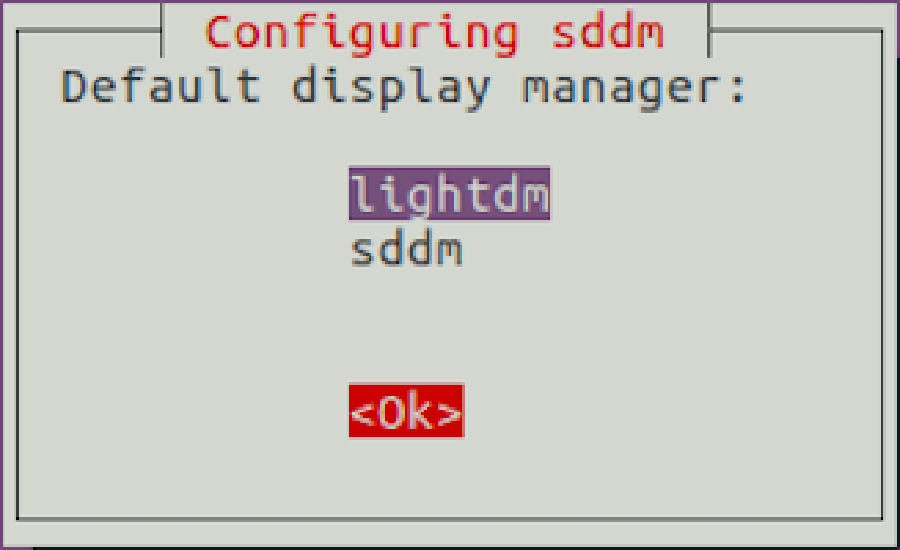
During installation, it will ask you to select your default display manager to sddm.
KDE-installation
Once the KDE installation is done, reboot the system to take effect. On the login screen, select KDE Plasma as a desktop environment and login to the system. Now your Ubuntu system has the KDE desktop environment.

Congratulation’s! You have successfully installed KDE Plasma. Thanks for using this tutorial for installing KDE Plasma desktop environment in Ubuntu 18.04 bionic beaver system. For additional help or useful information, we recommend you to check the official KDE website.

How To Install XWiki on Ubuntu 18.04 LTS

Install XWiki on Ubuntu 18

XWiki is a free and open source, Java-based advanced wiki software platform. It runs on servlet containers like JBoss, Tomcat, Jetty etc. It also uses a database such as MySQL or PostgreSQL to store its information.

This article assumes you have at least basic knowledge of Linux, know how to use the shell, and most importantly, you host your site on your own VPS. The installation is quite simple and assumes you are running in the root account, if not you may need to add ‘sudo’ to the commands to get root privileges. I will show you through the step by step installation XWiki on a Ubuntu 18.04 (Bionic Beaver) server.

Install XWiki on Ubuntu 18.04 LTS Bionic Beaver

Step 1. First, make sure that all your system packages are up-to-date by running these following apt commands in the terminal.

sudo apt update
sudo apt upgrade

Step 2. Installing XWiki on Ubuntu.

Before we begin the installation, you will need to add the official XWiki repository. You can do this by executing the following commands:

wget -q "https://maven.xwiki.org/public.gpg" -O- | sudo apt-key add -
sudo wget "https://maven.xwiki.org/stable/xwiki-stable.list" -P /etc/apt/sources.list.d/

To can check all available packages in this repository using the following command:

apt-cache search xwiki

Result:

xwiki-common - XWiki is a free wiki software platform written in Java with a design emphasis
xwiki-enterprise-common - XWiki is a free wiki software platform written in Java with a design emphasis
xwiki-enterprise-mysql-common - XWiki is a free wiki software platform written in Java with a design emphasis
xwiki-enterprise-pgsql-common - XWiki is a free wiki software platform written in Java with a design emphasis
xwiki-enterprise-tomcat-common - XWiki is a free wiki software platform written in Java with a design emphasis
xwiki-enterprise-tomcat-mysql - XWiki enterprise Tomcat/MySQL based package
xwiki-enterprise-tomcat-pgsql - XWiki enterprise Tomcat/PostgreSQL
xwiki-enterprise-tomcat5-mysql - XWiki is a free wiki software platform written in Java with a design emphasis
xwiki-enterprise-tomcat5-pgsql - XWiki is a free wiki software platform written in Java with a design emphasis
xwiki-enterprise-tomcat6-mysql - XWiki is a free wiki software platform written in Java with a design emphasis
xwiki-enterprise-tomcat6-pgsql - XWiki is a free wiki software platform written in Java with a design emphasis
xwiki-enterprise-tomcat7-common - XWiki is a free wiki software platform written in Java with a design emphasis
xwiki-enterprise-tomcat7-mysql - XWiki is a free wiki software platform written in Java with a design emphasis
xwiki-enterprise-tomcat7-pgsql - XWiki is a free wiki software platform written in Java with a design emphasis
xwiki-enterprise-tomcat8-common - XWiki is a free wiki software platform written in Java with a design emphasis
xwiki-enterprise-tomcat8-mysql - XWiki is a free wiki software platform written in Java with a design emphasis
xwiki-enterprise-tomcat8-pgsql - XWiki is a free wiki software platform written in Java with a design emphasis
xwiki-mysql-common - XWiki is a free wiki software platform written in Java with a design emphasis
xwiki-pgsql-common - XWiki is a free wiki software platform written in Java with a design emphasis
xwiki-solr-data - XWiki is a free wiki software platform written in Java with a design emphasis
xwiki-tomcat7-common - XWiki is a free wiki software platform written in Java with a design emphasis
xwiki-tomcat7-mysql - XWiki is a free wiki software platform written in Java with a design emphasis
xwiki-tomcat7-pgsql - XWiki is a free wiki software platform written in Java with a design emphasis
xwiki-tomcat8-common - XWiki is a free wiki software platform written in Java with a design emphasis
xwiki-tomcat8-mysql - XWiki is a free wiki software platform written in Java with a design emphasis
xwiki-tomcat8-pgsql - XWiki is a free wiki software platform written in Java with a design emphasis

You can see on the list that the repo contains packages that can install XWiki with different versions of Tomcat, MySQL and PostgreSQL. In this tutorial, we will install XWiki with Tomcat 8 and PostgreSQL as a database server. Run the following command:

apt-get install xwiki-enterprise-tomcat8-pgsql

Step 3. Accessing XWiki.

XWiki will be available on HTTP port 8080 by default. Open your favorite browser and navigate to http://yourdomain.com:8080/xwiki or http://server-ip:8080/xwiki and complete the required the steps to finish the installation. If you are using a firewall, please open port 80 to enable access to the control panel.

Congratulation’s! You have successfully installed XWiki. Thanks for using this tutorial for installing XWiki e-commerce on Ubuntu 18.04 systems. For additional help or useful information, we recommend you to check the official XWiki website.

How To Install Java (JRE or JDK) on Ubuntu 16.04

Install Java (JRE or JDK) on Ubuntu 16

In this tutorial we will show you how to install and configuration of java JRE or JDK on your Ubuntu 16.04 server. Many programs and scripts that require java to run it, but usually Java is not installed by default on VPS or Dedicated Server. This article assumes you have at least basic knowledge of linux, know how to use the shell, and most importantly, you host your site on your own VPS. The installation is quite simple and assumes you are running in the root account, if not you may need to add ‘sudo’ to the commands to get root privileges. I will show you through the step by step installation JRE (Java Runtime Environment) and JDK (Java Development Kit) on Ubuntu 16.04.

Install Java (JRE or JDK) on Ubuntu 16.04

Step 1. First make sure that all your system packages are up-to-date by running these following apt-get commands in the terminal.

sudo apt-get update
sudo apt-get upgrade

After your server has been fully updated, verify if java is installed or not:

java -version

If there is no java package installed ye, output will be something like:

The program 'java' can be found in the following packages:

* default-jre
* gcj-4.9-jre-headless
* gcj-5-jre-headless
* openjdk-7-jre-headless
* gcj-4.8-jre-headless
* openjdk-6-jre-headless
* openjdk-8-jre-headless
* openjdk-9-jre-headless
Try: apt install <selected package>

Step 2. Installing Java (JRE or JDK).

Once you have verified if Java is installed or not, choose the type of Java installation that you want with one the following:

sudo apt-get install openjdk-7-jre
sudo apt-get install openjdk-7-jdk

Another alternative Java install is with Oracle JRE and JDK. However, we would need to install additional repositories for a proper installation:

sudo apt-get install python-software-properties
sudo add-apt-repository ppa:webupd8team/java

Then, you will need to fully update the system with the following command and install it:

sudo apt-get update
sudo apt-get install oracle-java8-installer

Step 3. Verify Installed Java Version.

java -version

Result:

java version "1.8.0_74"
Java(TM) SE Runtime Environment (build 1.8.0_74-b02)
Java HotSpot(TM) 64-Bit Server VM (build 25.74-b02, mixed mode)

Step 4. Setup JAVA_HOME on Ubuntu 16.04.

Since many programs now days need a JAVA_HOME environment variable to work properly. We will need to find the appropriate path to make these changes. With the following command, you can view your installs and their path:

sudo update-alternatives --config java
sudo nano /etc/profile

Now that you are in the user profile file, add the following code, along with the Path of your installation from the previous step, to the bottom. ( Example: JAVA_HOME=”YOUR_PATH”):

export JAVA_HOME="/usr/lib/jvm/java-1.8.0-openjdk-1.8.0.51-1.b16.el7_1.x86_64"

Reload the file so all your changes could take effect with the following command:

source /etc/profile

Verify that your implementations are correct with the following command:

echo $JAVA_HOME

Congratulation’s! You have successfully installed Java. Thanks for using this tutorial for installing Oracle Java (JRE or JDK) on Ubuntu 16.04 Xenial Xerus system. For additional help or useful information, we recommend you to check the official Java web site.