How To Install Kloxo MR on CentOS 6

Install Kloxo MR on CentOS 6

Kloxo-MR is a fork of original LXCenter’s kloxo project and its developed by Mustafa Ramadan, hence the “MR”. Kloxo MR not only fixes the bugs of Kloxo but it has many additional features like the ability to switch to Nginx server. This article assumes you have at least basic knowledge of linux, know how to use the shell, and most importantly, you host your site on your own VPS. Follow guide how to install Kloxo MR on CentOS 6.
In this tutorial we will show you how to install and configuration of Kloxo MR on your CentOS 6 server.

Install Kloxo-MR on CentOS 6

Step 1. Update all the packages installed of the Operating System.

 yum update -y

Step 2. Install the needed packages.

yum install yum-utils yum-priorities vim-minimal subversion curl zip unzip -y
yum install telnet -y

Step 3. Make sure SELinux is disabled.

We have to disable SELinux, cause it not correctly disabled, the Kloxo installation useless and may required to reload OS to re-install it properly.

setenforce 0
echo ‘SELINUX=disabled’ > /etc/selinux/config

Step 4. Download Kloxo-MR repo.

wget https://github.com/mustafaramadhan/kloxo/raw/release/kloxo-mr.repo –no-check-certificate
cd /

Step 5. Install Kloxo-MR.

 yum install kloxomr-y

Now, run setup.sh before reboot.

 sh /script/upcp

It will ask you whether you want to install it as slave or master. Choose the option 1 (Master) and click enter. That’s it. Reboot the server after installation completes.

Step 6. Once it complete, we can navigate to our kloxo admin panel http://serverip:7777 over SSL or http://serverip:7778 without over SSL. So the traffic such as passwords and data will be sent unencrypted (plain). If we had trouble login to our kloxo admin panel. We should be stop the firewall before and make sure the firewall permit kloxo traffic at 7777 and 7778 port. Default username is admin and password is admin.

Congratulation’s! You have successfully installed Kloxo MR. Thanks for using this tutorial for installing Kloxo MR control panel on CentOS 6 system. For additional help or useful information, we recommend you to check the official Kloxo MR web site.


How To Install Fail2Ban on Ubuntu

Install Fail2Ban on Ubuntu

Fail2Ban is a utility that is used to detect and prevent brute force intrusion. By scanning logs for certain actions, such as repeated failed login attempts, Fail2Ban is able to alter firewall configurations to halt further events. This article assumes you have at least basic knowledge of linux, know how to use the shell, and most importantly, you host your site on your own VPS. Follow guide how to install Fail2Ban on Ubuntu.

In this tutorial we will show you how to install and configuration of Fail2Ban on your Ubuntu server.

Install Fail2Ban on Ubuntu

Step 1. First log-in as root user and enter the following command to install Fail2ban.

 apt-get install fail2ban

Step 2. Once that has finished, go ahead and create your “local” jail (this is where you define your overrides of jail.conf). You can read more about jails here.

 cp /etc/fail2ban/jail.conf /etc/fail2ban/jail.local

Step 3. Setup Fail2ban default configuration.

 nano /etc/fail2ban/jail.local

Now, you will see default section with some basic rules that are followed by fail2ban itself. If you want to add some extra layer of protection to your server, then you can customize the each rule section as per your needs. There are few lines act as basic setup you can edit as necessary to suit your need including: ignoreip, bantime, findtime, and maxretry. You can read what each line means in the explanation available there.

[DEFAULT]

# "ignoreip" can be an IP address, a CIDR mask or a DNS host. Fail2ban will not
# ban a host which matches an address in this list. Several addresses can be
# defined using space separator.
ignoreip = 127.0.0.1/8

# "bantime" is the number of seconds that a host is banned.
bantime = 600

# A host is banned if it has generated "maxretry" during the last "findtime"
# seconds.
findtime = 600
maxretry = 3

# Destination email address used solely for the interpolations in
# jail.{conf,local} configuration files.
destemail = root@localhost

Step 4. Restarting Fail2Ban service.

 service fail2ban restart

Congratulation’s! You have successfully installed Fail2Ban. Thanks for using this tutorial for installing Fail2Ban on Linux ubuntu system. For additional help or useful information, we recommend you to check the official Fail2Ban web site.

How To Install Gnome GUI on CentOS 7

Install Gnome GUI on CentOS 7

By default, RHEL/CentOS 7 server installed as minimal without any Graphical Desktop support. Installing GNOME Desktop on CentOS is faily straightforward. Most CentOS servers are run on CLI (Command-Line Interface) mode. But in some cases, one may need to have a desktop to install some applications with GUI (Grapich User Interface) mode. In this case, we will use GNOME, the most popular user-friendly desktop for any UNIX based system. This article assumes you have at least basic knowledge of linux, know how to use the shell, and most importantly, you host your site on your own VPS. Follow guide how to install Gnome GUI on CentOS 7.

In this tutorial we will show you how to install and configuration of Gnome on your CentOS 7 server.

Install Gnome GUI on CentOS 7

Step 1. Install Gnome GUI by issuing the following command.

CentOS 7:

 yum groupinstall "GNOME Desktop" "Graphical Administration Tools"

RHEL 7:

 yum groupinstall "Server with GUI"

Step 2. When the installation finishes, run the following command to tell the system to boot Gnome Desktop automatically at system startup.

 ln -sf /lib/systemd/system/runlevel5.target /etc/systemd/system/default.target

Step 3. Reboot the system.

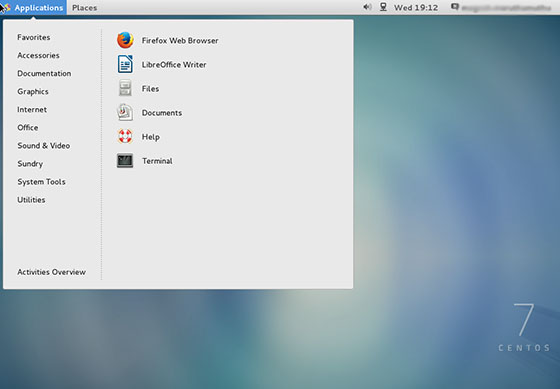
After you reboot the system , the system will enter into the Gnome GUI interface automatically.

centos-7-desktop-installation

Step 4. Installing additional applications.

After logging in to the GNOME Desktop, you can now go to System > Administration > Add/Remove Software to manage application in CentOS. By using this wizard, you can install various applications similar to yum but through a GUI. Applications installed using this method will appear in the Application menu list.

Congratulation’s! You have successfully installed Gnome. Thanks for using this tutorial for installing Gnome GUI on CentOS 7 system. For additional help or useful information, we recommend you to check the official Gnome web site.

You Might Also Like: How To Install GNOME on Ubuntu 14.04

How To Install Adobe Flash Player 11.2 on CentOS

Install Adobe Flash Player 11.2 on CentOS

Adobe Flash Player are very useful for watching videos in web browser online. Without flash player most of the videos will not play in your browser. This article assumes you have at least basic knowledge of linux, know how to use the shell, and most importantly, you host your site on your own VPS. Follow guide how to install the latest version of adobe flash player 11.2 on your CentOS  using Adobe’s own YUM repository.

In this tutorial we will show you how to install of Adobe Flash Player on your CentOS server.

Install Adobe Flash Player 11.2 on CentOS

Step 1. Install Adobe YUM Repository RPM package.

First add the following Adobe repository for Flash Player based on your CentOS system:

## Adobe Repository 32-bit x86 ##
rpm -ivh http://linuxdownload.adobe.com/adobe-release/adobe-release-i386-1.0-1.noarch.rpm
rpm --import /etc/pki/rpm-gpg/RPM-GPG-KEY-adobe-linux
 
## Adobe Repository 64-bit x86_64 ##
rpm -ivh http://linuxdownload.adobe.com/adobe-release/adobe-release-x86_64-1.0-1.noarch.rpm
rpm --import /etc/pki/rpm-gpg/RPM-GPG-KEY-adobe-linux

Step 2. Update Repositories.

Next, we need to run the following command to update the Adobe’s own YUM repository to install Adobe Flash Player latest version:

 yum check-update

Step 3. Start to install Adobe Flash Player 11.2 and dependency packages using yum command.

Now run the following command to install latest version of Flash Plugin on your Linux system:

 yum install flash-plugin nspluginwrapper alsa-plugins-pulseaudio libcurl

Step 4. Verify that the Flash Player Plugin is working, issue the following command.

[root@wpcademy~]# rpm -qa | grep flash
flash-plugin-11.2.202.425-release.x86_64

That’s all for now, enjoy playing games and watching streaming videos on your browser using Flash Player on systems.

Congratulation’s! You have successfully installed Adobe Flash Player. Thanks for using this tutorial for installing Adobe Flash Player on CentOS system. For additional help or useful information, we recommend you to check the official Adobe web site.

How To Install Webmin on Ubuntu

Install Webmin on Ubuntu

Webmin is a free control Panel for managing VPS. Webmin is a web based interface which is used to manage VPS web hosting server. With the help of webmin you can setup user account, apache, dns & file sharing and other actions. Webmin very suitable for beginners who do not know much about the unix or linux command line. For future reference, I will show you a steps to setup on Webmin on Ubuntu server.

This article assumes you have at least basic knowledge of linux, know how to use the shell, and most importantly, you host your site on your own VPS. The installation is quite simple. I will show you through the step by step installation Webmin on Ubuntu server.

In this tutorial we will show you how to install and configuration of Webmin on your Ubuntu server.

Install Webmin on Ubuntu

Step 1. First add repository.

 nano /etc/apt/sources.list

Then, add the following lines:

deb http://download.webmin.com/download/repository sarge contrib
deb http://webmin.mirror.somersettechsolutions.co.uk/repository sarge contrib

Step 2. Fetch and install the GPG key:

sudo wget http://www.webmin.com/jcameron-key.asc
sudo apt-key add jcameron-key.asc

Step 3. Install Webmin.

Install Webmin on Ubuntu with the following command:

sudo apt-get update
sudo apt-get install webmin

Step 4. Start webmin.

 /etc/init.d/webmin start

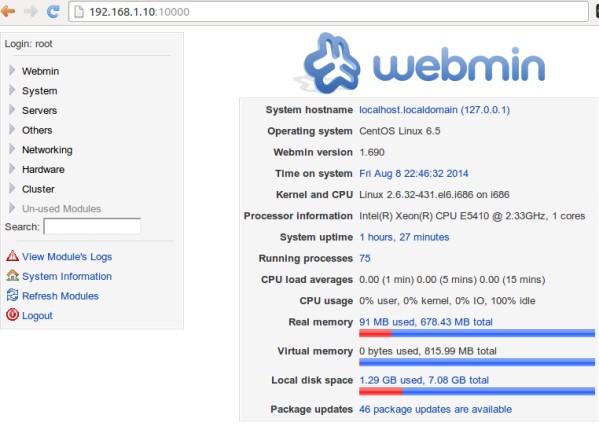
Step 5. Finaly, we can access the webmin panel using our web browser. Webmin use 10000 as its default port. Type this into our URL address web browser. https://ip-address:10000 then login as super user or root access priviliges. If you are using a firewall, please open port 80 and 10000 to enable access to the control panel.

webmin-ubuntu-server

Congratulation’s! You have successfully installed Webmin. Thanks for using this tutorial for installing Webmin control panel in Ubuntu system. For additional help or useful information, we recommend you to check the official Webmin web site.

You Might Also Like: How To Install Webmin on CentOS

How To Install Pure-FTPd on CentOS

Install Pure-FTPd on CentOS

Pure-FTPd is a free (BSD), secure, production-quality and standard-conformant FTP server. It doesn’t provide useless bells and whistles, but focuses on efficiency and ease of use. It provides simple answers to common needs, plus unique useful features for personal users as well as hosting providers. This article teaches you how to install free ftp server Pure-FTPd on CentOS 6 and how to configure and use it so you can access your server via ftp connection using your favorite ftp client (e.g:FileZilla).

In this tutorial we will show you how to install and configuration of Pure-FTPd on your CentOS server.

Install Pure-FTPd on CentOS

Step 1. First add EPEL yum repository your system.

CentOS 6:

 rpm -Uvh http://dl.fedoraproject.org/pub/epel/6/x86_64/epel-release-6-8.noarch.rpm

CentOS 7:

 rpm -Uvh http://dl.fedoraproject.org/pub/epel/7/x86_64/e/epel-release-7-1.noarch.rpm

Step 2. Installing Pure-FTPd on CentOS

 yum install pure-ftpd -y

Step 3. Configuring Pure-FTPd server.

Type the following command to edit Pure-FTPd configuration file.

 nano /etc/pure-ftpd/pure-ftpd.conf

Make sure you have this options:

# If you want simple Unix (/etc/passwd) authentication, uncomment this
UnixAuthentication            yes
ChrootEveryone yes
NoAnonymous yes
# PureDB user database (see README.Virtual-Users)
PureDB /etc/pure-ftpd/pureftpd.pdb
# Automatically create home directories if they are missing
CreateHomeDir yes

Finally, save Pure-FTPD user database.

 pure-pw mkdb

Add a virtual user.

 pure-pw useradd ftpuser -u user -g group -d /var/www/yourdomain.com/public_html

Step 4. Start service and enable the service to start on boot.

service pure-ftpd start
chkconfig pure-ftpd on

Congratulation’s! You have successfully installed Pure-FTPd. Thanks for using this tutorial for installing Pure-FTPd secure FTP server on CentOS system. For additional help or useful information, we recommend you to check the official Pure-FTPd web site.

How To Install Apache Tomcat 8 on CentOS

Install Apache Tomcat 8 on CentOS

Apache Tomcat is an open source web server and servlet container developed by the Apache Software Foundation. It implements the Java Servlet, JavaServer Pages (JSP), Java Unified Expression Language and Java WebSocket specifications from Sun Microsystems and provides a web server environment for Java code to run in. This article assumes you have at least basic knowledge of linux, know how to use the shell, and most importantly, you host your site on your own VPS.

Install Apache Tomcat 8 on CentOS

Step 1. JAVA is the first requirement of Tomcat installation.

CentOS 32 bit:

wget --no-cookies \
--no-check-certificate \
--header "Cookie: oraclelicense=accept-securebackup-cookie" \
"http://download.oracle.com/otn-pub/java/jdk/8u5-b13/jdk-8u5-linux-i586.rpm" \
-O /opt/jdk-8-linux-i586.rpm
 rpm -Uvh /opt/jdk-8-linux-i586.rpm

CentOS 64 bit:

wget --no-cookies \
--no-check-certificate \
--header "Cookie: oraclelicense=accept-securebackup-cookie" \
"http://download.oracle.com/otn-pub/java/jdk/8u5-b13/jdk-8u5-linux-x64.rpm" \
-O /opt/jdk-8-linux-x64.rpm
 rpm -Uvh /opt/jdk-8-linux-x64.rpm

Next, configure newly installed JAVA 8 files using command ‘alternatives‘, run the following series of commands on the terminal to configure Java.

# alternatives --install /usr/bin/java java /usr/java/jdk1.8.0_05/jre/bin/java 20000
# alternatives --install /usr/bin/jar jar /usr/java/jdk1.8.0_05/bin/jar 20000
# alternatives --install /usr/bin/javac javac /usr/java/jdk1.8.0_05/bin/javac 20000
# alternatives --install /usr/bin/javaws javaws /usr/java/jdk1.8.0_05/jre/bin/javaws 20000
# alternatives --set java /usr/java/jdk1.8.0_05/jre/bin/java
# alternatives --set javaws /usr/java/jdk1.8.0_05/jre/bin/javaws
# alternatives --set javac /usr/java/jdk1.8.0_05/bin/javac
# alternatives --set jar /usr/java/jdk1.8.0_05/bin/jar

You can also verify it, by issuing the following command.

 java -version

Step 2. Download and extract Tomcat archive.

Once installing and configuring JAVA on the system, now it’s time to download latest version of Apache Tomcat.

cd /opt
wget http://www.apache.org/dist/tomcat/tomcat-8/v8.0.33/bin/apache-tomcat-8.0.33.tar.gz
tar -xvf pache-tomcat-8.0.21.tar.gz


Step 3. Add tomcat user and group.

ln -s /opt/apache-tomcat-8.0.21 /opt/tomcat-latest
chown -hR tomcat8: /opt/tomcat-latest /opt/apache-tomcat-8.0.21

Step 4. Configure Tomcat to run as a service.

cd /opt/apache-tomcat-8.0.21/bin
./startup.sh

You will get the following output.

Using CATALINA_BASE:   /var/local/apache-tomcat-8.0.21
Using CATALINA_HOME:   /var/local/apache-tomcat-8.0.21
Using CATALINA_TMPDIR: /var/local/apache-tomcat-8.0.21/temp
Using JRE_HOME:        /usr
Using CLASSPATH:       /var/local/apache-tomcat-8.0.21/bin/bootstrap.jar:/var/local/apache-tomcat-8.0.21/bin/tomcat-juli.jar
Tomcat started.

You can verify the service running, by default tomcat runs on port no 8080.

[root@server ~]# netstat -antup | grep 8080
tcp        0      0 0.0.0.0:8080                0.0.0.0:*                   LISTEN

Step 5. Finally, open Tomcat from your browser, go to your IP or domain with the 8080 port (because Tomcat will always run on the 8080 port) as an example: mydomain.com:8080, replace mydomain.com with your IP or domain.

To shutdown Tomcat you can simply run the shutdown script in the same folder like this:

 /opt/apache-tomcat-8.0.21/bin/shutdown.sh

Step 6. Setup user accounts.

Configure Tomcat users so they can access admin/manager sections. You can do this by adding the users in the conf/tomcat-users.xml file with your favorite text editor. Add this text to the file:

 nano /opt/apache-tomcat-8.0.21/conf/server.xml

Place the following two lines just above the last line.

<!-- user manager can access only manager section -->
<role rolename="manager-gui" />
<user username="manager" password="_SECRET_PASSWORD_" roles="manager-gui" />

<!-- user admin can access manager and admin section both -->
<role rolename="admin-gui" />
<user username="admin" password="_SECRET_PASSWORD_" roles="manager-gui,admin-gui" />

Congratulation’s! You have successfully Apache Tomcat. Thanks for using this tutorial for installing Apache Tomcat 8 on CentOS system. For additional help or useful information, we recommend you to check the official Apache Tomcat web site.