How To Install Shopware on CentOS 7 – Step by Step

Install Shopware on CentOS 7

Shopware is a free and open source e-commerce application written in PHP. It uses MySQL as the database server to store the data. Shopware is very easy to use and require no coding knowledge to work. It is secure and responsive. The application provides the interface for elements to drag and drop, it also supports design grids. It contains story telling, slide shows, and quick views. In this tutorial we will learn how to Install Shopware on CentOS 7.

This article assumes you have at least basic knowledge of Linux, know how to use the shell, and most importantly, you host your site on your own VPS. The installation is quite simple and assumes you are running in the root accge of Linount, if not you may need to add ‘sudo’ to the commands to get root privileges. I will show you through the step by step installation Shopware on a CentOS 7 server.

Install Shopware on CentOS 7

Step 1. First let’s start by ensuring your system is up-to-date.

yum clean all
yum -y update

Step 2. Install LAMP server.

A CentOS 7 LAMP stack server is required. If you do not have LAMP installed, you can follow our guide here. Also install required PHP modules:

yum -y install php-gd php-imap php-ldap php-odbc php-pear php-xml php-xmlrpc php-mbstring php-mcrypt php-mssql php-snmp php-soap php-tidy curl curl-devel

Step 3. Installing Shopware on CentOS.

Go to the root directory of your system and download the latest stable version of Shopware:

wget https://codeload.github.com/shopware/shopware/zip/5.5
unzip v5.5.zip -d /var/www/html
cd /var/www/html/shopware-5.5 cp -a * ..

We will need to change some folders permissions:

chown -R www-data:www-data /var/www/html/

Step 4. Configuring MariaDB for Shopware.

By default, MariaDB is not hardened. You can secure MariaDB using the mysql_secure_installation script. You should read and below each steps carefully which will set root password, remove anonymous users, disallow remote root login, and remove the test database and access to secure MariaDB.

mysql_secure_installation

Configure it like this:

- Set root password? [Y/n] y
- Remove anonymous users? [Y/n] y
- Disallow root login remotely? [Y/n] y
- Remove test database and access to it? [Y/n] y
- Reload privilege tables now? [Y/n] y

Next we will need to log in to the MariaDB console and create a database for the Shopware. Run the following command:

mysql -u root -p

This will prompt you for a password, so enter your MariaDB root password and hit Enter. Once you are logged in to your database server you need to create a database for Shopware installation:

CREATE DATABASE shopware;
GRANT ALL PRIVILEGES ON shopware.* TO 'shopware'@'localhost' IDENTIFIED BY 'strong_password';
FLUSH PRIVILEGES;
\q

Step 5. Configuring Apache for Shopware.

We will create Apache virtual host for your Shopware website. First create ‘/etc/httpd/conf.d/vhosts.conf’ file with using a text editor of your choice:

nano /etc/httpd/conf.d/vhosts.conf
IncludeOptional vhosts.d/*.conf

Next, create the virtual host:

mkdir /etc/httpd/vhosts.d/
nano /etc/httpd/vhosts.d/yourdomain.com.conf

Add the following lines:

<VirtualHost YOUR_SERVER_IP:80>
ServerAdmin [email protected]
DocumentRoot /var/www/html
ServerName yourdomain.com
ServerAlias www.yourdomain.com
ErrorLog "/var/log/httpd/yourdomain.com-error_log"
CustomLog "/var/log/httpd/yourdomain.com-access_log" combined

<Directory "/var/www/html/">
DirectoryIndex index.html index.php
Options FollowSymLinks
AllowOverride All
Require all granted
</Directory>
</VirtualHost>

Save and close the file. Restart the Apache service for the changes to take effects:

systemctl restart httpd.service

Step 6. Accessing Shopware e-commerce.

Shopware will be available on HTTP port 80 by default. Open your favorite browser and navigate to http://yourdomain.com or http://server-ip and complete the required the steps to finish the installation. If you are using a firewall, please open port 80 to enable access to the control panel.

Congratulation’s! You have successfully installed Shopware. Thanks for using this tutorial for installing Shopware community edition on CentOS 7 systems. For additional help or useful information, we recommend you to check the official Shopware website.

How to set correct file permission for your WordPress website

file permission wordpress

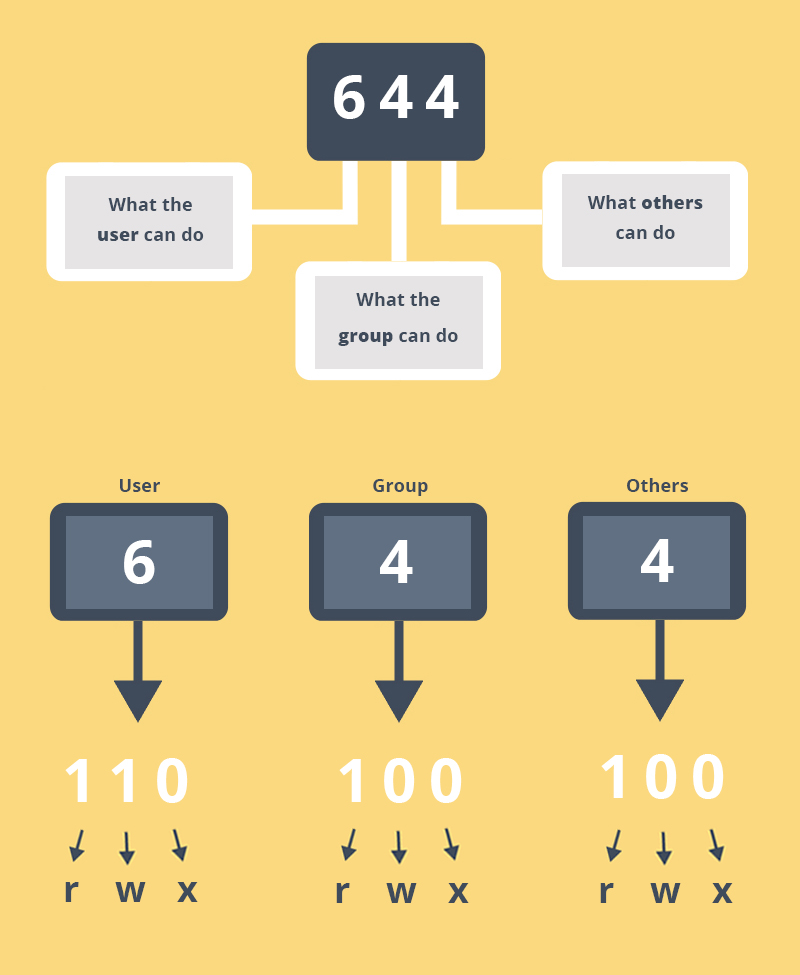
There a number of ways to accomplish this change. There are also a number of variations to these permissions that include changing them to be more restrictive. These however are the default recommendations. Check with your host before making permissions changes as they can have adverse affects on the performance and availability of your site.

Avoid having any file or directory set to 777. The default permission scheme should be:

Folders – 750
Files – 640

understanding file permission in wp

When you setup WP you (the webserver) may need write access to the files. So the access rights may need to be loose.

chown www-data:www-data  -R * # Let Apache be owner
find . -type d -exec chmod 755 {} \;  # Change directory permissions rwxr-xr-x
find . -type f -exec chmod 644 {} \;  # Change file permissions rw-r--r--

After the setup you should tighten the access rights, according to Hardening WordPress all files except for wp-content should be writable by your user account only. wp-content must be writable by www-data too.


chown :  -R * # Let your useraccount be owner
chown www-data:www-data wp-content # Let apache be owner of wp-content

Maybe you want to change the contents in wp-content later on. In this case you could

  • Temporarily change to the user to www-data with su,
  • Give wp-content group write access 775 and join the group www-data or
  • Give your user the access rights to the folder using ACLs.

Whatever you do, make sure the files have rw permissions for www-data.

For a detailed explanation of unix file permissions, see File system permissions – on Wikipedia

How To Install BIND9 DNS Server on Ubuntu Step by Step

BIND is a widely used DNS Server. Ideally, DNS server consist of 2 machines that work together simultaneously, one act as master and the other one act as slave. If your domain registrar doesn’t provide you a free DNS server, or if you want to create a custom DNS record, then you might need to host your own DNS server.

In this tutorial, we will learn how to install and configure BIND9 Master and Slave DNS server. Both server will use Ubuntu OS. We will start configuring the master then the slave.

Install BIND9 Master and Slave DNS Server on Ubuntu

Here are the servers example data:

Server1 (master) IP address: 108.100.100.1
Server2 (slave) IP address: 108.100.100.2
Domain: wpcademy.com
This domain will be hosted on this server: 192.168.100.07

ON MASTER

Step1. Update ubuntu repository and install Bind using apt-get.

apt-get update
apt-get install bind9

Step2. Configure bind options

*)do this if you haven't installed nano text editor: 
apt-get install nano

nano /etc/bind/named.conf.options
options {
	directory "/var/cache/bind";
	additional-from-auth no;
	additional-from-cache no;
	version "Bind Server";

	// If there is a firewall between you and nameservers you want
	// to talk to, you may need to fix the firewall to allow multiple
	// ports to talk.  See http://www.kb.cert.org/vuls/id/800113

	// If your ISP provided one or more IP addresses for stable 
	// nameservers, you probably want to use them as forwarders.  
	// Uncomment the following block, and insert the addresses replacing 
	// the all-0's placeholder.

	 forwarders {
	 	8.8.8.8;
		8.8.4.4;
	 };

	//========================================================================
	// If BIND logs error messages about the root key being expired,
	// you will need to update your keys.  See https://www.isc.org/bind-keys
	//========================================================================
	dnssec-validation auto;
	allow-recursion { 127.0.0.1; };
	auth-nxdomain no;    # conform to RFC1035
	listen-on-v6 { any; };
};

Step 3. Store the domain name and zone file setting

 nano /etc/bind/named.conf.local
//place these lines at the bottom of file

zone "wpcademy.com" {
        type master;
        file "/etc/bind/zones/wpcademy.com.db";
        allow-transfer { 108.200.200.2; };
        also-notify { 108.200.200.200.2; };
};

Step4. Because in the above config we put zone file in “/etc/bind/zones/wpcademy.com.db”, then we need to create the folder and file

mkdir /etc/bind/zones
nano /etc/bind/zones/wpcademy.com.db
$TTL    86400
$ORIGIN wpcademy.com.
@       IN      SOA     ns1.wpcademy.com. root.wpcademy.com. (
                              1         ; Serial
                          86400         ; Refresh
                           7200         ; Retry
                        2419200         ; Expire
                         604800 )       ; Negative Cache TTL
;
@       IN      NS      ns1.wpcademy.com.
@       IN      NS      ns2.wpcademy.com.
ns1      IN      A       108.100.100.1
ns2      IN      A       108.100.100.2

;also list other computers
@       IN      A       192.168.100.07
www     IN      A       192.168.100.07

Step 5. (last step on master) Restart bind9 dns service

 service bind9 restart

ON SLAVE

Repeat step 1-2 similar to the master.

Step 3. Configure slave bind options

 nano /etc/bind/named.conf.options
zone "wpcademy.com" {
	type slave;
	file "/var/cache/bind/wpcademy.com.db";
	masters {108.100.100.1;};
};

notice the difference in this config file from the master.

Step 4. Restart bind9 service.

 service bind9 restart

What to do next?

This DNS server will not work until you change your domain’s nameserver. It can be done from your domain’s registrar website. In this scenario, we change nameserver to:

ns1.wpcademy.com
ns2.wpcademy.com

Testing BIND

This test could be done either on the DNS server itself or from another server, or from your own PC. In this case, we will do the test from another server running Ubuntu OS.

Step 1.Install dnsutils

 apt-get install dnsutils

Step 2. Do the dig dns test

 dig wpcademy.com

Step 3. Do the nslookup dns test

 nslookup wpcademy.com

How To Setup a NGINX Virtual Host – Easy Guide

In this tutorial we are going to learn how to install and configuration of virtual hosts “Server Blocks” Nginx on your Linux server. Virtual hosts such as nginx are used for running two or more domains or websites using just one server which you can learn more about in this hosting fundamentals course. Here’s a brief tutorial that shows you how to create a virtual host or server block on Nginx web server. This guide assumes that you’ve been following along from the previous tutorial: How to Install and Configure a NGINX Server.

Setup a NGINX Virtual Host

Create a New Directory

cd /var/www
mkdir -p wpcademy.com/{public_html,logs,stats}
Create vhost conf file
#nano /etc/nginx/conf.d/wpcademy.com.conf

server {
   listen  80;
   server_name  wpcademy.com www.wpcademy.com;
 
   access_log  /var/www/wpcademy.com/logs/access.log ;
   error_log    /var/www/wpcademy.com/logs/error.log ;
 
   location / {
       root   /var/www/wpcademy.com/public_html;
       index  index.php index.html index.htm;
 
   }
 
   error_page   500 502 503 504  /50x.html;
   location = /50x.html {
       root   /var/www/wpcademy.com/public_html;
   }
 
  # pass the PHP scripts to FastCGI server listening on 127.0.0.1:9000
  location ~ .php$ {
fastcgi_pass   127.0.0.1:9000;
fastcgi_index  index.php;
root    /var/www/wpcademy.com/public_html;
fastcgi_param  SCRIPT_FILENAME  /var/www/wpcademy.com/public_html$fastcgi_script_name;
include fastcgi_params;
}
 
 
   location ~ /.ht {
       deny  all;
   }
}
# nano /etc/nginx/conf.d/wpcademy.com.conf
server {
   listen  80;
   server_name  wpcademy.com www.wpcademy.com;
 
   access_log  /var/www/wpcademy.com/logs/access.log ;
   error_log    /var/www/wpcademy.com/logs/error.log ;
 
   location / {
       root   /var/www/wpcademy.com/public_html;
       index  index.php index.html index.htm;
 
   }
 
   error_page   500 502 503 504  /50x.html;
   location = /50x.html {
       root   /var/www/wpcademy.com/public_html;
   }
 
  # pass the PHP scripts to FastCGI server listening on 127.0.0.1:9000
  location ~ .php$ {
fastcgi_pass   127.0.0.1:9000;
fastcgi_index  index.php;
root    /var/www/wpcademy.com/public_html;
fastcgi_param  SCRIPT_FILENAME  /var/www/wpcademy.com/public_html$fastcgi_script_name;
include fastcgi_params;
}
 
   location ~ /.ht {
       deny  all;
   }
}

Add vhost on nginx.conf

# nano /etc/nginx/nginx.conf
### add line like this on http section:
include /etc/nginx/conf.d/*.conf;

Restarting nginx and php-fpm

# /etc/init.d/nginx restart
# /etc/init.d php-fpm restart

Note: Please make sure that all the domain names are propagated and are properly directed to your servers ip address, if not you will not able able to check if your new configuration works or not.

Congratulation’s! You have successfully installed server blocks Nginx. Thanks for using this tutorial for installing Virtual hosts Nginx on Linux system. For additional help or useful information, we recommend you to check the official Nginx web site

How To Install Netbeans 11.0 on Ubuntu 18.04 LTS

Install Netbeans on Ubuntu 18

The NetBeans is an open-source integrated development environment which provides a powerful application frame platform which allows programmers to create Java-based net applications, mobile software, and desktop software.

This article assumes you have at least basic knowledge of Linux, know how to use the shell, and most importantly, you host your site on your own VPS. The installation is quite simple and assumes you are running in the root account, if not you may need to add ‘sudo’ to the commands to get root privileges. I will show you through the step by step installation Netbeans on a Ubuntu 18.04 (Bionic Beaver) server.

Install Netbeans on Ubuntu 18.04 LTS

Step 1. First, make sure that all your system packages are up-to-date

sudo apt update
sudo apt upgrade

Step 2. Installing Java OpenJDK.

NetBeans requires having the Java VM installed on the machine, so you would need to install either Oracle Java 8 or OpenJDK 8:

sudo apt install openjdk-8-jdk
sudoaptinstallopenjdk-8-jdk

Step 3. Installing Netbeans IDE.

Install the Netbeans using snap:

sudo snap install netbeans --classic
sudosnapinstallnetbeans--classic

The process may take some time depending on your connection speed. On successful installation, you will see the following output:
netbeans 10.0 from ‘apache-netbeans’ installed

netbeans10.0from’apache-netbeans’installed

Step 4. Assessing Netbeans IDE.

Now that Netbeans is installed on your Ubuntu system you can start it typing netbeans in your terminal or by clicking on the Netbeans icon (Activities -> Netbeans).

Congratulation’s! You have successfully installed Netbeans. Thanks for using this tutorial for installing Netbeans on your Ubuntu 18.04 system. For additional help or useful information, we recommend you to check the official Netbeans website.

How To Install RubyMine 2019.1 on Ubuntu 18.04 LTS

Install RubyMine on Ubuntu 18

RubyMine is an all-new IDE for Ruby and Rails developers, developed by JetBrains (best known for Java IDE IntelliJ IDEA). RubyMine build upon the IntelliJ IDEA platform and brings together all of the essential features you expect of an IDE (editor, debugging tools, source control integration, code completion, and so forth) along with lots of extra goodies specific to Ruby, such as GUI-based support for RSpec and Test.

This article assumes you have at least basic knowledge of Linux, know how to use the shell, and most importantly, you host your site on your own VPS. The installation is quite simple and assumes you are running in the root account, if not you may need to add ‘sudo’ to the commands to get root privileges. I will show you through the step by step installation RubyMine on a Ubuntu 18.04 (Bionic Beaver) server.

Install RubyMine on Ubuntu 18.04 LTS

Step 1. First, make sure that all your system packages are up-to-date

sudo apt update
sudo apt upgrade

Step 2. Installing Snappy Package Manager.

Install Snappy package manager type following command:

sudo apt install snapd snapd-xdg-open

Step 3. Installing RubyMine on Ubuntu.

First, download and installed RubyMine snap package run following command:

sudo snap install rubymine --classic

After successful installation to start RubyMine via terminal run following command:

rubymine

Also start RubyMine from activities on Ubuntu. Typing RubyMine will show you RubyMine icon.

Congratulation’s! You have successfully installed RubyMine. Thanks for using this tutorial for installing RubyMine on your Ubuntu 18.04 system. For additional help or useful information, we recommend you to check the official RubyMine website.

How To Install WildFly 16.0.0.Final on Ubuntu 18.04 LTS

Install WildFly on Ubuntu 18

The WildFly implements the Java Enterprise Edition (Java EE). It is among the most common source Java server applications. It offers you an administration dashboard to manage single or multiple domains efficiently.

This article assumes you have at least basic knowledge of Linux, know how to use the shell, and most importantly, you host your site on your own VPS. The installation is quite simple and assumes you are running in the root account, if not you may need to add ‘sudo’ to the commands to get root privileges. I will show you through the step by step installation WildFly on a Ubuntu 18.04 (Bionic Beaver) server.

Install WildFly on Ubuntu 18.04 LTS

Step 1. First, make sure that all your system packages are up-to-date

sudo apt update
sudo apt upgrade

Step 2. Download and install Java.

In order to run WildFly, Java has to be installed on the server so run the following command to install the Java Development Kit package (JDK):

sudo apt install default-jdk

Step 3. Create WildFly User.

We will create a new system user and group named wildfly with home directory /opt/wildfly that will run the WildFly service:

sudo groupadd -r wildfly
sudo useradd -r -g wildfly -d /opt/wildfly -s /sbin/nologin wildfly

Step 4. Download WildFly latest version

First, Download the latest version of WildFly on the server and extract it using the following commands:

wget https://download.jboss.org/wildfly/$WILDFLY_VERSION/wildfly-$WILDFLY_VERSION.tar.gz -P /tmp
sudo tar xf /tmp/wildfly-$WILDFLY_VERSION.tar.gz -C /opt/
[php]


Next, create a symbolic link wildfly which will point to the WildFly installation directory:
[php]
sudo ln -s /opt/wildfly-$WILDFLY_VERSION /opt/wildfly
sudo chown -RH wildfly: /opt/wildfly

Step 5. Configure Systemd WildFly.

Start by creating a directory which will hold the WildFly configuration file:
sudo mkdir -p /etc/wildfly
sudo cp /opt/wildfly/docs/contrib/scripts/systemd/wildfly.conf /etc/wildfly/

By default, WildFly will run in a standalone mode and will listen on all interfaces. You can edit the file according to your needs:

nano /etc/wildfly/wildfly.conf

# The configuration you want to run
WILDFLY_CONFIG=standalone.xml

# The mode you want to run
WILDFLY_MODE=standalone

# The address to bind to
WILDFLY_BIND=0.0.0.0

Next copy the WildFly launch.sh script to the /opt/wildfly/bin/ directory:

sudo cp /opt/wildfly/docs/contrib/scripts/systemd/launch.sh /opt/wildfly/bin/
sudo sh -c 'chmod +x /opt/wildfly/bin/*.sh'
sudo cp /opt/wildfly/docs/contrib/scripts/systemd/wildfly.service /etc/systemd/system/

Then, start the WildFly service by executing:

sudo systemctl daemon-reload
sudo systemctl start wildfly
sudo systemctl enable wildfly

Step 6. Configure the Firewall for WildFly.

Allow traffic on port 8080 type the following command:

sudo ufw allow 8080/tcp

Step 7. Accessing WildFly

WildFly will be available on HTTP port 8080 by default. Open your favorite browser and navigate to http://yourdomain.com:8080 or http://server-ip:8080 and complete the required the steps to finish the installation.

Congratulation’s! You have successfully installed WildFly. Thanks for using this tutorial for installing WildFly on your Ubuntu 18.04 system. For additional help or useful information, we recommend you to check the official WildFly website.