How To Configuration Iptables Firewall on CentOS

Configuration Iptables Firewall on CentOS

Iptables is a user space application program that allows a system administrator to configure the tables provided by the Linux kernel firewall (implemented as different Netfilter modules) and the chains and rules it stores. Different kernel modules and programs are currently used for different protocols; iptables applies to IPv4, ip6tables to IPv6, arptables to ARP, and ebtables for Ethernet frames. (Read more on: wikipedia)

Configuration Iptables Firewall on CentOS

Setting up iptables

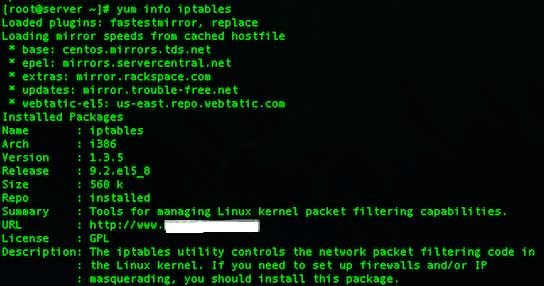
You can use the following procedure to verify that iptables has been installed and view the status of iptables. Open terminal and type the following command:

# iptables -V
# yum info iptables

iptables-centos

If the above message does not appear, you can type the following command to install iptables:

 # yum -y install iptables

Understanding Firewall, At present here are total four chains:

  • INPUT : The default chain is used for packets addressed to the system.
  • OUTPUT : The default chain generating from system.
  • FORWARD : The default chains is used when packets send through another interface.
  • RH-Firewall-1-INPUT : The user-defined custom chain.

Target Meanings

  • The target ACCEPT means allow packet.
  • The target REJECT means to drop the packet and send an error message to remote host.
  • The target DROP means drop the packet and do not send an error message to remote host or sending host.

The default iptables configuration on CentOS does not allow access to the HTTP (TCP PORT # 80) and HTTPS (TCP PORT # 443) ports used by Nginx web server. You can do step by step to configure:

Step 1: Flush all iptables rules

# iptables -F
# iptables -X
# iptables -t nat -F
# iptables -t nat -X
# iptables -t mangle -F
# iptables -t mangle -X

Step 2: Set default rules

# iptables -P INPUT DROP
# iptables -P FORWARD ACCEPT
# iptables -P OUTPUT ACCEPT

Step 3: Allow access to HTTP (port 80) and HTTPS (port 443)

# iptables -A INPUT -i lo -j ACCEPT 
# iptables -A INPUT -m state --state ESTABLISHED -j ACCEPT 
# iptables -A INPUT -m state --state RELATED,ESTABLISHED -j ACCEPT 
# iptables -A INPUT -p icmp -j ACCEPT
# iptables -A INPUT -m state --state NEW -m tcp -p tcp --dport 80 -j ACCEPT
# iptables -A INPUT -m state --state NEW -m tcp -p tcp --dport 443 -j ACCEPT

 Turn on and save iptables

Type the following two commands to turn on firewall:

# chkconfig iptables on
# service iptables save

How To Install PHP 5.5 on CentOS

Install PHP 5.5 on CentOS

PHP (PHP: Hypertext Preprocessor) is a server-side scripting language designed for web development but also used as a general-purpose programming language. PHP code is interpreted by a web server with a PHP processor module, which generates the resulting web page: PHP commands can be embedded directly into an HTML source document rather than calling an external file to process data.

This tutorial we will show you how to install PHP 5.5 on CentOS.

Install PHP 5.5 on CentOS

To install, first you must add the Webtatic yum repository information corresponding to your CentOS/RHEL version to yum:

For CentOS 6.x use:

 #rpm -Uvh http://mirror.webtatic.com/yum/el6/latest.rpm

For CentOS 5.x use:

 #rpm -Uvh http://mirror.webtatic.com/yum/el5/latest.rpm

Now you can install PHP 5.5:

 #yum install php55w --enablerepo=webtatic-archive[/#yum install php55w --enablerepo=webtatic-archive

Restart apache after PHP installation:

#service httpd restart
#php -v

PHP should now be installed. You can check by creating a file called info.php in /var/www/html/ with the following content:

<?php
 phpinfo();
 ?>

Congratulation’s! You have successfully installed PHP. Thanks for using this tutorial for installing PHP 5.5 in CentOS system. For additional help or useful information, we recommend you to check the official PHP web site.

You Might Also Like: How To Install and Enable Alternative PHP Cache (APC) on CentOS

How To Install and Enable Remi Repository on CentOS

Install and Enable Remi Repository on CentOS

The Remi repository provides newer version of popular opensource software for CentOS and Red Hat Enterprise Linux. More than 5000 individual packages are included in the repository. It’s a great repository to add to your system if you’re running CentOS or Red Hat servers.

This article assumes you have at least basic knowledge of linux, know how to use the shell, and most importantly, you host your site on your own VPS. The installation is quite simple. I will show you through the step by step installation and enable Remi repository on CentOS 5, CentOS 6 and CentOS 7.

In this tutorial we will show you how to install and configuration of remi repository on your CentOS server.

Enable Remi Repository on CentOS 5, CentOS 6 and CentOS 7

On CentOS The Remi repository depends on the Epel repository which must be installed along with it, for it to work. If you already have epel repository setup then execute the following command:

  • CentOS 7
wget http://rpms.famillecollet.com/enterprise/remi-release-7.rpm
rpm -Uvh remi-release-7.rpm
  • CentOS 6
wget http://rpms.famillecollet.com/enterprise/remi-release-6.rpm
rpm -Uvh remi-release-6.rpm
  • CentOS 5
wget http://rpms.famillecollet.com/enterprise/remi-release-5.rpm
rpm -Uvh remi-release-5.rpm

If you want to permanently enable the Remi repository, you need to edit the yum configuration file for Remi. Open the repository configuration file by using a text editor of your choice:

 nano /etc/yum.repos.d/remi.repo

The very first section that starts with [remi] is the main repository. Change the value of enabled from 0 to 1 to enable it.

[remi]
name=Les RPM de remi pour Enterprise Linux 6 - $basearch
#baseurl=http://rpms.famillecollet.com/enterprise/6/remi/$basearch/
mirrorlist=http://rpms.famillecollet.com/enterprise/6/remi/mirror
enabled=1
gpgcheck=1
gpgkey=file:///etc/pki/rpm-gpg/RPM-GPG-KEY-remi

Now list out the installed repositories with command:

 yum repolist

Now, you’re ready to install packages. You can install packages using command:

yum update
yum install <package-name>

Congratulation’s! You have successfully installed remi repository. Thanks for using this tutorial for installing remi repository on CentOS system. For additional help or useful information, we recommend you to check the official remi repository web site.

How To Install and Enable EPEL Repo on CentOS

Install and Enable EPEL Repo on CentOS

EPEL(Extra Packages for Enterprise Linux) is a repo developed by Fedora project to ensure that there is a quality 3rd party packages available for enterprise users such as people who are using RHEL, CentOS, Oracle Linux and Scientific Linux. EPEL is a community effort to create a repository of high-quality add-on free software packages for RHEL-based distributions. Once you set up EPEL repository, you can use yum command to install any of close to 7,000 EPEL packages.

This article assumes you have at least basic knowledge of linux, know how to use the shell, and most importantly, you host your site on your own VPS. The installation is quite simple. I will show you through the step by step installation and enable EPEL repository on CentOS 5, CentOS 6 and CentOS 7.

Install and Enable EPEL Repo on CentOS 5, CentOS 6 and CentOS 7

First, you need to enable EPEL repository on your system. You don’t need to configure this repository manually in your yum. Instead, download the following package and install it, which will enable the EPEL repository on your system.

  • CentOS 7 64 Bit
## RHEL/CentOS 7 64-Bit ##
# wget http://dl.fedoraproject.org/pub/epel/7/x86_64/e/epel-release-7-8.noarch.rpm
# rpm -ivh epel-release-7-8.noarch.rpm
  • CentOS 6 64 Bit
## RHEL/CentOS 6 64-Bit ##
# wget http://dl.fedoraproject.org/pub/epel/6/x86_64/epel-release-6-8.noarch.rpm
# rpm -ivh epel-release-6-8.noarch.rpm
  • CentOS 6 32 Bit
## RHEL/CentOS 6 32-Bit ##
# wget http://dl.fedoraproject.org/pub/epel/6/i386/epel-release-6-8.noarch.rpm
# rpm -ivh epel-release-6-8.noarch.rpm
  • CentOS 5 64 Bit
## RHEL/CentOS 5 64-Bit ##
# wget http://dl.fedoraproject.org/pub/epel/5/x86_64/epel-release-5-4.noarch.rpm
# rpm -ivh epel-release-5-4.noarch.rpm
  • CentOS 5 32 Bit
## RHEL/CentOS 5 32-Bit ##
# wget http://dl.fedoraproject.org/pub/epel/5/i386/epel-release-5-4.noarch.rpm
# rpm -ivh epel-release-5-4.noarch.rpm

To verify that EPEL repository has been set up successfully, run the following command to list all available repositories on your system:

 # <code>yum repolist

You Might Also Like: How To Install Nginx Web Server On CentOS

How To Install CentOS Web Panel on CentOS 6

Install CentOS Web Panel

CentOS Web Panel is a free alternative to cPanel and provides plenty of features and designed for newbie who want to build a working hosting server easily and to take control or manage his/her server all in an intuitive web interface without having to open any SSH console. CentOS Web Panel provides Apache, Varnish, suPHP & suExec, Mod Security, PHP version switcher, Postfix and Dovecot, MySQL Database Managment, PhpMyAdmin, CSF Firewall, CageFS, SSL Certificates, FreeDNS (DNS server) and many more.

This article assumes you have at least basic knowledge of linux, know how to use the shell, and most importantly, you host your site on your own VPS. The installation is quite simple. I will show you through the step by step installation CentOS Web Panel on CentOS 6.

Install CentOS Web Panel on CentOS 6

Step 1. First, you need to update the system to ensure that we have all of the latest software installed.

 yum update -y

Step 2. Setup Hostname.

You can use the following command for hostname setup:

 hostname srv1.wpcademy.com

Step 2. Downloading and install CentOS Web Panel script.

cd /usr/local/src
wget http://centos-webpanel.com/cwp-latest

Once you download the installer on your server, you are ready to start with the installation process. Installation will take approximately 5-15 minutes depends on your server speed and power. To do so, use the command below:

 sh cwp-latest

Step 3. Accessing CentOS Web Panel.

CentOS Web Panel will be available on HTTPS port 2031 by default. Open your favorite browser and navigate to https://yourdomain.com:2031 or http://server-ip:2030. To log in, you can use ‘root’ as user and your root password. If you are using a firewall, please open port 2030 to enable access to the control panel.

Congratulation’s! You have successfully installed CentOS Web Panel. Thanks for using this tutorial for installing CentOS Web Panel web server management on CentOS 6 system.

How To Install Apache Solr on CentOS 6

install apache solr on centos

In this tutorial we will learn how to Install Apache Solr on CentOS.

Apache Solr is an open source enterprise search platform used to easily create search engines which searches websites, files and databases. Its major features include powerful full-text search, faceted search, distributed search, hit highlighting and index replication.

This article assumes you have at least basic knowledge of linux, know how to use the shell, and most importantly, you host your site on your own VPS. The installation is quite simple. I will show you through the step by step installation Apache Solr on CentOS 6.

Step 1. Install Java.

Download latest Java SE Development Kit 8 release from its official download page or use following commands to download from shell:

### CentOS 64-Bit ###
cd /opt/
wget --no-cookies --no-check-certificate --header "Cookie: gpw_e24=http%3A%2F%2Fwww.oracle.com%2F; oraclelicense=accept-securebackup-cookie" "http://download.oracle.com/otn-pub/java/jdk/8u40-b25/jdk-8u40-linux-x64.tar.gz"
tar xzf jdk-8u40-linux-x64.tar.gz
### CentOS 32-Bit ###
cd /opt/
wget --no-cookies --no-check-certificate --header "Cookie: gpw_e24=http%3A%2F%2Fwww.oracle.com%2F; oraclelicense=accept-securebackup-cookie" "http://download.oracle.com/otn-pub/java/jdk/8u40-b25/jdk-8u40-linux-i586.tar.gz"
tar xzf jdk-8u40-linux-i586.tar.g

Verify Installed Java version:

# java -version
java version "1.8.0_40"
Java(TM) SE Runtime Environment (build 1.8.0_40-b25)
Java HotSpot(TM) 64-Bit Server VM (build 25.40-b25, mixed mode)

Step 2. Install Solr.

Download the latest version of solr and extract it (5.0.0 is the latest at time of writing):

cd /opt
http://www.us.apache.org/dist/lucene/solr/5.0.0/solr-5.0.0.tgz
tar -xvf solr-5.0.0.tgz
mv /opt/solr-5.0.0 /opt/solr
mv /opt/solr/example /opt/solr/core

Step 3. Create script for handling the Solr server service.

Create a systemd service for Solr or if you are used to the old init scripts, you can keep using them. Create an init script for the Solr service:

 nano /etc/init.d/solr
#!/bin/bash
#
# chkconfig: 2345 20 20
# short-description: Solr
# description: Startup script for Apache Solr Server

SOLR_DIR="/opt/solr/core"
LOG_FILE="/var/log/solr.log"
JAVA="/usr/bin/java -DSTOP.PORT=8079 -DSTOP.KEY=stopkey -jar start.jar"

start() {
echo -n "Starting Solr... "
cd $SOLR_DIR
$JAVA > $LOG_FILE 2>&1 &
sleep 2
RETVAL=$?

    if [ $RETVAL = 0 ]
    then
        echo "done."
    else
        echo "failed. See error code for more information."
    fi
    return $RETVAL
}

stop() {
echo -n "Stopping Solr... "
pkill -f start.jar > /dev/null
RETVAL=$?

    if [ $RETVAL = 0 ]
    then
        echo "done."
    else
        echo "failed. See error code for more information."
    fi
    return $RETVAL
}

case "$1" in
start)
start
;;
stop)
stop
;;
restart)
stop
start
;;
*)
echo $"Usage: solr {start|stop|restart}"
exit 3
esac
exit $RETVAL

Save the file and make it executable:

chmod +x /etc/init.d/solr
chkconfig --add solr

Start Solr using the following command:

 /etc/init.d/solr start

Step 4. Configure Iptables or Firewall.

If you use iptables add a rule to allow access to Solr’s admin section and query Solr data:

 iptables -A INPUT -p tcp -m tcp --dport 8983 -j ACCEPT
service iptables save

Step 5. Accessing Apache Solr.

Apache Solr will be available on HTTP port 8983 by default. Open your favorite browser and navigate to http://yourdomain.com:8983/solr/  or http://server-ip:8983/solr/.

apache solr web admin

Congratulation’s! You have successfully installed Apache Solr. Thanks for using this tutorial for installing Apache Solr on CentOS 6 system.

You Might Also Like: How To Install Apache Solr on Ubuntu 14.04

How To Install Java JDK 8 on CentOS 6

install java jdk on centos 6

There are many programs and scripts that require java to run it, but usually Java is not installed by default on VPS or Dedicated Server. This article assumes you have at least basic knowledge of linux, know how to use the shell, and most importantly, you host your site on your own VPS. The installation is quite simple. I will show you through the step by step installation Java JDK 8 on CentOS 6.

Step 1. Remove the Java 1.6 or 1.7 have been installed already, you can uninstall them using the following commands.

yum remove java-1.6.0-openjdk
yum remove java-1.7.0-openjdk

Step 2. Downloading latest Java archive.

Download latest Java SE Development Kit 8 release from its official download page or use following commands to download from shell:

### CentOS 64-Bit ###
cd /opt/
wget --no-cookies --no-check-certificate --header "Cookie: gpw_e24=http%3A%2F%2Fwww.oracle.com%2F; oraclelicense=accept-securebackup-cookie" "http://download.oracle.com/otn-pub/java/jdk/8u40-b25/jdk-8u40-linux-x64.tar.gz"
tar xzf jdk-8u40-linux-x64.tar.gz
### CentOS 32-Bit ###
cd /opt/
wget --no-cookies --no-check-certificate --header "Cookie: gpw_e24=http%3A%2F%2Fwww.oracle.com%2F; oraclelicense=accept-securebackup-cookie" "http://download.oracle.com/otn-pub/java/jdk/8u40-b25/jdk-8u40-linux-i586.tar.gz"
tar xzf jdk-8u40-linux-i586.tar.g

Step 3. Install JAVA using alternatives.
After extracting archive file use alternatives command to install it. alternatives command is available in chkconfig package:

# cd /opt/jdk1.8.0_40/
# alternatives --install /usr/bin/java java /opt/jdk1.8.0_40/bin/java 2
# alternatives --config java
There are 3 programs which provide 'java'.
  Selection    Command
-----------------------------------------------
*  1           /opt/jdk1.8.0/bin/java
 + 2           /opt/jdk1.8.0_25/bin/java
   3           /opt/jdk1.8.0_40/bin/java
Enter to keep the current selection[+], or type selection number: 3

At this point JAVA 8 has been successfully installed on your system. We also recommend to setup javac and jar commands path using alternatives:

alternatives --install /usr/bin/jar jar /opt/jdk1.8.0_40/bin/jar 2
alternatives --install /usr/bin/javac javac /opt/jdk1.8.0_40/bin/javac 2
alternatives --set jar /opt/jdk1.8.0_40/bin/jar
alternatives --set javac /opt/jdk1.8.0_40/bin/javac

Step 4. Verify Installed Java version.

# java -version
java version "1.8.0_40"
Java(TM) SE Runtime Environment (build 1.8.0_40-b25)
Java HotSpot(TM) 64-Bit Server VM (build 25.40-b25, mixed mode)

Step 5. Setup global environment variables.

We can easily set the environment variables using the export command as shown below:

Setup JAVA_HOME Variable:

 export JAVA_HOME=/opt/jdk1.8.0_40

Setup JRE_HOME Variable:

 export JRE_HOME=/opt/jdk1.8.0_40/jre

Setup PATH Variable:

 export PATH=$PATH:/opt/jdk1.8.0_40/bin:/opt/jdk1.8.0_40/jre/bin

Congratulation’s! You have successfully installed Java. Thanks for using this tutorial for installing Oracle Java (JDK) 8 on CentOS 6 system.