How To Install MyCollab Project Management Software on CentOS 7

MyCollab Project Management Software on CentOS 7

MyCollab is the free and open source collaboration tools, it has three existing modules: Project Management, CRM and Document Management. Intuitive UI, rich features, high performance and stability are the advantages compared with various popular tools in the market such as Redmine, Bugzilla, Mantis etc. This open source is included in a trusted commercial product that is deployed on hundreds of companies’ servers.

Table of Contents

Step 1. First let’s start by ensuring your system is up-to-date.

Step 2. Install LAMP server.

Step 3. Installing Java.

Step 3. Installing MyCollab Project Management Software.

Step 4. Configuring MariaDB for Concrete5.

Step 5. Configure Firewall for MyCollab.

Step 6. Accessing MyCollab.

Prerequisites

This article assumes you have at least basic knowledge of Linux, know how to use the shell, and most importantly, you host your site on your own VPS. The installation is quite simple and assumes you are running in the root account, if not you may need to add ‘sudo’ to the commands to get root privileges. I will show you through the step by step installation MyCollab Project Management Software on a CentOS 7 server.
Install MyCollab Project Management Software on CentOS 7

Step 1. First let’s start by ensuring your system is up-to-date.

yum clean all
yum -y update

Step 2. Install LAMP server.

A CentOS 7 LAMP stack server is required. If you do not have LAMP installed, you can follow our guide here.

Step 3. Installing Java.

You will also need the Java Runtime Environment (JRE) version 8 or higher. You can install it by running the following command:

yum install java-1.8.0-openjdk

Step 3. Installing MyCollab Project Management Software.

First thing to do is to go to MyCollab Project Management Software’s download page and download the latest stable version of MyCollab:

wget https://github.com/MyCollab/mycollab/releases/download/Release_5.4.10/MyCollab-All-5.4.10.zip

After downloading Concrete5 you will need to unzip master.zip. To do this, run:

unzip MyCollab-All-5.4.10.zip

You can install MyCollab by running the provided startup.sh installation script:

cd MyCollab-5.4.10/bin
sudo ./startup.sh

Step 4. Configuring MariaDB for Concrete5.

By default, MariaDB is not hardened. You can secure MariaDB using the mysql_secure_installation script. you should read and below each steps carefully which will set root password, remove anonymous users, disallow remote root login, and remove the test database and access to secure MariaDB:

mysql_secure_installation

Configure it like this:

- Set root password? [Y/n] y
- Remove anonymous users? [Y/n] y
- Disallow root login remotely? [Y/n] y
- Remove test database and access to it? [Y/n] y
- Reload privilege tables now? [Y/n] y

Next we will need to log in to the MariaDB console and create a database for the Concrete5. Run the following command:

mysql -u root -p

This will prompt you for a password, so enter your MariaDB root password and hit Enter. Once you are logged in to your database server you need to create a database for Concrete5 installation:

MariaDB [(none)]>CREATE USER 'mcuser'@'localhost' IDENTIFIED BY 'password';
MariaDB [(none)]>GRANT ALL PRIVILEGES ON mycollab.* TO 'mcuser'@'localhost' IDENTIFIED BY 'password' WITH GRANT OPTION;
MariaDB [(none)]>FLUSH PRIVILEGES;
MariaDB [(none)]>exit;

Step 5. Configure Firewall for MyCollab.

Next step, we should allow HTTP traffic on port 8080 through firewalld. You can do this by running the following command:

firewall-cmd --zone=public --permanent --add-port=8080/tcp
firewall-cmd --reload

Step 6. Accessing MyCollab.

MyCollab will be available on HTTP port 80 by default. Open your favorite browser and navigate to http://yourdomain.com:8080 or http://server-ip:8080 and complete the required the steps to finish the installation.
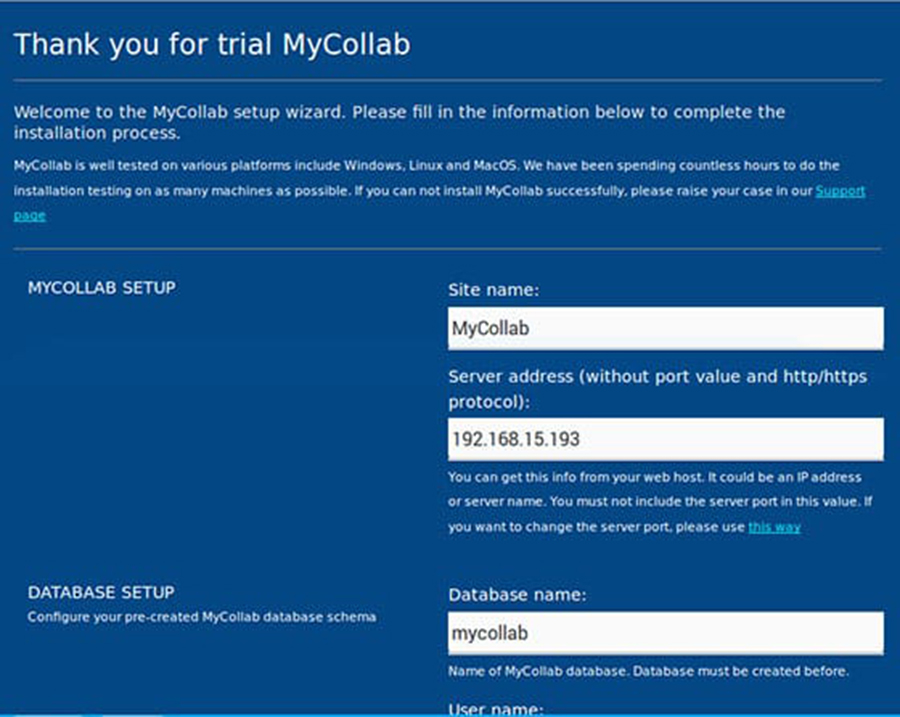
mycollab-setup-wizard
Congratulation’s! You have successfully installed MyCollab. Thanks for using this tutorial for installing MyCollab Project Management Software on CentOS 7 system. For additional help or useful information, we recommend you to check the official MyCollab Project Management Software web site.

How To Install XWiki on CentOS 7

XWiki on CentOS 7

XWiki is a free wiki software platform written in Java. XWiki is an enterprise but open source wiki. It includes WYSIWYG editing, OpenDocument based document import/export, semantic annotations and tagging, and advanced permissions management.

Table of Contents

Step 1. First let’s start by ensuring your system is up-to-date.

Step 2. Installing Java.

Step 3. Installing XWiki.

Step 4. Start XWiki.

Step 5. Accessing XWiki.

 Prerequisites

This article assumes you have at least basic knowledge of Linux, know how to use the shell, and most importantly, you host your site on your own VPS. The installation is quite simple and assumes you are running in the root account, if not you may need to add ‘sudo’ to the commands to get root privileges. I will show you through the step by step installation XWiki on a CentOS 7 server.
Install XWiki on CentOS 7

Step 1. First let’s start by ensuring your system is up-to-date.

yum clean all
yum -y update

Step 2. Installing Java.

Now you will need to install JAVA, run the following command to download the RPM package using the following command:

wget --no-cookies --no-check-certificate --header "Cookie:oraclelicense=accept-securebackup-cookie" "http://download.oracle.com/otn-pub/java/jdk/8u91-b14/jdk-8u91-linux-x64.rpm"

Once you have downloaded the RPM file, you can install the package using following command:

yum localinstall jdk-8u91-linux-x64.rpm

Check if it is successfully installed with the following command:

java -version

Step 3. Installing XWiki.

Run the following commands in Terminal to install XWiki on CentOS 7:

wget http://download.forge.ow2.org/xwiki/xwiki-enterprise-installer-generic-8.4.4-standard.jar

To run the installer, enter the following command:

java -jar xwiki-enterprise-installer-generic-8.4.4-standard.jar

Now, the installer will ask you several questions with a prompt to enter 1 (accept) 2 (quit) 3 (redisplay). Most of the prompts can be answered with 1 (accept).

Step 4. Start XWiki.

To start XWiki, you need to navigate to the directory you chose in the previous step:

cd /usr/local/"XWiki Enterprise 8.4.4"
bash start_xwiki.sh

Step 5. Accessing XWiki.

XWiki will be available on HTTP port 8080 by default. Open your favorite browser and navigate to http://yourdomain.com:8080 or http://server-ip:8080 and complete the required the steps to finish the installation. If you are using a firewall, please open port 80 to enable access to the control panel.

Congratulation’s! You have successfully installed XWiki. Thanks for using this tutorial for installing XWiki in CentOS 7 systems. For additional help or useful information, we recommend you to check the official XWiki web site.

How To Install Graylog on CentOS 7

Graylog on CentOS 7

Graylog is a free and open source powerful centralized log management tool based on Elasticsearch and MongoDB. Graylog helps you to collect, index and analyze any machine logs centrally.

Table of Contents

Step 1. First let’s start by ensuring your system is up-to-date.

Step 2. Installing Java.

Step 3. Installing MongoDB.

Step 4. Installing Elasticsearch.

Step 5. Configuring Elasticsearch.

Step 6. Installing Graylog.

Step 7. Accessing Graylog.

Prerequisites

This article assumes you have at least basic knowledge of Linux, know how to use the shell, and most importantly, you host your site on your own VPS. The installation is quite simple and assumes you are running in the root account, if not you may need to add ‘sudo’ to the commands to get root privileges. I will show you through the step by step installation Graylog on a CentOS 7 server.
Install Graylog on CentOS 7

Step 1. First let’s start by ensuring your system is up-to-date.

yum clean all
yum -y update

Step 2. Installing Java.

Now you will need to install JAVA, run the following command to download the RPM package using the following command:

wget --no-cookies --no-check-certificate --header "Cookie:oraclelicense=accept-securebackup-cookie" "http://download.oracle.com/otn-pub/java/jdk/8u91-b14/jdk-8u91-linux-x64.rpm"

Once you have downloaded the RPM file, you can install the package using following command:

yum localinstall jdk-8u91-linux-x64.rpm

Check if it is successfully installed with the following command:

java -version

Step 3. Installing MongoDB.

MongoDB is not available in the default CentOS repository. You will need to add the MongoDB repo first:

nano /etc/yum.repos.d/mongodb.repo

Add the following contents:

[mongodb]
name=MongoDB Repository
baseurl=https://repo.mongodb.org/yum/redhat/$releasever/mongodb-org/3.2/x86_64/
gpgcheck=1
enabled=1
gpgkey=https://www.mongodb.org/static/pgp/server-3.2.asc

Install MongoDB by running the following command:

yum install mongodb-org -y

Start the MongoDB service and enable it to start on boot with the following command:

systemctl enable mongod.service
systemctl start mongod.service

Step 4. Installing Elasticsearch.

In order to install Elasticsearch using the official repository, we have to download and install the public signing key:

rpm --import https://packages.elastic.co/GPG-KEY-elasticsearch

Create and add the following in your /etc/yum.repos.d/ director:

nano /etc/yum.repos.d/elasticsearch.repo

Add the following contents:

[elasticsearch-2.x]
name=Elasticsearch repository for 2.x packages
baseurl=https://packages.elastic.co/elasticsearch/2.x/centos
gpgcheck=1
gpgkey=https://packages.elastic.co/GPG-KEY-elasticsearch
enabled=1

Now, install Elasticsearch using the follwing command:

yum install elasticsearch -y

Start the elasticsearch service and enable it to start on boot time with the following command:

systemctl enable elasticsearch.service
systemctl start elasticsearch.service

Step 5. Configuring Elasticsearch.

First, open up the Elasticsearch configuration file:

nano /etc/elasticsearch/elasticsearch.yml

Change the file as shown below:

cluster.name: graylog

Let’s prevent possible remote code executions. Add the following lines:

script.inline: false
script.indexed: false
script.file: false

Restart the elasticsearch service:

systemctl restart elasticsearch.service

Check the health of the Elasticsearch with the following command:

curl -XGET 'http://localhost:9200/_cluster/health?pretty=true'

Step 6. Installing Graylog.

We need to download and install the Graylog repository using the following command:

rpm -Uvh https://packages.graylog2.org/repo/packages/graylog-2.2-repository_latest.rpm

Install Graylog server using yum:

yum install graylog-server -y

After you have installed the Graylog Server, you have to generate secret key for Graylog using the following command:

### pwgen -N 1 -s 96 
MTtPFSMZxAvoLsUiXXauggyJ761hwkGn1ZTN2ovb8wN2tO1LzyeNbaatOrpLukp96p0MxwHQosmMGPbmw46ojnnSORVvr2

Now create a hash password for the root user that can be used to log in to the Graylog web server using the following command:

### echo -n Password | sha256sum
e7cf3ef4f17c3999a94f2c6f612e8bmwe46b1026878e4e19398b23bd38ec221a
1
2
	
### echo -n Password | sha256sum
e7cf3ef4f17c3999a94f2c6f612e8bmwe46b1026878e4e19398b23bd38ec221a

Edit the server.conf file:

nano /etc/graylog/server/server.conf

Make changes to the file as shown below:

password_secret= MTtPFSMZxAvoLsUiXXauggyJ761hwkGn1ZTN2ovb8wN2tO1LzyeNbaatOrpLukp96p0MxwHQosmMGPborm1YRojnnSORVvr2
root_password_sha2= e7cf3ef4f17c3999a94f2c6f612e8a888e5b10268bmwe4619398b23bd38ec221a
[email protected]
root_timezone=UTC
elasticsearch_discovery_zen_ping_unicast_hosts = ipaddress:9300
elasticsearch_shards=1
script.inline: false
script.indexed: false
script.file: false

To enable the Graylog web interface, make changes to the file as shown below:

rest_listen_uri = http://your-server-ip:12900/
web_listen_uri = http://your-server-ip:9000/

After you have modified the configuration file, you can start Graylog Service using the following commands:

systemctl enable graylog-server.service
systemctl start graylog-server.service

Step 7. Accessing Graylog.

Graylog will be available on HTTP port 8080 by default. Open your favorite browser and navigate to http://yourdomain.com:9000 or http://server-ip:9000 and complete the required the steps to finish the installation.
Installing-Graylog-LoginScreen
Congratulation’s! You have successfully installed Graylog. Thanks for using this tutorial for installing Graylog in CentOS 7 system. For additional help or useful information, we recommend you to check the official Graylog web site.

How To Install Apache Maven on CentOS 7

Apache Maven on CentOS 7

Apache Maven is a free and open source project management tool used for Java projects. You can easily handle a project’s build, reporting, and Documentation from a central piece of advice using Apache Maven. Apache Maven provides a complete framework to automate the job’s Build infrastructure.

Table of Contents

Step 1. First make sure that all your system packages are up-to-date by running these following apt-get commands in the terminal.

Step 2. Installing Java.

Step 3. Installing Apache Maven.

Step 4. Setup Environment Variables.

Step 5. Verify Installation Apache Maven.


Prerequisites

This article assumes you have at least basic knowledge of Linux, know how to use the shell, and most importantly, you host your site on your own VPS. The installation is quite simple and assumes you are running in the root accge of Linount, if not you may need to add ‘sudo’ to the commands to get root privileges. I will show you through the step by step installation Apache Maven on a CentOS 7 server.
Install Apache Maven on CentOS 7

Step 1. First make sure that all your system packages are up-to-date by running these following apt-get commands in the terminal.

sudo apt-get update
sudo apt-get upgrade

Step 2. Installing Java.

Java development kit is the primary requirement of Apache Maven. So you need to install Java development kit (JDK) on your system.

Verify the Java version by running the following command:

### java -version

java version "1.8.0_144"
Java(TM) SE Runtime Environment (build 1.8.0_144-b01)
Java HotSpot(TM) 64-Bit Server VM (build 25.144-b01, mixed mode)

Step 3. Installing Apache Maven.

First thing to do is to go to Apache Maven’s download page and download the latest stable version of Apache Maven, At the moment of writing this article it is version 3.5.2:

wget http://www-eu.apache.org/dist/maven/maven-3/3.5.2/binaries/apache-maven-3.5.2-bin.tar.gz

Now extract downloaded archive using following command:

tar xzf apache-maven-3.5.2-bin.tar.gz
ln -s apache-maven-3.5.2 maven

Step 4. Setup Environment Variables.

Now set the environments variables by creating new file /etc/profile.d/maven.sh:

nano /etc/profile.d/apache-maven.sh

Add following content:

export M2_HOME=/usr/local/maven
export PATH=${M2_HOME}/bin:${PATH}

Now load the environment variables in current shell using following command:

source /etc/profile.d/apache-maven.sh

Step 5. Verify Installation Apache Maven.

Once everything has been successfully configured, check the version of the Apache Maven:

### mvn -version

Apache Maven 3.5.2 (138edd61fd100ec658bfa2d307c4e466940a5d7d; 2017-12-18T13:28:13+05:30)
Maven home: /usr/local/maven
Java version: 1.8.0_144, vendor: Oracle Corporation
Java home: /opt/jdk1.8.0_144/jre
Default locale: en_IN, platform encoding: UTF-8
OS name: "linux", version: "4.4.0-93-generic", arch: "amd64", family: "unix"

Congratulation’s! You have successfully installed Apache Maven. Thanks for using this tutorial for installing Apache Maven on CentOS 7 systems. For additional help or useful information, we recommend you to check the official Apache Maven web site.

How To Install ELK Stack on CentOS 7

ELK Stack on CentOS 7

ELK stack is a popular, open source log management platform. It is used as a centralized management for storing, analyzing and viewing of logs. Centralized management makes it easier to study the logs & identify issues if any for any number of servers.

Table of Contents

Step 1. First let’s start by ensuring your system is up-to-date.

Step 2. Installing Java.

Step 3. Installing Elasticsearch.

Step 4. Installing Kibana.

Step 5. Configure ELK stack.

Step 6. Configure Logstash.

Prerequisites

This article assumes you have at least basic knowledge of Linux, know how to use the shell, and most importantly, you host your site on your own VPS. The installation is quite simple and assumes you are running in the root account, if not you may need to add ‘sudo’ to the commands to get root privileges. I will show you through the step by step install ELK Stack (Elasticsearch, Logstash and Kibana) on CentOS 7 server.
Install ELK Stack on CentOS 7

Step 1. First let’s start by ensuring your system is up-to-date.

yum clean all
yum -y update

Step 2. Installing Java.

You need a Java Runtime Environment (JRE) because Elasticsearch is written in Java programming language, you can install OpenJDK package that includes JRE:

yum install java-1.8.0-openjdk.x86_64

Verify the Java version:

[[email protected] ~]# java -version
openjdk version "1.8.0_131"
OpenJDK Runtime Environment (build 1.8.0_131-b12)
OpenJDK 64-Bit Server VM (build 25.131-b12, mixed mode)

Step 3. Installing Elasticsearch.

Elasticsearch can be installed with a package manager by adding Elastic’s package repository:

wget https://artifacts.elastic.co/downloads/elasticsearch/elasticsearch-5.0.0.rpm

Then install the RPM package that you just downloaded:

rpm -ivh elasticsearch-5.0.0.rpm

Start and enable the service:

systemctl enable elasticsearch
systemctl start elasticsearch

Now run the following command from the terminal to check if the elasticsearch is working properly:

curl -X GET http://localhost:9200

You should get the following output:

{
"name" : "idroot.net",
"cluster_name" : "elasticsearch",
"cluster_uuid" : "k27ZZFJPTaOtwg6_pyzEiw",
"version" : {
"number" : "5.5.0",
"build_hash" : "2cfe0df",
"build_date" : "2017-05-29T16:05:51.443Z",
"build_snapshot" : false,
"lucene_version" : "6.5.1"
},
"tagline" : "You Know, for Search"
}

Step 4. Installing Kibana.

Install Kibana is very simple, you can easily install it using an RPM package:

wget https://artifacts.elastic.co/downloads/kibana/kibana-5.5.0-x86_64.rpm

Now just execute the following command so you can start the Kibana service:

systemctl daemon-reload
systemctl start kibana

Kibana is now installed and working on our system. To check the web-page, open the web browser & go to the URL mentioned below (use the IP address for your ELK host):

http://localhost:5601

Step 5. Configure ELK stack.

First, we need to create an SSL certificate. This certificate will be used for securing communication between logstash & filebeat clients. Before creating a SSL certificate, we will make an entry of our server IP address in openssl.cnf:

nano /etc/ssl/openssl.cnf

Look for section with ‘subjectAltName’ & add your server IP to it:

subjectAltName = IP:10.20.30.100

Now change the directory to /etc/ssl and create SSL certificate:

cd /etc/ssl
openssl req -x509 -days 365 -batch -nodes -newkey rsa:2048 -keyout logstash-forwarder.key -out logstash_frwrd.crt

Step 6. Configure Logstash.

We will now create a configuration file for logstash under the folder ‘/etc/logstash/conf.d‘:

[[email protected] ~]# nano /etc/logstash/conf.d/logstash.conf

# input section
input {
 beats {
 port => 5044
 ssl => true
 ssl_certificate => "/etc/ssl/logstash_frwrd.crt"
 ssl_key => "/etc/ssl/logstash-forwarder.key"
 congestion_threshold => "40"
 }
}

Next section i.e. ‘filter section’ will parse the logs before sending them to elasticsearch:

# Filter section
filter {
if [type] == "syslog" {
 grok {
 match => { "message" => "%{SYSLOGLINE}" }
 }
 date {
match => [ "timestamp", "MMM d HH:mm:ss", "MMM dd HH:mm:ss" ]

}
 }
}

Last section is ‘output section’ & it defines the location for the storage of logs:

# output section
output {
 elasticsearch {
 hosts => localhost
 index => "%{[@metadata][beat]}-%{+YYYY.MM.dd}"
 }
stdout {
 codec => rubydebug
 }
}

Now save the file and exit. Now start the logstash service & enable it at boot time:

systemctl start logstash
systemctl enable logstash

Step 7. Installing Filebeat on Clients.

Now to be able to communicate with the ELK stack, Filebeat needs to installed on all the client machines:

### nano /etc/yum.repos.d/filebeat.repo
[beats]
name=Elastic Beats Repository
baseurl=https://packages.elastic.co/beats/yum/el/$basearch
enabled=1
gpgkey=https://packages.elastic.co/GPG-KEY-elasticsearch
gpgcheck=1

Now install filebeat using following command:

yum install filebeat

After the filebeat has been installed, copy the ssl certificate from the ELK stack server to ‘/etc/ssl’. Next we will make changes to filebeat configuration file to connect the client to ELK server:

nano /etc/filebeat/filebeat.yml

Make the following changes to file:

. . .
paths:
– /var/log/*.log
. . .

. . .
document_type: syslog
. . .

. . .
output:
logstash:
hosts: [“10.20.30.100:5044”]
tls:
certificate_authorities: [“/etc/ssl/logstash_frwrd.crt”]
. . .

Now start the service and enable it at boot time:

systemctl restart filebeat
systemctl enable filebeat

Configurations on both server end and client end are now complete. We can now login to the kibana web interface to look for analysed logs.

http://your-ip-address:5601/

Congratulation’s! You have successfully installed ELK Stack on CentOS 7. Thanks for using this tutorial for installing ELK Stack (Elasticsearch, Logstash and Kibana) on CentOS 7 systems. For additional help or useful information, we recommend you to check the official ELK Stack web site.

How To Install Apache Zeppelin on CentOS 7

Apache Zeppelin on CentOS 7

Apache Zeppelin is an online open source laptop and collaborative application for interactive data ingestion, discovery, analytics, and visualization. Zeppelin supports 20+ languages, including Apache Spark, SQL, R, Elasticsearch and many more. Apache Zeppelin allows you to make beautiful data-driven documents and see the results of your analytics.

Table of Contents

Step 1. First let’s start by ensuring your system is up-to-date.

Step 2. Installing Java.

Step 3. Installing Zeppelin.

Step 4. Configure Systemd service for Apache Zeppelin.

Step 5. Configure Reverse Proxy Nginx.

Step 6. Accessing Apache Zeppelin.


Prerequisites

This article assumes you have at least basic knowledge of Linux, know how to use the shell, and most importantly, you host your site on your own VPS. The installation is quite simple and assumes you are running in the root account, if not you may need to add ‘sudo’ to the commands to get root privileges. I will show you through the step by step install Apache Zeppelin on CentOS 7 server.
Install Apache Zeppelin on CentOS 7

Step 1. First let’s start by ensuring your system is up-to-date.

yum clean all
yum -y update

Step 2. Installing Java.

At the time of writing this tutorial, the latest Java JDK version was JDK 8u45. First, let us download the latest Java SE Development Kit 8 release from its official download page or use following commands to download from shell:

cd /opt/
wget --no-cookies --no-check-certificate --header "Cookie: gpw_e24=http%3A%2F%2Fwww.oracle.com%2F; oraclelicense=accept-securebackup-cookie" "http://download.oracle.com/otn-pub/java/jdk/8u45-b14/jdk-8u45-linux-x64.tar.gz"
tar xzf jdk-8u45-linux-x64.tar.gz

After extracting archive file use alternatives command to install it. alternatives command is available in chkconfig package:

cd /opt/jdk1.8.0_45/
alternatives --install /usr/bin/java java /opt/jdk1.8.0_45/bin/java 2
alternatives --config java
There are 3 programs which provide 'java'.

  Selection    Command
-----------------------------------------------
*  1           /opt/jdk1.7.0_71/bin/java
 + 2           /opt/jdk1.8.0_25/bin/java
   3           /opt/jdk1.8.0_45/bin/java

Enter to keep the current selection[+], or type selection number: 3

At this point JAVA 8 (JDK 8u45) has been successfully installed on your system. We also recommend to setup javac and jar commands path using alternatives:

alternatives --install /usr/bin/jar jar /opt/jdk1.8.0_45/bin/jar 2
alternatives --install /usr/bin/javac javac /opt/jdk1.8.0_45/bin/javac 2
alternatives --set jar /opt/jdk1.8.0_45/bin/jar
alternatives --set javac /opt/jdk1.8.0_45/bin/javac

Checking Installed java version:

[email protected] ~# java -version
java version "1.8.0_45"
Java(TM) SE Runtime Environment (build 1.8.0_45-b14)
Java HotSpot(TM) 64-Bit Server VM (build 25.45-b02, mixed mode)

We can easily set the environment variables using the export command as shown below:

Setup JAVA_HOME Variable:

export JAVA_HOME=/opt/jdk1.8.0_45

Setup JRE_HOME Variable:

export JRE_HOME=/opt/jdk1.8.0_45/jre

Setup PATH Variable:

export PATH=$PATH:/opt/jdk1.8.0_45/bin:/opt/jdk1.8.0_45/jre/bin.

Step 3. Installing Zeppelin.

First, download the Zeppelin binary on your system. You can always find the latest version of the application on Zeppelin download page:

wget http://www-us.apache.org/dist/zeppelin/zeppelin-0.7.3/zeppelin-0.7.3-bin-all.tgz
tar xf zeppelin-*-bin-all.tgz -C /opt

Rename the directory for sake of convenience:

mv /opt/zeppelin-*-bin-all /opt/zeppelin

Step 4. Configure Systemd service for Apache Zeppelin.

We will set up a Systemd unit file for the Zeppelin application:

adduser -d /opt/zeppelin -s /sbin/nologin zeppelin

Provide ownership of the files to the newly created Zeppelin user:

chown -R zeppelin:zeppelin /opt/zeppelin

Next, Create a new Systemd service unit file:

### nano /etc/systemd/system/zeppelin.service
[Unit]
Description=Zeppelin service
After=syslog.target network.target

[Service]
Type=forking
ExecStart=/opt/zeppelin/bin/zeppelin-daemon.sh start
ExecStop=/opt/zeppelin/bin/zeppelin-daemon.sh stop
ExecReload=/opt/zeppelin/bin/zeppelin-daemon.sh reload
User=zeppelin
Group=zeppelin
Restart=always

[Install]
WantedBy=multi-user.target

Then, Start the application:

systemctl start zeppelin
systemctl enable zeppelin

Step 5. Configure Reverse Proxy Nginx.

By default, the Zeppelin server listens to localhost on port 8080. In this tutorial, we will use Nginx as a reverse proxy so that the application can be accessed via standard HTTP and HTTPS ports:

yum install certbot
yum install nginx

Start Nginx and enable it to automatically start at boot time:

sudo systemctl start nginx
sudo systemctl enable nginx

Next, Generate the SSL certificates:

certbot certonly --webroot -w /usr/share/nginx/html -d zeppelin.wpcademy.com

The generated certificates are likely to be stored in /etc/letsencrypt/live/zeppelin.wpcademy.com/. The SSL certificate will be stored as fullchain.pem and private key will be stored as privkey.pem.

Set up auto-renewal of the certificates Let’s Encrypt using cron jobs:

sudo crontab -e
30 5 * * * /usr/bin/certbot renew --quiet

Next steps, create a new server block file for the Zeppelin site:

nano /etc/nginx/conf.d/zeppelin.wpcademy.com.conf
upstream zeppelin {
server 127.0.0.1:8080;
}
server {
 listen 80;
 server_name zeppelin.wpcademy.com;
 return 301 https://$host$request_uri;
}

server {
 listen 443;
 server_name zeppelin.wpcademy.com;

ssl_certificate /etc/letsencrypt/live/zeppelin.wpcademy.com/fullchain.pem;
 ssl_certificate_key /etc/letsencrypt/live/zeppelin.wpcademy.com/privkey.pem;

ssl on;
 ssl_session_cache builtin:1000 shared:SSL:10m;
 ssl_protocols TLSv1 TLSv1.1 TLSv1.2;
 ssl_ciphers HIGH:!aNULL:!eNULL:!EXPORT:!CAMELLIA:!DES:!MD5:!PSK:!RC4;
 ssl_prefer_server_ciphers on;

access_log /var/log/nginx/zeppelin.access.log;

location / {
 proxy_pass http://zeppelin;
 proxy_set_header X-Real-IP $remote_addr;
 proxy_set_header X-Forwarded-For $proxy_add_x_forwarded_for;
 proxy_set_header Host $http_host;
 proxy_set_header X-NginX-Proxy true;
 proxy_redirect off;
 }
location /ws {
 proxy_pass http://zeppelin/ws;
 proxy_http_version 1.1;
 proxy_set_header Upgrade websocket;
 proxy_set_header Connection upgrade;
 proxy_read_timeout 86400;
 }
 }

Restart Nginx so that the changes can take effect:

systemctl restart nginx

Step 6. Accessing Apache Zeppelin.

Apache Zeppelin will be available on HTTP port 80 by default. Open your favorite browser and navigate to https://zeppelin.wpcademy.com and complete the required the steps to finish the installation. If you are using a firewall, please open port 80 to enable access to the control panel.

Congratulation’s! You have successfully installed Apache Zeppelin on CentOS 7. Thanks for using this tutorial for installing Apache Zeppelin on CentOS 7 systems. For additional help or useful information, we recommend you to check the official Apache Zeppelin web site.

How To Install OpenCV on CentOS 7 Step by Step

Install OpenCV on CentOS 7

OpenCV (Open Source Computer Vision Library) is an open source computer vision library with bindings for C++, Python, and Java and supports all major operating systems. It can take advantage of multi-core processing and features GPU acceleration for real-time operation. OpenCV can be deployed on various platforms, including Windows, Linux, Android, iOS, etc. In this tutorial we will learn how to Install OpenCV on CentOS 7 Step by Step.

This article assumes you have at least basic knowledge of Linux, know how to use the shell, and most importantly, you host your site on your own VPS. The installation is quite simple and assumes you are running in the root account, if not you may need to add ‘sudo’ to the commands to get root privileges. I will show you through the step by step installation OpenCV on a CentOS 7 server.
Install OpenCV on CentOS 7

Step 1. First, let’s start by ensuring your system is up-to-date.

yum clean all
yum -y update

Step 2. Installing dependencies for OpenCV.

Use the following commands to install all required dependencies for compiling OpenCV:

yum groupinstall "Development Tools"
yum install cmake gcc gtk2-devel numpy pkconfig

Step 3. Installing OpenCV on CentOS 7.

First, Download and unarchive OpenCV archive as below:

wget https://github.com/opencv/opencv/archive/3.3.0.zip
unzip 3.3.0.zip

Next, compile and install OpenCV:

cd opencv-3.3.0
mkdir build
cd build
cmake -D CMAKE_BUILD_TYPE=DEBUG -D CMAKE_INSTALL_PREFIX=/usr/local ..
make
make install

Then, configure required variables:

export PKG_CONFIG_PATH=$PKG_CONFIG_PATH:/usr/local/lib/pkgconfig/
echo '/usr/local/lib/' >> /etc/ld.so.conf.d/opencv.conf
ldconfig

To test your OpenCV installation, you can download extra test data from the OpenCV extra repository:

cd
git clone https://github.com/opencv/opencv_extra.git
export OPENCV_TEST_DATA_PATH=/root/opencv_extra/testcinta

In the cmake build directory, you will find several test executables named in the same kind of format opencv_test_*. Run any one you are interested in to perform a test. Example below:

cd /root/opencv-3.3.0/build/bin
ls
./opencv_test_cinta

Congratulation’s! You have successfully installed OpenCV. Thanks for using this tutorial for installing OpenCV on CentOS 7 system. For additional help or useful information, we recommend you to check the official OpenCV web site.