Joomla is a free and open source popular content management that uses a PHP and a backend database, such as MySQL. It offers a wide variety of features that make it an incredibly flexible content management system right out of the box. Furthermore, there are hundreds of free extensions written for that allows users to extend its functionality and customize it to their own objectives. Continue reading “How To Install Joomla 3.9.5 on Ubuntu 18.04 LTS”
How To Install MySQL on Ubuntu 18.04 LTS
MySQL is a relational database management system (RDBMS) that runs as a server providing multi-user access to a number of databases. The MySQL source code is freely available because it was originally developed as freeware. MySQL is written in C and C++ and is compatible with all major operating systems. MySQL can be used for a variety of applications, but is most commonly found on web servers.
This article assumes you have at least basic knowledge of Linux, know how to use the shell, and most importantly, you host your site on your own VPS. The installation is quite simple and assumes you are running in the root account, if not you may need to add ‘sudo’ to the commands to get root privileges. I will show you through the step by step installation MySQL 8.0 on a Ubuntu 18.04 (Bionic Beaver) server.
Install MySQL on Ubuntu 18.04 LTS Bionic Beaver
Step 1. First make sure that all your system packages are up-to-date
sudo apt-get update
sudo apt-get upgrade
Step 2. Installing MySQL on Ubuntu 18.04 LTS.
First step, we will now set up the MySQL official repository on the system:
wget https://dev.mysql.com/get/mysql-apt-config_0.8.10-1_all.deb
Then run the commands below to install:
sudo dpkg -i mysql-apt-config_0.8.10-1_all.deb
The MYSQL installer will prompt you to select the MySQL repository. Based on your selection, the installer will configure repositories on the system to receive the appropriate version of MySQL.
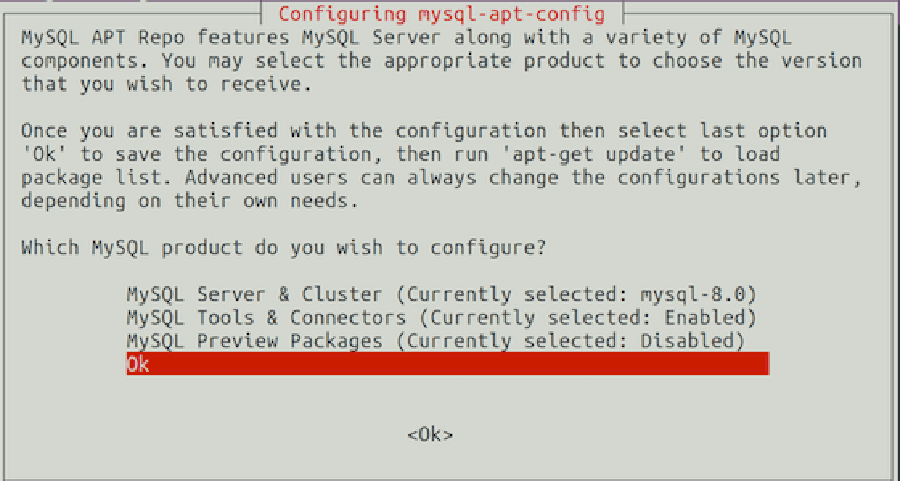
Now that the repository is installed, run the commands below to install:
apt install mysql-server mysql-client
During the installation, you should be prompted to create and confirm a MySQL root password.

Once complete, you can verify MySQL 8.0 is installed by running the below command:
systemctl status mysql
systemctl start mysql
systemctl enable mysql
After the installation of MySQL is complete, you may need to secure your new MySQL. By default, MySQL is not hardened. You can secure MySQL using the mysql_secure_installation script. you should read and below each steps carefully which will set root password, remove anonymous users, disallow remote root login, and remove the test database and access to secure MySQL:
mysql_secure_installation
Configure it like this:
- Set root password? [Y/n] y
- Remove anonymous users? [Y/n] y
- Disallow root login remotely? [Y/n] y
- Remove test database and access to it? [Y/n] y
- Reload privilege tables now? [Y/n] y
To log into MySQL, use the following command (note that it’s the same command you would use to log into a MySQL database):
mysql -u root -p
One of the most important things when running MySQL on a production server is to get the most out of its performances. If you are a beginner and you do not know how to tune your MySQL server, you can start with a program called MySQLTuner. It will help you to analyze your server and to tune MySQL for better overall performances.
Congratulation’s! You have successfully installed MySQL. Thanks for using this tutorial for installing MySQL 8.0 server in Ubuntu 18.04 Bionic Beaver system. For additional help or useful information, we recommend you to check the official MySQL web site.
How To Install LAMP Stack on Ubuntu 18.04 LTS
LAMP represents a full featured stack containing the most popular web server known as Apache, the most popular database server MySQL and the most popular open-source web programming language known as PHP. All components are free and open-source software, and the combination is suitable for building dynamic web pages.
This article assumes you have at least basic knowledge of linux, know how to use the shell, and most importantly, you host your site on your own VPS. The installation is quite simple. I will show you through the step by step installation LAMP (Linux Apache, MySQL and PHP) on Ubuntu 18.04 LTS Bionic Beaver server.
Install LAMP Stack on Ubuntu 18.04 LTS Bionic Beaver
Step 1. First make sure that all your system packages are up-to-date
apt-get update
apt-get upgrade
Step 2. Installing Apache web server on Ubuntu 18.04 LTS Bionic Beaver.
We will be installing Apache with apt-get, which is the default package manager for ubuntu:
apt-get install -y apache2 apache2-utils
After installing Apache2, the commands below can be used to stop, start and enable Apache2 service to always start up with the server boots:
systemctl enable apache2
systemctl start apache2
systemctl status apache2
Check Apache version:
apache2 -v
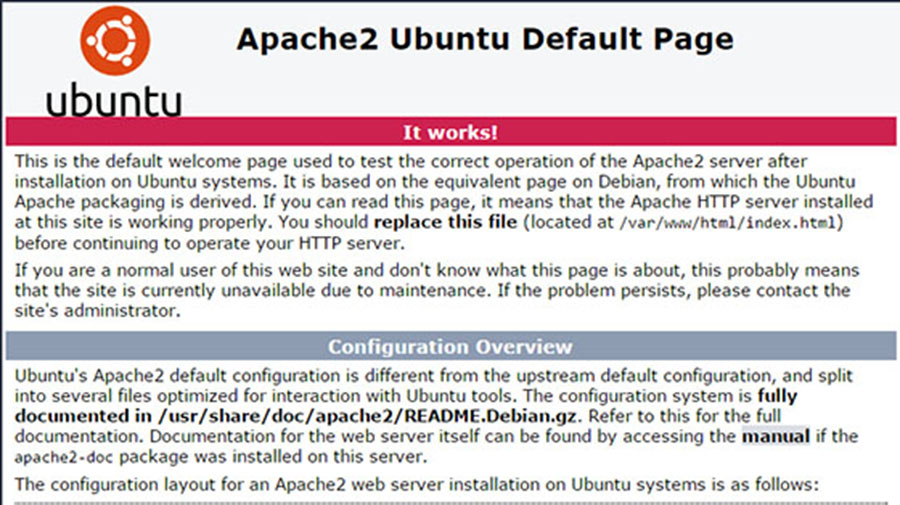
You can verify that Apache is really running by opening your favorite web browser and entering the URL http://your-server’s-address, if it is installed, then you will see this:
Step 3. Installing MariaDB on Ubuntu 18.04 LTS Bionic Beaver.
Now that we have our web server up and running, it is time to install MariaDB. MariaDB is a database management system. Basically, it will organize and provide access to databases where our site can store information:
apt-get install mariadb-server mariadb-client
After installing MariaDB, the commands below can be used to stop, start and enable MariaDB service to always start up when the server boots:
systemctl status mariadb
systemctl enable mariadb
systemctl start mariadb
By default, MariaDB is not hardened. You can secure MariaDB using the mysql_secure_installation script. you should read and below each steps carefully which will set root password, remove anonymous users, disallow remote root login, and remove the test database and access to secure MariaDB:
mysql_secure_installation
Configure it like this:
- Set root password? [Y/n] y
- Remove anonymous users? [Y/n] y
- Disallow root login remotely? [Y/n] y
- Remove test database and access to it? [Y/n] y
- Reload privilege tables
To log into MariaDB, use the following command (note that it’s the same command you would use to log into a MySQL database):
mysql -u root -p
Step 4. Installing PHP 7.2 on Ubuntu 18.04 Bionic Beaver.
At the the time of this writing, PHP7.2 is the latest stable version of PHP and has a minor performance edge over PHP7.0. Enter the following command to install PHP7.2:
apt-get install software-properties-common
add-apt-repository ppa:ondrej/php
Run the commands below to install PHP 7.2 FPM and related modules:
apt-get update
apt-get install php7.2 libapache2-mod-php7.2 php7.2-common php7.2-mbstring php7.2-xmlrpc php7.2-soap php7.2-gd php7.2-xml php7.2-intl php7.2-mysql php7.2-cli php7.2-zip php7.2-curl
After install PHP and related modules, all you have to do is restart Apache2 to reload PHP configurations:
systemctl restart apache2
To test PHP, create a test file named info.php with he content below. Save the file, then browse to it to see if PHP is working:
nano /var/www/html/info.php
In this file, paste the following code:
<?php
phpinfo();
?>
1
2
3

<?php
phpinfo();
?>
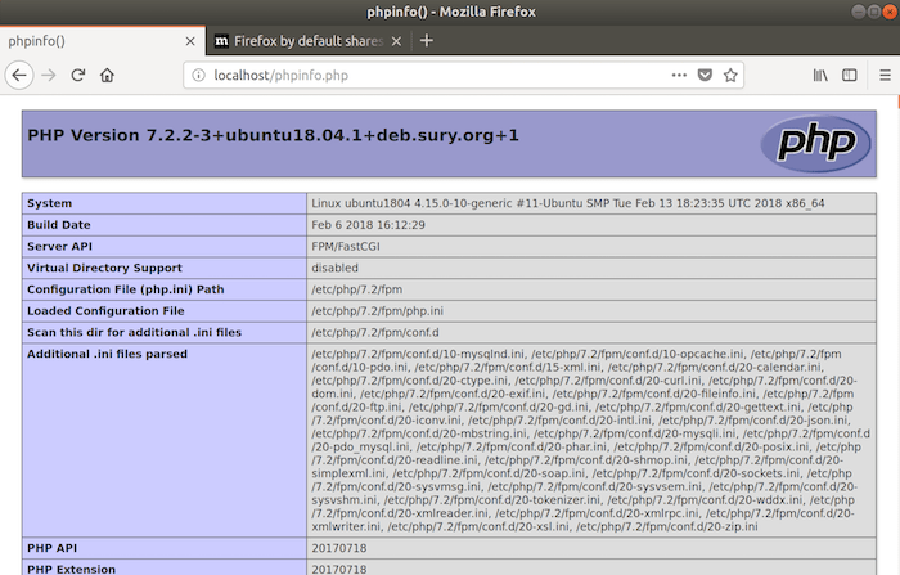
Try to access it at http://your_server_ip/info.php . If the PHP info page is rendered in your browser then everything looks good and you are ready to proceed further.
Congratulation’s! You have successfully installed LAMP stack. Thanks for using this tutorial for installing LAMP (Linux Apache, MySQL and PHP) in Ubuntu 18.04 LTS (Bionic Beaver) system. For additional help or useful information, we recommend you to check the official Apache, MySQL and PHP web site.
How To Install LEMP on Ubuntu 17.10
A LEMP software stack is a group of open source software that is typically installed together to enable a server to host dynamic websites and web apps. This term is actually an acronym which represents the Linux operating system, with the Nginx web server (which replaces the Apache component of a LAMP stack). The site data is stored in a MySQL database (using MariaDB), and dynamic content is processed by PHP. In this tutorial we will show you how to install LEMP on Ubuntu 17.10 Artful Aardvark.
This article assumes you have at least basic knowledge of Linux, know how to use the shell, and most importantly, you host your site on your own VPS. The installation is quite simple and assumes you are running in the root account, if not you may need to add ‘sudo’ to the commands to get root privileges. I will show you through the step by step installation LEMP Stack on an Ubuntu Ubuntu 17.10 Artful Aardvark server.
Install LEMP on Ubuntu 17.10 Artful Aardvark
Step 1. First make sure that all your system packages are up-to-date
sudo apt-get update
sudo apt-get upgrade
Step 2. Installing Nginx on Ubuntu 17.10.
Install Nginx with apt-get, which is the default package manager for Ubuntu:
sudo apt-get install nginx
Start Nginx service using the following command:
sudo systemctl start nginx
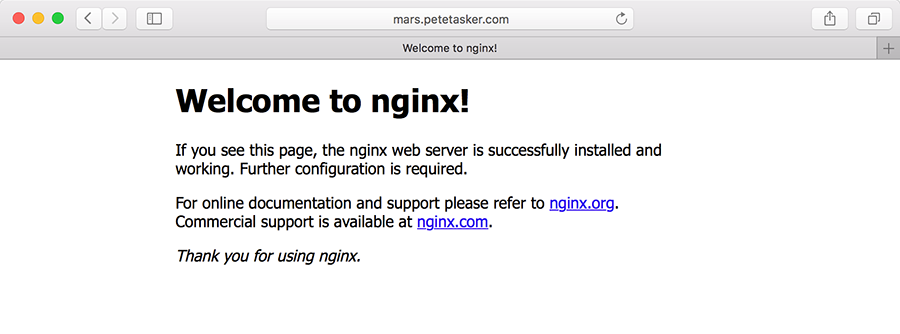
You can verify that Nginx is really running by opening your favorite web browser and entering the URL http://your-server’s-address, if it is installed, then you will see this:
Step 3 Configure Nginx web server.
To get Nginx to work with PHP correctly, we need to make changes to the Nginx configuration file. This guide we will be using a simple Nginx config file:
sudo nano /etc/nginx/sites-available/default
Copy the following into your text editor:
    server {
            listen       80;
            server_name  your_domain_name.com;
            root /usr/share/nginx/html;
            index index.php index.html;
            location / {
                    try_files $uri $uri/ =404;
            }
            error_page 404 /404.html;
            error_page 500 502 503 504 /50x.html;
            location = /50x.html {
                    root /var/www/html;
            }
            location ~ \.php$ {
                    try_files $uri =404;
                    fastcgi_pass unix:/var/run/php5-fpm.sock;
                    fastcgi_index index.php;
                    fastcgi_param SCRIPT_FILENAME $document_root$fastcgi_script_name;
                    include fastcgi_params;
            }
    }
Once you have finished editing the file restart Nginx with:
sudo nginx -t
sudo systemctl restart nginx
Step 4. Installing MySQL on Ubuntu 17.10.
To install MySQL in Ubuntu 17.10 run the following command:
sudo apt-get install mysql-server php7.0-mysql
Once complete, you can verify MySQL is installed by running the below command:
systemctl status mysql
By default, MySQL is not hardened. You can secure MySQL using the mysql_secure_installation script. you should read and below each steps carefully which will set root password, remove anonymous users, disallow remote root login, and remove the test database and access to secure MySQL:
mysql_secure_installation
Configure it like this:
- Set root password? [Y/n] y
- Remove anonymous users? [Y/n] y
- Disallow root login remotely? [Y/n] y
- Remove test database and access to it? [Y/n] y
- Reload privilege tables now? [Y/n] y
To log into MySQL, use the following command (note that it’s the same command you would use to log into a MySQL database):
mysql -u root -p
Step 5. Installing and Configuring PHP on Ubuntu 17.10
Install PHP on the Ubuntu 17.10 with the following command to begin the install:
sudo apt-get install php php-fpm php7.0-mysql
Once the installation is finished, edit the server php.ini file and change the cgi.fix_pathinfo parameter value to 0. By default it will be commented out with a semi-colon and the value set to 1 which practically ensures that PHP will attempt to execute the closest file available when a requested PHP file can’t be found. This is a bad security practice, so let’s change it. Execute the below command:
nano /etc/php/7.0/fpm/php.ini
Now find the cgi.fix_pathinfo line, uncomment it and set the value to 0. Save and close the file.
Your server should restart Nginx automatically after the installation of both MySQL and PHP. If it doesn’t, execute this command:
sudo systemctl restart nginx
To test PHP, create a test file named info.php with he content below. Save the file, then browse to it to see if PHP is working:
nano /usr/share/nginx/html/info.php
Copy the following into your text editor:
<?php phpinfo(); ?>
Try to access it at http://your_server_ip/info.php . If the PHP info page is rendered in your browser then everything looks good and you are ready to proceed further.
Congratulation’s! You have successfully installed LEMP stack. Thanks for using this tutorial for installing LAMP (Linux, Nginx, MySQL and PHP) in Ubuntu 17.10 Artful Aardvark system. For additional help or useful information, we recommend you to check the official Nginx, MySQL and PHP web site.
How To Install LAMP Stack on Ubuntu 17.10
LAMP represents a full featured stack containing the most popular web server known as Apache, the most popular database server MySQL and the most popular open-source web programming language known as PHP. All components are free and open-source software, and the combination is suitable for building dynamic web pages.
This article assumes you have at least basic knowledge of linux, know how to use the shell, and most importantly, you host your site on your own VPS. The installation is quite simple. I will show you through the step by step installation LAMP (Linux Apache, MySQL and PHP) on Ubuntu 17.10 Artful Aardvark server.
Install LAMP Stack on Ubuntu 17.10 Artful Aardvark
Step 1. First make sure that all your system packages are up-to-date
apt-get update
apt-get upgrade
Step 2. Installing Apache web server on Ubuntu 17.10.
We will be installing Apache with apt-get, which is the default package manager for ubuntu:
apt-get install -y apache2 apache2-utils
After installing apache services on your system, start all required services:
systemctl enable apache2
systemctl start apache2
systemctl status apache2
Check Apache version:
### apache2 -v
Server version: Apache/2.4.27 (Ubuntu)
Server built: 2017-09-18T15:46:93
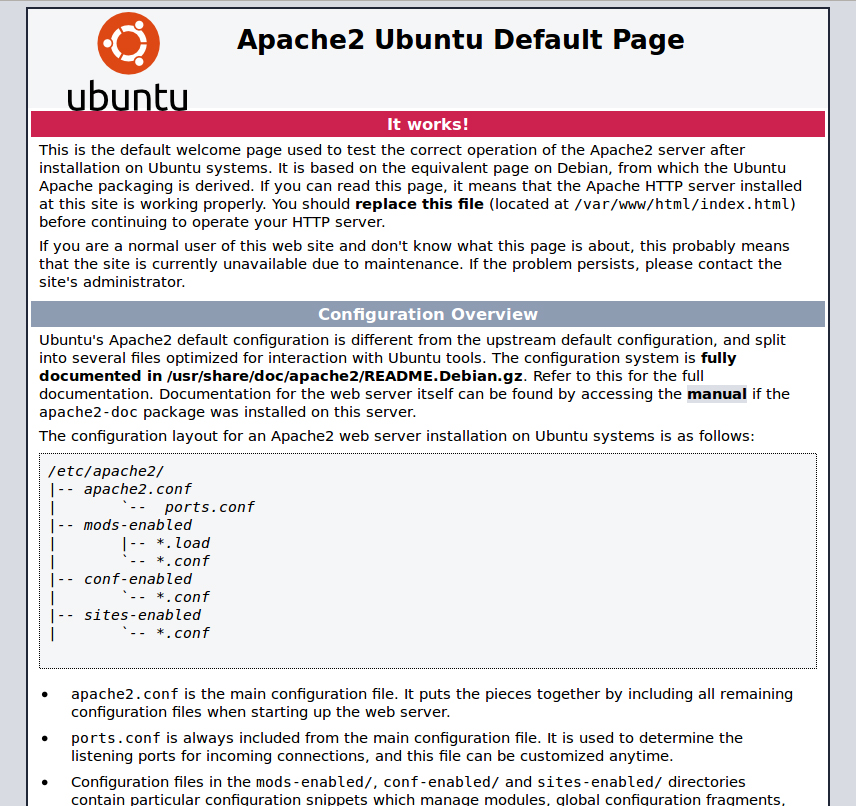
You can verify that Apache is really running by opening your favorite web browser and entering the URL http://your-server’s-address, if it is installed, then you will see this:
Step 3. Installing MariaDB on Ubuntu 17.10.
Now that we have our web server up and running, it is time to install MariaDB. MariaDB is a database management system. Basically, it will organize and provide access to databases where our site can store information:
apt-get install mariadb-server mariadb-client
Once complete, you can verify MariaDB is installed by running the below command:
systemctl status mariadb
systemctl enable mariadb
systemctl start mariadb
By default, MariaDB is not hardened. You can secure MariaDB using the mysql_secure_installation script. you should read and below each steps carefully which will set root password, remove anonymous users, disallow remote root login, and remove the test database and access to secure MariaDB:
mysql_secure_installation
Configure it like this:
- Set root password? [Y/n] y
- Remove anonymous users? [Y/n] y
- Disallow root login remotely? [Y/n] y
- Remove test database and access to it? [Y/n] y
- Reload privilege tables now? [Y/n] y
To log into MariaDB, use the following command (note that it’s the same command you would use to log into a MySQL database):
mysql -u root -p
Step 4. Installing PHP 7.1 on Ubuntu 17.10.
At the the time of this writing, PHP7.1 is the latest stable version of PHP and has a minor performance edge over PHP7.0. Enter the following command to install PHP7.1:
apt-get install php7.1 libapache2-mod-php7.1 php7.1-mysql php-common php7.1-cli php7.1-common php7.1-json php7.1-opcache php7.1-readline
Enable the Apache php7.1 module then restart Apache web server:
a2enmod php7.1
systemctl restart apache2
Check PHP version:
### php --version
PHP 7.1.8-1ubuntu1 (cli) (built: Aug 18 2017 15:46:93) ( NTS )
Copyright (c) 1997-2017 The PHP Group
Zend Engine v3.1.0, Copyright (c) 1998-2017 Zend Technologies
 with Zend OPcache v7.1.8-1ubuntu1, Copyright (c) 1999-2017, by Zend Technologies
To test PHP, create a test file named info.php with he content below. Save the file, then browse to it to see if PHP is working:
nano /var/www/html/info.php
In this file, paste the following code:
<?php phpinfo(); ?>
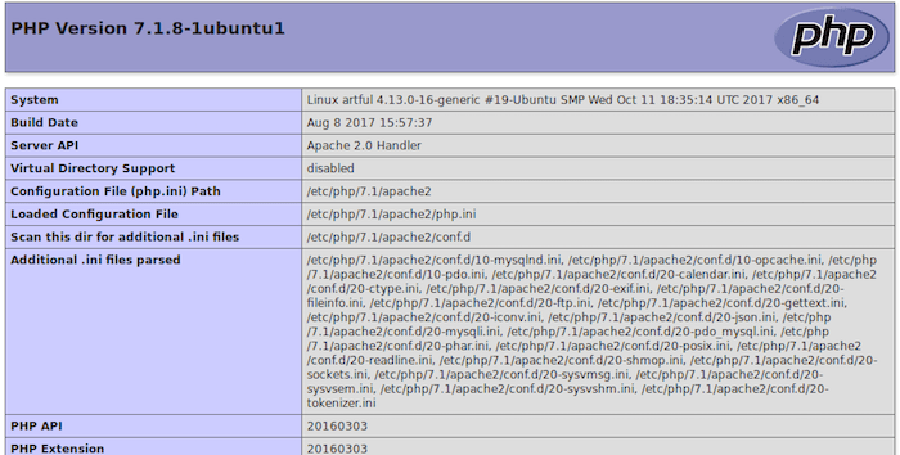
Try to access it at http://your_server_ip/info.php . If the PHP info page is rendered in your browser then everything looks good and you are ready to proceed further.
ongratulation’s! You have successfully installed LAMP stack. Thanks for using this tutorial for installing LAMP (Linux Apache, MySQL and PHP) in Ubuntu 17.10 (Artful Aardvark) system. For additional help or useful information, we recommend you to check the official Apache, MySQL and PHP web site.
How To Install MySQL Server on Ubuntu 17.04
MySQL is a relational database management system (RDBMS) that runs as a server providing multi-user access to a number of databases. The MySQL source code is freely available because it was originally developed as freeware. MySQL is written in C and C++ and is compatible with all major operating systems. MySQL can be used for a variety of applications, but is most commonly found on web servers.
This article assumes you have at least basic knowledge of Linux, know how to use the shell, and most importantly, you host your site on your own VPS. The installation is quite simple and assumes you are running in the root account, if not you may need to add ‘sudo’ to the commands to get root privileges. I will show you through the step by step installation MySQL Server on a Ubuntu 17.04 Zesty Zapus server.
Install MySQL Server on Ubuntu 17.04 Zesty Zapus
Step 1. First make sure that all your system packages are up-to-date
sudo apt-get update
sudo apt-get upgrade
Step 2. Installing MySQL.
Run the commands below to install MySQL:
apt-get install mysql-server mysql-client
Once complete, you can verify MySQL is installed by running the below command:
systemctl status mysql
systemctl start mysql
systemctl status mysql
After the installation of MySQL is complete, you may need to secure your new MySQL. By default, MySQL is not hardened. You can secure MySQL using the mysql_secure_installation script. you should read and below each steps carefully which will set root password, remove anonymous users, disallow remote root login, and remove the test database and access to secure MySQL:
mysql_secure_installation
Configure it like this:
- Set root password? [Y/n] y
- Remove anonymous users? [Y/n] y
- Disallow root login remotely? [Y/n] y
- Remove test database and access to it? [Y/n] y
- Reload privilege tables now? [Y/n] y
To log into MySQL, use the following command (note that it’s the same command you would use to log into a MySQL database):
mysql -u root -p
One of the most important things when running MySQL on a production server is to get the most out of its performances. If you are a beginner and you do not know how to tune your MySQL server, you can start with a program called MySQLTuner. It will help you to analyze your server and to tune MySQL for better overall performances.
Congratulation’s! You have successfully installed MySQL. Thanks for using this tutorial for installing MySQL Server in Ubuntu 17.04 Zesty Zapus system. For additional help or useful information, we recommend you to check the official MySQL web site.
How To Install Redmine on Ubuntu 16.04 LTS
Redmine is a project management web app that allows users to manage projects flexibly while offering robust monitoring tools and a broad library of plug-ins. This free and open source solution offers a substitute for paid job management tools and contains support for wikis, forums, calendars, and information visualization programs.
This article assumes you have at least basic knowledge of linux, know how to use the shell, and most importantly, you host your site on your own VPS. The installation is quite simple and assumes you are running in the root account, if not you may need to add ‘sudo’ to the commands to get root privileges. I will show you through the step by step installation Redmine project management web app on a Ubuntu 16.04 (Xenial Xerus) server.
Install Redmine on Ubuntu 16.04 LTS
Step 1. First make sure that all your system packages are up-to-date by running these following apt-get commands in the terminal.
sudo apt-get update
sudo apt-get upgrade
Step 2. Installing MySQL server.
MySQL needs to be configured so that Redmine can store data, so we will install MySQL server:
apt-get install mysql-server mysql-client
By default, MySQL is not hardened. You can secure MySQL using the mysql_secure_installation script. You should read and below each steps carefully which will set root password, remove anonymous users, disallow remote root login, and remove the test database and access to secure MySQL.
mysql_secure_installation
Configure it like this:
- Set root password? [Y/n] y
- Remove anonymous users? [Y/n] y
- Disallow root login remotely? [Y/n] y
- Remove test database and access to it? [Y/n] y
- Reload privilege tables now? [Y/n] y
Next we will need to log in to the MySQL console and create a database for the Redmine. Run the following command:
mysql -u root -p
This will prompt you for a password, so enter your MySQL root password and hit Enter. Once you are logged in to your database server you need to create a database for Redmine installation:
CREATE DATABASE redmin
GRANT ALL PRIVILEGES ON redmine.* TO 'redmine'@'localhost' IDENTIFIED BY 'PASSWORD';
FLUSH PRIVILEGES;
\q
Step 3. Installing Ruby and Ruby Version Manager (RVM).
Install the latest version of Ruby with the following command:
gpg --keyserver hkp://keys.gnupg.net --recv-keys D39DC0E3
curl -L https://get.rvm.io | bash -s stable --ruby=2.4.1
Run the following commands to load RVM:
source /usr/local/rvm/scripts/rvm
echo '[[ -s "/usr/local/rvm/scripts/rvm" ]] && source "/usr/local/rvm/scripts/rvm"' >> ~/.bashrc
Step 4. Installing Passenger and Nginx.
Passenger is an application server that runs your web application then communicates with the web server. We will install it and integrate it with Nginx:
gem install passenger --no-ri --no-rdoc
passenger-install-nginx-module
You will be prompted to select a language that will be supported, select Ruby. On the next step select the ‘Yes: download, compile and install Nginx for me. (recommended)’ option.
Next, open the Nginx configuration file:
nano /opt/nginx/conf/nginx.conf
Add following content:
server {
 listen 80;
 server_name yourdomain.com;

root /var/www/html/redmine/public;
 passenger_enabled on;
 client_max_body_size 10m; # Max attachemnt size

# redirect server error pages to the static page /50x.html
 #
 error_page 500 502 503 504 /50x.html;
 location = /50x.html {
 root html;
 }
 }
Restart the web server for the changes to take effect:
systemctl restart nginx
systemctl enable nginx
Step 5. Installing Redmine.
First, download the latest version of Redmine, at the moment of writing this article it is version 3.4:
cd /var/www/html
svn co http://svn.redmine.org/redmine/branches/3.4-stable redmine
Next, change the current working directory and the example configuration files:
cd redmine
cp config/configuration.yml.example config/configuration.yml
cp config/database.yml.example config/database.yml
Make the following changes to the database.yml file:
nano config/database.yml
Add following content:
production:
 adapter: mysql2
 database: redmine
 host: localhost
 username: redmine
 password: PASSWORD
 encoding: utf8
Install the Ruby dependencies and migrate the database:
gem install bundler --no-ri --no-rdoc
bundle install
bundle exec rake db:migrate
bundle exec rake redmine:plugins
Generate the secret token using the following command:
bundle exec rake generate_secret_token
RAILS_ENV=production bundle exec rake db:migrate
RAILS_ENV=production bundle exec rake redmine:load_default_data
Finally, Restart the web server for the changes to take effect:
systemctl restart nginx
Step 6. Accessing Redmine.
Redmine will be available on HTTP port 80 by default. Open your favorite browser and navigate to http://mydomain.com and complete the required the steps to finish the installation using the default credentials (admin/admin). If you are using a firewall, please open port 80 to enable access to the control panel.
Congratulation’s! You have successfully installed Redmine. Thanks for using this tutorial for installing Redmine project management web app on Ubuntu 16.04 LTS (Xenial Xerus) system. For additional help or useful information, we recommend you to check the official Redmine web site.


