How To Install HHVM on Ubuntu 16.04 LTS

Install HHVM on Ubuntu

HipHop Virtual Machine (HHVM) is a virtual machine developed and open sourced by Facebook to process and execute programs and scripts written in PHP. Facebook developed HHVM because the regular Zend+Apache combination isn’t as efficient to serve large applications built in PHP.

This article assumes you have at least basic knowledge of linux, know how to use the shell, and most importantly, you host your site on your own VPS. The installation is quite simple and assumes you are running in the root account, if not you may need to add ‘sudo’ to the commands to get root privileges. I will show you through the step by step installation HHVM (HipHop Virtual Machine) on a Ubuntu 16.04 (Xenial Xerus) server.
Install HHVM on Ubuntu 16.04 LTS

Step 1. First make sure that all your system packages are up-to-date by running these following apt-get commands in the terminal.

sudo apt-get update
sudo apt-get upgrade

Step 2. Installing HHVM.

First we need to add the HHVM repository to your Ubuntu Server with the following command:

apt-get install software-properties-common
apt-key adv --recv-keys --keyserver hkp://keyserver.ubuntu.com:80 0x5a16e7281be7a449
add-apt-repository "deb http://dl.hhvm.com/ubuntu $(lsb_release -sc) main"

Now we can install HHVM with the following command:

apt-get update
apt-get install -y hhvm

HHVM should have been successfully installed, to make sure run the following command:

$ php -v

HipHop VM 3.15.0 (rel)
Compiler: tags/HHVM-3.15.0-0-g92a682ebaa3c85b84857852d8621f528607fe27d
Repo schema: 225d4323575bbc8a498dc809a1c41354f6bca83

HHVM includes an excellent script to install FastCGI based on web server you have installed. This section will help you configure HHVM in the FastCGI mode with the Apache and Nginx servers:

With Apache

Configuring HHVM to work in the FastCGI mode with Apache is extremely simple. All you need to do is execute the following following script:

sudo /usr/share/hhvm/install_fastcgi.sh

With Nginx

If you are using Nginx with PHP-FPM, you’ll have to modify the configuration file to disable the use of PHP-FPM. This file is normally located at /etc/nginx/sites-available/default.Look for the following section and make sure it’s all commented (by adding a # at the beginning of each line):

# pass the PHP scripts to FastCGI server listening on 127.0.0.1:9000
#
# location ~ \.php$ {
# fastcgi_split_path_info ^(.+\.php)(/.+)$;
# # NOTE: You should have "cgi.fix_pathinfo = 0;" in php.ini
#
# # With php5-cgi alone:
# fastcgi_pass 127.0.0.1:9000;
# # With php5-fpm:
# fastcgi_pass unix:/var/run/php5-fpm.sock;
# fastcgi_index index.php;
# include fastcgi_params;
#}

After doing this, execute the following script:

sudo /usr/share/hhvm/install_fastcgi.sh

Finally, run the commands below to start up HHVM:

systemctl start hhvm

Step 3. Testing HHVM.

To test HHVM, create a test page in the root directory and type these lines in the file and save it:

nano /var/www/html/hhvminfo.php

Then add the following code to your new file:

<? php phpinfo(); ?>

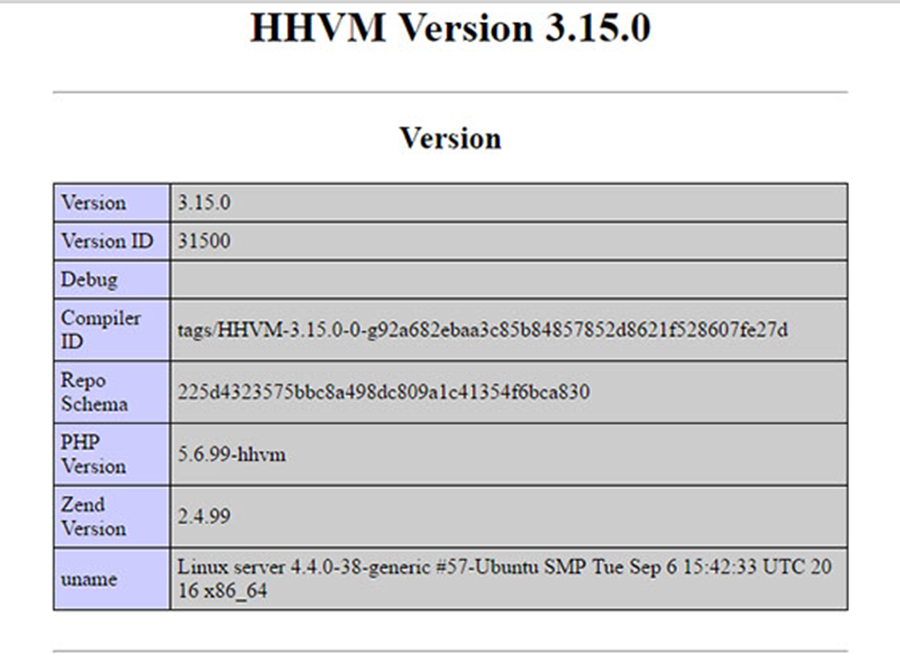
Try to access it at http://your_server_ip/hhvminfo.php. If the PHP info page is rendered in your browser then everything looks good and you are ready to proceed further.
Install-HHVM-on-Ubuntu-16.04
Congratulation’s! You have successfully installed HHVM. Thanks for using this tutorial for installing HHVM (HipHop Virtual Machine) on your Ubuntu 16.04 LTS (Xenial Xerus) system. For additional help or useful information, we recommend you to check the official HipHop Virtual Machine web site.

How To Install Magento on Ubuntu 16.04 LTS

Install Magento on Ubuntu

Magento is one of the worlds most widely used applications for managing E-Commerce sites. Magento is fully customizable to meet the users requirements and allowing them to create and launch a fully functional online store in minutes. Magento employs the MySQL relational database management system, the PHP programming language, and elements of the Zend Framework.

Marry content with commerce to customer demands for flawless brand interactions. Magento Commerce features are ever evolving with the consumer in mind. Own your customer experience, craft personalized content and promotions, and deliver a smooth path to purchase. Page Builder is a simple drag and drop solution to eCommerce website builders.

Page Builder
Customer Segmentation & Personalization
Content Staging & Preview
Instant Purchase
Merchandising

Install Magento on Ubuntu 16.04 LTS

This article assumes you have at least basic knowledge of linux, know how to use the shell, and most importantly, you host your site on your own VPS. The installation is quite simple and assumes you are running in the root account, if not you may need to add ‘sudo’ to the commands to get root privileges. I will show you through the step by step installation Magento on a Ubuntu 16.04 (Xenial Xerus) server.

Step 1. First make sure that all your system packages are up-to-date by running these following apt-get commands in the terminal.

sudo apt-get update
sudo apt-get upgrade

Step 2. Install LAMP (Linux, Apache, MariaDB, PHP) server.

A Ubuntu 16.04 LAMP server is required. If you do not have LAMP installed, you can follow our guide here. Also install all required PHP modules:

apt-get install imagemagick php7.0-curl php7.0-gd php7.0-mbstring php7.0-mysql libapache2-mod-php7.0 php7.0-mcrypt

Step 3. Installing Magento.

First thing to do is to go to Magento’s download page and download the latest stable version of Magento, At the moment of writing this article it is version 2.1.2:

wget http://www.magentocommerce.com/downloads/assets/2.1.2/magento-2.1.2.zip

Unpack the Magento archive to the document root directory on your server:

unzip magento*.zip
cp -rf magento/* /var/www/html/

We will need to change some folders permissions:

chown -R www-data:www-data /var/www/html/
chmod -R 755 /var/www/html

Step 4. Configuring MariaDB for Magento.

By default, MariaDB is not hardened. You can secure MariaDB using the mysql_secure_installation script. you should read and below each steps carefully which will set root password, remove anonymous users, disallow remote root login, and remove the test database and access to secure MariaDB:

mysql_secure_installation

Configure it like this:

- Set root password? [Y/n] y
- Remove anonymous users? [Y/n] y
- Disallow root login remotely? [Y/n] y
- Remove test database and access to it? [Y/n] y
- Reload privilege tables now? [Y/n] y

Next we will need to log in to the MariaDB console and create a database for the Magento. Run the following command:

mysql -u root -p

This will prompt you for a password, so enter your MariaDB root password and hit Enter. Once you are logged in to your database server you need to create a database for Magento installation:

CREATE DATABASE magentodb;
GRANT ALL PRIVILEGES ON magentodb . * TO magento@'localhost' IDENTIFIED BY 'PASSWORD' WITH GRANT OPTION;
flush privileges;
exit

Step 5. Configuring Apache web server for Magento.

Create a new virtual host directive in Apache. For example, create a new Apache configuration file named ‘magento.conf’ on your virtual server:

touch /etc/apache2/sites-available/magento.conf
ln -s /etc/apache2/sites-available/magento.conf /etc/apache2/sites-enabled/magento.conf
nano /etc/apache2/sites-available/magento.conf

Add the following lines:

ServerAdmin [email protected]
DocumentRoot /var/www/html/
ServerName your-domain.com
ServerAlias www.your-domain.com

Options FollowSymLinks
AllowOverride All

ErrorLog /var/log/apache2/your-domain.com-error_log
CustomLog /var/log/apache2/your-domain.com-access_log common

Save and close the file. Restart the apache service for the changes to take effects:

systemctl restart apache2

Step 6. Configure PHP for Magento.

Now here we should allow Magento to use enough PHP memory (it is recommended that PHP should be allowed 512 MB of RAM). To do that, run the commands below to open the configuration file:

nano /etc/php5/apache2/php.ini

Search for the line ‘memory_limit‘ in the file:

memory_limit = 128M
### And change the value to 512 ###
memory_limit = 512M

Restart Apache for the changes to take effect using the following command:

systemctl restart apache2

Step 7. Accessing Magento.

Magento will be available on HTTP port 80 by default. Open your favorite browser and navigate to http://yourdomain.com/ or http://server-ip and complete the required the steps to finish the installation. If you are using a firewall, please open port 80 to enable access to the control panel.

Congratulation’s! You have successfully installed Magento. Thanks for using this tutorial for installing Magento eCommerce in Ubuntu 16.04 LTS system. For additional help or useful information, we recommend you to check the official Magento web site.

You Might Also Like: How To Install OpenCart on Ubuntu 16.04

How To Install Memcached on Ubuntu 16.04 LTS

Install Memcached on Ubuntu 16

Free & open source, high-performance, distributed memory object caching system, generic in nature, but intended for use in speeding up dynamic web applications by alleviating database load.

Memcached is an in-memory key-value store for small chunks of arbitrary data (strings, objects) from results of database calls, API calls, or page rendering.

Memcached is simple yet powerful. Its simple design promotes quick deployment, ease of development, and solves many problems facing large data caches. Its API is available for most popular languages.

install memcached on ubuntu 16 example

Install Memcached on Ubuntu 16.04 LTS

This article assumes you have at least basic knowledge of linux, know how to use the shell, and most importantly, you host your site on your own VPS. The installation is quite simple and assumes you are running in the root account, if not you may need to add ‘sudo’ to the commands to get root privileges. I will show you through the step by step installation Memcached on a Ubuntu 16.04 (Xenial Xerus) server.

Step 1. First make sure that all your system packages are up-to-date by running these following apt-get commands in the terminal.

sudo apt-get update
sudo apt-get upgrade

Step 2. Installing Memcached.

Now use following command to install memcached service on your system:

sudo apt-get -y install memcached

Step 3. Configuration Memcached.

The default configuration file can be found at:

nano /etc/memcached.conf

When started, Memcached will start on port 11211 by default per the default configuration file:

# Default connection port is 11211
-p 11211

Exit and save the configuration file, and then restart Memcached:

systemctl restart memcached

Install Memcached extension for PHP

You will also need to install required php extension for memcached:

apt-get install php-memcached

Now, we can restart Apache so that the changes take place:

systemctl restart apache2

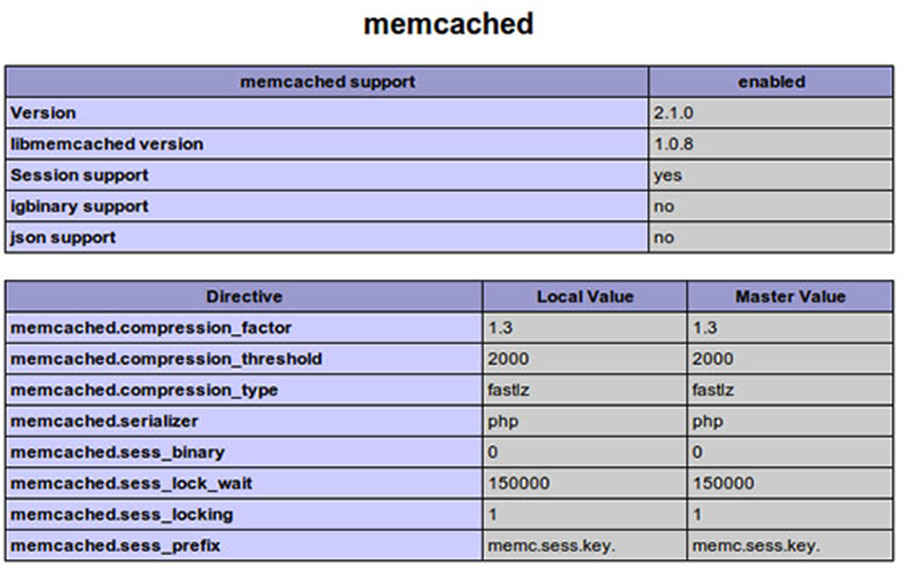
To test PHP, create a test file named info.php with he content below. Save the file, then browse to it to see if PHP is working:

nano /var/www/html/info.php
<!--?php phpinfo(); ?-->

Try to access it at http://your_server_ip/info.php . If the PHP info page is rendered in your browser then everything looks good and you are ready to proceed further.

memcached-php_info
Congratulation’s! You have successfully installed Memcached. Thanks for using this tutorial for installing Memcached on Ubuntu 16.04 LTS (Xenial Xerus) system. For additional help or useful information, we recommend you to check the official Memcached web site.

How To Install LimeSurvey on Ubuntu 16.04 LTS

Install LimeSurvey on Ubuntu 16

LimeSurvey (formerly PHPSurveyor) is an open source online survey application. It has been widely used by many big industries to create the survey tasks. It has many powerful features like creating dynamic fields for survey. Supports multilingual, defines userroles, user groups and the more it has been integrated into various CMS. The limesurvey team provides the commercial for those who are seeking.As well as community support for its users.

This article assumes you have at least basic knowledge of linux, know how to use the shell, and most importantly, you host your site on your own VPS. The installation is quite simple and assumes you are running in the root account, if not you may need to add ‘sudo’ to the commands to get root privileges. I will show you through the step by step installation LimeSurvey on a Ubuntu 16.04 (Xenial Xerus) server.
Install LimeSurvey on Ubuntu 16.04 LTS

Step 1. First make sure that all your system packages are up-to-date by running these following apt-get commands in the terminal.

sudo apt-get update
sudo apt-get upgrade

Step 2. Install LAMP (Linux, Apache, MariaDB, PHP) server.

A Ubuntu 16.04 LAMP server is required. If you do not have LAMP installed, you can follow our guide here. Also install all required PHP modules:

apt-get install php7.0-curl php7.0-gd php7.0-mbstring php7.0-mysql libapache2-mod-php7.0 php7.0-mcrypt php7.0-zip

Step 3. Installing LimeSurvey.

Download the latest stable version of LimeSurvey, At the moment of writing this article it is version 2.64.1:

wget https://www.limesurvey.org/stable-release?download=2015:limesurvey2641%20170310zip
unzip "stable-release?download=2015:limesurvey2641 170310zip"
mv limesurvey/ /var/www/html/limesurvey/

We will need to change some folders permissions:

chown www-data:www-data -R /var/www/html/limesurvey

Step 4. Configuring MariaDB.

By default, MariaDB is not hardened. You can secure MariaDB using the mysql_secure_installation script. You should read and below each steps carefully which will set root password, remove anonymous users, disallow remote root login, and remove the test database and access to secure MariaDB.

mysql_secure_installation

Configure it like this:

- Set root password? [Y/n] y
- Remove anonymous users? [Y/n] y
- Disallow root login remotely? [Y/n] y
- Remove test database and access to it? [Y/n] y
- Reload privilege tables now? [Y/n] y

Next we will need to log in to the MariaDB console and create a database for the LimeSurvey. Run the following command:

mysql -u root -p

This will prompt you for a password, so enter your MariaDB root password and hit Enter. Once you are logged in to your database server you need to create a database for LimeSurvey installation:

CREATE DATABASE limesurvey;
GRANT ALL PRIVILEGES ON limesurvey.* TO 'limeuser'@'localhost' IDENTIFIED BY 'your-password';
FLUSH PRIVILEGES;
\q

Step 5. Configuring Apache web server for LimeSurvey.

Create a new virtual host directive in Apache. For example, create a new Apache configuration file named ‘limesurvey.conf’ on your virtual server:

touch /etc/apache2/sites-available/limesurvey.conf
ln -s /etc/apache2/sites-available/limesurvey.conf /etc/apache2/sites-enabled/limesurvey.conf
nano /etc/apache2/sites-available/limesurvey.conf

Add the following lines:


ServerAdmin [email protected]
DocumentRoot /var/www/html/limesurvey/
ServerName your-domain.com
ServerAlias www.your-domain.com

Options FollowSymLinks
AllowOverride All

ErrorLog /var/log/apache2/your-domain.com-error_log
CustomLog /var/log/apache2/your-domain.com-access_log common

Now, we can restart Apache web server so that the changes take place:

systemctl restart apache2.service

Step 6. Accessing LimeSurvey.

LimeSurvey will be available on HTTP port 80 by default. Open your favorite browser and navigate to http://yourdomain.com/admin or http://server-ip/admin and complete the required the steps to finish the installation. If you are using a firewall, please open port 80 to enable access to the control panel.

Congratulation’s! You have successfully installed LimeSurvey. Thanks for using this tutorial for installing LimeSurvey leading free online survey app on Ubuntu 16.04 LTS (Xenial Xerus) system. For additional help or useful information, we recommend you to check the official LimeSurvey web site.

How To Install Cherokee Web Server on Ubuntu 16.04 LTS

Install Cherokee Web Server on Ubuntu 16

Cherokee is an free and open source high-performance web server. It is very fast, flexible and easy to configure. It offers support for the widespread technologies nowadays: FastCGI, SCGI, PHP, CGI, SSI, TLS and SSL encrypted connections, Virtual hosts, Authentication, on the fly encoding, Load Balancing, Apache compatible log files, Data Base Balancer, downtime-free updates and upgrades, Reverse HTTP Proxy, and much more.

This article assumes you have at least basic knowledge of linux, know how to use the shell, and most importantly, you host your site on your own VPS. The installation is quite simple and assumes you are running in the root account, if not you may need to add ‘sudo’ to the commands to get root privileges. I will show you through the step by step installation Cherokee Web Server on a Ubuntu 16.04 (Xenial Xerus) server.

Install Cherokee Web Server on Ubuntu 16.04 LTS

Step 1. First make sure that all your system packages are up-to-date by running these following apt-get commands in the terminal.

sudo apt-get update
sudo apt-get upgrade

Step 2. Enable Cherokee PPA (Personal Package Archive) repository.

add-apt-repository ppa:cherokee-webserver
apt-get update

Step 3.Installing Cherokee Web Server.

Install Cherokee Web Server using apt-get, Enter the following command to install the Cherokee web server including Module SSL:

sudo apt-get install cherokee cherokee-doc libcherokee-mod-libssl libcherokee-mod-streaming libcherokee-mod-rrd

Start Cherokee service daemon.

systemctl start cherokee
systemctl enable cherokee

Step 4. Configuring Cherokee.

The best part about using Cherokee Web Server is being able to manage all of its configurations through a simple to use web interface. It can be started through the cherokee-admin command.

sudo cherokee-admin

By default, cherokee-admin can only accessed from localhost. If you need to access the admin for other network address using the parameter ‘-b’. If you doesn’t mention any ip address, it will automatically listen to all network interfaces. Then you can connect to cherokee-admin from other network address.

sudo cherokee-admin -b

Access cherokee admin from specific network address:

sudo cherokee-admin -b 192.169.1.2
#sudo cherokee-admin -b

Cherokee Web Server 1.2.103 (Dec 059 2014): Listening on port 127.0.0.1:9090,
TLS disabled, IPv6 enabled, using epoll, 4096 fds system limit, max. 2041
connections, caching I/O, 2 threads, 1020 connections per thread, standard
scheduling policy

Login:
 User: admin
 One-time Password: wpcademyEMfQRznWWa6h

Web Interface:
 URL: http://127.0.0.1:9090/

Important: The password is for one time use only. If you need to login again, you should use the same command for generating it.

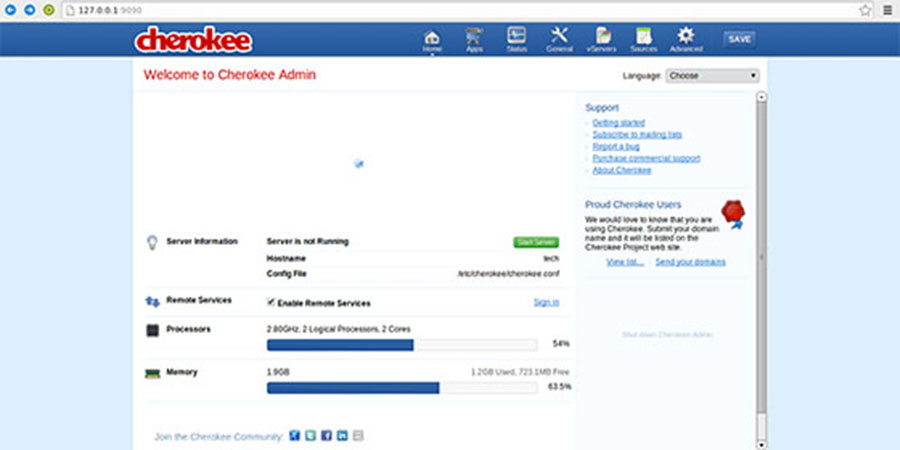
Step 5. Now access Cherokee-Admin by navigating your browser to http://127.0.0.1:9090. Type user name and password for accessing it.
cherokee-admin-panel

Congratulation’s! You have successfully installed Cherokee Web Server. Thanks for using this tutorial for installing Cherokee Web Server on Ubuntu 16.04 LTS (Xenial Xerus) system. For additional help or useful information, we recommend you to check the official Cheroke web site.

How To Install Seafile on Ubuntu 16.04 LTS

Install Seafile on Ubuntu 16

Seafile is a open source cloud storage software. It offers file sharing and syncing for individual users and groups, it provides client side encryption and easy access from mobile devices. Also easily integrated with local services such as LDAP and WebDAV or can be deployed using advanced network services and databases like MySQL, SQLite, PostgreSQL, Memcached, Nginx or Apache Web Server.

This article assumes you have at least basic knowledge of linux, know how to use the shell, and most importantly, you host your site on your own VPS. The installation is quite simple and assumes you are running in the root account, if not you may need to add ‘sudo’ to the commands to get root privileges. I will show you through the step by step installation Seafile open source secure cloud storage on a Ubuntu 16.04 (Xenial Xerus) server.
Install Seafile on Ubuntu 16.04 LTS Xenial Xerus

Step 1. First make sure that all your system packages are up-to-date by running these following apt-get commands in the terminal.

sudo apt-get update
sudo apt-get upgrade

Step 2. Install LEMP (Linux, Nginx, MariaDB, PHP) server.

A Ubuntu 16.04 LAMP server is required. If you do not have LEMP installed, you can follow our guide here. Also install all required PHP modules:

apt-get install php7.0-curl php7.0-gd php7.0-mbstring php7.0-mysql libapache2-mod-php7.0 php7.0-mcrypt php7.0-zip

Installing Python modules:

apt-get install python2.7 libpython2.7 python-setuptools python-imaging python-ldap python-mysqldb python-memcache python-urllib3

Step 3. Configure the MariaDB database for Seafile.

By default, MariaDB is not hardened. You can secure MariaDB using the mysql_secure_installation script. You should read and below each steps carefully which will set root password, remove anonymous users, disallow remote root login, and remove the test database and access to secure MariaDB.

mysql_secure_installation

Configure it like this:

- Set root password? [Y/n] y
- Remove anonymous users? [Y/n] y
- Disallow root login remotely? [Y/n] y
- Remove test database and access to it? [Y/n] y
- Reload privilege tables now? [Y/n] y

Next we will need to log in to the MariaDB console and create a database for the Seafile. Run the following command:

mysql -u root -p

This will prompt you for a password, so enter your MariaDB root password and hit Enter. Once you are logged in to your database server you need to create a database for Seafile installation:

MariaDB [(none)]> create database ccnet_db character set = 'utf8'; MariaDB [(none)]> create database seafile_db character set = 'utf8'; MariaDB [(none)]> create database seahub_db character set = 'utf8';
MariaDB [(none)]> create user seacloud@localhost identified by 'password';
MariaDB [(none)]> grant all privileges on ccnet_db.* to seacloud@localhost identified by 'password'; MariaDB [(none)]> grant all privileges on seafile_db.* to seacloud@localhost identified by 'password'; MariaDB [(none)]> grant all privileges on seahub_db.* to seacloud@localhost identified by 'password';
MariaDB [(none)]> flush privileges; MariaDB [(none)]> exit

Step 4. Installing Seafile on Server.

You need to download the last stable release of Seafile:

wget https://bintray.com/artifact/download/seafile-org/seafile/seafile-server_6.0.6_x86-64.tar.gz

Extract the tarball into the current directory:

tar -xvzf seafile-server_6.0.6_x86-64.tar.gz
mv seafile-server_6.0.6 seafile-server

Install Seafile:

Run this script which will create the required databases and directories for the Seafile server and and answer all questions using the following configuration options, after the script verifies the existence of all Python required modules:

./setup-seafile-mysql.sh

After Seafile server successfully installs, it will generate some useful information such as what ports needs to be open on your Firewall to allow external connection and what scripts to handle in order to start the server.

Step 5. Starting the Seafile services.

Create startup script for the Seafile server like this:

nano /lib/systemd/system/seafile.service

Add the following lines:

[Unit]
Description=Seafile Server
After=network.target mariadb.service[Service]
Type=oneshot
ExecStart=/home/seafile/seafile-server/seafile.sh start
ExecStop=/home/seafile/seafile-server/seafile.sh stop
RemainAfterExit=yes
User=seafile
Group=seafile[Install]
WantedBy=multi-user.target

Save the file and create a new service file for seahub:

[Unit]
Description=Seafile Hub
After=network.target seafile.target[Service]
Type=oneshot
ExecStart=/home/seafile/seafile-server/seahub.sh start-fastcgi
ExecStop=/home/seafile/seafile-server/seahub.sh stop
RemainAfterExit=yes
User=seafile
Group=seafile[Install]
WantedBy=multi-user.target

Now try using the service and command to start a new Seafile server instance:

systemctl daemon-reload 
systemctl start seafile
systemctl start seahub

Step 6. Configuring Nginx web server for Seafile.

*Note: A static IP address 192.168.77.21 configure on your server.

First, create a new virtual host file with name seafile.conf:

nano /etc/nginx/sites-available/seafile.conf

Add the following lines:

server {
    listen 80;
    server_name 192.168.77.21;proxy_set_header X-Forwarded-For $remote_addr;# Reverse proxy for seafile
    location / {
        fastcgi_pass    127.0.0.1:8000;
        fastcgi_param   SCRIPT_FILENAME     $document_root$fastcgi_script_name;
        fastcgi_param   PATH_INFO           $fastcgi_script_name;fastcgi_param    SERVER_PROTOCOL        $server_protocol;
        fastcgi_param   QUERY_STRING        $query_string;
        fastcgi_param   REQUEST_METHOD      $request_method;
        fastcgi_param   CONTENT_TYPE        $content_type;
        fastcgi_param   CONTENT_LENGTH      $content_length;
        fastcgi_param   SERVER_ADDR         $server_addr;
        fastcgi_param   SERVER_PORT         $server_port;
        fastcgi_param   SERVER_NAME         $server_name;
        fastcgi_param   REMOTE_ADDR         $remote_addr;access_log      /var/log/nginx/seahub.access.log;
        error_log       /var/log/nginx/seahub.error.log;
        fastcgi_read_timeout 36000;
    }# Reverse Proxy for seahub
    location /seafhttp {
        rewrite ^/seafhttp(.*)$ $1 break;
        proxy_pass http://127.0.0.1:8082;
        client_max_body_size 0;
        proxy_connect_timeout  36000s;
        proxy_read_timeout  36000s;
        proxy_send_timeout  36000s;
        send_timeout  36000s;
    }#CHANGE THIS PATH WITH YOUR OWN DIRECTORY
    location /media {
        root /home/seafile/seafile-server/seahub;
    }
}

Save the file and restart nginx:

systemctl restart nginx

Step 7. Accessing Seafile.

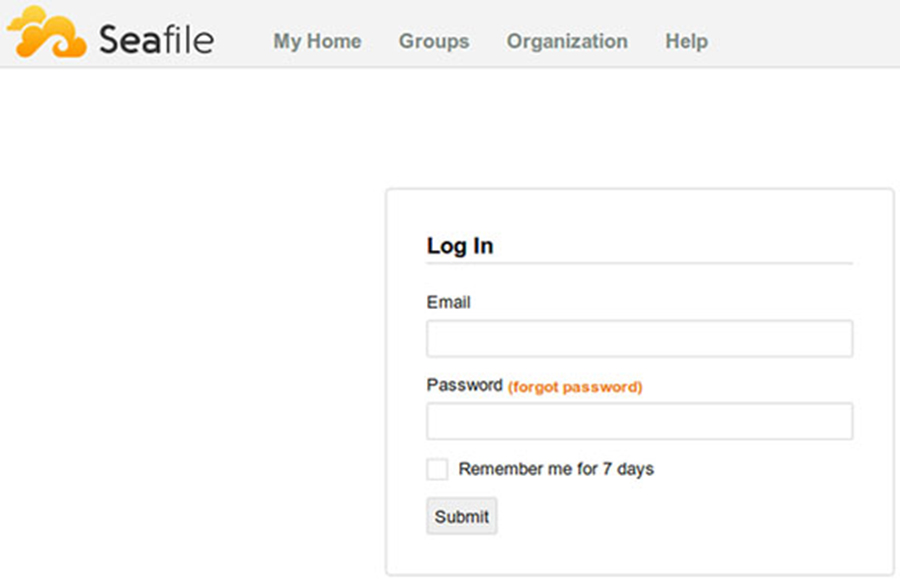
Seafile cloud storage will be available on HTTP port 80 by default. Open your favorite browser and navigate to http://yourdomain.com or http://192.168.77.21. Enter the admin email id and password to login which you have created at the time of installation. If you are using a firewall, please open port 8000 to enable access to the control panel.

seafile-web-interface-login

Congratulation’s! You have successfully installed Seafile. Thanks for using this tutorial for installing Seafile open source secure cloud storage on Ubuntu 16.04 LTS (Xenial Xerus) system. For additional help or useful information, we recommend you to check the official Seafile web site.

How To Install LAMP Stack on Ubuntu 17.04

Install LAMP Stack on Ubuntu 17

LAMP represents a full featured stack containing the most popular web server known as Apache, the most popular database server MySQL and the most popular open-source web programming language known as PHP. All components are free and open-source software, and the combination is suitable for building dynamic web pages.

This article assumes you have at least basic knowledge of linux, know how to use the shell, and most importantly, you host your site on your own VPS. The installation is quite simple. I will show you through the step by step installation LAMP (Linux Apache, MySQL and PHP) on Ubuntu 17.04 Zesty Zapus server.
Install LAMP Stack on Ubuntu 17.04

Step 1. First make sure that all your system packages are up-to-date by running these following apt-get commands in the terminal.

apt-get update
apt-get upgrade

Step 2. Installing Apache on Ubuntu 17.04.

We will be installing Apache with apt-get, which is the default package manager for ubuntu. Your also required to install libapache2-mod-php module to work PHP with Apache2:

apt-get install apache2 libapache2-mod-php

After installing apache services on your system, start all required services:

systemctl enable apache2
systemctl start apache2
systemctl status apache2

Check Apache version:

apache2 -v

You can verify that Apache is really running by opening your favorite web browser and entering the URL http://your-server’s-address, if it is installed, then you will see this:
apache2-ubuntu-default-page
Step 3. Installing MySQL on Ubuntu 17.04

Now that we have our web server up and running, it is time to install MySQL. MySQL is a database management system. Basically, it will organize and provide access to databases where our site can store information:

apt-get install mysql-server php7.1-mysql

Once complete, you can verify MySQL is installed by running the below command:

systemctl status mysql
systemctl enable mysql
systemctl start mysql

By default, MySQL is not hardened. You can secure MySQL using the mysql_secure_installation script. you should read and below each steps carefully which will set root password, remove anonymous users, disallow remote root login, and remove the test database and access to secure MySQL:

mysql_secure_installation

Configure it like this:

- Set root password? [Y/n] y
- Remove anonymous users? [Y/n] y
- Disallow root login remotely? [Y/n] y
- Remove test database and access to it? [Y/n] y
- Reload privilege tables now? [Y/n] y

To log into MySQL, use the following command (note that it’s the same command you would use to log into a MySQL database):

mysql -u root -p

Step 4. Installing PHP 7 on Ubuntu 17.04

PHP 7.1 is now the default PHP package shipping in Ubuntu LTS 17.04 (Zesty Zapus), Now install PHP 7 with the following command:

sudo apt-get install -y php7.1 php7.1-cgi php7.1-cli php7.1-fpm php7.1-mysql php7.1-mcrypt php7.1-mbstring php7.1-common php7.1-curl php7.1-pgsq

If you like to search all the available PHP 7 modules you can use to command:

sudo apt-cache search php- | less

Your server should restart Apache automatically after the installation of both MySQL and PHP. If it doesn’t, execute this command:

sudo systemctl restart apache2
sudo systemctl restart mysql

To test PHP, create a test file named info.php with he content below. Save the file, then browse to it to see if PHP is working:

nano /var/www/html/info.php

In this file, paste the following code:

<?php phpinfo(); ?>

Try to access it at http://your_server_ip/info.php . If the PHP info page is rendered in your browser then everything looks good and you are ready to proceed further.
install-php7-ubuntu-17.04

Congratulation’s! You have successfully installed LAMP stack. Thanks for using this tutorial for installing LAMP (LinuxApache, MySQLand PHP) in Ubuntu 17.04 (Zesty Zapus) system. For additional help or useful information, we recommend you to check the official Apache, MySQL and PHP web site.