How To Install WebERP on Ubuntu 16.04 LTS

Install WebERP on Ubuntu 16

WebERP is an open source, web based accounting and business management instrument for Small and Medium Enterprises. It supports almost all platforms and is extremely useful as an internet store or a retail management system for business.

This article assumes you have at least basic knowledge of Linux, know how to use the shell, and most importantly, you host your site on your own VPS. The installation is quite simple and assumes you are running in the root account, if not you may need to add ‘sudo’ to the commands to get root privileges. I will show you through the step by step installation WebERP web based accounting and business management system on an Ubuntu 16.04 Xenial Xerus server.

Install WebERP on Ubuntu 16.04 LTS

Step 1. First make sure that all your system packages are up-to-date by running these following apt-get commands in the terminal.

sudo apt-get update
sudo apt-get upgrade

Step 2. Install LAMP (Linux, Apache, MariaDB, PHP) server.

A Ubuntu 16.04 LAMP server is required. If you do not have LAMP installed, you can follow our guide here. Also install all required PHP modules:

apt-get install php7.0-mysql php7.0-curl php7.0-json php7.0-cgi php7.0 libapache2-mod-php7.0 php7.0-mcrypt php7.0-xmlrpc php7.0-gd

Step 3. Installing WebERP on Ubuntu system.

First thing to do is to go to WebERP’s download page and download the latest stable version of WebERP, At the moment of writing this article it is version 4.14.1:

wget https://excellmedia.dl.sourceforge.net/project/web-erp/webERP4.14.1.zip

Unpack the WebERP archive to the document root directory on your server:

unzip webERP4.14.1.zip
cp -r webERP /var/www/html/weberp

We will need to change some folders permissions:

chown -R www-data:www-data /var/www/html/weberp

Step 4. Configuring MariaDB for WebERP.

By default, MariaDB is not hardened. You can secure MariaDB using the mysql_secure_installation script. you should read and below each steps carefully which will set root password, remove anonymous users, disallow remote root login, and remove the test database and access to secure MariaDB:

mysql_secure_installation

Configure it like this:

- Set root password? [Y/n] y
- Remove anonymous users? [Y/n] y
- Disallow root login remotely? [Y/n] y
- Remove test database and access to it? [Y/n] y
- Reload privilege tables now? [Y/n] y

Next we will need to log in to the MariaDB console and create a database for the WebERP. Run the following command:

mysql -u root -p

This will prompt you for a password, so enter your MariaDB root password and hit Enter. Once you are logged in to your database server you need to create a database for WebERP installation:

MariaDB [(none)]>CREATE USER 'weberp_usr'@'localhost' IDENTIFIED BY 'usr_strong_passwd';
MariaDB [(none)]>CREATE DATABASE weberpdb;
MariaDB [(none)]>GRANT ALL PRIVILEGES ON weberpdb.* TO 'weberp_usr'@'localhost';
MariaDB [(none)]>FLUSH PRIVILEGES;
MariaDB [(none)]>EXIT;

Step 5. Configuring Apache web server for WebERP.

Create a new virtual host directive in Apache. For example, create a new Apache configuration file named ‘weberp.conf’ on your virtual server:

sudo a2enmod rewrite
touch /etc/apache2/sites-available/weberp.conf
ln -s /etc/apache2/sites-available/weberp.conf /etc/apache2/sites-enabled/weberp.conf
nano /etc/apache2/sites-available/weberp.conf

Add the following lines:

<VirtualHost *:80>
ServerAdmin [email protected]
DocumentRoot /var/www/html/weberp
ServerName your-domain.com
ServerAlias www.your-domain.com
<Directory /var/www/html/weberp/>
Options FollowSymLinks
AllowOverride All
Order allow,deny
allow from all
</Directory>
ErrorLog /var/log/apache2/your-domain.com-error_log
CustomLog /var/log/apache2/your-domain.com-access_log common
</VirtualHost>

Now, we can restart Apache web server so that the changes take place:

a2ensite weberp
systemctl restart apache2.service

Step 6. Configuration Firewall for WebERP.

WebERP runs on port 80, so you will need to allow port 80 through the firewall:

sudo ufw enable
sudo ufw allow 80/tcp

Step 7. Accessing WebERP.

WebERP will be available on HTTP port 80 by default. Open your favorite browser and navigate to http://yourdomain.com/ or http://server-ip/ and complete the required the steps to finish the installation. If you are using a firewall, please open port 80 to enable access to the control panel.
How To Install Attendize on Ubuntu 16.04 LTS

Install Attendize on Ubuntu 16

Attendize is an open-source event ticketing and event management application built using the Laravel PHP framework. Attendize was created to offer event organizers a easy solution to managing general admission occasions, without paying exorbitant support charges.

This article assumes you have at least basic knowledge of Linux, know how to use the shell, and most importantly, you host your site on your own VPS. The installation is quite simple and assumes you are running in the root account, if not you may need to add ‘sudo’ to the commands to get root privileges. I will show you through the step by step installation Attendize open source ticket selling and event management platform on an Ubuntu 16.04 Xenial Xerus server.

Install Attendize on Ubuntu 16.04 LTS

Step 1. First make sure that all your system packages are up-to-date by running these following apt-get commands in the terminal.

sudo apt-get update
sudo apt-get upgrade

Step 2. Install LAMP (Linux, Apache, MariaDB, PHP) server.

A Ubuntu 16.04 LAMP server is required. If you do not have LAMP installed, you can follow our guide here. Also install all required PHP modules:

apt-get install php7.0-mysql php7.0-curl php7.0-json php7.0-cgi php7.0 libapache2-mod-php7.0 php7.0-mcrypt php7.0-xmlrpc php7.0-gd

Step 3. Configuring MariaDB.

By default, MariaDB is not hardened. You can secure MySQL using the mysql_secure_installation script. you should read and below each steps carefully which will set root password, remove anonymous users, disallow remote root login, and remove the test database and access to secure MariaDB.

mysql_secure_installation

Next we will need to log in to the MariaDB console and create a database for the Attendize. Run the following command:

mysql -u root -p

This will prompt you for a password, so enter your MariaDB root password and hit Enter. Once you are logged in to your database server you need to create a database for Attendize installation:

MariaDB [(none)]&amp;gt; CREATE DATABASE attendize;
MariaDB [(none)]&amp;gt; GRANT ALL PRIVILEGES ON attendize.* TO 'attendize'@'localhost' IDENTIFIED BY 'strongpassword';
MariaDB [(none)]&amp;gt; FLUSH PRIVILEGES;
MariaDB [(none)]&amp;gt; \q

Step 4. Installing Composer.

Composer will pull in all the required libraries and dependencies you need for your project:

curl -sS https://getcomposer.org/installer | php
sudo mv composer.phar /usr/local/bin/composer

Step 5. Installing Attendize.

First, clone the Attendize repository from Github:

git clone https://github.com/attendize/attendize /var/www/myAttendize.com

Switch to the /var/www/myAttendize.com directory and set the .env variables:

cd /var/www/myAttendize.com
cp .env.example .env
nano .env
DB_TYPE=mysql
DB_HOST=localhost
DB_DATABASE=attendize
DB_USERNAME=attendize
DB_PASSWORD=strongpassword

Next, Install all of the application dependencies:

composer install

Step 6. Configure database.

Once Composer has downloaded the components run the install command to migrate the database and create an admin user:

php artisan attendize:install
 
--------------------
Attempting to install Attendize v1.0.0
--------------------
Generating app key
Migrating database.
Database successfully migrated.
Seeding DB data
Data successfully seeded
--------------------
Please create an admin user.
--------------------

 Enter first name::
 &amp;gt; Rezkia

 Enter last name::
 &amp;gt; Ulva
 Enter your email::
 &amp;gt; [email protected]

 Enter a password::
 &amp;gt;

Admin User Successfully Created

          _   _                 _ _
     /\  | | | |               | (_)
    /  \ | |_| |_ ___ _ __   __| |_ _______
   / /\ \| __| __/ _ \ '_ \ / _` | |_  / _ \
  / ____ \ |_| ||  __/ | | | (_| | |/ /  __/
 /_/    \_\__|\__\___|_| |_|\__,_|_/___\___|

Success! You can now run Attendize

We will need to change some folders permissions:

chown -R www-data: /var/www/myAttendize.com

Step 7. Configuring Apache web server for attendize.

Create a new virtual host directive in Apache. For example, create a new Apache configuration file named ‘attendize.conf’ on your virtual server:

sudo a2enmod rewrite
touch /etc/apache2/sites-available/attendize.conf
ln -s /etc/apache2/sites-available/attendize.conf /etc/apache2/sites-enabled/attendize.conf
nano /etc/apache2/sites-available/attendize.conf

Add the following lines:

&amp;lt;VirtualHost *:80&amp;gt;
ServerAdmin [email protected]
DocumentRoot /var/www/myAttendize.com
ServerName your-domain.com
ServerAlias www.your-domain.com
&amp;lt;Directory /var/www/myAttendize.com/&amp;gt;
Options FollowSymLinks
AllowOverride All
Order allow,deny
allow from all
&amp;lt;/Directory&amp;gt;
ErrorLog /var/log/apache2/your-domain.com-error_log
CustomLog /var/log/apache2/your-domain.com-access_log common
&amp;lt;/VirtualHost&amp;gt;

Now, we can restart Apache web server so that the changes take place:

systemctl restart apache2.service

Step 6. Accessing Attendize.

Attendize content management system will be available on HTTP port 80 by default. Open your favorite browser and navigate to http://yourdomain.com/ or http://server-ip and complete the required the steps to finish the installation. If you are using a firewall, please open port 80 to enable access to the control panel.

Congratulation’s! You have successfully installed Attendize. Thanks for using this tutorial for installing Attendize open source ticket selling and event management platform on your Ubuntu 16.04 system. For additional help or useful information, we recommend you to check the official Attendize web site.

How To Install FFmpeg and FFmpeg-PHP Extension on CentOS

Install FFmpeg and FFmpeg-PHP Extension on CentOS

FFmpeg is a cross-platform solution for streaming audio and video as well as recording and conversion. There’s also a great PHP package called ffmpeg-php that allows for easy use of FFmpeg from inside PHP scripts. In this tutorial we will learn Install FFmpeg and FFmpeg-PHP Extension on CentOS server.

Install FFmpeg on CentOS

Step 1. To install, first you must add the DAG yum repository information corresponding to your CentOS/RHEL version to yum:

 #nano /etc/yum.repos.d/dag.repo

Add the following text to the file and save:

[dag]
name=DAG RPM Repository
baseurl=http://apt.sw.be/redhat/el$releasever/en/$basearch/dag
gpgcheck=1
enabled=1

Step 2. After add Dag repository, Use yum to install ffmpeg using following command.

#<code>rpm --import http://apt.sw.be/RPM-GPG-KEY.dag.txt
#yum install ffmpeg ffmpeg-devel ffmpeg-libpostproc


FFmpeg Basic Commands

#ffmpeg -version:            show version
#ffmpeg -formats:            show available formats
#ffmpeg -codecs:             show available codecs
#ffmpeg -decoders:           show available decoders
#ffmpeg -encoders:           show available encoders
#ffmpeg -bsfs:               show available bit stream filters
#ffmpeg -protocols:          show available protocols
#ffmpeg -pix_fmts:           show available pixel formats
#ffmpeg -layouts:            show standard channel layouts
#ffmpeg -sample_fmts:        show available audio sample formats
#ffmpeg -filters:            show available filters

 Install FFmpeg-PHP Extension on CentOS

Step 1.

 #yum install php-gd php-devel

Step 2.Download the latest ffmpeg-php release

#wget http://nchc.dl.sourceforge.net/project/ffmpeg-php/ffmpeg-php/0.6.0/ffmpeg-php-0.6.0.tbz2
#tar -xjf ffmpeg-php-0.6.0.tbz2
#cd ffmpeg-php-0.6.0
#phpize
#./configure
#make
#make install

If you get  [ffmpeg_movie.lo] Error 1 when compiling ffmpeg-php, then you will need to do:

#nano ffmpeg_movie.c
Changes in ffmpeg_movie.c:
#row 311: list_entry *le; to zend_rsrc_list_entry *le;
#row 346: list_entry new_le; to zend_rsrc_list_entry new_le;
#row 360: hashkey_length+1, (void *)&new_le, sizeof(list_entry), to hashkey_length+1, (void *)&new_le,sizeof(zend_rsrc_list_entry),


Step 3. Copy the ffmpeg.so module in php default module location. Now you have to edit php.ini file to enable ffmpeg-php support in it by using ffmpeg.so module.

 #nano /etc/php.ini

Put the below two lines at the end of the php.ini file

[ffmpeg]
extension=ffmpeg.so

FFmpeg-PHP extension should now be installed. You can check by creating a file called info.php in /var/www/html/ with the following content:

<?php phpinfo(); ?>

How To Install Orangescrum on Ubuntu 18.04 LTS

Install Orangescrum on Ubuntu 18

Orangescrum is a free, open source, flexible project management web application written using CakePHP. It helps you to manage projects, teams, documents, and tasks, all in one place. Orangescrum provides various features like agile project management, collaboration, issue tracking, notifications, reporting, task management, and traditional project management functionality for small/medium businesses. Continue reading “How To Install Orangescrum on Ubuntu 18.04 LTS”

How To Install Icinga 2 on Ubuntu 18.04 LTS

Install Icinga 2 on Ubuntu 18

Icinga 2 is an open source network monitoring system which checks the availability of your network resources, notifies users of outages, and generates performance data for reporting. Its Scalable and extensible, Icinga2 can monitor large, complex environments across multiple locations.

This article assumes you have at least basic knowledge of Linux, know how to use the shell, and most importantly, you host your site on your own VPS. The installation is quite simple and assumes you are running in the root account, if not you may need to add ‘sudo’ to the commands to get root privileges. I will show you through the step by step installation Icinga 2 on an Ubuntu 18.04 Bionic Beaver server.

Install Icinga 2 on Ubuntu 18.04 LTS Bionic Beaver

Step 1. First, make sure that all your system packages are up-to-date by running these following apt-get commands in the terminal.

sudo apt-get update
sudo apt-get upgrade

Step 2. Install LAMP (Linux, Apache, MariaDB and PHP) server.

An Ubuntu 18.04 LAMP server is required. If you do not have a LAMP installed, you can follow our guide here. Also install all required PHP modules:

apt-get install php7.1-cli php7.1-mbstring php7.1-gd php7.1-opcache php7.1-mysql php7.1-json php7.1-mcrypt php7.1-xml php7.1-curl

Step 3. Installing Icinga 2 on Ubuntu 18.04.

First, enable the add-repository feature and add the repository for Icinga with the below commands:
curl -sSL https://packages.icinga.com/icinga.key | sudo apt-key add -
echo "deb https://packages.icinga.com/ubuntu icinga-bionic main" | sudo tee /etc/apt/sources.list.d/icinga.list

Run update of package list and install Icinga2 packages:

sudo apt-get install icinga2 icingaweb2 icinga2-ido-mysql

Once the installation is complete. Make sure the service is up and running fine:

systemctl status icinga2.service
systemctl enable icinga2.service
systemctl start icinga2.service

Step 4. Installing Nagios Plugins.

Icinga2 will collect the service information based on the monitoring plugins. So, we need to install nagios plugin using below command:

apt-get install monitoring-plugins

Next, you need to install the IDO module which is crucial for the Icinga 2 web interface. It will export all configuration and status information into its database. Execute the following command:

apt install icinga2-ido-mysql

Then restart Icinga 2 for the changes to take effect:

systemctl restart icinga2.service

Once you have enabled the IDO modules, Icinga 2 places the new configuration file at /etc/icinga2/features-enabled/ido-mysql.conf in which we need to update the database credentials manually:

cat /etc/icinga2/features-enabled/ido-mysql.conf

Update the above file shown like below:

[email protected]:~# nano /etc/icinga2/features-enabled/ido-mysql.conf
/**
* The db_ido_mysql library implements IDO functionality
* for MySQL.
*/
library "db_ido_mysql"
object IdoMysqlConnection "ido-mysql" {
user = "icinga2",
password = "icinga123",
host = "localhost",
database = "icinga2"
}

Step 4. Configuring MariaDB for Icinga 2.

By default, MariaDB is not hardened. You can secure MariaDB using the mysql_secure_installation script. You should read and below each step carefully which will set the root password, remove anonymous users, disallow remote root login, and remove the test database and access to secure MariaDB.

mysql_secure_installation

Configure it like this:

- Set root password? [Y/n] y
- Remove anonymous users? [Y/n] y
- Disallow root login remotely? [Y/n] y
- Remove test database and access to it? [Y/n] y
- Reload privilege tables now? [Y/n] y

Next we will need to log in to the MariaDB console and create a database for the Icinga 2. Run the following command:

mysql -u root -p

This will prompt you for a password, so enter your MariaDB root password and hit Enter. Once you are logged in to your database server, you need to create a database for Icinga 2 installation:

MariaDB [(none)]> create database icinga2;
MariaDB [(none)]> grant all privileges on icingaweb.* to icinga2@localhost identified by 'icinga123';
MariaDB [(none)]> flush privileges;
MariaDB [(none)]> \q

Step 5. Installing Icinga 2 Web.

After creating the database, we can install the Web interface plugin and configure it one by one:

apt-get install icingaweb2

Both Icinga Web 2 and CLI must have access to logs and configurations. Add web server user (www-data) to the system group (icingaweb2):

addgroup --system icingaweb2
usermod -a -G icingaweb2 www-data

Icinga2 will be available on HTTP port 80 by default. Open your favorite browser and navigate to http://yourdomain.com/icingaweb2/setup or http://server-ip/icingaweb2/setup and complete the required the steps to finish the installation. If you are using a firewall, please open port 80 to enable access to the control panel.
icingaweb2

Congratulation’s! You have successfully installed Icinga. Thanks for using this tutorial for installing Icinga 2 on your Ubuntu 18.04 LTS system. For additional help or useful information, we recommend you to check the official Icinga web site.

How To Install Nagios on Ubuntu 18.04 LTS

Install Nagios on Ubuntu 18

Nagios is an open source software that can be used for network and infrastructure monitoring. Nagios will monitor servers, switches, applications and services. It alerts the System Administrator when something went wrong and also alerts back when the issues has been rectified. Resources that can be monitored include CPU, memory and disk space loads, log files, temperature or hardware errors. It can monitor various parameters and problems for services like HTTP, SMTP, DNS, and with the help of plugins it can be highly extended. Nagios core was originally designed to run under Linux, although it should work under most other unices as well.

This article assumes you have at least basic knowledge of Linux, know how to use the shell, and most importantly, you host your site on your own VPS. The installation is quite simple and assumes you are running in the root account, if not you may need to add ‘sudo’ to the commands to get root privileges. I will show you through the step by step installation Nagios on a Ubuntu 18.04 (Bionic Beaver) server.

Install Nagios on Ubuntu 18.04 LTS Bionic Beaver

Step 1. First make sure that all your system packages are up-to-date by running these following apt-get commands in the terminal.

sudo apt-get update
sudo apt-get upgrade
[php]

<strong> Step 2. Install LAMP (Linux, Apache, MariaDB and PHP) server.</strong>

A Ubuntu 18.04 LAMP server is required. If you do not have LAMP installed, you can follow our guide here. Also install all required PHP modules:
[php]
apt-get install php7.1-cli php7.1-mbstring php7.1-gd php7.1-opcache php7.1-mysql php7.1-json php7.1-mcrypt php7.1-xml php7.1-curl

Step 3. Create users and groups for Nagios.

For security reasons, create a user and group specifically to run Nagios:

useradd nagios
groupadd nagcmd
usermod -a -G nagcmd nagios
usermod -a -G nagcmd www-data

Step 4. Installing Nagios and plugins on Ubuntu 18.04 LTS.

First thing to do is to go to Nagios’s download page and download the latest stable version of Nagios, At the moment of writing this article it is version 4.4.2:
wget https://assets.nagios.com/downloads/nagioscore/releases/nagios-4.4.2.tar.gz
tar -zxvf /tmp/nagios-4.4.2.tar.gz
cd /tmp/nagios-4.4.2/

Perform below steps to compile the Nagios from the source code:

./configure --with-nagios-group=nagios --with-command-group=nagcmd --with-httpd_conf=/etc/apache2/sites-enabled/
make all
make install
make install-init
make install-config
make install-commandmode
make install-webconf

Next steps, Download latest nagios-plugins source and install using following commands:

wget http://www.nagios-plugins.org/download/nagios-plugins-2.1.1.tar.gz
tar xzf nagios-plugins-2.1.1.tar.gz
cd nagios-plugins-2.1.1
./configure --with-nagios-user=nagios --with-nagios-group=nagios
make
make install

Step 5. Configure Nagios on Ubuntu 18.04 Bionic Beaver.

Edit the /usr/local/nagios/etc/objects/contacts.cfg config file with your favorite editor and change the email address associated with the nagiosadmin contact definition to the address you’d like to use for receiving alerts.

nano /usr/local/nagios/etc/objects/contacts.cfg

Change the email address field to receive the notification:

[...]
define contact{
contact_name nagiosadmin ; Short name of userus
generic-contact ; Inherit default values from generic-contact template (defined above)
alias Nagios Admin ; Full name of useremail
[email protected] ; <<=== CHANGE THIS TO YOUR EMAIL ADDRESS ===
[...]

Step 6. Configure Apache web server for Nagios.

Now create nagios apache2 configuration file:

nano /etc/apache2/sites-enabled/nagios.conf

Edit the following lines if you want to access nagios administrative console from a particular IP series, Here, I want to allow nagios administrative access from 192.168.1.0/24 series only:

[...]
## Comment the following lines ##
#   Order allow,deny
#   Allow from all

## Uncomment and Change lines as shown below ##
Order deny,allow
Deny from all
Allow from 127.0.0.1 192.168.1.0/24
[...]

Enable Apache’s rewrite and cgi modules:

sudo a2enmod rewrite
sudo a2enmod cgi

Configure Apache authentication:

We need to setup the password for the user nagiosadmin. This username will be used to access the web interface so it is important to remember the password that you will input here. Set the password running the following command and enter the password twice:

# sudo htpasswd -s -c /usr/local/nagios/etc/htpasswd.users nagiosadmin
New password:
Re-type new password:
Adding password for user nagiosadmin

Restart Apache for the changes to take effect:

systemctl restart apache2

Step 7. Verify and Start Nagios service.

Next we have to make Nagios start at boot time, so first verify that the configuration file has no errors running the following command:

sudo /usr/local/nagios/bin/nagios -v /usr/local/nagios/etc/nagios.cfg

And you should get the output:

[...]
Checking objects...
    Checked 8 services.
    Checked 1 hosts.
    Checked 1 host groups.
    Checked 0 service groups.
    Checked 1 contacts.
    Checked 1 contact groups.
    Checked 24 commands.
    Checked 5 time periods.
    Checked 0 host escalations.
    Checked 0 service escalations.
Checking for circular paths...
    Checked 1 hosts
    Checked 0 service dependencies
    Checked 0 host dependencies
    Checked 5 timeperiods
Checking global event handlers...
Checking obsessive compulsive processor commands...
Checking misc settings...

Total Warnings: 0
Total Errors:   0

Things look okay - No serious problems were detected during the pre-flight check
[...]

Ubuntu 18.04 uses systemd for starting / stopping all the services, so, we need to create nagios.service file:

nano /etc/systemd/system/nagios.service

Add the following lines:

[Unit]
Description=Nagios
BindTo=network.target

[Install]
WantedBy=multi-user.target

[Service]
User=nagios
Group=nagios
Type=simple
ExecStart=/usr/local/nagios/bin/nagios /usr/local/nagios/etc/nagios.cfg

Enable Nagios to start automatically at system startup:

systemctl enable /etc/systemd/system/nagios.service

Now, start Nagios service:

systemctl start nagios

Step 8. Accessing Nagios.

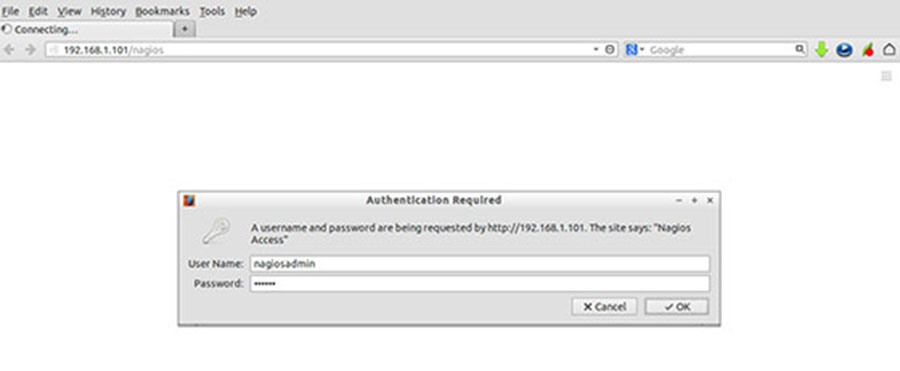
Nagios will be available on HTTP port 80 by default. Open your favorite browser and navigate to http://your-domain.com/nagios or http://server-ip/nagios and complete the required the steps to finish the installation. When prompted for username and password you will introduce the username “nagiosadmin” and the password that you entered in step 6.
Nagios-admin-panel
Congratulation’s! You have successfully installed Nagios. Thanks for using this tutorial for installting Nagios monitoring tool in ubuntu 18.04 (Bionic Beaver) systems. For additional help or useful information, we recommend you to check the official Nagios web site.

How To Install Eclipse Oxygen on Ubuntu 18.04 LTS

Install Eclipse Oxygen on Ubuntu 18

Eclipse is an open source and free multi-language and multi-platform (Windows , Linux and Mac) software development program that used to build JAVA based web applications. It is written in Java program and can be used to develop Java based applications and other various plugins, including languages like C, C++, PHP, Perl, Python, Ruby and Rails framework and much more.

This article assumes you have at least basic knowledge of Linux, know how to use the shell, and most importantly, you host your site on your own VPS. The installation is quite simple and assumes you are running in the root account, if not you may need to add ‘sudo’ to the commands to get root privileges. I will show you through the step by step installation Eclipse Oxygen on a Ubuntu 18.04 (Bionic Beaver) server.

Install Eclipse Oxygen on Ubuntu 18.04 LTS Bionic Beaver

Step 1. First make sure that all your system packages are up-to-date by running these following apt-get commands in the terminal.

sudo apt-get update
sudo apt-get upgrade

Step 2. Installing Java.

Jenkins requires Java to be installed on your server. By default, Java is not available in Ubuntu’s repository. Add the Oracle Java PPA to Apt with the following command:

sudo add-apt-repository ppa:webupd8team/java
sudo apt install oracle-java8-installer
sudo apt install oracle-java8-set-default

Verify the Java version by running the following command:

java -version

Step 3. Installing Eclipse Oxygen on Ubuntu 18.04 LTS.

Download latest eclipse package. This guide uses Eclipse IDE for Java Developers version. Another popular versions are Eclipse IDE for Java EE Developers and Eclipse for PHP Developers. Select also 32-bit or 64-bit version depending on your system:

wget http://eclipse.bluemix.net/packages/oxygen.2/data/eclipse-inst-linux64.tar.gz

Extract Eclipse package to your desired directory:

tar xzf eclipse-inst-linux64.tar.gz

Next, Start the installer by executing the bellow command:

./eclipse-installer/eclipse-inst

Step 4. Create desktop launcher.

Create a new file eclipse.desktop in /usr/share/applications/ and add the below code:

nano .local/share/applications/eclipse.desktop

Add the following content in the above file:

[Desktop Entry]
Name=Eclipse JEE Oxygen
Type=Application
Exec=/home/<strong>wpcademy</strong>/eclipse/jee-oxygen/eclipse/eclipse
Terminal=false
Icon=/home/<strong>wpcademy</strong>/eclipse/jee-oxygen/eclipse/icon.xpm
Comment=Integrated Development Environment
NoDisplay=false
Categories=Development;IDE;
Name[en]=Eclipse

Replace the highlighted username (wpcademy) with your own account name, also the Exec = location and icon.xpm should depend on where Eclipse got installed on your system.

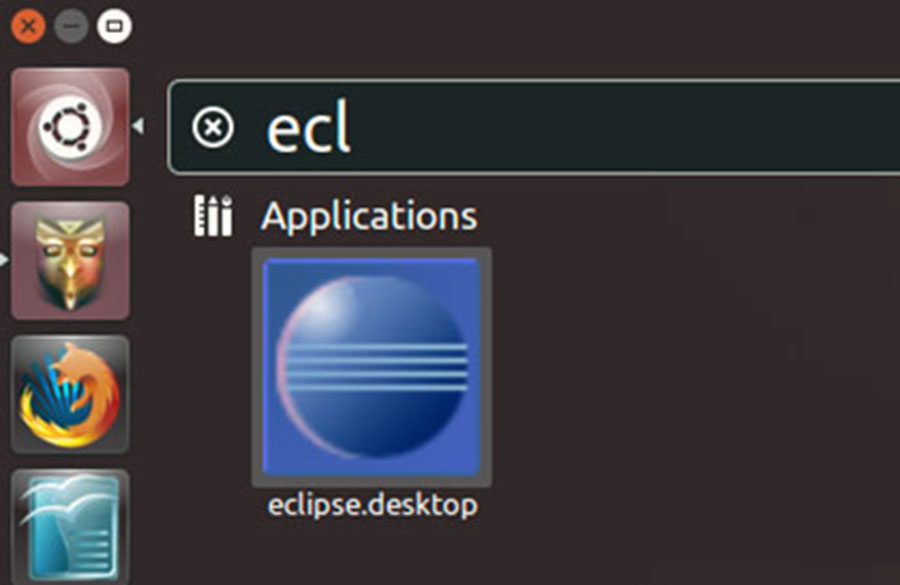
Finally steps, Open Dash or the activities overview and search for Eclipse… then launch.

install-eclipse-luna-ubuntu
Congratulation’s! You have successfully installed Eclipse. Thanks for using this tutorial for installing Eclipse Oxygen in Ubuntu 18.04 Bionic Beaver system. For additional help or useful information, we recommend you to check the official Eclipse web site.