How To Install Buddy on Ubuntu 16.04 LTS

Install Buddy on Ubuntu 16

Buddy is a continuous integration and delivery platform for GitHub, GitLab and Bitbucket with Docker-based builds and automatic deployments. In this tutorial we will show you how to install Buddy on Ubuntu 16.04 LTS.

This article assumes you have at least basic knowledge of Linux, know how to use the shell, and most importantly, you host your site on your own VPS. The installation is quite simple and assumes you are running in the root account, if not you may need to add ‘sudo’ to the commands to get root privileges. I will show you through the step by step installation Buddy on an Ubuntu 16.04 Xenial Xerus server.

Install Buddy on Ubuntu 16.04 LTS

Step 1. First make sure that all your system packages are up-to-date

sudo apt-get update
sudo apt-get upgrade

Step 2. Installing Docker Engine.

Buddy requires the Docker Engine to run. Follow Docker installation instructions:

apt-get install apt-transport-https ca-certificates curl software-properties-common
curl -fsSL https://download.docker.com/linux/ubuntu/gpg | sudo apt-key add -
add-apt-repository "deb [arch=amd64] https://download.docker.com/linux/ubuntu $(lsb_release -cs) stable"
apt-get -y update
apt-get -y install docker-ce

Step 3. Installing Docker Composer.

With the Engine installed, you can install Docker Compose which is also required by Buddy:

curl -L https://github.com/docker/compose/releases/download/1.14.0/docker-compose-`uname -s`-`uname -m` > /usr/local/bin/docker-compose
chmod +x /usr/local/bin/docker-compose

Step 4. Installing Buddy on Ubuntu 16.04.

To install Buddy Enterprise, run the following in the terminal:

curl -sSL https://get.buddy.works | sh && buddy install

Buddy Enterprise uses ports 80, 443 and 22 on the installation server. You will be asked for an alternative port if one of the ports is unavailable. When asking for the terms, simply confirm with “Enter”. When the installation is complete, change to the next tab.

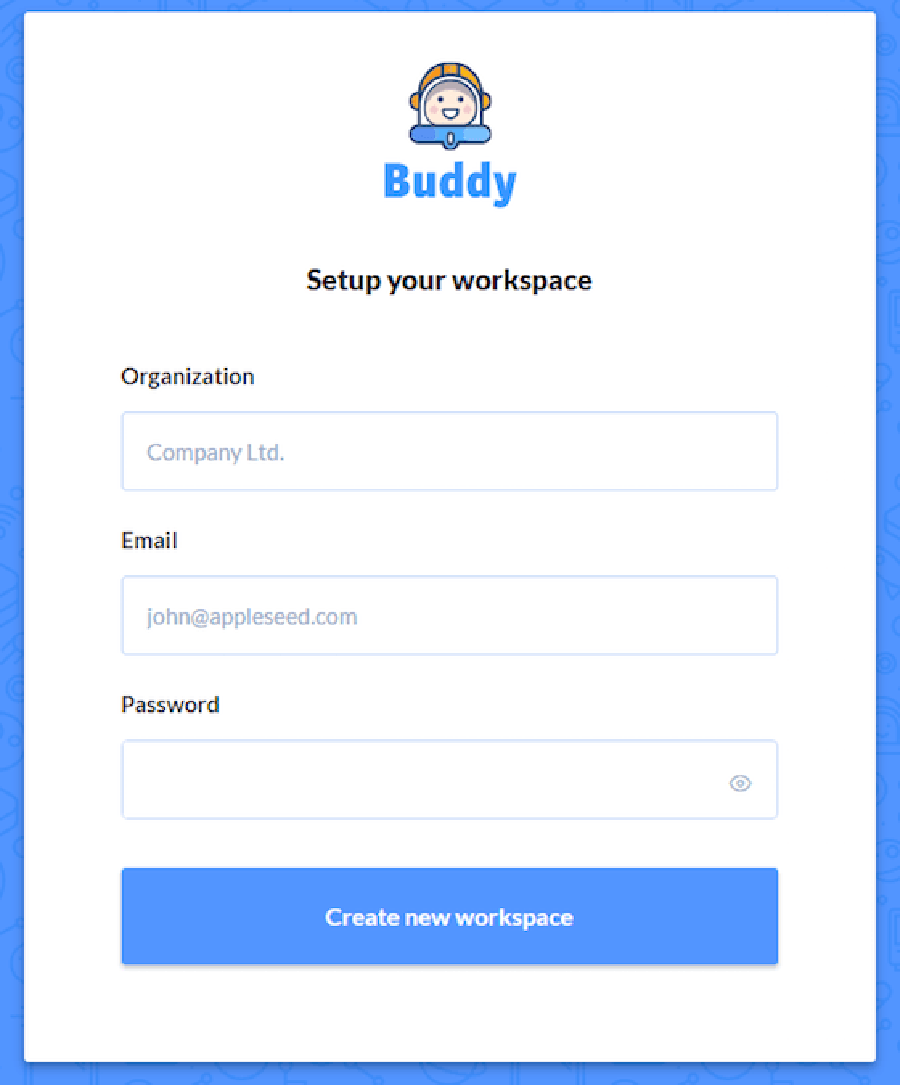
Step 5. Accessing Buddy.

Buddy will be available on HTTP port 80 by default. Open your favorite browser and navigate to http://yourdomain.com or http://server-ip and complete the required the steps to finish the installation.
buddy-web-interface

Congratulation’s! You have successfully installed Buddy. Thanks for using this tutorial for installing Buddy on your Ubuntu 16.04 LTS. For additional help or useful information, we recommend you to check the official Buddy web site.

How To Install Prometheus on Ubuntu 16.04 LTS

Install Prometheus on Ubuntu 16

Prometheus is an excellent open-source monitoring system which allows us to collect metrics from our applications and stores them in a database, especially a time-series based DB. The biggest advantage of Prometheus is the query language it provides for data processing.

This article assumes you have at least basic knowledge of Linux, know how to use the shell, and most importantly, you host your site on your own VPS. The installation is quite simple and assumes you are running in the root account, if not you may need to add ‘sudo’ to the commands to get root privileges. I will show you through the step by step installation Prometheus open-source monitoring on an Ubuntu 16.04 Xenial Xerus server.

Install Prometheus on Ubuntu 16.04 LTS

Step 1. First make sure that all your system packages are up-to-date

sudo apt-get update
sudo apt-get upgrade

Step 2. Installing Nginx web server.

The first thing we must do is install NGINX on the system:

sudo apt-get install nginx
sudo systemctl start nginx
sudo systemctl enable nginx

Step 3. Installing Prometheus.

Prometheus has a Debian Package. To do this, import the package key into our machine:

GET https://s3-eu-west-1.amazonaws.com/deb.robustperception.io/41EFC99D.gpg | apt-key add -

Next, we’re ready to install all required packages in your system:

apt-get update
apt-get install prometheus prometheus-node-exporter prometheus-pushgateway prometheus-alertmanager

Once installed, you can confirm that the app is running by using this command:

service prometheus start
service prometheus status

Step 4. Accessing Prometheus.

Prometheus will be available on HTTP port 9090 by default. Open your favorite browser and navigate to http://yourdomain.com:9090 or http://server-ip:9090 and complete the required the steps to finish the installation.

prometheus-web-interface

Congratulation’s! You have successfully installed Prometheus. Thanks for using this tutorial for installing Prometheus open-source monitoring on your Ubuntu 16.04 LTS. For additional help or useful information, we recommend you to check the official Prometheus web site.

How To Install Angry IP Scanner on ubuntu 16.04 LTS

Install Angry IP Scanner on ubuntu 16

Angry IP Scanner is an open-source and cross-platform system scanner. It is very fast and simple to use platform that scans IP addresses and ports. TCP/IP(Angry IP) network scanner allows users to easily scan IP addresses within any range of your choice with a user friendly interface.

This article assumes you have at least basic knowledge of Linux, know how to use the shell, and most importantly, you host your site on your own VPS. The installation is quite simple and assumes you are running in the root account, if not you may need to add ‘sudo’ to the commands to get root privileges. I will show you through the step by step installation Angry IP Scanner on an Ubuntu 16.04 Xenial Xerus server.

Install Angry IP Scanner on ubuntu 16.04 LTS

Step 1. First make sure that all your system packages are up-to-date

sudo apt-get update
sudo apt-get upgrade
sudo apt-get install gdebi

Step 2. Installing Angry IP Scanner.

Use the below commands to install Angry IP scanner on Linux Ubuntu:

wget http://github.com/angryziber/ipscan/releases/download/3.3.3/ipscan_3.3.3_amd64.deb

Next, the installation process by simply running the following command which triggers the installation:

gdebi ipscan_3.3.3_amd64.deb

Step 3. Accessing Angry IP Scanner.

Once the Angry IP Scanner installation is complete, You can launch the application straight from your Ubuntu dashboard. In the search field, you can type the application name and when the icon appears, you shall click on it to launch it.

Congratulation’s! You have successfully installed Angry IP Scanner. Thanks for using this tutorial for installing Angry IP Scanner on your Ubuntu 16.04 system. For additional help or useful information, we recommend you to check the official Angry IP Scanner web site.

How To Install Firefox Quantum on Ubuntu 16.04 LTS

Install Firefox Quantum on Ubuntu 16

In this tutorial we will show you how to install and configure Firefox Quantum on Ubuntu 16.04 LTS. Mozilla today released Firefox 57 a.k.a Firefox Quantum. According to a Completely overhauled heart along with a revamped layout, Firefox Quantum has been built from the ground up to deliver a quick browsing experience while swallowing a limited amount of resources. Mozilla is calling Quantum the biggest update to the browser since its original release in 2004.

The browser now also comes with a new CSS engine Named Stylo which Takes better advantage of today’s devices featuring multi-core Processors to deliver a faster and simpler browsing experience. Firefox Will automatically prioritize busy tabs over inactive ones for better resource management. Mozilla claims that its approach to multiple Processes is exceptional and different from that of Chrome.

This article assumes you have at least basic knowledge of linux, know how to use the shell, and most importantly, you host your site on your own VPS. The installation is quite simple and assumes you are running in the root account, if not you may need to add ‘sudo’ to the commands to get root privileges. I will show you through the step by step installation Firefox Quantum web browser on a Ubuntu 16.04 (Xenial Xerus) server.

Install Firefox Quantum on Ubuntu 16.04 LTS

Step 1. First make sure that all your system packages are up-to-date

sudo apt-get update
sudo apt-get upgrade

Step 2. Installing Firefox Quantum.

First, add a repository for download Mozilla Firefox Quantum. Just follow this command:

sudo add-apt-repository ppa:mozillateam/firefox-next
sudo apt update
sudo apt upgrade
sudo apt install firefox

Once installed, open the Firefox Quantum from Ubuntu Dash.

Alternative Another Method:

cd /opt
sudo wget https://download-installer.cdn.mozilla.net/pub/firefox/releases/57.0/linux-x86_64/en-US/firefox-57.0.tar.bz2
sudo tar xfj firefox-57.0.tar.bz2

Start Firefox 57 from the CLI:

/opt/firefox/firefox

In order to create a quick launch icon in your desktop applications menu, issue the following commands in terminal:

cd /usr/share/applications/
sudo cp firefox.desktop firefox-quantum.desktop

Congratulation’s! You have successfully installed Firefox Quantum. Thanks for using this tutorial for installing Firefox Quantum web browser on Ubuntu 16.04 LTS (Xenial Xerus) system. For additional help or useful information, we recommend you to check the official Firefox web site.

How To Install UFW Firewall on Ubuntu 16.04 LTS

Install UFW Firewall on Ubuntu 16

The default firewall configuration tool for Ubuntu is ufw. Developed to ease iptables firewall setup, ufw provides a user friendly way to produce an IPv4 or IPv6 host-based antivirus. By default UFW is disabled.

This article assumes you have at least basic knowledge of Linux, know how to use the shell, and most importantly, you host your site on your own VPS. The installation is quite simple and assumes you are running in the root account, if not you may need to add ‘sudo’ to the commands to get root privileges. I will show you through the step by step installation UFW Firewall on an Ubuntu 16.04 Xenial Xerus server.

Install UFW Firewall on Ubuntu 16.04 LTS

Step 1. First make sure that all your system packages are up-to-date

sudo apt-get update
sudo apt-get upgrade

Step 2. Installing UFW Firewall.

In Ubuntu 16.04, UFW is installed by default. If not, you can easily install it by running the following command:

apt-get install ufw

After installation, UFW is deactivated. If you configure your server via SSH, it is important to release SSH before you enable UFW:

ufw allow ssh

Step 3. UFW control.

Turn on:

ufw enable

Turn off:

ufw disable

Attention! The following are examples, please use only if you know what you are doing!

Allow protocol:

ufw allow ssh

Allow port:

ufw allow 22

Allow Port Ranges:

ufw allow 1000:2000

Prohibit connections:

Deny protocol:

ufw deny ssh

Deny port:

ufw deny 22

For more usage commands you can use the –help flag:

ufw --help

Congratulation’s! You have successfully installed UFW. Thanks for using this tutorial for installing UFW Firewall on your Ubuntu 16.04 system. For additional help or useful information, we recommend you to check the official UFW Firewall web site.

How To Install Shotcut Video Editor on Ubuntu 16.04 LTS

Install Shotcut Video Editor on Ubuntu 16

Shotcut is an free supply, multi-platform video editing software, that supports all forms of audio and video files. It’s an application with a OpenGL GPU-based image processing system. It allows appending, insert, overwrite, export and import options in the timeline. In this tutorial we will learn How To Install Shotcut Video Editor on Ubuntu 16.04 LTS

This article assumes you have at least basic knowledge of Linux, know how to use the shell, and most importantly, you host your site on your own VPS. The installation is quite simple and assumes you are running in the root account, if not you may need to add ‘sudo’ to the commands to get root privileges. I will show you through the step by step installation Shotcut video editor on an Ubuntu 16.04 Xenial Xerus server.

Install Shotcut Video Editor on Ubuntu 16.04 LTS

Step 1. First make sure that all your system packages are up-to-date

sudo apt-get update
sudo apt-get upgrade

Step 2. Installing Shotcut video editor.
Install shotcut on Ubuntu systems is easy, First add the PPA to your system, update the local repository index and install the shotcut package:

sudo add-apt-repository ppa:haraldhv/shotcut
sudo apt-get update

Lets install the shotcut package by utilizing the following command:

sudo apt-get install shotcut

Once it is done, just run the command shotcut in terminal, shotcut dashboard will be opened:

shotcut

Congratulation’s! You have successfully installed Shotcut. Thanks for using this tutorial for installing Shotcut video editor on your Ubuntu 16.04 system. For additional help or useful information, we recommend you to check the official Shotcut web site.

How To Install Minecraft Server on Ubuntu 16.04 LTS

Install Minecraft Server on Ubuntu 16

Minecraft is a game about breaking and placing blocks. The creative and building aspects of Minecraft allow players to build constructions out of textured cubes in a 3D procedurally generated world. Minecraft servers allow players to play online or via a local area network with other people. They may either be run on a hosted server, on local dedicated server hardware, a Virtual Private server on a home machine, or on your local gaming computer. In this tutorial we will show you how to install Minecraft server on Ubuntu 16.04 LTS.

This article assumes you have at least basic knowledge of Linux, know how to use the shell, and most importantly, you host your site on your own VPS. The installation is quite simple and assumes you are running in the root account, if not you may need to add ‘sudo’ to the commands to get root privileges. I will show you through the step by step installation Minecraft Server on an Ubuntu 16.04 Xenial Xerus server.

Install Minecraft Server on Ubuntu 16.04 LTS

Step 1. First make sure that all your system packages are up-to-date

sudo apt-get update
sudo apt-get upgrade

Step 2. Installing Java-JDK.

Minecraft server setup requires Java to be installed on your system. To do this, follow these steps:

apt-get install openjdk-8-jre-headless screen

Step 3. Installing Minecraft Server on Ubuntu.

First, create a new user for Minecraft to run as:

adduser minecraft

Create a Minecraft directory:

mkdir minecraft
cd minecraft

Now download and install your own Minecraft server:

wget -O minecraft_server.jar https://s3.amazonaws.com/Minecraft.Download/versions/1.12.2/minecraft_server.1.12.2.jar

Accept Minecraft’s end-user license agreement:

echo "eula=true" > eula.txt

Get screen up and running, so that the server can run in the background:

screen -S "Minecraft server 1"

Step 4. Running Minecraft Server.

Now you only need to run the installed server (you can edit the 1024M value to match your server’s RAM):

java -Xmx1024M -Xms1024M -jar minecraft_server.jar nogui

To get back to the normal screen, press these keys: Control+A+D, To get back to the screen where Minecraft is running:

screen -r

Congratulation’s! You have successfully installed Minecraft. Thanks for using this tutorial for installing Minecraft server on your Ubuntu 16.04 system. For additional help or useful information, we recommend you to check the official Minecraft web site.