How To Install Attendize on Ubuntu 16.04 LTS

Install Attendize on Ubuntu 16

Attendize is an open-source event ticketing and event management application built using the Laravel PHP framework. Attendize was created to offer event organizers a easy solution to managing general admission occasions, without paying exorbitant support charges.

This article assumes you have at least basic knowledge of Linux, know how to use the shell, and most importantly, you host your site on your own VPS. The installation is quite simple and assumes you are running in the root account, if not you may need to add ‘sudo’ to the commands to get root privileges. I will show you through the step by step installation Attendize open source ticket selling and event management platform on an Ubuntu 16.04 Xenial Xerus server.

Install Attendize on Ubuntu 16.04 LTS

Step 1. First make sure that all your system packages are up-to-date by running these following apt-get commands in the terminal.

sudo apt-get update
sudo apt-get upgrade

Step 2. Install LAMP (Linux, Apache, MariaDB, PHP) server.

A Ubuntu 16.04 LAMP server is required. If you do not have LAMP installed, you can follow our guide here. Also install all required PHP modules:

apt-get install php7.0-mysql php7.0-curl php7.0-json php7.0-cgi php7.0 libapache2-mod-php7.0 php7.0-mcrypt php7.0-xmlrpc php7.0-gd

Step 3. Configuring MariaDB.

By default, MariaDB is not hardened. You can secure MySQL using the mysql_secure_installation script. you should read and below each steps carefully which will set root password, remove anonymous users, disallow remote root login, and remove the test database and access to secure MariaDB.

mysql_secure_installation

Next we will need to log in to the MariaDB console and create a database for the Attendize. Run the following command:

mysql -u root -p

This will prompt you for a password, so enter your MariaDB root password and hit Enter. Once you are logged in to your database server you need to create a database for Attendize installation:

MariaDB [(none)]> CREATE DATABASE attendize;
MariaDB [(none)]> GRANT ALL PRIVILEGES ON attendize.* TO 'attendize'@'localhost' IDENTIFIED BY 'strongpassword';
MariaDB [(none)]> FLUSH PRIVILEGES;
MariaDB [(none)]> \q

Step 4. Installing Composer.

Composer will pull in all the required libraries and dependencies you need for your project:

curl -sS https://getcomposer.org/installer | php
sudo mv composer.phar /usr/local/bin/composer

Step 5. Installing Attendize.

First, clone the Attendize repository from Github:

git clone https://github.com/attendize/attendize /var/www/myAttendize.com

Switch to the /var/www/myAttendize.com directory and set the .env variables:

cd /var/www/myAttendize.com
cp .env.example .env
nano .env
DB_TYPE=mysql
DB_HOST=localhost
DB_DATABASE=attendize
DB_USERNAME=attendize
DB_PASSWORD=strongpassword

Next, Install all of the application dependencies:

composer install

Step 6. Configure database.

Once Composer has downloaded the components run the install command to migrate the database and create an admin user:

php artisan attendize:install
 
--------------------
Attempting to install Attendize v1.0.0
--------------------
Generating app key
Migrating database.
Database successfully migrated.
Seeding DB data
Data successfully seeded
--------------------
Please create an admin user.
--------------------

 Enter first name::
 > Rezkia

 Enter last name::
 > Ulva
 Enter your email::
 > [email protected]

 Enter a password::
 >

Admin User Successfully Created

          _   _                 _ _
     /\  | | | |               | (_)
    /  \ | |_| |_ ___ _ __   __| |_ _______
   / /\ \| __| __/ _ \ '_ \ / _` | |_  / _ \
  / ____ \ |_| ||  __/ | | | (_| | |/ /  __/
 /_/    \_\__|\__\___|_| |_|\__,_|_/___\___|

Success! You can now run Attendize

We will need to change some folders permissions:

chown -R www-data: /var/www/myAttendize.com

Step 7. Configuring Apache web server for attendize.

Create a new virtual host directive in Apache. For example, create a new Apache configuration file named ‘attendize.conf’ on your virtual server:

sudo a2enmod rewrite
touch /etc/apache2/sites-available/attendize.conf
ln -s /etc/apache2/sites-available/attendize.conf /etc/apache2/sites-enabled/attendize.conf
nano /etc/apache2/sites-available/attendize.conf

Add the following lines:

<VirtualHost *:80>
ServerAdmin [email protected]
DocumentRoot /var/www/myAttendize.com
ServerName your-domain.com
ServerAlias www.your-domain.com
<Directory /var/www/myAttendize.com/>
Options FollowSymLinks
AllowOverride All
Order allow,deny
allow from all
</Directory>
ErrorLog /var/log/apache2/your-domain.com-error_log
CustomLog /var/log/apache2/your-domain.com-access_log common
</VirtualHost>

Now, we can restart Apache web server so that the changes take place:

systemctl restart apache2.service

Step 6. Accessing Attendize.

Attendize content management system will be available on HTTP port 80 by default. Open your favorite browser and navigate to http://yourdomain.com/ or http://server-ip and complete the required the steps to finish the installation. If you are using a firewall, please open port 80 to enable access to the control panel.

Congratulation’s! You have successfully installed Attendize. Thanks for using this tutorial for installing Attendize open source ticket selling and event management platform on your Ubuntu 16.04 system. For additional help or useful information, we recommend you to check the official Attendize web site.

How To Install OpenSSH on Ubuntu 16.04 LTS

Install OpenSSH on Ubuntu 16

OpenSSH (OpenBSD Secure Shell) is a connectivity tool that enables remote login via the SSH protocol, hence eliminating eavesdropping, connection hijacking, and other attacks. It helps to secure all network communications by encrypting all network traffic over multiple authentication methods through a secured tunnel.

This article assumes you have at least basic knowledge of Linux, know how to use the shell, and most importantly, you host your site on your own VPS. The installation is quite simple and assumes you are running in the root account, if not you may need to add ‘sudo’ to the commands to get root privileges. I will show you through the step by step installation OpenSSH on an Ubuntu 16.04 Xenial Xerus server.

Install OpenSSH on Ubuntu 16.04 LTS

Step 1. First make sure that all your system packages are up-to-date by running these following apt-get commands in the terminal.

sudo apt-get update
sudo apt-get upgrade

Step 2. Installing OpenSSH on Ubuntu 16.04.

Install it by running the following command in your terminal:

apt-get install openssh-server

Furthermore, you can install the OpenSSH client application using the following command:

apt-get install openssh-client

After that, you should have SSH service enabled in your system:

systemctl start sshd.service
systemctl enable sshd.service

Last step is to open up the ssh firewall port:

ufw allow ssh
ufw reload

Step 3. Advanced Configuration OpenSSH.

Now sometime we may want to change some settings (for example, the port, and root login permission) . This can be done by editing the configuration file via command:

nano /etc/ssh/sshd_config

The first thing you may want to do is to change the default SSH listening port. Open the file and locate the line that specifies the listening port:

Port 22

Change it to something else. For example to 2022:

Port 2022

Save the file and close it. Then restart the service for the changes to take effect:

systemctl restart sshd.service

Congratulation’s! You have successfully installed OpenSSH. Thanks for using this tutorial for installing OpenSSH on your Ubuntu 16.04 LTS. For additional help or useful information, we recommend you to check the official OpenSSH web site.

How To Install Microsoft SQL Server on Ubuntu 16.04 LTS

Install Microsoft SQL Server on Ubuntu 16

Microsoft SQL Server is a relational database management system developed by Microsoft. As a database server, it is a software product with the primary function of storing and retrieving data as requested by other software applications which may run either on the same computer or on another computer across a network (including the Internet).

This article assumes you have at least basic knowledge of Linux, know how to use the shell, and most importantly, you host your site on your own VPS. The installation is quite simple and assumes you are running in the root account, if not you may need to add ‘sudo’ to the commands to get root privileges. I will show you through the step by step installation Microsoft SQL Server on a Ubuntu 16.04 (Xenial Xerus) server.

Install Microsoft SQL Server on Ubuntu 16.04 LTS

Step 1. First make sure that all your system packages are up-to-date by running these following apt-get commands in the terminal.

sudo apt-get update
sudo apt-get upgrade

Step 2. Installing Microsoft SQL Server on Ubuntu 16.04.

To begin, we’ll need to add two repositories to our software sources list:

wget https://packages.microsoft.com/keys/microsoft.asc
sudo apt-key add microsoft.asc
curl https://packages.microsoft.com/config/ubuntu/16.04/mssql-server.list | sudo tee /etc/apt/sources.list.d/mssql.list
curl https://packages.microsoft.com/config/ubuntu/16.04/prod.list | sudo tee /etc/apt/sources.list.d/msprod.list

Next we install the MS SQL server by following command:

apt-get update
apt-get install mssql-server mssql-tools -y

Step 3. Configure MS SQL server.

Once installation is complete, you will be reminded to run the configuration script (/opt/mssql/bin/sqlservr-setup) to accept the license terms, set the password for the SA user, and start the service.

sudo /opt/mssql/bin/sqlservr-setup

Output:

Microsoft(R) SQL Server(R) Setup

You can abort setup at anytime by pressing Ctrl-C. Start this program
with the –help option for information about running it in unattended
mode.


The license terms for this product can be downloaded from
http://go.microsoft.com/fwlink/?LinkId=746388 and found
in /usr/share/doc/mssql-server/LICENSE.TXT.

Do you accept the license terms? If so, please type "YES": YES

Please enter a password for the system administrator (SA) account: Enter Admin Password
Please confirm the password for the system administrator (SA) account: Re Enter Admin Password

Setting system administrator (SA) account password...

Do you wish to start the SQL Server service now? [y/n]: n

You can use sqlservr-setup --start-service to start SQL Server, and
sqlservr-setup --enable-service to enable SQL Server to start at boot.

Setup completed successfully.

Finally, Start the Microsoft SQL Server Service:

systemctl start mssql-server
systemctl enable mssql-server

Step 4. Connect to MS SQL server.

Once the installation is complete, connect to MS SQL server using the following command:

sqlcmd -H 127.0.0.1 -U sa
Password:
1>

Congratulation’s! You have successfully installed Microsoft SQL Server. Thanks for using this tutorial for installing Microsoft SQL Server (MS SQL) on your Ubuntu 16.04 LTS (Xenial Xerus) system. For additional help or useful information, we recommend you to check the official Microsoft SQL Server web site.

How To Install VMware Workstation on Ubuntu 16.04 LTS

Install VMware Workstation on Ubuntu 16

VMware Workstation is the most popular Virtualization software used at the desktop level on Linux like operating systems and Microsoft Windows. It allows the us to create and run multiple Virtual machines simultaneously. VMware Workstation is not an open source or free software so we need to buy its license key, though we can use its trail version for 30 days then later you can apply its license key. Continue reading “How To Install VMware Workstation on Ubuntu 16.04 LTS”

How To Install FreeIPA on Ubuntu 16.04 LTS

Install FreeIPA on Ubuntu 16

FreeIPA is an open source identity management system for Linux/Unix environments which provides centralized account management and authentication, like Microsoft Active Directory or LDAP.

This article assumes you have at least basic knowledge of Linux, know how to use the shell, and most importantly, you host your site on your own VPS. The installation is quite simple and assumes you are running in the root account, if not you may need to add ‘sudo’ to the commands to get root privileges. I will show you through the step by step installation FreeIPA open source identity management system on an Ubuntu 16.04 Xenial Xerus server.

Install FreeIPA on Ubuntu 16.04 LTS

Step 1. First make sure that all your system packages are up-to-date by running these following apt-get commands in the terminal.

sudo apt-get update
sudo apt-get upgrade

Step 2. Installing FreeIPA.

The first thing that we are going to do is to prepare the Ubuntu 16.04 server to run FreeIPA. In order to do this, we are going to set the IP address on the system, In our case the host IP is 192.168.1.2/24:

### nano /etc/hosts
192.168.1.2 ipa.wpcademy.com

Next, Install the package dependencies required for our setup with the following commands if they are not already installed:

ipa-server-install

Then, install FreeIPA using following command:

apt-get install freeipa-server freeipa-server-dns

After the FreeIPA installation, authenticate to the Kerberos realm to ensure that the administrator is configured correctly:

​​kinit admin

Ensure the following ports are opened in the security group of the FreeIPA Server:


    80,443
    tcp 88,464
    ldap 389

Step 3. Accessing FreeIPA.

FreeIPA will be available on HTTP port 80 by default. Open your favorite browser and navigate to https://ipa.wpcademy.local/ and complete the required the steps to finish the installation.

Congratulation’s! You have successfully installed FreeIPA. Thanks for using this tutorial for installing FreeIPA open source identity management system on your Ubuntu 16.04 LTS. For additional help or useful information, we recommend you to check the official FreeIPA web site.

How To Install Observium on Ubuntu 16.04 LTS

Install Observium on Ubuntu 16

Observium is a Network Management and Monitoring System that collects data from using SNMP and allows you to monitor all of the networks devices via an easy to use interface. It is PHP-based and uses a MySQL database to store data.

This article assumes you have at least basic knowledge of linux, know how to use the shell, and most importantly, you host your site on your own VPS. The installation is quite simple and assumes you are running in the root account, if not you may need to add ‘sudo’ to the commands to get root privileges. I will show you through the step by step installation Conky system on a Ubuntu 16.04 (Xenial Xerus) server.

Install Observium on Ubuntu 16.04 LTS

Step 1. First make sure that all your system packages are up-to-date by running these following apt-get commands in the terminal.

sudo apt-get update
sudo apt-get upgrade

Step 2. Install LAMP (Linux, Apache, MariaDB, PHP) server.

A Ubuntu 16.04 LAMP server is required. If you do not have LAMP installed, you can follow our guide here. Also install all required PHP modules:

apt-get install php7.0-mysql php7.0-curl php7.0-json php7.0-cgi php7.0 libapache2-mod-php7.0 php7.0-mcrypt php7.0-xmlrpc php7.0-gd

Step 3. Installing Observium.

First, Go to Observium’s download page and download the latest stable version of Observium:

cd /opt
wget http://www.observium.org/observium-community-latest.tar.gz

Unpack the Observium archive to the document root directory on your server:

tar zxvf observium-community-latest.tar.gz

Step 4. Configuring MariaDB for Observium.

By default, MariaDB is not hardened. You can secure MariaDB using the mysql_secure_installation script. you should read and below each steps carefully which will set root password, remove anonymous users, disallow remote root login, and remove the test database and access to secure MariaDB:

mysql_secure_installation

Configure it like this:

- Set root password? [Y/n] y
- Remove anonymous users? [Y/n] y
- Disallow root login remotely? [Y/n] y
- Remove test database and access to it? [Y/n] y
- Reload privilege tables now? [Y/n] y

Next we will need to log in to the MariaDB console and create a database for the Observium. Run the following command:

mysql -u root -p

This will prompt you for a password, so enter your MariaDB root password and hit Enter. Once you are logged in to your database server you need to create a database for Observium installation:

CREATE DATABASE observium DEFAULT CHARACTER SET utf8 COLLATE utf8_general_ci;
GRANT ALL PRIVILEGES ON observium.* TO 'observium'@'localhost' IDENTIFIED BY 'dbpassword';
flush privileges;
exit

Next, Copy the default configuration file ‘config.php.default‘ to ‘config.php‘ and fill out the database config options:

cd observium
cp config.php.default config.php

Changes the database configuration parameters with the ones created previously:

nano config.php

After you edit the file and modify the database parameters, the section should look like this:

// Database config --- This MUST be configured
$config['db_extension'] = 'mysqli';
$config['db_host'] = 'localhost';
$config['db_user'] = 'observium';
$config['db_pass'] = 'dbpassword';
$config['db_name'] = 'observium';

Give Apache user www-data ownership of the Observium web files:

chown -R www-data:www-data /opt/observium/html/

Run this script to Setup the MySQL database and insert the default schema:

./discovery.php -u

Create the directory to store RRDs in and set the proper ownership:

mkdir rrd
chown www-data:www-data rrd

Step 5. Configuring Apache web server for Observium.

Now we have to create the virtual host configuration for Observium. You can either add a new virtual host or alter the default one:

nano /etc/apache2/sites-available/000-default.conf

Add the following lines:

<VirtualHost *:80>
ServerAdmin webmaster@localhost
DocumentRoot /opt/observium/html
<Directory />
Options FollowSymLinks
AllowOverride None
</Directory>
<Directory /opt/observium/html/>
Options Indexes FollowSymLinks MultiViews
AllowOverride All
Require all granted
</Directory>
ErrorLog  ${APACHE_LOG_DIR}/error.log
LogLevel warn
CustomLog  ${APACHE_LOG_DIR}/access.log combined
ServerSignature On
</VirtualHost>

Next, you need to enable rewrite functionality for your Apache server:

a2enmod rewrite

Enable the PHP mcrypt module:

phpenmod mcrypt

Now, we can restart Apache web server so that the changes take place:

systemctl restart apache2.service

Next, enter the observium directory:

cd /opt/observium

Add a first user with the use level of 10 for admin. The command sintax is below:

./adduser.php <username> <password> <level>

We are using the following:

./adduser.php wpcademy random_password 10

Step 6. Accessing Observium.

Observium will be available on HTTP port 80 by default. Open your favorite browser and navigate to http://yourdomain.com/ or http://server-ip. If you are using a firewall, please open port 80 to enable access to the control panel.

Observium-login-page

Congratulation’s! You have successfully installed Observium. Thanks for using this tutorial for installing latest stable version of Observium on Ubuntu 16.04 LTS (Xenial Xerus) system. For additional help or useful information, we recommend you to check the official Observium web site.

How To Install Nginx Amplify Agent on Ubuntu 16.04 LTS

Install Nginx Amplify Agent on Ubuntu 16

Nginx Amplify Agent is a Strong Nginx monitoring tool written in Python. Its function is to collect various metrics and metadata and send Them securely into the backend for storage and visualization. After appropriate Installation, it supplies you with NGINX Amplify web interface and also you Should observe real-time metrics to your monitored systems.

This article assumes you have at least basic knowledge of Linux, know how to use the shell, and most importantly, you host your site on your own VPS. The installation is quite simple and assumes you are running in the root account, if not you may need to add ‘sudo’ to the commands to get root privileges. I will show you through the step by step installation Nginx Amplify Agent monitoring tool on an Ubuntu 16.04 Xenial Xerus server.

Install Nginx Amplify Agent on Ubuntu 16.04 LTS

Step 1. First make sure that all your system packages are up-to-date by running these following apt-get commands in the terminal.

sudo apt-get update
sudo apt-get upgrade

Step 2. Installing Nginx Amplify Agent on Ubuntu 16.04.

First, add the necessary public key with the command:

curl -fs http://nginx.org/keys/nginx_signing.key | apt-key add -

Configure the repository with the command:

# codename=`lsb_release -cs` && \
os=`lsb_release -is | tr '[:upper:]' '[:lower:]'` && \
echo "deb http://packages.amplify.nginx.com/${os}/ ${codename} amplify-agent" > \
/etc/apt/sources.list.d/nginx-amplify.list

Install the Nginx Amplify Agent using apt:

apt-get update
apt-get install nginx-amplify-agent

Creating the Config File from a Template:

api_key="KEY" && \
sed "s/api_key.*$/api_key = ${api_key}/" \
/etc/amplify-agent/agent.conf.default > \
/etc/amplify-agent/agent.conf

*Where KEY is the API key is the unique key assigned to your NGINX Amplify account.

Once installed, These commands can be used to start/stop the agent:

systemctl enable amplify-agent
systemctl start amplify-agent

Step 3. Configuring the Nginx Amplify Agent.

Checklist:

stub status
extended access logging
‘warn’ level on error logging


server {
 listen [::]:80;
 server_name bmw.wpcademy.com localhost [::1] 127.0.0.1;
 keepalive_timeout 60;

location /nginx_status {
 stub_status;
 access_log off;

allow ::1;
 allow 127.0.0.1;
 deny all;
 }
}

The logging needs to be confiured to have extended information as per the documentation:

log_format  main      '$remote_addr - $remote_user [$time_local] "$request" '
                      ' $status $body_bytes_sent "$http_referer" '
                      '"$http_user_agent" "$http_x_forwarded_for" '
                      'rt=$request_time ua="$upstream_addr" '
                      'us="$upstream_status" ut="$upstream_response_time" '
                      'ul="$upstream_response_length" '
                      'cs=$upstream_cache_status' ;

Ensure warnings are logged to the error log:

error_log /var/log/nginx/error.log warn

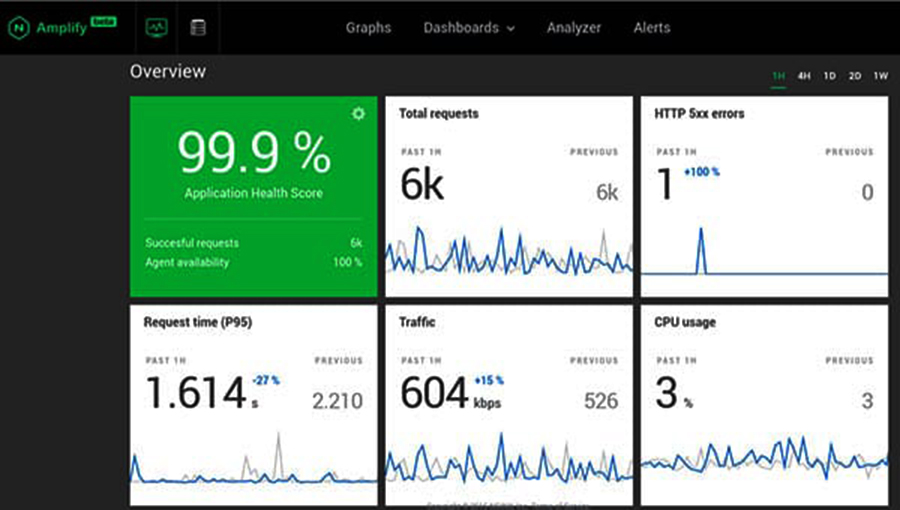
Finally steps, You can overview the status of our monitored server in the Web interface logging to your Amplify Account as in the snapshot:
nginx-amplify-agent

Congratulation’s! You have successfully installed Nginx Amplify Agent. Thanks for using this tutorial for installing Nginx Amplify Agent monitoring tool on your Ubuntu 16.04 LTS. For additional help or useful information, we recommend you to check the official Nginx Amplify Agent web site.