Easy Guide to Add Custom Post Status for Blog Posts in WordPress

In this article, we will show you how to easily add custom post status to blog posts in WordPress.


What is Post Status in WordPress and Why Do You Need it?

Post status is an editorial tool that tells WordPress the stage of a blog post during editing. For example, posts that are incomplete are saved with the post status labeled ‘Draft’. When you publish an article, the status changes to ‘Published’.
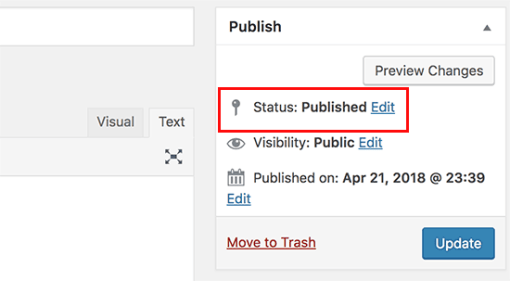
Post status helps WordPress choose how to handle and display blog posts on your website. For example, it will automatically exclude posts labeled draft from your homepage and other publicly viewable areas of your website.

By default, WordPress comes with the following post status that you can use:

  • Draft – An item that is saved but incomplete and not yet published
  • Auto draft – WordPress has an auto-save feature that automatically saves a draft as revision.
  • Pending review – Items that are complete and submitted for review but not yet published.
  • Future – Posts scheduled to be published later.
  • Private – Items marked as private
  • Trash – Items that are trashed
  • Inherit – Child pages that automatically inherit status of their parent page.

Apart from these default post statuses, you can also create your own custom post statuses to improve your editorial workflow. For example, you can add a label ‘Not suitable’ for posts that are complete but not suitable for publication.

Having said that, let’s take a look at how to easily create custom post statuses in WordPress.

Method 1. Create Custom Post Status Using a Plugin

This method is easier and recommended for most users. It allows you to create custom post statuses as well as efficiently manage editorial workflowon your multi-author WordPress blog.

The first thing you need to do is install and activate the Edit Flow plugin. For more details, see our step by step guide on how to install a WordPress plugin.

Upon activation, the plugin will add a new menu item labeled ‘Edit Flow’ to your WordPress admin menu. Clicking on it will take you to the plugin’s settings page.
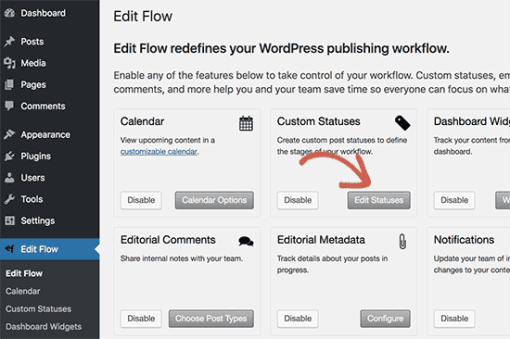
Edit Flow comes with a lot of useful features, and you can turn them On/Off from this screen. Go ahead and click on the ‘Edit Statuses’ button under ‘Custom Statuses’ box to continue.

Edit Flow automatically creates the following custom post statuses:

  • Pitch – Used to pitch new article ideas and this status also becomes the default post status of every new post.
  • Assigned – You can select an author and mark an article as assigned so that the author can work on it.
  • In progress – Writer is working on the post but is not yet available as a readable draft.
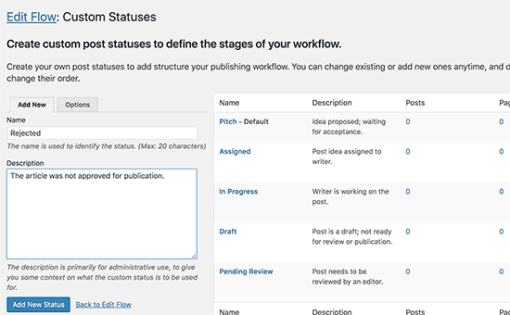
You can create your own custom status by providing a name and description in the left column. Once you are done, click on the ‘Add new status’ button to save your changes.

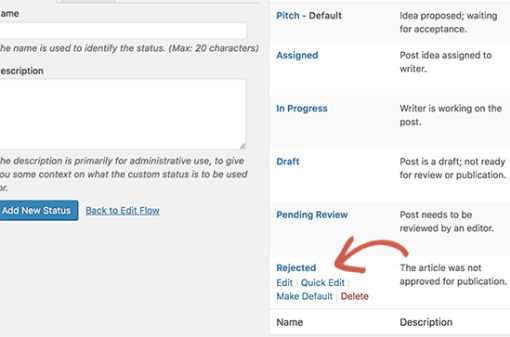
Your custom status will now appear in the right-hand column, so you can edit or delete it at any time.
Next, you need to go to Posts » Add New page to create a new post. On the post edit screen, click on the ‘Edit’ link next to status option under the ‘Publish’ meta box.
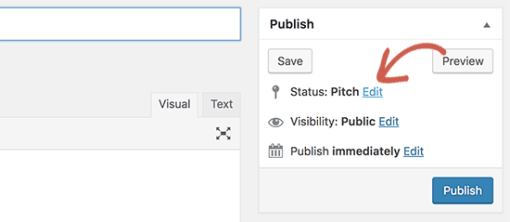
This will reveal a drop-down menu showing all post statuses that you can select including the custom post status you just created.

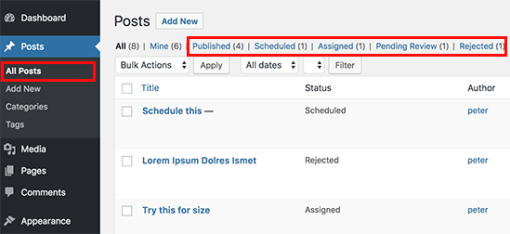
You can also see all articles filed under different post statuses by visiting Posts » All Posts page.
Method 2. Create Custom Post Status Using Code

WordPress has a known bug in the API used to register custom post statuses. It allows you to create custom post status, but you cannot use it in the admin panel. This means that the coding method can get the job done, but it is not as clean, and you will need to change it after it is officially fixed.

However if you still want to do it manually, then you can continue reading.

This method requires you to add code to your WordPress site. If you haven’t done this before, then take a look at our guide on how to copy and paste code in WordPress.

First, you need to add the following code to your theme’s functions.php file or a site-specific plugin.

// Registering custom post status
function wpb_custom_post_status(){
    register_post_status('rejected', array(
        'label'                     => _x( 'Rejected', 'post' ),
        'public'                    => false,
        'exclude_from_search'       => false,
        'show_in_admin_all_list'    => true,
        'show_in_admin_status_list' => true,
        'label_count'               => _n_noop( 'Rejected <span class="count">(%s)</span>', 'Rejected <span class="count">(%s)</span>' ),
    ) );
}
add_action( 'init', 'wpb_custom_post_status' );
 
// Using jQuery to add it to post status dropdown
add_action('admin_footer-post.php', 'wpb_append_post_status_list');
function wpb_append_post_status_list(){
global $post;
$complete = '';
$label = '';
if($post->post_type == 'post'){
if($post->post_status == 'rejected'){
$complete = ' selected="selected"';
$label = '<span id="post-status-display"> Rejected</span>';
}
echo '
<script>
jQuery(document).ready(function($){
$("select#post_status").append("<option value=\"rejected\" '.$complete.'>Rejected</option>");
$(".misc-pub-section label").append("'.$label.'");
});
</script>
';
}
}

Don’t forget to replace all instances of the word rejected with your own custom post status.

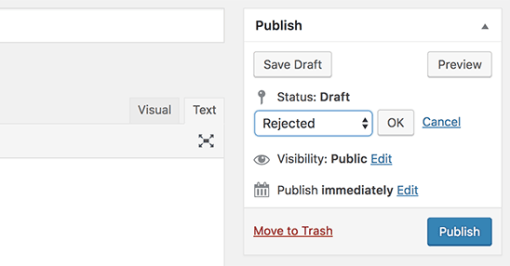
This code registers a custom post status and after that, it uses jQuery to add it to the admin panel. You can now edit a WordPress post, and you will be able to see it in the status drop-down menu.
We hope this article helped you add custom post status to blog posts in WordPress. You may also want to see our list of 55+ most wanted WordPress tips, tricks, and hacks.

If you liked this article, then please subscribe to our YouTube Channel for WordPress video tutorials. You can also find us on Twitter and Facebook.
How To Install WordPress 5.1.1 on Ubuntu 18.04 LTS

Install WordPress on Ubuntu 18

WordPress is an online, open source website creation tool written in PHP. But in non-geek speak, it’s probably the easiest and most powerful blogging and website content management system (or CMS) in existence today.

This article assumes you have at least basic knowledge of Linux, know how to use the shell, and most importantly, you host your site on your own VPS. The installation is quite simple and assumes you are running in the root account, if not you may need to add ‘sudo’ to the commands to get root privileges. I will show you through the step by step installation WordPress content management systems on an Ubuntu 18.04 Bionic Beaver server.

Install WordPress on Ubuntu 18.04 LTS

Step 1. First make sure that all your system packages are up-to-date

sudo apt-get update
sudo apt-get upgrade

Step 2. Install LAMP (Linux, Apache, MariaDB, PHP) server.

A Ubuntu 18.04 LAMP server is required. If you do not have LAMP installed, you can follow our guide here. Also install all required PHP modules:

apt-get install php7.1-cli php7.1-gd php7.1-opcache php7.1-mysql php7.1-json php7.1-mcrypt php7.1-xml php7.1-curl php7.1-mysql php7.1-xml php7.1-xmlrpc

Step 3. Installing WordPress on Ubuntu 18.04 LTS.

First thing to do is to go to WordPress’s download page and download the latest stable version of WordPress, At the moment of writing this article it is version 4.9.7:

wget http://wordpress.org/latest.zip

Unpack the WordPress archive to the document root directory on your server:

unzip -q latest.zip -d /var/www/html/
cd wordpress
cp -a * ..

We will need to change some folders permissions:

chown www-data:www-data -R /var/www/html/

We need to create the upload directory manually:

mkdir -p /var/www/html/wp-content/uploads

Allow the Apache web server to write to the uploads directory. Do this by assigning group ownership of this directory to your web server which will allow Apache to create files and directories. Issue the following command:

chown www-data:www-data -R /var/www/html/wp-content/uploads

Step 4. Configuring MariaDB for WordPress.

By default, MariaDB is not hardened. You can secure MariaDB using the mysql_secure_installation script. you should read and below each steps carefully which will set root password, remove anonymous users, disallow remote root login, and remove the test database and access to secure MariaDB:

mysql_secure_installation

Configure it like this:

- Set root password? [Y/n] y
- Remove anonymous users? [Y/n] y
- Disallow root login remotely? [Y/n] y
- Remove test database and access to it? [Y/n] y
- Reload privilege tables now? [Y/n] y

Next we will need to log in to the MariaDB console and create a database for the WordPress. Run the following command:

mysql -u root -p

This will prompt you for a password, so enter your MariaDB root password and hit Enter. Once you are logged in to your database server you need to create a database for WordPress installation:

create database wordpress;
grant all privileges on wordpress.* to wpuser@localhost identified by 'your-password';
flush privileges;
exit;

Step 5. Configuring WordPress

In this step we will configure the main configuration file of WordPress, where we need to configure it’s basic parameters so that it can be connected with the database and user:

mv wp-config-sample.php wp-config.php

Now open it using any of your favourite editor, to make any changes in the WordPress configuration file:

nano wp-config.php

Here are the values that we need to update according to our previous database and user’s setup:

// ** MySQL settings - You can get this info from your web host ** //
/** The name of the database for WordPress */
define('DB_NAME', 'wordpress');

/** MySQL database username */
define('DB_USER', 'wpuser');

/** MySQL database password */
define('DB_PASSWORD', 'your_password');

/** MySQL hostname */
define('DB_HOST', 'localhost');

Step 6. Configuring Apache web server for WordPress.

Create a new virtual host directive in Apache. For example, create a new Apache configuration file named ‘wordpress.conf’ on your virtual server:

touch /etc/apache2/sites-available/wordpress.conf
ln -s /etc/apache2/sites-available/wordpress.conf /etc/apache2/sites-enabled/wordpress.conf
nano /etc/apache2/sites-available/wordpress.conf

Add the following lines:

&lt;VirtualHost *:80&gt;
ServerAdmin [email protected]
DocumentRoot /var/www/html/
ServerName your-domain.com
ServerAlias www.your-domain.com
&lt;Directory /var/www/html/&gt;
Options FollowSymLinks
AllowOverride All
Order allow,deny
allow from all
&lt;/Directory&gt;
ErrorLog /var/log/apache2/your-domain.com-error_log
CustomLog /var/log/apache2/your-domain.com-access_log common
&lt;/VirtualHost&gt;

Next step we will need to adjust the some some values in the PHP configuration files as follow:

nano /etc/php/7.1/apache2/php.ini

Add/modify the following settings:

max_execution_time = 300
max_input_time = 600
memory_limit = 256M
post_max_size = 64M
upload_max_filesize = 64M

Now, we can restart Apache web server so that the changes take place:

sudo a2ensite wordpress.conf
sudo a2enmod rewrite 
sudo systemctl restart apache2.service

Step 7. Accessing WordPress.

WordPress will be available on HTTP port 80 by default. Open your favorite browser and navigate to http://yourdomain.com or http://server-ip/ and complete the required the steps to finish the installation. If you are using a firewall, please open port 80 to enable access to the control panel.

Congratulation’s! You have successfully installed WordPress. Thanks for using this tutorial for installing WordPress CMS (Content Management Systems) on your Ubuntu 18.04 Bionic Beaver. For additional help or useful information, we recommend you to check the official WordPress installation guideline .

How to Install WordPress on Ubuntu 17.10

Install WordPress on Ubuntu 17

WordPress is an online, open source website creation tool written in PHP. But in non-geek speak, it’s probably the easiest and most powerful blogging and website content management system (or CMS) in existence today. In this tutorial we will show you how to install WordPress on Ubuntu 17.10.

This article assumes you have at least basic knowledge of Linux, know how to use the shell, and most importantly, you host your site on your own VPS. The installation is quite simple and assumes you are running in the root account, if not you may need to add ‘sudo’ to the commands to get root privileges. I will show you through the step by step installation WordPress content management systems on an Ubuntu 17.10 Artful Aardvark server.

Install WordPress on Ubuntu 17.10 Artful Aardvark

Step 1. First make sure that all your system packages are up-to-date

sudo apt-get update
sudo apt-get upgrade

Step 2. Install LAMP (Linux, Apache, MariaDB, PHP) server.

A Ubuntu 17.10 LAMP server is required. If you do not have LAMP installed, you can follow our guide here. Also install all required PHP modules:

apt-get install php7.0-mysql php7.0-curl php7.0-json php7.0-cgi php7.0 libapache2-mod-php7.0 php7.0-mcrypt php7.0-xmlrpc php7.0-gd

Step 3. Installing WordPress on Ubuntu 17.10 Artful Aardvark.

First thing to do is to go to WordPress’s download page and download the latest stable version of WordPress, At the moment of writing this article it is version 4.8.2:

wget http://wordpress.org/latest.zip

Unpack the WordPress archive to the document root directory on your server:

unzip -q latest.zip -d /var/www/html/
cd wordpress
cp -a * ..

We will need to change some folders permissions:

chown www-data:www-data -R /var/www/html/

We need to create the upload directory manually:

mkdir -p /var/www/html/wp-content/uploads

Allow the Apache web server to write to the uploads directory. Do this by assigning group ownership of this directory to your web server which will allow Apache to create files and directories. Issue the following command:

chown www-data:www-data -R /var/www/html/wp-content/uploads

Step 4. Configuring MariaDB for WordPress.

By default, MariaDB is not hardened. You can secure MariaDB using the mysql_secure_installation script. you should read and below each steps carefully which will set root password, remove anonymous users, disallow remote root login, and remove the test database and access to secure MariaDB:

mysql_secure_installation

Configure it like this:

- Set root password? [Y/n] y
- Remove anonymous users? [Y/n] y
- Disallow root login remotely? [Y/n] y
- Remove test database and access to it? [Y/n] y
- Reload privilege tables now? [Y/n] y

Next we will need to log in to the MariaDB console and create a database for the WordPress. Run the following command:

mysql -u root -p

This will prompt you for a password, so enter your MariaDB root password and hit Enter. Once you are logged in to your database server you need to create a database for WordPress installation:

create database wordpress;
grant all privileges on wordpress.* to wpuser@localhost identified by 'your-password';
flush privileges;
exit;

Step 5. Configuring WordPress

In this step we will configure the main configuration file of WordPress, where we need to configure it’s basic parameters so that it can be connected with the database and user:

mv wp-config-sample.php wp-config.php

Now open it using any of your favourite editor, to make any changes in the WordPress configuration file:

nano wp-config.php

Here are the values that we need to update according to our previous database and user’s setup:

// ** MySQL settings - You can get this info from your web host ** //
/** The name of the database for WordPress */
define('DB_NAME', 'wordpress');

/** MySQL database username */
define('DB_USER', 'wpuser');

/** MySQL database password */
define('DB_PASSWORD', 'your_password');

/** MySQL hostname */
define('DB_HOST', 'localhost');

Step 6. Configuring Apache web server for WordPress.

Create a new virtual host directive in Apache. For example, create a new Apache configuration file named ‘wordpress.conf’ on your virtual server:

sudo a2enmod rewrite
touch /etc/apache2/sites-available/wordpress.conf
ln -s /etc/apache2/sites-available/wordpress.conf /etc/apache2/sites-enabled/wordpress.conf
nano /etc/apache2/sites-available/wordpress.conf

Add the following lines:

<VirtualHost *:80>
ServerAdmin [email protected]
DocumentRoot /var/www/html/
ServerName your-domain.com
ServerAlias www.your-domain.com
<Directory /var/www/html/>
Options FollowSymLinks
AllowOverride All
Order allow,deny
allow from all
</Directory>
ErrorLog /var/log/apache2/your-domain.com-error_log
CustomLog /var/log/apache2/your-domain.com-access_log common
</VirtualHost>

Next step we will need to adjust the some some values in the PHP configuration files as follow:

nano /etc/php/7.0/apache2/php.ini

Add/modify the following settings:

max_execution_time = 300
max_input_time = 600
memory_limit = 256M
post_max_size = 64M
upload_max_filesize = 64M

Now, we can restart Apache web server so that the changes take place:

systemctl restart apache2.service

Step 7. Accessing WordPress.

WordPress will be available on HTTP port 80 by default. Open your favorite browser and navigate to http://yourdomain.com or http://server-ip/ and complete the required the steps to finish the installation. If you are using a firewall, please open port 80 to enable access to the control panel.

Congratulation’s! You have successfully installed WordPress. Thanks for using this tutorial for installing WordPress CMS (Content Management Systems) on your Ubuntu 17.10 Artful Aardvark. For additional help or useful information, we recommend you to check the official WordPress web site.

How to Speed Up WordPress Using Redis Caching

How to Speed Up WordPress Using Redis Caching

WordPress is software designed for everyone, emphasizing accessibility, performance, security, and ease of use. WP believe great software should work with minimum set up, so you can focus on sharing your story, product, or services freely. The basic WordPress software is simple and predictable so you can easily get started. It also offers powerful features for growth and success.

But in non-geek speak, it’s probably the easiest and most powerful blogging and website content management system (or CMS) in existence today.

This article assumes you have at least basic knowledge of Linux, know how to use the shell, and most importantly, you host your site on your own VPS. The installation is quite simple and assumes you are running in the root account, if not you may need to add ‘sudo’ to the commands to get root privileges. I will show you through the step by step installation WordPress content management systems on a Ubuntu 16.04 server.

Speed Up WordPress Using Redis Caching

Step 1. First make sure that all your system packages are up-to-date

sudo apt-get update
sudo apt-get upgrade

Step 2. Installing WordPress

If you do not have WordPress installed, you can follow WP Installation guide here.

Step 3. Installing Redis.

In order to use Redis with WordPress, two packages need to be installed: redis-server and php-redis. The redis-server package provides Redis itself, while the php-redis package provides a PHP extension for PHP applications like WordPress to communicate with Redis:

apt-get install redis-server
apt-get install php-redis

Start and enable Redis on system boot:

systemctl start redis.service
systemctl enable redis.service

Step 4. Install Redis Caching Plugin in WordPress.

After installing Redis and the PHP Redis client extension, log in to your WordPress Dashboard and select Add New from the Plugins menu.

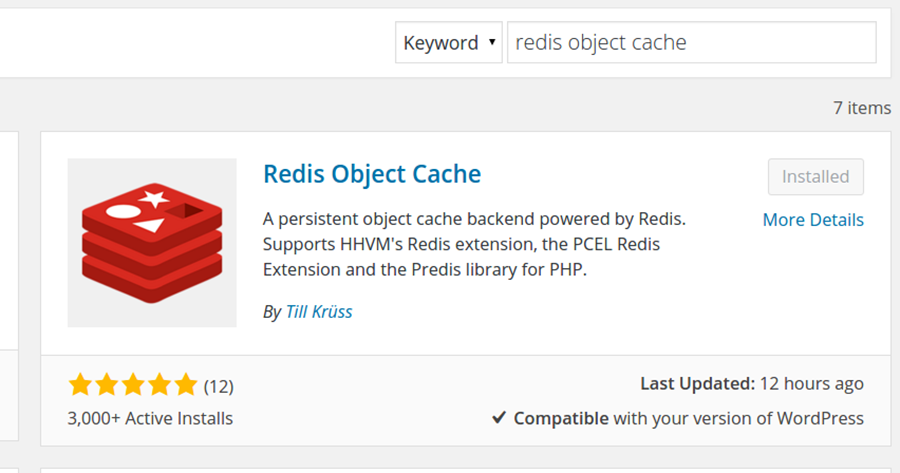
Then, search for “Redis Object Cache” and click Install Now on the matching result.

redis-object-cache
Next, navigate to Settins > Redis and click on Enable Object Cache to enable the object caching in WordPress. The default configuration should work out of the box sonce the default Redis listening address is 127.0.0.1 and the default listening port is 6379.

Step 5. Verify WordPress caching.

To check whether the WordPress caching works OK with Redis you can connect to your server via SSH and run the following command:

redis-cli monitor

When you run this command, you will see the real-time output of Redis serving cached queries. If you don’t see anything, visit your website and reload a page.

Congratulation’s! You have successfully installed WordPress with Redis Caching.

How To Install WordPress on Ubuntu 16.04

Install WordPress on Ubuntu 16

WordPress is an online, open source website creation tool written in PHP. But in non-geek speak, it’s probably the easiest and most powerful blogging and website content management system (or CMS) in existence today.

This article assumes you have at least basic knowledge of linux, know how to use the shell, and most importantly, you host your site on your own VPS. The installation is quite simple and assumes you are running in the root account, if not you may need to add ‘sudo’ to the commands to get root privileges. I will show you through the step by step installation WordPress content management systems on a Ubuntu 16.04 server.

Install WordPress on Ubuntu 16.04

Step 1. First make sure that all your system packages are up-to-date by running these following apt-get commands in the terminal.

sudo apt-get update
sudo apt-get upgrade

Step 2. Install LAMP (Linux, Apache, MariaDB, PHP) server.

A Ubuntu 16.04 LAMP server is required. If you do not have LAMP installed, you can follow our guide here. Also install all required PHP modules:

apt-get install php7.0-mysql php7.0-curl php7.0-json php7.0-cgi php7.0 libapache2-mod-php7.0 php7.0-mcrypt php7.0-xmlrpc php7.0-gd

Step 3. Installing WordPress.

First thing to do is to go to WordPress’s download page and download the latest stable version of WordPress, At the moment of writing this article it is version 4.5.1:

wget http://wordpress.org/latest.zip

Unpack the WordPress archive to the document root directory on your server:

unzip -q latest.zip -d /var/www/html/
cd wordpress
cp -a * ..

We will need to change some folders permissions:

chown www-data:www-data -R /var/www/html/

We need to create the upload directory manually:

mkdir -p /var/www/html/wp-content/uploads

Allow the Apache web server to write to the uploads directory. Do this by assigning group ownership of this directory to your web server which will allow Apache to create files and directories. Issue the following command:

chown www-data:www-data -R /var/www/html/wp-content/uploads

Step 4. Configuring MariaDB for WordPress.

By default, MariaDB is not hardened. You can secure MariaDB using the mysql_secure_installation script. you should read and below each steps carefully which will set root password, remove anonymous users, disallow remote root login, and remove the test database and access to secure MariaDB:

mysql_secure_installation

Configure it like this:

- Set root password? [Y/n] y
- Remove anonymous users? [Y/n] y
- Disallow root login remotely? [Y/n] y
- Remove test database and access to it? [Y/n] y
- Reload privilege tables now? [Y/n] y

Next we will need to log in to the MariaDB console and create a database for the WordPress. Run the following command:

mysql -u root -p

This will prompt you for a password, so enter your MariaDB root password and hit Enter. Once you are logged in to your database server you need to create a database for WordPress installation:

CREATE DATABASE wordpress character set utf8 collate utf8_bin;
GRANT ALL PRIVILEGES on wordpress.* to 'wpuser'@'localhost' identified by 'your_password';
FLUSH PRIVILEGES;
exit

Step 5. Configuring WordPress

In this step we will configure the main configuration file of WordPress, where we need to configure it’s basic parameters so that it can be connected with the database and user:

mv wp-config-sample.php wp-config.php

Now open it using any of your favourite editor, to make any changes in the WordPress configuration file:

nano wp-config.php

Here are the values that we need to update according to our previous database and user’s setup:

// ** MySQL settings - You can get this info from your web host ** //
/** The name of the database for WordPress */
define('DB_NAME', 'wordpress');

/** MySQL database username */
define('DB_USER', 'wpuser');

/** MySQL database password */
define('DB_PASSWORD', 'your_password');

/** MySQL hostname */
define('DB_HOST', 'localhost');

Step 6. Configuring Apache web server for WordPress.

Create a new virtual host directive in Apache. For example, create a new Apache configuration file named ‘wordpress.conf’ on your virtual server:

sudo a2enmod rewrite
touch /etc/apache2/sites-available/wordpress.conf
ln -s /etc/apache2/sites-available/wordpress.conf /etc/apache2/sites-enabled/wordpress.conf
nano /etc/apache2/sites-available/wordpress.conf

Add the following lines:

ServerAdmin [email protected]
DocumentRoot /var/www/html/
ServerName your-domain.com
ServerAlias www.your-domain.com

Options FollowSymLinks
AllowOverride All
Order allow,deny
allow from all

ErrorLog /var/log/apache2/your-domain.com-error_log
CustomLog /var/log/apache2/your-domain.com-access_log common

Now, we can restart Apache web server so that the changes take place:

systemctl restart apache2.service

Step 7. Accessing WordPress.

WordPress will be available on HTTP port 80 by default. Open your favorite browser and navigate to http://yourdomain.com or http://server-ip/ and complete the required the steps to finish the installation. If you are using a firewall, please open port 80 to enable access to the control panel.

Congratulation’s! You have successfully installed WordPress. Thanks for using this tutorial for installing WordPress CMS (Content Management Systems) on your Ubuntu 16.04 system. For additional help or useful information, we recommend you to check the official WordPress web site.

How To Install WordPress on Ubuntu 17.04

Install WordPress on Ubuntu 17

WordPress is an online, open source website creation tool written in PHP. But in non-geek speak, it’s probably the easiest and most powerful blogging and website content management system (or CMS) in existence today.

This article assumes you have at least basic knowledge of Linux, know how to use the shell, and most importantly, you host your site on your own VPS. The installation is quite simple and assumes you are running in the root account, if not you may need to add ‘sudo’ to the commands to get root privileges. I will show you through the step by step installation WordPress content management systems on an Ubuntu 17.04 Zesty Zapus server.
Install WordPress on Ubuntu 17.04 Zesty Zapus

Step 1. First make sure that all your system packages are up-to-date by running these following apt-get commands in the terminal.

sudo apt-get update
sudo apt-get upgrade

Step 2. Install LAMP (Linux, Apache, MariaDB, PHP) server.

A Ubuntu 17.04 LAMP server is required. If you do not have LAMP installed, you can follow our guide here. Also install all required PHP modules:

apt-get install php7.0-mysql php7.0-curl php7.0-json php7.0-cgi php7.0 libapache2-mod-php7.0 php7.0-mcrypt php7.0-xmlrpc php7.0-gd

Step 3. Installing WordPress on Ubuntu 17.04.

First thing to do is to go to WordPress’s download page and download the latest stable version of WordPress, At the moment of writing this article it is version 4.8:

wget http://wordpress.org/latest.zip

Unpack the WordPress archive to the document root directory on your server:

unzip -q latest.zip -d /var/www/html/
cd wordpress
cp -a * ..

We will need to change some folders permissions:

chown www-data:www-data -R /var/www/html/

We need to create the upload directory manually:

mkdir -p /var/www/html/wp-content/uploads

Allow the Apache web server to write to the uploads directory. Do this by assigning group ownership of this directory to your web server which will allow Apache to create files and directories. Issue the following command:

chown www-data:www-data -R /var/www/html/wp-content/uploads

Step 4. Configuring MariaDB for WordPress.

By default, MariaDB is not hardened. You can secure MariaDB using the mysql_secure_installation script. you should read and below each steps carefully which will set root password, remove anonymous users, disallow remote root login, and remove the test database and access to secure MariaDB:

mysql_secure_installation

Configure it like this:

- Set root password? [Y/n] y
- Remove anonymous users? [Y/n] y
- Disallow root login remotely? [Y/n] y
- Remove test database and access to it? [Y/n] y
- Reload privilege tables now? [Y/n] y

Next we will need to log in to the MariaDB console and create a database for the WordPress. Run the following command:

mysql -u root -p

This will prompt you for a password, so enter your MariaDB root password and hit Enter. Once you are logged in to your database server you need to create a database for WordPress installation:

CREATE DATABASE wordpress character set utf8 collate utf8_bin;
GRANT ALL PRIVILEGES on wordpress.* to 'wpuser'@'localhost' identified by 'your_password';
FLUSH PRIVILEGES;
exit

Step 5. Configuring WordPress

In this step we will configure the main configuration file of WordPress, where we need to configure it’s basic parameters so that it can be connected with the database and user:

mv wp-config-sample.php wp-config.php

Now open it using any of your favourite editor, to make any changes in the WordPress configuration file:

nano wp-config.php

Here are the values that we need to update according to our previous database and user’s setup:

// ** MySQL settings - You can get this info from your web host ** //
/** The name of the database for WordPress */
define('DB_NAME', 'wordpress');

/** MySQL database username */
define('DB_USER', 'wpuser');

/** MySQL database password */
define('DB_PASSWORD', 'your_password');

/** MySQL hostname */
define('DB_HOST', 'localhost');

Step 6. Configuring Apache web server for WordPress.

Create a new virtual host directive in Apache. For example, create a new Apache configuration file named ‘wordpress.conf’ on your virtual server:

sudo a2enmod rewrite
touch /etc/apache2/sites-available/wordpress.conf
ln -s /etc/apache2/sites-available/wordpress.conf /etc/apache2/sites-enabled/wordpress.conf
nano /etc/apache2/sites-available/wordpress.conf

Add the following lines:

<VirtualHost *:80>
ServerAdmin [email protected]
DocumentRoot /var/www/html/
ServerName your-domain.com
ServerAlias www.your-domain.com
<Directory /var/www/html/>
Options FollowSymLinks
AllowOverride All
Order allow,deny
allow from all
</Directory>
ErrorLog /var/log/apache2/your-domain.com-error_log
CustomLog /var/log/apache2/your-domain.com-access_log common
</VirtualHost>

Next step we will need to adjust the some some values in the PHP configuration files as follow:

nano /etc/php/7.0/apache2/php.ini

Add/modify the following settings:

max_execution_time = 300
max_input_time = 600
memory_limit = 256M
post_max_size = 64M
upload_max_filesize = 64M

Now, we can restart Apache web server so that the changes take place:

systemctl restart apache2.service

Step 7. Accessing WordPress.

WordPress will be available on HTTP port 80 by default. Open your favorite browser and navigate to http://yourdomain.com or http://server-ip/ and complete the required the steps to finish the installation. If you are using a firewall, please open port 80 to enable access to the control panel.

Congratulation’s! You have successfully installed WordPress. Thanks for using this tutorial for installing WordPress CMS (Content Management Systems) on your Ubuntu 17.04. For additional help or useful information, we recommend you to check the official WordPress web site.

How To Install WordPress with Docker on Ubuntu 16.04 LTS

Install WordPress with Docker on Ubuntu 16

Docker is an open-source project that automates the deployment of application inside the software container. The container allows the developer to package up all project resources such as libraries, dependencies, assets etc. Docker is written in Go Programming language and is developed by Dotcloud. It is basically a container engine which uses the Linux Kernel features like namespaces and control groups to create containers on top of an operating system and automates the application deployment on the container.

This article assumes you have at least basic knowledge of Linux, know how to use the shell, and most importantly, you host your site on your own VPS. The installation is quite simple and assumes you are running in the root account, if not you may need to add ‘sudo’ to the commands to get root privileges. I will show you through the step by step installation WordPress content management systems on an Ubuntu 16.04 Xenial Xerus server.

Install WordPress with Docker on Ubuntu 16.04 LTS

Step 1. First make sure that all your system packages are up-to-date by running these following apt-get commands in the terminal.

sudo apt-get update
sudo apt-get upgrade

Step 2. Installing Docker.

A Ubuntu 16.04 Docker server is required. If you do not have Docker installed, you can follow our guide here.

Step 3. Installing MariaDB Container.

Before installing WordPress with Docker you will need to have somewhere to store the data. MariaDB is a community-developed relational database management system and a drop-in replacement for MySQL:

mkdir ~/wordpress && cd ~/wordpress

Next we create the MariaDB container with the command:

docker run -e MYSQL_ROOT_PASSWORD=<password> -e MYSQL_DATABASE=wordpress --name wordpressdb -v "$PWD/database":/var/lib/mysql -d mariadb:latest

If Docker was successful at creating the container, you should see a code at the end of the output similar to the example below:

...
Status: Downloaded newer image for mariadb:latest
23df0ec2e48beb1fb8704ba612e9eb083f4193BMWe4611102bc91232955cccc54

You can confirm that the MariaDB container is running by using the following command:

docker ps

Step 4. Installing WordPress Container.

WordPress is made officially available on Docker Hub, pull the image using with the command below:

docker pull wordpress

Run the command below while replacing the and as appropriate to your cloud server:

docker run -e WORDPRESS_DB_PASSWORD=<password> --name wordpress --link wordpressdb:mysql -p <server public IP>:80:80 -v "$PWD/html":/var/www/html -d wordpress

Finally step, restart Docker and the database container, also make sure no other service is already bound to the port 80:

sudo service docker restart
docker start wordpressdb

*Note: Full command-line documentation is also available over at Docker support page.

Step 5. Accessing WordPress Installation.

WordPress will be available on HTTP port 80 by default. Open your favorite browser and navigate to http://yourdomain.com/wp-admin/install.php or http://server-ip/wp-admin/install.php and complete the required the steps to finish the installation. If you are using a firewall, please open port 80 to enable access to the control panel.

Congratulation’s! You have successfully installed WordPress with Docker. Thanks for using this tutorial for installing WordPress with Docker on your Ubuntu 16.04. For additional help or useful information, we recommend you to check the official Docker web site.

You Might Also Like: How To Install WordPress with OpenLiteSpeed on Ubuntu 16.04 LTS