Easy Guide to List Scheduled Posts in WordPress

In this tutorial, we will learn how to display future upcoming posts in WordPress sidebar.

What is Scheduled or Future Upcoming Posts in WordPress?

If you have been blogging for a while, then you have probably noticed that publishing posts on a certain time gets more people to read it. If you are new to blogging and don’t know what time you get the most visitors, then you should start using Google Analytics to track this information.

The problem is that you cannot just sit around and wait for that time to hit the publish button. That’s why WordPress comes with built-in scheduling feature. It allows you to schedule your posts to be published later.

Using scheduling you can focus on creating content and managing your editorial calendar like a pro.

Having said that, let’s see how you can show off your upcoming posts in WordPress and use it to get more subscribers.

Method 1: Showing Scheduled or Future Posts with Plugin

First thing you need to do is install and activate SOUP – Show off Upcoming Posts plugin. For more details, see our step by step guide on how to install a WordPress plugin.

Upon activation, you need to visit Appearance » Widgets page. There you will find ‘Upcoming Posts’ widget under the list of available widgets. Simply add the widget to your sidebar where you to display scheduled posts.
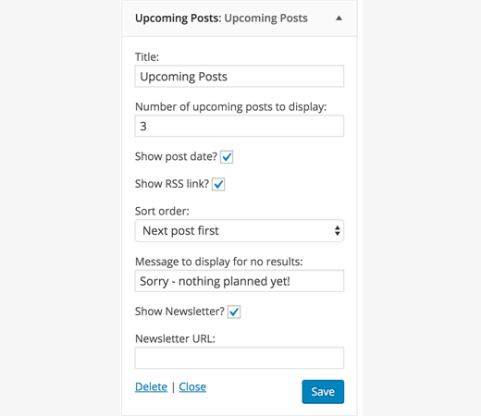
Upcoming posts widget

The widget settings allow you to choose the number of scheduled posts you want to show. You can also show dates next to them, link to your RSS feed, or link to a page where users can signup for your email list.

Click on the save button to store your widget settings.

You can now visit your website to see the widget in action.
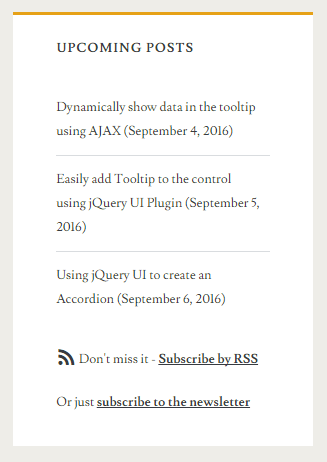
display schedule post

Method 2: Showing Scheduled or Upcoming Posts Manually

Simply add this code to your theme’s functions.php file or a site-specific plugin.

function wpb_upcoming_posts() { 
    // The query to fetch future posts
    $the_query = new WP_Query(array( 
        'post_status' => 'future',
        'posts_per_page' => 3,
        'orderby' => 'date',
        'order' => 'ASC'
    ));
 
// The loop to display posts
if ( $the_query->have_posts() ) {
    echo '


'; while ( $the_query->have_posts() ) { $the_query->the_post(); $output .= '
 	' . get_the_title() .' ('. get_the_time('d-M-Y') . ')

'; } echo '

'; } else { // Show this when no future posts are found $output .= '

No posts planned yet.

'; } // Reset post data wp_reset_postdata(); // Return output return $output; } // Add shortcode add_shortcode('upcoming_posts', 'wpb_upcoming_posts'); // Enable shortcode execution inside text widgets add_filter('widget_text', 'do_shortcode');

Now you can visit Appearance » Widgets page. Add a text widget to your sidebar where you want to display upcoming posts and add this shortcodeinside the widget.

[upcoming_posts]
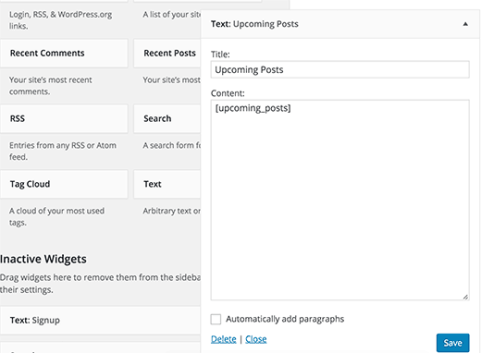
Adding upcoming posts shortcode in a text widget

Click on the save button to store your widget settings.

You can now visit your website to see the upcoming scheduled posts in your sidebar. You can also use this shortcode in a post, page, or a template in your child theme.

We hope this tutorial helped you learn how to show scheduled posts in your WordPress sidebar.

Easy Guide to Change WordPress JPEG Image Compression

WordPress compresses your images for better performance. Recently one of our readers asked if it was possible to change the image compression setting in WordPress. In this article, we will show you how to increase or decrease JPEG image compression in WordPress.

Every time you upload a JPEG image in WordPress, it would automatically compress the image to 90% quality. In WordPress 4.5, this number was further decreased to 82% to improve site performance for mobile users.

If you are a photographer who wants to showcase high quality images on your website, then you can turn off image compression in WordPress.

How to Disable Image Compression in WordPress

All you need to do is paste the following code in your theme’s functions.php file or in a site-specific plugin.

 add_filter('jpeg_quality', function($arg){return 100;});

When you set the value to 100, it means that WordPress compress the image at its highest quality.

If you’re not a photographer or an artist, then you would probably not see much of a difference in quality. But for those who work with high quality images on a daily basis, the difference in quality is obvious.

How to Increase Image compression in WordPress

There are definitely performance benefits to leaving the compression quality as is. If you want, you can change the number from 100 to 80 or something lower to squeeze a few more kBs, then all you have to do is paste the following code:

 add_filter('jpeg_quality', function($arg){return 75;});

When you do make these image quality changes, you want to make sure that you regenerate your thumbnails.

We hope this tutorial helped you learn how to change JPEG image compression in WordPress.

Easy Guide to Find and Replace Text in your WordPress Database

In this tutorial, we will learn how to find and replace text in your WordPress database.

When You May Need Find & Replace for WordPress Database?

Let’s suppose that you have added specific text or URL to a number of your posts. You don’t know which posts you have added that text to, but you do know that there are a lot of them.

Now you can manually search your site and edit every single post one by one. That’s going to take time and has a high chance of you missing some occurrences.

Using a single command to automatically find and replace will do the same thing but much quicker and efficiently.

There is one downside to it though. If you made a mistake, then you will not be able to undo it. Once you replace the text, it is gone. You will need to carefully type the text you are looking for and the text you want to replace it with.

Having said that, let’s see how you can easily find and replace text in your WordPress database.

Lets Start

As we mentioned earlier that the changes you make to your database will not be reversible. You need to take every precaution to make sure that you don’t lose data.

First you need to create a WordPress database backup. You can do that by using a WordPress backup plugin. Alternatively, you can also create a database backup using phpMyAdmin.

After creating the backup of your WordPress database, you can move on to run your find and replace commands.

Running Find and Replace with a WordPress plugin

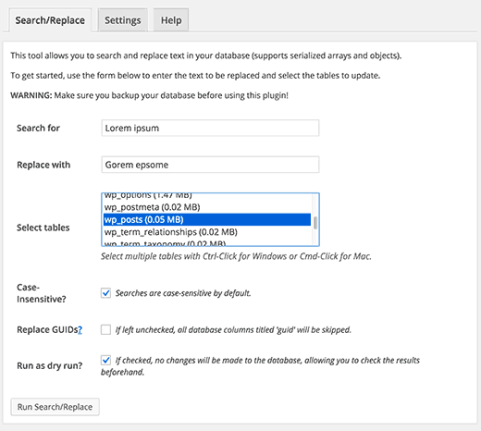
If you are not familiar with code and don’t want to write a custom SQL query, then there is an easy to use find and replace WordPress plugin called Better Search Replace.

It allows you to run search and replace commands from inside your WordPress admin area. We have a detailed guide on how to search and replace in WordPress with Better Search Replace plugin.

Running Find & Replace MySQL Query with phpMyAdmin

You can also use phpMyAdmin to find and replace text from your WordPress database.

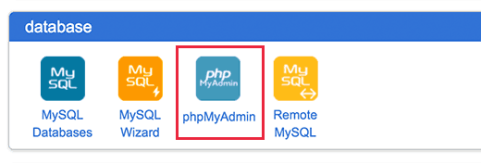
First you need to login to cPanel dashboard of your WordPress hosting. Scroll down to the database section and then click on phpMyAdmin.

The screenshot above is showing the cPanel dashboard on BlueHost. Your cPanel dashboard may look slightly different.

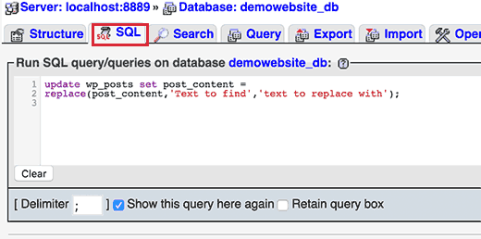
This will launch phpMyAdmin where you will need to click on your WordPress database name and then click on SQL.

You will need to enter your SQL query in this format:

update TABLE_NAME set FIELD_NAME =
replace(FIELD_NAME, 'Text to find', 'text to replace with');

For example, if you wanted to search for text in a WordPress post’s content, then you would write your query like this:

update wp_posts set post_content =
replace(post_content,'Text to find','text to replace with');

Click on the ‘Go’ button to continue.

PhpMyAdmin will run your SQL query and upon success it will show the number of rows affected by the query.

You can now visit your WordPress site to see your changes in action.

We hope this tutorial helped you learn how to find and replace text with one click in your WordPress database.

Easy Guide to Remove the Welcome Panel in WordPress Dashboard

In this tutorial, we will learn how to remove the welcome panel in WordPress dashboard.

Why Remove Welcome Panel in WordPress?

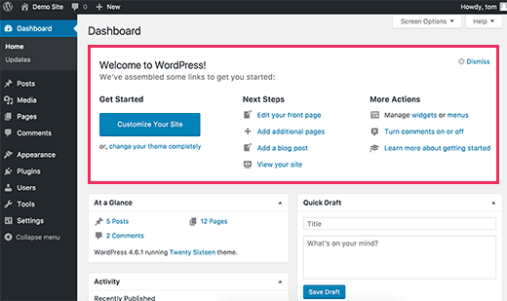
Welcome panel is a meta box added to the dashboard screen of WordPress admin area. It shows shortcuts to different sections of your WordPress site.

wordpress dashboard

The purpose of the welcome panel is to help beginners find their way around WordPress.

However as you become more familiar to all these locations, this panel will become less useful for you.

Having it on the screen, pushes down other important dashboard widgets and make them less noticeable.

Let’s see how you can easily get rid of the welcome panel from your WordPress dashboard screen.

Removing Welcome Panel from WordPress Dashboard

There are multiple ways to hide and even completely remove the welcome panel.

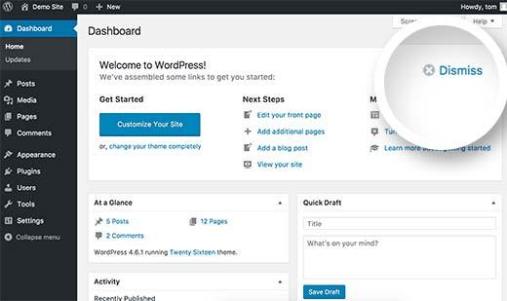
The easiest way to remove it is by simply clicking on the Dismiss button at the top right corner of the panel.

wordpress dashboard dismiss

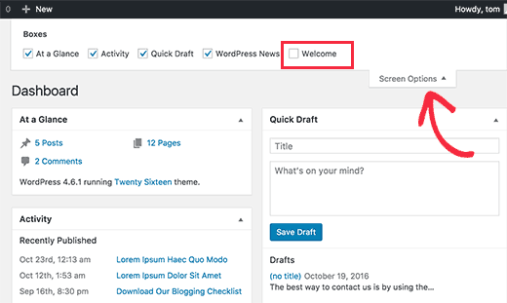
You can also remove the welcome panel by clicking on the Screen Optionsbutton at the top right corner of the screen.

This will bring a fly down menu. You need to uncheck the checkbox next to ‘Welcome’ option.

wordpress screen options

Both methods mentioned above will hide the welcome panel. You can access it again by clicking on the Screen Options button and checking the box next to Welcome option.

However if you want to completely remove the welcome panel even from the Screen Options, then that’s also possible.

This method requires you to add code to your WordPress site. If you haven’t done this before, then take a look at our guide on pasting snippets from the web into WordPress.

You will need to add this code to your theme’s functions.php file or a site-specific plugin.

remove_action('welcome_panel', 'wp_welcome_panel');

This code simply removes the action that adds the welcome panel to the admin dashboard.

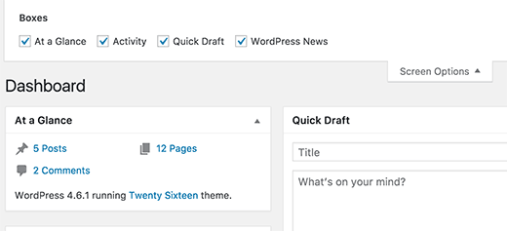
You can now visit the dashboard screen and click on the Screen Options menu. You will notice that the welcome panel option will no longer be available.

wp dashboard at a glance

That’s all. We hope this tutorial helped you remove the welcome panel in WordPress dashboard.

Easy Guide to Improve WordPress Email Deliverability with SendGrid

In this tutorial, we will learn how to improve WordPress email deliverability with SendGrid.

The Problem with Emails in WordPress

By default, WordPress uses the PHP mail function to send out emails. Many WordPress hosting providers do not have this function configured properly. Some even block it to make sure that their servers aren’t used to send spam.

This becomes problematic for site owners because their WordPress site fails to send some or all emails.

WordPress emails are crucial for resetting passwords, sending notification emails, running an online store, getting contact form notifications, and more. If WordPress can’t send emails, you could get locked out of your site or lose customers by missing out on important notifications.

Having said that, let’s take a look at how to improve WordPress email deliverability with SendGrid (for free).

What is SendGrid?

SendGrid is an email service provider. They offer highly optimized email servers that you can use to send out your emails.

They offer both transactional email service (one-to-one emails like WordPress notices, order receipts, password resets, etc.) and email marketing services.

Like all good email service providers, SendGrid spends significant resources to improve deliverability. This ensures that your WordPress emails land in your users’ inboxes, instead of being marked as spam. This is why companies like Uber, Spotify, Airbnb, Yelp, and thousands of others use SendGrid.

Sending WordPress Emails Using SendGrid

To set up SendGrid to work with your WordPress site, first you’ll need to visit the SendGrid website and sign up for an account.

SendGrid is a paid service, but they also offer a free plan which allows you to send up to 12,000 emails each month. That’s plenty for most small to medium-sized websites.

As your site grows, you can upgrade to their paid plan. It starts at $9.90 per month for up to 40,000 emails. You can scale your pricing based on how many emails you need to send every month, but in our experience the free plan is sufficient for most folks.

Next, you need to install and activate the SendGrid WordPress plugin. For more details, see our step by step guide on how to install a WordPress plugin.

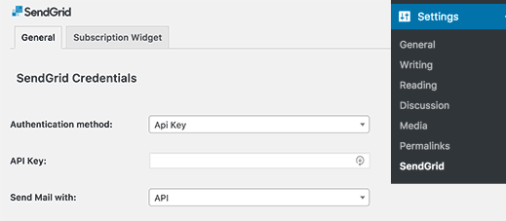
Upon activation, visit Settings » SendGrid to configure the plugin.

sengrid mail

The plugin allows you to connect your WordPress site to SendGrid. You can do that by adding an API key or by using your SendGrid username or password.

We recommend using the API key method because it’s more secure. We will only cover the API method in this tutorial.

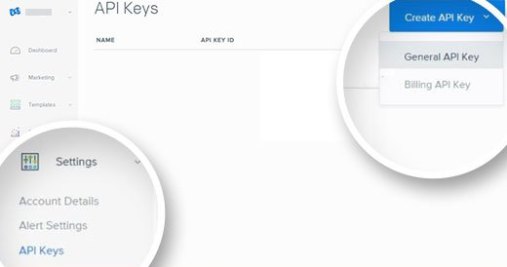
Start by visiting your SendGrid account dashboard and then click on Settings » API Keys.

api settings

Next, you need to choose how to send mail. You can send it using the SendGrid API, or with SMTP.

The SMTP method requires Swift Mailer support. You can add it by installing and activating the Swift Mailer plugin on your WordPress site.

But you don’t need that. We recommend using the API method, since it’s easier to set up and more secure.

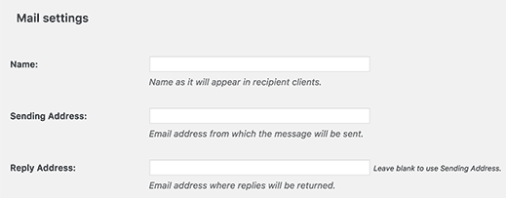
Go back to the Settings » SendGrid page in your WordPress dashboard. Under the Mail Settings heading, you’ll need to provide the sender name, email address, and reply-to address.

sendgrid mail settings

The name can be your website name, and the sending address can be your professional email address.

In other optional settings, you can choose to use email templates from SendGrid website and add their template ID in plugin settings. You can also create and use categories for emails you send through WordPress.

Don’t forget to click on the Save Changes button to store your settings.

That’s all! SendGrid will now replace the default WordPress mail function with SendGrid API, providing more reliable email service.

You can test it by performing any action that generates an email notification from WordPress. For example, you could reset your password, add a new user, or fill out your contact form.

We hope this tutorial helped you improve your WordPress email deliverability with SendGrid.

Easy Guide to Add Your WordPress Blog to Apple News

In this tutorial, we will learn how to add your WordPress blog to Apple news.

Before Getting Started

Apple News app allows users to read news and blogs articles in one single app on their Apple devices. It provides a better reading experience and makes it easier for users to stay updated with their favorite content from a single app.

The Apple News program for publishers allows you to submit your blog as an Apple News channel. It also allows you to monetize your content by showing advertisements.

However the monetization program is still in beta, and it is only available in the United States, UK, and Australia. You will have to wait for a couple weeks for your application to get reviewed.

Please note: this guide is for self-hosted WordPress blogs and not for WordPress.com blogs. See our guide on the difference between WordPress.org vs WordPress.com. If you’re on WordPress.com, then you can use this guide to move from WordPress.com to WordPress.org.

Having said that, let’s learn how to add your WordPress blog to Apple News.

Adding a WordPress Site to Apple News

First thing you need to visit the News Publisher app on the iCloud website. You will need to login with your Apple ID.

Once you are logged in, you will see News Publisher terms of service. Click on I agree and then click on the submit button.

Next, you will be asked to provide publisher information. Fill in the form and then click on Next.

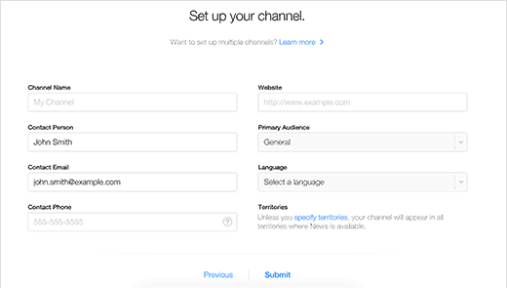
In the following step, you will be asked to setup your channel by providing information about your website. Fill in the required fields and click on the next button to proceed.

You will now be asked to provide a type based logo for your channel. A type based logo is just an image with your site name in readable text format. It should have a transparent background, and the file size should be less than 2 MB.

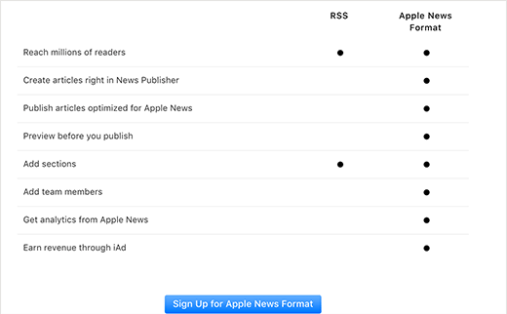
Next, you will be asked to choose between RSS or Apple News Format. Go ahead and choose Apple News Format, we will cover this in the next step.

If you use the RSS feed option, then you will not be able to monetize your content in Apple News. It also prevents you from using other Apple News features as a publisher.

See the comparison chart below:

Once you are done, click on the Signup for Apple News Format button.

That’s all, you have successfully finished your application for joining the Apple News. You will now see a thank you page like this one:

Now you will have to wait to hear back from Apple News. An application can take up to two weeks to be approved.

You may want to bookmark this article now and come back to complete step 2 once your application is approved. Press Ctrl + D to bookmark the article in your browser (Cmd + D for Mac users).

Submitting Articles to Apple News

Once your application is approved, you will be able to submit articles from your WordPress blog to the Apple news app.

You will have to manually submit your first article via your News Publisher account on iCloud. Since Apple is notorious for quality, your first article will be manually reviewed by the Apple News team, and this could also take some time (anywhere between 1-2 weeks).

After that Apple News will automatically start showing articles from your RSS Feed.

Here is how to automatically publish your WordPress blog posts to Apple News.

First thing you need to do is install and activate the Publish to Apple Newsplugin. For more details, see our step by step guide on how to install a WordPress plugin.

Upon activation, you need to visit Settings » Apple News page to configure plugin settings.

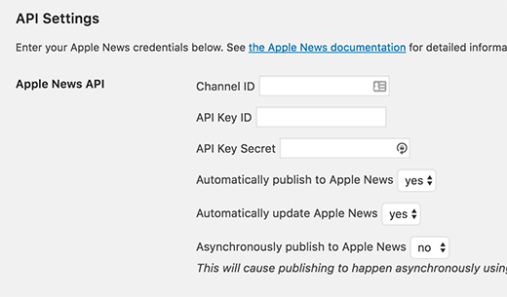
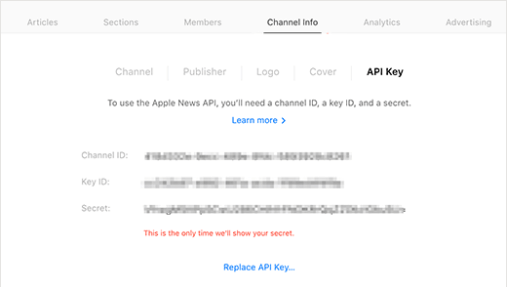
Next, you need to enter your channel ID, API key, and API key secret. You can find this information by signing into your Apple News Publisher account.

After that you need to select which post types you would like to generate in Apple News format. In most cases, the only post type you need to select is Posts.

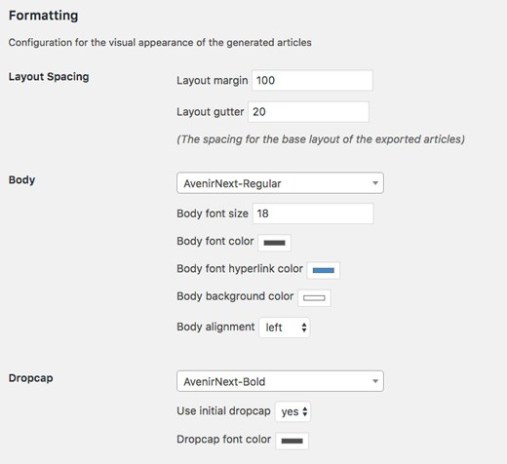
The last section is to configure the visual appearance of different elements in your generated articles. Feel free to customize the settings as you need.

Don’t forget to click on the save changes button when you are done.

That’s all, Publish to Apple News will now start publishing your article in the Apple News Format.

We hope this tutorial helped you learn how to add your WordPress blog to Apple News.