How To Install OBS Studio v23.1 on Ubuntu 18.04 LTS

OBS Studio

OBS Studio (Open Broadcast Studio) is a free and open source application for video recording and live streaming. With this tool, you can record your screen activity or record video from webcam and any other sources.

This article assumes you have at least basic knowledge of Linux, know how to use the shell, and most importantly, you host your site on your own VPS. The installation is quite simple and assumes you are running in the root account, if not you may need to add ‘sudo’ to the commands to get root privileges. I will show you through the step by step installation OBS Studio free and open source software for video recording and live streaming on a Ubuntu 18.04 (Bionic Beaver) server.

Install OBS Studio on Ubuntu 18.04 LTS

Step 1. First make sure that all your system packages are up-to-date

sudo apt-get update
sudo apt-get upgrade

Step 2. Installing OBS Studio on Ubuntu 18.04 LTS.

Method 1. Install OBS Studio using PPA:

First, add the official OBS Studio PPA:

sudo add-apt-repository ppa:obsproject/obs-studio
sudo apt-get update
sudo apt-get install obs-studio

Method 2. Install OBS Studio using Snap:


sudo apt install snapd

Install the OBS Studio snap package using following command:

snap install obs-studio

Please note that to use OBS Studio in Ubuntu, you’ll need FFMpeg. If you haven’t installed FFMpeg, do it now. Run the following commands to install FFMpeg.

Congratulation’s! You have successfully installed OBS Studio. Thanks for using this tutorial for installing free and open source software for video recording and live streaming. in Ubuntu 18.04 LTS (Bionic Beaver) systems. For additional help or useful information, we recommend you to check the official OBS Studio Linux Installation.

How To Install Phabricator on Ubuntu 18.04 LTS

Install Phabricator on Ubuntu 18

Phabricator is an open source collection of web applications which help software companies build better software. Phabricator is similar to GIT, and SVN. Currently maintained by Phacility, it was originally developed as an internal tool at Facebook. It is available as free software under the Apache License, version 2.

This article assumes you have at least basic knowledge of Linux, know how to use the shell, and most importantly, you host your site on your own VPS. The installation is quite simple and assumes you are running in the root account, if not you may need to add ‘sudo’ to the commands to get root privileges. I will show you through the step by step installation Phabricator on a Ubuntu 18.04 (Bionic Beaver) server.

Install Phabricator on Ubuntu 18.04 LTS

Step 1. First make sure that all your system packages are up-to-date

sudo apt-get update
sudo apt-get upgrade

Step 2. Install LAMP (Linux, Apache, MariaDB and PHP) server.

A Ubuntu 18.04 LAMP server is required. If you do not have LAMP installed, you can follow our guide here. Also install all required PHP modules:

apt-get install php7.1-cli php7.1-gd php7.1-opcache php7.1-mysql php7.1-json php7.1-mcrypt php7.1-xml php7.1-curl

Step 3. Installing Phabricator on Ubuntu 18.04 LTS.

First, create and switch to the directory in which we will download Phabricator and its dependencies run the following command:

mkdir /var/www/html/myapps
cd /var/www/html/myapps

Next, clone the needed Git repositories from Phacility:

sudo git clone https://github.com/phacility/libphutil.git
sudo git clone https://github.com/phacility/arcanist.git
sudo git clone https://github.com/phacility/phabricator.git

Step 4. Configuring MariaDB for Phabricator.

By default, MariaDB is not hardened. You can secure MariaDB using the mysql_secure_installation script. you should read and below each steps carefully which will set root password, remove anonymous users, disallow remote root login, and remove the test database and access to secure MariaDB:

mysql_secure_installation

Configure it like this:


- Set root password? [Y/n] y
- Remove anonymous users? [Y/n] y
- Disallow root login remotely? [Y/n] y
- Remove test database and access to it? [Y/n] y
- Reload privilege tables now? [Y/n] y

Next we will need to log in to the MariaDB console and create a database for the Phabricator. Run the following command:

mysql -u root -p

This will prompt you for a password, so enter your MariaDB root password and hit Enter. Once you are logged in to your database server you need to create a database for Phabricator installation:

use mysql;
ALTER USER 'root'@'localhost' IDENTIFIED WITH mysql_native_password BY 'your_mysql_root_password';
flush privileges;

Next, Enter the phabricator directory:

cd /var/www/html/myapp/phabricator

Now, it’s time to configure MySQL. Execute the following commands:

./bin/config set mysql.host localhost
./bin/config set mysql.user root
./bin/config set mysql.pass your_mysql_root_password

Then, run storage upgrade script to load the Phabricator schemata into it. You’ll be asked to press ‘y’ while loading database schema:

./bin/storage upgrade --user root --password your_mariadb_root_password

Step 5. Configuring Apache web server for Phabricator.

Create a new virtual host directive in Apache. For example, create a new Apache configuration file named ‘phabricator.conf’ on your virtual server:

sudo a2enmod rewrite
touch /etc/apache2/sites-available/phabricator.conf
ln -s /etc/apache2/sites-available/phabricator.conf /etc/apache2/sites-enabled/phabricator.conf
nano /etc/apache2/sites-available/phabricator.conf

Add the following lines:

<VirtualHost *:80>
ServerAdmin [email protected]
DocumentRoot /var/www/html/myapp/phabricator/webroot
ServerName your-domain.com
ServerAlias www.your-domain.com
<Directory /var/www/html/myapp/phabricator/webroot/>
Options FollowSymLinks
AllowOverride All
Order allow,deny
allow from all
</Directory>
ErrorLog /var/log/apache2/your-domain.com-error_log
CustomLog /var/log/apache2/your-domain.com-access_log common
</VirtualHost>

Now, we can restart Apache web server so that the changes take place:

sudo a2ensite phabricator
systemctl restart apache2.service

Step 6. Accessing Phabricator.

Phabricator will be available on HTTP port 80 by default. Open your favorite browser and navigate to http://phabricator.domain.com and complete the required the steps to finish the installation. If you are using a firewall, please open port 80 to enable access to the control panel.
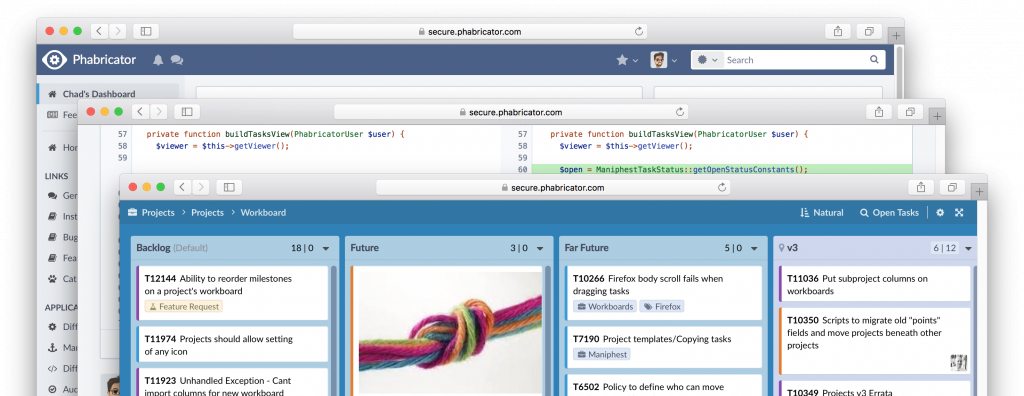
install phabricator on ubuntu 18

Congratulation’s! You have successfully installed Phabricator. Thanks for using this tutorial for installing Phabricator in Ubuntu 18.04 LTS (Bionic Beaver) systems. For additional help or useful information, we recommend you to check the official Phabricator Installation page.

How To Install Craft CMS on Ubuntu 18.04 LTS

Install Craft CMS on Ubuntu 18

Craft is a content management system (CMS) designed for publishers who want more control and more powerful performances from their CMS. It is a PHP based application build on Yii framework.

This article assumes you have at least basic knowledge of Linux, know how to use the shell, and most importantly, you host your site on your own VPS. The installation is quite simple and assumes you are running in the root account, if not you may need to add ‘sudo’ to the commands to get root privileges. I will show you through the step by step installation Craft content management system (CMS) on a Ubuntu 18.04 LTS (Bionic Beaver) server.

Install Craft CMS on Ubuntu 18.04 LTS

Step 1. First make sure that all your system packages are up-to-date

sudo apt-get update
sudo apt-get upgrade

Step 2. Install LAMP (Linux, Apache, MariaDB and PHP) server.

A Ubuntu 18.04 LAMP server is required. If you do not have LAMP installed, you can follow our guide here. Also install all required PHP modules:

apt-get install php7.1-cli php7.1-gd php7.1-opcache php7.1-mysql php7.1-json php7.1-mcrypt php7.1-xml php7.1-curl

Step 3. Installing Craft CMS on Ubuntu 18.04 LTS.

First thing to do is to go to Craft CMS’s download page and download the latest stable version of Craft CMS, At the moment of writing this article it is version 3:

wget https://craftcms.com/latest-v3.zip

Unpack the Craft CMS archive to the document root directory on your server:

mkdir /var/www/html/craft
unzip latest-v3.zip -d /var/www/html/craft

We will need to change some folders permissions:

chown -R www-data:www-data /var/www/html/craft/
chmod -R 755 /var/www/html/craft/

Step 4. Configuring MariaDB for Craft CMS.

By default, MariaDB is not hardened. You can secure MariaDB using the mysql_secure_installation script. you should read and below each steps carefully which will set root password, remove anonymous users, disallow remote root login, and remove the test database and access to secure MariaDB:

mysql_secure_installation

Configure it like this:

- Set root password? [Y/n] y
- Remove anonymous users? [Y/n] y
- Disallow root login remotely? [Y/n] y
- Remove test database and access to it? [Y/n] y
- Reload privilege tables now? [Y/n] y

Next we will need to log in to the MariaDB console and create a database for the Craft CMS. Run the following command:

mysql -u root -p

This will prompt you for a password, so enter your MariaDB root password and hit Enter. Once you are logged in to your database server you need to create a database for Craft CMS installation:

CREATE DATABASE craft;
CREATE USER 'craftuser'@'localhost' IDENTIFIED BY 'PASSWORD';
GRANT ALL PRIVILEGES ON `craft`.* TO 'craftuser'@'localhost';
FLUSH PRIVILEGES;

Step 5. Configuring Apache web server for Craft CMS.

Create a new virtual host directive in Apache. For example, create a new Apache configuration file named ‘craft.conf’ on your virtual server:

touch /etc/apache2/sites-available/craft.conf
ln -s /etc/apache2/sites-available/craft.conf /etc/apache2/sites-enabled/craft.conf
nano /etc/apache2/sites-available/craft.conf

Add the following lines:

&amp;lt;VirtualHost *:80&amp;gt;
ServerAdmin [email protected]
DocumentRoot /var/www/html/craft/web
ServerName your-domain.com
ServerAlias www.your-domain.com
&amp;lt;Directory /var/www/html/craft/&amp;gt;
Options FollowSymLinks
AllowOverride All
Order allow,deny
allow from all
&amp;lt;/Directory&amp;gt;
ErrorLog /var/log/apache2/your-domain.com-error_log
CustomLog /var/log/apache2/your-domain.com-access_log common
&amp;lt;/VirtualHost&amp;gt;

Now, we can restart Apache web server so that the changes take place:

sudo a2ensite craft.conf
sudo a2enmod rewrite
sudo systemctl restart apache2.service

Step 6. Accessing Craft CMS.

Craft CMS will be available on HTTP port 80 by default. Open your favorite browser and navigate to http://yourdomain.com/admin or http://server-ip/admin and complete the required the steps to finish the installation. If you are using a firewall, please open port 80 to enable access to the control panel.

Congratulation’s! You have successfully installed Craft CMS. Thanks for using this tutorial for installing Craft content management system (CMS) on your Ubuntu 18.04 LTS (Bionic Beaver) system. For additional help or useful information, we recommend you to check the official Craft CMS Installation guide.

How To Install Vivaldi Browser v2.4 on Ubuntu 18.04 LTS

Install Vivaldi Browser on Ubuntu 18

Vivaldi is a feature-rich, next-generation web browser application based on the powerful and open source Chromium project, from which the popular Google Chrome web browser is derived. The application is freely distributed and cross-platform, created by the former CEO of Opera Software, built using modern Web technologies like React, JavaScript, Node.js, and Browserify.

This article assumes you have at least basic knowledge of Linux, know how to use the shell, and most importantly, you host your site on your own VPS. The installation is quite simple and assumes you are running in the root account, if not you may need to add ‘sudo’ to the commands to get root privileges. I will show you through the step by step installation Vivaldi Browser on a 18.04 LTS (Bionic Beaver) server.

Install Vivaldi Browser on Ubuntu 18.04 LTS

Step 1. First make sure that all your system packages are up-to-date

sudo apt-get update
sudo apt-get upgrade

Step 2. Installing Vivaldi Browser on Ubuntu 18.04 LTS.

First, adding a Vivaldi repository and key:

sudo add-apt-repository "deb [arch=i386,amd64] http://repo.vivaldi.com/stable/deb/ stable main"
wget -qO- http://repo.vivaldi.com/stable/linux_signing_key.pub | sudo apt-key add -
sudo apt update

Then, install Vivaldi browser using following command:

sudo apt install vivaldi-stable

Once installed, open Vivaldi web browser from Ubuntu Dash or Terminal. Run “vivaldi” command in Terminal. (without quotes):

vivaldi

Congratulation’s! You have successfully installed Vivaldi. Thanks for using this tutorial for installing Vivaldi browser on Ubuntu 18.04 LTS (Bionic Beaver) system. For additional help or useful information, we recommend you to check the official Vivaldi browser Documentation.

How To Install Couchbase 6.0.1 on Ubuntu 18.04 LTS

Install Couchbase on Ubuntu 18

Couchbase is an open-source, distributed key-value based NoSQL database. It comes in two flavors: Enterprise Edition (EE) and Community Edition (CE). Usually first to be released with new updates and bug fixes after testing and QA processes, the Enterprise Edition is the most up-to-date edition of Couchbase. Following suit, the Community Edition gets released shortly afterwards.

This article assumes you have at least basic knowledge of Linux, know how to use the shell, and most importantly, you host your site on your own VPS. The installation is quite simple and assumes you are running in the root account, if not you may need to add ‘sudo’ to the commands to get root privileges. I will show you through the step by step installation Vivaldi Browser on a Ubuntu 18.04 LTS (Bionic Beaver) server.

Install Couchbase on Ubuntu 18.04 LTS

Step 1. First make sure that all your system packages are up-to-date

sudo apt-get update
sudo apt-get upgrade
sudo apt install gdebi-core

Step 2. Installing Couchbase on Ubuntu 18.04 LTS.

First, download Couchbase Server debian package. If the Ubuntu 18.04 version is still not available the 16.04 version will do just well:

### COUCHBASE SERVER COMMUNITY EDITION ###
wget https://packages.couchbase.com/releases/5.0.1/couchbase-server-community_5.0.1-ubuntu16.04_amd64.deb
### COUCHBASE SERVER ENTERPRISE EDITION ###
wget https://packages.couchbase.com/releases/5.0.1/couchbase-server-enterprise_5.0.1-ubuntu16.04_amd64.deb

Next, install the previously downloaded Couchbase Server DEB package:

sudo gdebi couchbase-server-enterprise_5.0.1-ubuntu16.04_amd64.deb

After installation your Couchbase server should be up and running:

service couchbase-server status

Step 3. Configure Firewall Rules of Couchbase.

Use the below command to allow incoming TCP ports on UFW firewall as required by Couchbase Server:

sudo ufw allow from any to any port 369,8091:8094,9100:9105,9998,9999,11209:11211,11214,11215,18091:18093,21100:21299 proto tcp

Step 4. Accessing Couchbase.

Couchbase will be available on HTTP port 80 by default. Open your favorite browser and navigate to http://yourdomain.com:8091 or http://server-ip:8091 and complete the required the steps to finish the installation.

Congratulation’s! You have successfully installed Couchbase. Thanks for using this tutorial for installing Vivaldi browser on Ubuntu 18.04 LTS (Bionic Beaver) system. For additional help or useful information, we recommend you to check the official Couchbase Documentation.

How To Install Sitemagic CMS on Ubuntu 18.04 LTS

Install Sitemagic CMS on Ubuntu 18

Sitemagic CMS is an amazing Content Management System that helps you build and maintain professional websites. Sitemagic CMS is a lightweight yet very capable Content Management System. Sitemagic CMS is super user friendly. Installation is easy as no database is required (but MySQL is supported for big websites). The administration menu provides easy access to all the built in functionality. Sitemagic CMS is super fast, super reliable, and super flexible, as you would expect from a professional Content Management System.

This article assumes you have at least basic knowledge of linux, know how to use the shell, and most importantly, you host your site on your own VPS. The installation is quite simple and assumes you are running in the root account, if not you may need to add ‘sudo’ to the commands to get root privileges. I will show you through the step by step installation Sitemagic CMS on a Ubuntu 18.04 LTS (Bionic Beaver) server.

Install Sitemagic CMS on Ubuntu 18.04 LTS

Step 1. First make sure that all your system packages are up-to-date

sudo apt-get update
sudo apt-get upgrade

Step 2. Install LAMP (Linux, Apache, MariaDB and PHP) server.

A Ubuntu 18.04 LAMP server is required. If you do not have LAMP installed, you can follow our guide here. Also install all required PHP modules:

apt-get install php7.1-cli php7.1-gd php7.1-opcache php7.1-mysql php7.1-json php7.1-mcrypt php7.1-xml php7.1-curl

Step 3. Installing Sitemagic CMS on Ubuntu 18.04 LTS.

First thing to do is to go to Sitemagic CMS’s download page and download the latest stable version of Sitemagic CMS, At the moment of writing this article it is version 4.3.0 series:

wget https://github.com/Jemt/SitemagicCMS/archive/master.zip
unzip master.zip
sudo mv SitemagicCMS-master /var/www/html/sitemagic

We will need to change some folders permissions:

chown -R www-data:www-data /var/www/html/sitemagic/
chmod -R 755 /var/www/html/sitemagic/

Step 4. Configuring MariaDB for Sitemagic CMS.

By default, MariaDB is not hardened. You can secure MariaDB using the mysql_secure_installation script. you should read and below each steps carefully which will set root password, remove anonymous users, disallow remote root login, and remove the test database and access to secure MariaDB:

mysql_secure_installation

Configure it like this:

- Set root password? [Y/n] y
- Remove anonymous users? [Y/n] y
- Disallow root login remotely? [Y/n] y
- Remove test database and access to it? [Y/n] y
- Reload privilege tables now? [Y/n] y

Next we will need to log in to the MariaDB console and create a database for the Sitemagic CMS. Run the following command:

mysql -u root -p

This will prompt you for a password, so enter your MariaDB root password and hit Enter. Once you are logged in to your database server you need to create a database for Sitemagic CMS installation:

CREATE DATABASE sitemagic;
CREATE USER 'siteuser'@'localhost' IDENTIFIED BY 'PASSWORD';
GRANT ALL PRIVILEGES ON `sitemagic`.* TO 'siteuser'@'localhost';
FLUSH PRIVILEGES;
exit

Step 5. Configuring Apache web server for Sitemagic CMS.

Create a new virtual host directive in Apache. For example, create a new Apache configuration file named ‘sitemagic.conf’ on your virtual server:

touch /etc/apache2/sites-available/sitemagic.conf
ln -s /etc/apache2/sites-available/sitemagic.conf /etc/apache2/sites-enabled/sitemagic.conf
nano /etc/apache2/sites-available/sitemagic.conf

Add the following lines:

<VirtualHost *:80>
ServerAdmin [email protected]
DocumentRoot /var/www/html/sitemagic
ServerName your-domain.com
ServerAlias www.your-domain.com
<Directory "/var/www/html/sitemagic/">
Options FollowSymLinks
AllowOverride All
Order allow,deny
allow from all
</Directory>
ErrorLog /var/log/apache2/your-domain.com-error_log
CustomLog /var/log/apache2/your-domain.com-access_log common
</VirtualHost>

Now, we can restart Apache web server so that the changes take place:

a2ensite sitemagic.conf
a2enmod rewrite
systemctl restart apache2.service

Step 6. Accessing Sitemagic CMS.

Sitemagic CMS will be available on HTTP port 80 by default. Open your favorite browser and navigate to http://yourdomain.com/ or http://server-ip/ and complete the required the steps to finish the installation, Also log in using ‘admin’ as username and ‘admin’ as password. If you are using a firewall, please open port 80 to enable access to the control panel.

Congratulation’s! You have successfully installed Sitemagic CMS. Thanks for using this tutorial for installing Sitemagic Content Management System on your Ubuntu 18.04 LTS (Bionic Beaver) system. For additional help or useful information, we recommend you to check the official Sitemagic web site.

How To Install Opera Browser on Ubuntu 18.04 LTS

Install Opera Browser on Ubuntu 18

Opera is a fast, secure and easy-to-use internet browser which works well on most of the Linux distributions. It’s now designed with an integrated ad blocker, battery saver and free VPN, so it saves time and resources for its own users. Also, Opera browser is stuffed with several other innovative features such as speed dialup, pop-up blocking, personal browsing and tabbed browsing.

This article assumes you have at least basic knowledge of Linux, know how to use the shell, and most importantly, you host your site on your own VPS. The installation is quite simple and assumes you are running in the root account, if not you may need to add ‘sudo’ to the commands to get root privileges. I will show you through the step by step installation Opera browser on Ubuntu 18.04 Bionic Beaver.

Install Opera Browser on Ubuntu 18.04 LTS Bionic Beaver

Step 1. First make sure that all your system packages are up-to-date

sudo apt-get update
sudo apt-get upgrade

Step 2. Installing Opera Browser on Ubuntu 18.04 LTS.

First, add Opera browser repository:

wget -qO- https://deb.opera.com/archive.key | sudo apt-key add -
add-apt-repository "deb [arch=i386,amd64] https://deb.opera.com/opera-stable/ stable non-free"

Install opera package using following command:

sudo apt install opera-stable

Step 3. Accessing Opera Web Browser.

Once the Opera installation is complete, you can start Opera by typing below command in the terminal or Going to Activities on Ubuntu:

opera

install-opera

Congratulations! You have successfully installed Opera. Thanks for using this tutorial for installing Opera browser in Ubuntu 18.04 Bionic Beaver systems. For additional help or useful information, we recommend you to check the official Opera Download page.