How To Install MySQL on Ubuntu 18.04 LTS

Install MySQL on Ubuntu 18

MySQL is a relational database management system (RDBMS) that runs as a server providing multi-user access to a number of databases. The MySQL source code is freely available because it was originally developed as freeware. MySQL is written in C and C++ and is compatible with all major operating systems. MySQL can be used for a variety of applications, but is most commonly found on web servers.

This article assumes you have at least basic knowledge of Linux, know how to use the shell, and most importantly, you host your site on your own VPS. The installation is quite simple and assumes you are running in the root account, if not you may need to add ‘sudo’ to the commands to get root privileges. I will show you through the step by step installation MySQL 8.0 on a Ubuntu 18.04 (Bionic Beaver) server.

Install MySQL on Ubuntu 18.04 LTS Bionic Beaver

Step 1. First make sure that all your system packages are up-to-date

sudo apt-get update
sudo apt-get upgrade

Step 2. Installing MySQL on Ubuntu 18.04 LTS.

First step, we will now set up the MySQL official repository on the system:

wget https://dev.mysql.com/get/mysql-apt-config_0.8.10-1_all.deb

Then run the commands below to install:

sudo dpkg -i mysql-apt-config_0.8.10-1_all.deb

The MYSQL installer will prompt you to select the MySQL repository. Based on your selection, the installer will configure repositories on the system to receive the appropriate version of MySQL.
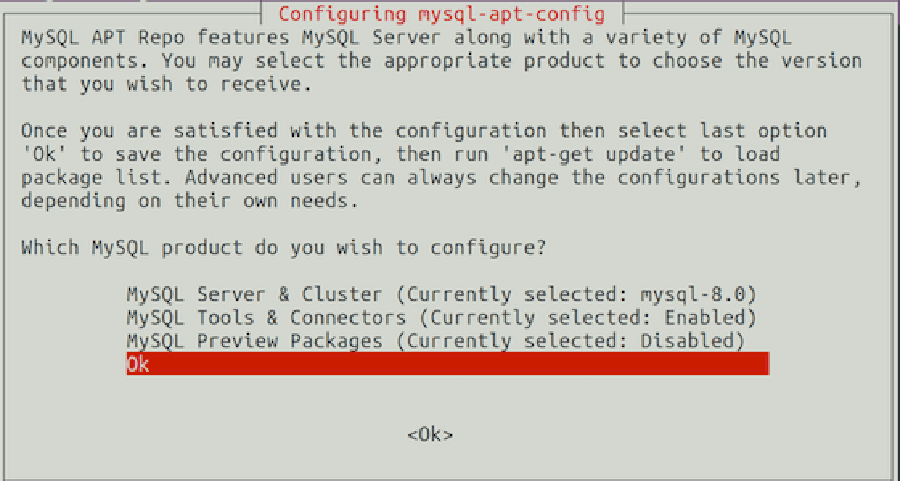
mysql_8_install
Now that the repository is installed, run the commands below to install:

apt install mysql-server mysql-client

During the installation, you should be prompted to create and confirm a MySQL root password.

mysql_8_install_1

Once complete, you can verify MySQL 8.0 is installed by running the below command:

systemctl status mysql
systemctl start mysql
systemctl enable mysql

After the installation of MySQL is complete, you may need to secure your new MySQL. By default, MySQL is not hardened. You can secure MySQL using the mysql_secure_installation script. you should read and below each steps carefully which will set root password, remove anonymous users, disallow remote root login, and remove the test database and access to secure MySQL:

mysql_secure_installation

Configure it like this:

- Set root password? [Y/n] y
- Remove anonymous users? [Y/n] y
- Disallow root login remotely? [Y/n] y
- Remove test database and access to it? [Y/n] y
- Reload privilege tables now? [Y/n] y

To log into MySQL, use the following command (note that it’s the same command you would use to log into a MySQL database):

mysql -u root -p

One of the most important things when running MySQL on a production server is to get the most out of its performances. If you are a beginner and you do not know how to tune your MySQL server, you can start with a program called MySQLTuner. It will help you to analyze your server and to tune MySQL for better overall performances.

Congratulation’s! You have successfully installed MySQL. Thanks for using this tutorial for installing MySQL 8.0 server in Ubuntu 18.04 Bionic Beaver system. For additional help or useful information, we recommend you to check the official MySQL web site.

How To Setup UFW Firewall on Ubuntu 18.04 LTS

Setup UFW Firewall on Ubuntu 18

The default firewall configuration tool for Ubuntu is ufw. Developed to ease iptables firewall setup, ufw provides a user friendly way to produce an IPv4 or IPv6 host-based antivirus. By default UFW is disabled.

This article assumes you have at least basic knowledge of Linux, know how to use the shell, and most importantly, you host your site on your own VPS. The installation is quite simple and assumes you are running in the root account, if not you may need to add ‘sudo’ to the commands to get root privileges. I will show you through the step by step installation UFW Firewall on an Ubuntu 18.04 Bionic Beaver server.

Setup UFW Firewall on Ubuntu 18.04 LTS Bionic Beaver

Step 1. First make sure that all your system packages are up-to-date

sudo apt-get update
sudo apt-get upgrade

Step 2. Installing UFW Firewall on Ubuntu 18.04 LTS.

In Ubuntu 18.04, UFW is installed by default. If not, you can easily install it by running the following command:

apt-get install ufw

To check whether ufw is running run:

systemctl status ufw

After installation, UFW is deactivated. If you configure your server via SSH, it is important to release SSH before you enable UFW:

ufw allow ssh

Step 3. UFW control.

Turn on:

ufw enable

Turn off:

ufw disable

Attention! The following are examples, please use only if you know what you are doing!

Allow protocol:

ufw allow ssh

Allow port:

ufw allow 22

Allow Port Ranges:

ufw allow 1000:2000

Prohibit connections:

Deny protocol:

ufw deny ssh

Deny port:

ufw deny 22

To see all services that can be allowed or denied in the system check out the /etc/services file:

$ cat /etc/services | less
1
	
$cat/etc/services|less

Sample output:
ftp-data        20/tcp
ftp             21/tcp
fsp             21/udp          fspd
ssh             22/tcp                          # SSH Remote Login Protocol
ssh             22/udp
telnet          23/tcp
smtp            25/tcp          mail
time            37/tcp          timserver
time            37/udp          timserver
rlp             39/udp          resource        # resource location
nameserver      42/tcp          name            # IEN 116
whois           43/tcp          nicname
tacacs          49/tcp                          # Login Host Protocol (TACACS)
tacacs          49/udp
re-mail-ck      50/tcp                          # Remote Mail Checking Protocol
re-mail-ck      50/udp
domain          53/tcp                          # Domain Name Server
domain          53/udp

For more usage commands you can use the –help flag:

ufw --help

Step 4. Managing UFW via graphical user interface (GUI).

Install gufw package if you wish to manage our UFW firewall via graphical user interface application:

apt install gufw

Once installed, start Gufw by searching your start menu:
gufw-ubuntu
Congratulation’s! You have successfully install and setup UFW. Thanks for using this tutorial for installing UFW Firewall on your Ubuntu 18.04 Bionic Beaver system. For additional help or useful information, we recommend you to check the official UFW Firewall web site.

How To Install Google Chrome on Ubuntu 18.04 LTS

Install Google Chrome on Ubuntu 18

Google Chrome is a freeware web browser developed by Google, uses the WebKit layout engine. It is available for the Linux, Android, iOS, Microsoft Windows, and Mac OS X operating systems. But Google Chrome is more than a web browser, as it combines sophisticated open source technology, borrowed from the Chromium application, into a minimal design, all in order to help users surf the web much faster, a lot easier, and safer than ever before.

This article assumes you have at least basic knowledge of linux, know how to use the shell, and most importantly, you host your site on your own VPS. The installation is quite simple and assumes you are running in the root account, if not you may need to add ‘sudo’ to the commands to get root privileges. I will show you through the step by step installation Google Chrome on a Ubuntu 18.04 LTS (Bionic Beaver) server.

Install Google Chrome on Ubuntu 18.04 Bionic Beaver

Method 1. Install Google Chrome on Ubuntu 18.04 LTS from the Command Line.

Step 1. First make sure that all your system packages are up-to-date

sudo apt-get update
sudo apt-get upgrade

Step 2. Installing Google Chrome on Ubuntu 18.04 LTS.

First, create a source list file for Google Chrome browser:

nano /etc/apt/sources.list.d/google-chrome.list

Next, copy the following APT line and paste it into google-chrome.list file:

deb [arch=amd64] http://dl.google.com/linux/chrome/deb/ stable main

After that, run the following command to download Google’s signing key:

wget https://dl.google.com/linux/linux_signing_key.pub
apt-key add linux_signing_key.pub

Now update package list and install the stable version of Google Chrome:

apt update
apt install google-chrome-stable

Step 3. Accessing Google Chrome.
Once installed, open Google Chrome from Ubuntu Dash or Terminal:

google-chrome-stable

If you wish to uninstall and remove Google Chrome from Ubuntu, run the following commands:

apt-get purge google-chrome-stable
apt-get autoremove

Method 2. Install Google Chrome on Ubuntu 18.04 the Graphical Way

Step 1. Go to https://www.google.com/chrome. Click the Download Chrome button.

Step 2. Then select the first option (64 bit .deb package), click Accept and Install.

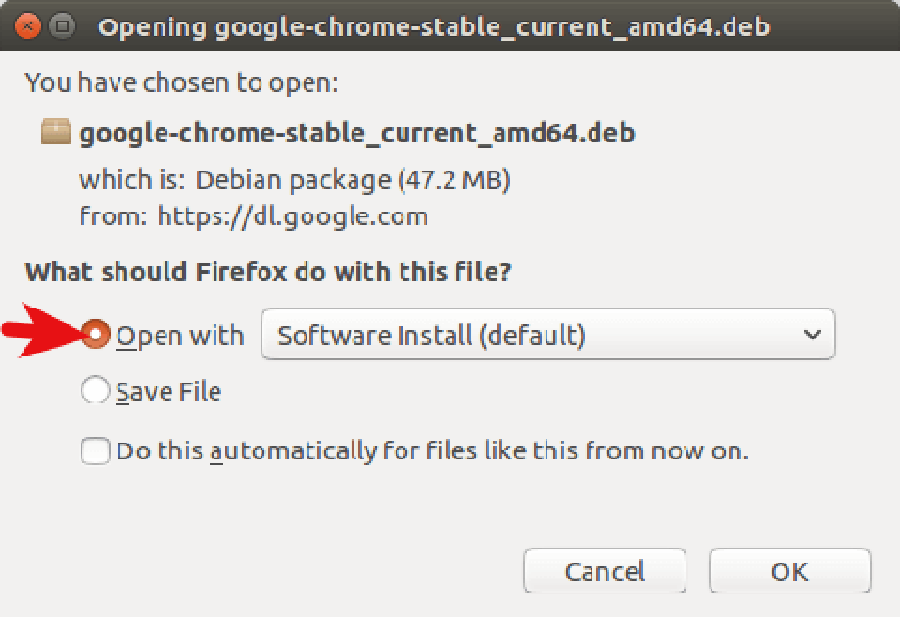
Step 3. When Firefox asks you how to open this deb file, choose the default option to open it in Ubuntu Software (formerly Ubuntu Software Center).

google-chrome-stable_current_amd64.deb_

If you choose the first option, Google Chrome deb package will be downloaded to /tmp/mozilla_$username directory. Once the download is complete, Ubuntu Software will automatically open. Click the Install button to install google-chrome-stable to Ubuntu 18.04. The version and installation size information can be seen in the Details section. 189.4MB of disk space! That’s huge for a Web browser.

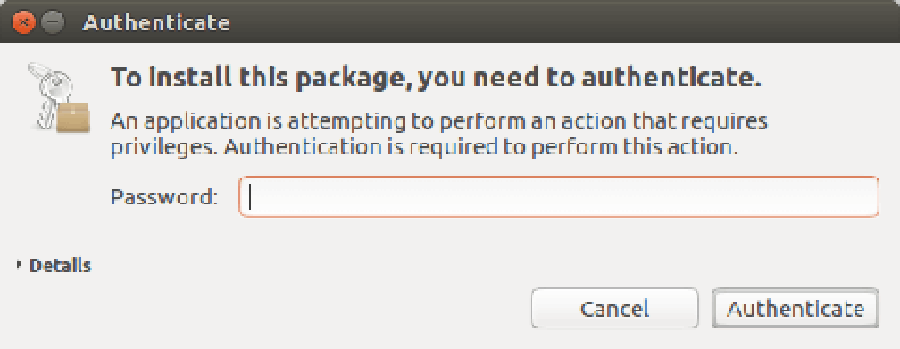
Because software installation on Linux requires root privilege, so you have to enter your password to authenticate.

google-chrome-browser 2

Step 4. Once the installation is complete, you can start Chrome browser in the Unity Dash or by typing the following command in the terminal.

google-chrome-stable

Congratulation’s! You have successfully installed Google Chrome. Thanks for using this tutorial for installing Google Chrome web browser in Ubuntu 18.04 Bionic Beaver system. For additional help or useful information, we recommend you to check the official Google Chrome web site.

How To Install Sublime Text on Ubuntu 18.04 LTS

Install Sublime Text on Ubuntu 18

Sublime Text is a cross-platform text and source code editor with a Python API. It is a sophisticated text editor for code, markup and prose. Its functionality is extendable with plugins. Most of the extending packages have free-software licenses and are community-built and maintained.

This article assumes you have at least basic knowledge of Linux, know how to use the shell, and most importantly, you host your site on your own VPS. The installation is quite simple and assumes you are running in the root account, if not you may need to add ‘sudo’ to the commands to get root privileges. I will show you through the step by step installation Sublime Text 3 on a Ubuntu 18.04 (Bionic Beaver) server.
Sublime Text 3 Features

“Goto Anything,” quick navigation to files, symbols, or lines
“Command palette” uses adaptive matching for quick keyboard invocation of arbitrary commands
Simultaneous editing: simultaneously make the same interactive changes to multiple selected areas
Python-based plugin API
Project-specific preferences
Extensive customizability via JSON settings files, including project-specific and platform-specific settings
Cross platform (Windows, OS X, Linux)
Compatible with many language grammars from Textmate.
proprietary software, may be downloaded and evaluated for free, however a license must be purchased for continued use.

Install Sublime Text on Ubuntu 18.04 LTS Bionic Beaver

Step 1. First make sure that all your system packages are up-to-date

sudo apt-get update
sudo apt-get upgrade

Step 2. Installing Sublime Text on Ubuntu 18.04 LTS.

First add Sublime Text signing key and repository:

wget -qO - https://download.sublimetext.com/sublimehq-pub.gpg | sudo apt-key add -
apt-add-repository "deb https://download.sublimetext.com/ apt/stable/"

Once you’ve added the repo you can go ahead and run an update and install the app:

apt install sublime-text

When installation is complete you can launch the app from your desktop app launcher or start Sublime Text editor on your Ubuntu 18.04 system open up terminal and enter:

subl

Congratulation’s! You have successfully installed Sublime Text 3. Thanks for using this tutorial for installing Sublime Text editor on Ubuntu 18.04 LTS Bionic Beaver systems. For additional help or useful information, we recommend you to check the official Sublime Text web site.

How To Install Drupal on Ubuntu 18.04 LTS

Install Drupal on Ubuntu 18

Drupal is an open-source and one of the most popular PHP based content Management System (CMS) platform for building personal blogs or big corporate websites. It has thousands of templates and plugins that are mostly free to download and install. Due to the stability of the base, the adaptability of the platform, and its active community, Drupal remains a popular choice after more than a decade on the scene.

This article assumes you have at least basic knowledge of linux, know how to use the shell, and most importantly, you host your site on your own VPS. The installation is quite simple and assumes you are running in the root account, if not you may need to add ‘sudo’ to the commands to get root privileges. I will show you through the step by step installation Drupal content management system on a Ubuntu 18.04 LTS (Bionic Beaver) server.

Install Drupal on Ubuntu 18.04 LTS Bionic Beaver

Step 1. First make sure that all your system packages are up-to-date

sudo apt-get update
sudo apt-get upgrade
[php]


<strong>Step 2. Install LAMP (Linux, Apache, MariaDB, PHP) server.</strong>

A Ubuntu 18.04 LAMP server is required. If you do not have LAMP installed, you can follow our guide here. Also install all required PHP modules:
[php]
apt-get install php7.1-cli php7.1-gd php7.1-opcache php7.1-mysql php7.1-json php7.1-mcrypt php7.1-xml php7.1-curl

Step 3. Installing Drupal on Ubuntu 18.04 LTS.

First thing to do is to go to Drupal’s download page and download the latest stable version of Drupal, At the moment of writing this article it is version 8.5.3:

wget https://ftp.drupal.org/files/projects/drupal-8.5.3.zip

Unpack the Drupal archive to the document root directory in your server:

unzip drupal*.zip
cp -rf drupal*/* /var/www/html/

/

We will need to change some folders permissions:

chown www-data:www-data -R /var/www/html/
chmod -R 755 /var/www/html/

Step 4. Configuring MariaDB for Drupal.

By default, MariaDB is not hardened. You can secure MariaDB using the mysql_secure_installation script. you should read and below each steps carefully which will set root password, remove anonymous users, disallow remote root login, and remove the test database and access to secure MariaDB:

mysql_secure_installation

Configure it like this:

- Set root password? [Y/n] y
- Remove anonymous users? [Y/n] y
- Disallow root login remotely? [Y/n] y
- Remove test database and access to it? [Y/n] y
- Reload privilege tables now? [Y/n] y

Next we will need to log in to the MariaDB console and create a database for the Drupal. Run the following command:

mysql -u root -p

This will prompt you for a password, so enter your MariaDB root password and hit Enter. Once you are logged in to your database server you need to create a database for Drupal installation:

create database drupal;
grant all privileges on drupal.* to drupaluser@localhost identified by 'your_password';
flush privileges;
exit

Step 5. Configuring Apache web server for Drupal.

Create a new virtual host directive in Apache. For example, create a new Apache configuration file named ‘drupal.conf’ on your virtual server:

sudo a2enmod rewrite
touch /etc/apache2/sites-available/drupal.conf
ln -s /etc/apache2/sites-available/drupal.conf /etc/apache2/sites-enabled/drupal.conf
nano /etc/apache2/sites-available/drupal.conf

Add the following lines:

<VirtualHost *:80>
ServerAdmin [email protected]
DocumentRoot /var/www/html/
ServerName your-domain.com
ServerAlias www.your-domain.com
<Directory /var/www/html/>
Options FollowSymLinks
AllowOverride All
Order allow,deny
allow from all
</Directory>
ErrorLog /var/log/apache2/your-domain.com-error_log
CustomLog /var/log/apache2/your-domain.com-access_log common
</VirtualHost>

Now, we can restart Apache web server so that the changes take place:

systemctl restart apache2.service

Step 6. Accessing Drupal CMS.

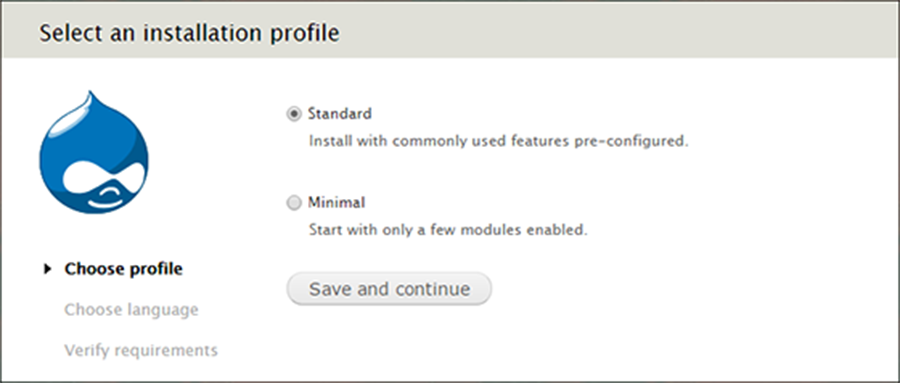
Drupal will be available on HTTP port 80 by default. Open your favorite browser and navigate to http://yourdomain.com or http://server-ip and complete the required the steps to finish the installation. Remember that you’ll need the database name, username and password you created earlier to connect. If you are using a firewall, please open port 80 to enable access to the control panel.
install-drupal
Drupal start up installation page

Congratulation’s! You have successfully installed Drupal. Thanks for using this tutorial for installing Drupal content management system (CMS) on Ubuntu 18.04 LTS (Bionic Beaver) system. For additional help or useful information, we recommend you to check the official Drupal web site.

How To Install Lighttpd With MariaDB and PHP on Ubuntu 18.04 LTS

Install Lighttpd With MariaDB and PHP on Ubuntu

Lighttpd is a fast and secure web-server which has been optimized for high-performance environments. With a small memory footprint compared to other web-servers, effective management of the cpu-load, and advanced feature set (FastCGI, SCGI, Auth, Output-Compression, URL-Rewriting and many more) lighttpd is the perfect solution for every server that is suffering load problems.

This article assumes you have at least basic knowledge of Linux, know how to use the shell, and most importantly, you host your site on your own VPS. The installation is quite simple and assumes you are running in the root account, if not you may need to add ‘sudo’ to the commands to get root privileges. I will show you through the step by step installation Lighttpd With MariaDB and PHP FastCGI on Ubuntu 18.04 Bionic Beaver server.

Install Lighttpd With MariaDB and PHP on Ubuntu 18.04 LTS Bionic Beaver


Step 1. First make sure that all your system packages are up-to-date

apt-get update
apt-get upgrade

Step 2. Installing Lighttpd on Ubuntu 18.04 LTS.

Lighttpd is available to install from the official Ubuntu repositories, So if you want to install Lighttpd, you only have to run this command:

sudo apt install lighttpd

To start up Lighttpd webserver, run the commands below and You can test the status of the server by accessing the IP address of your VPS in a web browser. Upon success, you will see the Lighttp welcome page:

systemctl start lighttpd.service

Step 3. Installing MariaDB on Ubuntu 18.04 LTS.

To install MariaDB in Ubuntu run the following command:

sudo apt install mariadb-server mariadb-client

By default, MariaDB is not hardened. You can secure MariaDB using the mysql_secure_installation script. you should read and below each steps carefully which will set root password, remove anonymous users, disallow remote root login, and remove the test database and access to secure MariaDB:

mysql_secure_installation

To log into MariaDB, use the following command (note that it’s the same command you would use to log into a MySQL database):

mysql -u root -p

To start the database, run the commands below:

systemctl start mariadb.service

Step 4. Installing PHP 7 FastCGI and other PHP7 modules.

First, add the below third party repository to upgrade to PHP 7.1:

sudo apt-get install software-properties-common
sudo add-apt-repository ppa:ondrej/php

Then, install and upgrade to PHP 7.1:

sudo apt update
sudo apt install php7.1-cgi php7.1-mcrypt php7.1-cli php7.1-mysql php7.1-gd php7.1-imagick php7.1-recode php7.1-tidy php7.1-xmlrpc

Enable PHP CGI modules in Lighttpd with the following commands:

sudo sudo lighttpd-enable-mod fastcgi 
sudo lighttpd-enable-mod fastcgi-php

After enabling the modules, you need to restart the Lighttpd service by running the following command:

systemctl restart lighttpd

Testing if PHP is working:

nano /srv/www/htdocs/info.php

Then, we’ll simply add the following line into the file:

<?php phpinfo(); ?>

Step 5. Configure firewall for LLMP.

Run following commands to allow HTTP (80) and HTPPS (443) request through the firewall.

ufw allow 80/tcp
ufw allow 443/tcp
ufw reload

Congratulations! You have successfully installed LLMP. Thanks for using this tutorial for installing Lighttpd With PHP FPM and MariaDB in Ubuntu 18.04 LTS Bionic Beaver systems. For additional help or useful information, we recommend you to check the official Lighttpd web site.

How To Install Red5 Media Server on Ubuntu 16.04 LTS

Install Red5 Media Server on Ubuntu 16

Red5 is an open source media server for live streaming solutions of all kinds. It is designed to be flexible with a simple plugin architecture that allows for customization of virtually any VOD and live streaming scenario.

This article assumes you have at least basic knowledge of linux, know how to use the shell, and most importantly, you host your site on your own VPS. The installation is quite simple and assumes you are running in the root account, if not you may need to add ‘sudo’ to the commands to get root privileges. I will show you through the step by step installation Red5 media server on a Ubuntu 16.04 (Xenial Xerus) server.

Install Red5 Media Server on Ubuntu 16.04 LTS

Step 1. First make sure that all your system packages are up-to-date

sudo apt-get update
sudo apt-get upgrade

Step 2. Installing Java.

You may skip this steps if you have already installed java on your system else use below link to install latest java version:

Install Java JDK on Ubuntu

Step 3. Installing Red5 Media Server.

Use following commands to install red5:

wget https://github.com/Red5/red5-server/releases/download/v1.0.10-M4/red5-server-1.0.10-M4.tar.gz
tar -xvzf red5-server-1.0.10-M4.tar.gz
cd red5-server

After extracting downloaded archive, lets start Red5 using shell script red5.sh:

./red5.sh &

Step 4. Accessing Red 5 installation.

Red5 demo pages and application can be accessed on port 5080 like http://your-server-ip:5080/

Congratulation’s! You have successfully installed Red5. Thanks for using this tutorial for installing latest stable version of Red5 media server on Ubuntu 16.04 LTS (Xenial Xerus) system. For additional help or useful information, we recommend you to check the official Red5 Media Server web site.