How To Install Munin on Ubuntu 17.04

Install Munin on Ubuntu 17

Munin is a free and open-source networked resource monitoring tool. It offers monitoring and alerting services for servers, switches, applications, and services. Munin uses the RRDtool to create graphs which are accessible over a web browser. Also, Munin can be configured to send alerts when some service/application etc. is not working and Munin will automatically send an additional email alert once the problem has been resolved.

This article assumes you have at least basic knowledge of Linux, know how to use the shell, and most importantly, you host your site on your own VPS. The installation is quite simple and assumes you are running in the root account, if not you may need to add ‘sudo’ to the commands to get root privileges. I will show you through the step by step installation Munin monitoring tool on Ubuntu 17.04 Zesty Zapus.
Install Munin on Ubuntu 17.04 Zesty Zapus

Step 1. First make sure that all your system packages are up-to-date by running these following apt-get commands in the terminal.

sudo apt-get update
sudo apt-get upgrade

Step 2. Installing Apache web server.

Munin will generate graphs that are viewed via a web application. So the first thing we need is an Apache web server:

apt-get install apache2 apache2-utils libcgi-fast-perl libapache2-mod-fcgid

Once the installation process is complete, we must ensure that the fcgid module is enabled. Check using the following command:

a2enmod fcgid

Step 3. Installing Munin.

Install Munin and extra plugins using the following command:

apt-get install munin munin-node munin-plugins-extra

Step 4. Configure Munin Master.

Munin puts all its configuration files in /etc/munin. We can start with editing the Munin configuration file /etc/munin/munin.conf:

nano /etc/munin/munin.conf

Edit the Munin configuration file and add/modify the following lines:

dbdir /var/lib/munin
htmldir /var/cache/munin/www
logdir /var/log/munin
rundir /var/run/munin
tmpldir /etc/munin/templates

[localhost]
    address 127.0.0.1
    use_node_name yes

Step 5. Configuring Apache web server.

Next, you will be editing Munin’s apache configuration file to point apache in the right direction when you request the monitoring information:

mv /etc/munin/apache.conf /etc/munin/apache.conf.bak

Edit the ‘/etc/munin/apache.conf’ configuration file and add the following lines:

#nano /etc/munin/apache.conf
<VirtualHost *:80>
   ServerName munin.your-domain.com
   ServerAlias www.munin.your-domain.com
   ServerAdmin [email protected]
      DocumentRoot "/var/cache/munin/www"
      DirectoryIndex index.html

   <Directory "/var/cache/munin/www">
      Options Indexes Includes FollowSymLinks MultiViews
      AllowOverride AuthConfig
      AuthUserFile /etc/munin/htpasswd
      AuthName "munin"
      AuthType Basic
      Require valid-user
      Order allow,deny
      Allow from all
   </Directory>

   CustomLog /var/log/apache2/munin.your-domain.com-access.log combined
   ErrorLog /var/log/apache2/munin.your-domain.com-error.log

   <Directory "/etc/munin/static">
      Require all granted
   </Directory>

   <Directory "/usr/lib/munin/cgi">
      Options +ExecCGI
      Require all granted
   <IfModule mod_fcgid.c>
      SetHandler fcgid-script
   </IfModule>
   <IfModule !mod_fcgid.c>
      SetHandler cgi-script
   </IfModule>
   </Directory>
</VirtualHost>

Restart Apache and Munin:

systemctl restart apache2
systemctl restart munin-node

Step 6. Accessing Munin.

Munin will be available on HTTP port 80 by default. Open your favorite browser and navigate to http://yourdomain.com/munin or http://server-ip/munin. Using ‘admin’ as username and the previously generated munin password as password and you will be able to access Munin graphs and data.
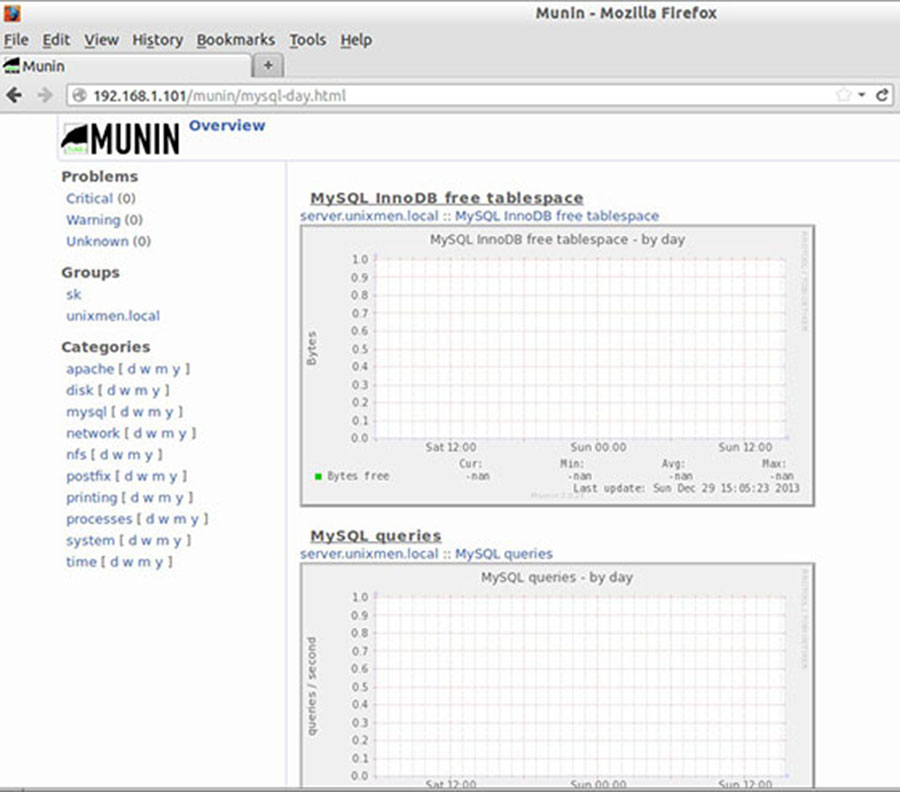
Munin-graphs-data

Congratulation’s! You have successfully installed Munin. Thanks for using this tutorial for installing Munin monitoring tool on Ubuntu 17.04 Zesty system. For additional help or useful information, we recommend you to check the official Munin web site.

How To Install Gogs on Ubuntu 16.04 LTS

Install Gogs on Ubuntu 16

Gogs is a free and open source self-hosted Git service written in the Go programming language. It is very similar to GitLab and aims to be the easiest and most painless way to set up self-hosted Git service in your development environment.

This article assumes you have at least basic knowledge of Linux, know how to use the shell, and most importantly, you host your site on your own VPS. The installation is quite simple and assumes you are running in the root account, if not you may need to add ‘sudo’ to the commands to get root privileges. I will show you through the step by step installation Gogs on Ubuntu 16.04 Xenial Xerus server.
Install Gogs on Ubuntu 16.04 LTS

Step 1. First make sure that all your system packages are up-to-date by running these following apt-get commands in the terminal.

sudo apt-get update
sudo apt-get upgrade

Step 2. Install LAMP (Linux, Apache, MariaDB and PHP) server.

A Ubuntu 16.04 LAMP server is required. If you do not have LAMP installed, you can follow our guide here. Also install all required PHP modules:

apt-get install php7.0-curl php7.0-gd php7.0-mbstring php7.0-mysql libapache2-mod-php7.0 php7.0-mcrypt php7.0-zip

Step 3. Installing Gogs.

First thing to do is to go to Gogs’s download page and download the latest stable version of Gogs, At the moment of writing this article it is version 0.11.4:

cd /opt && wget https://dl.gogs.io/0.11.4/linux_amd64.zip

Unpack the Gogs archive to the document root directory on your server:

unzip linux_amd64.zip
mv gogs/ /var/www/html/gogs

Next, change the directory to the gogs and run the following command to start gogs:

cd /var/www/html/gogs
./gogs web &

Step 4. Configuring MariaDB for Gogs.

By default, MariaDB is not hardened. You can secure MariaDB using the mysql_secure_installation script. you should read and below each steps carefully which will set root password, remove anonymous users, disallow remote root login, and remove the test database and access to secure MariaDB:

mysql_secure_installation

Configure it like this:

- Set root password? [Y/n] y
- Remove anonymous users? [Y/n] y
- Disallow root login remotely? [Y/n] y
- Remove test database and access to it? [Y/n] y
- Reload privilege tables now? [Y/n] y

Next we will need to log in to the MariaDB console and create a database for the Gogs. Run the following command:

mysql -u root -p

This will prompt you for a password, so enter your MariaDB root password and hit Enter. Once you are logged in to your database server you need to create a database for Gogs installation:

MariaDB [(none)]> CREATE DATABASE gogs;
MariaDB [(none)]> GRANT ALL PRIVILEGES ON gogs.* TO 'gogs'@'localhost' IDENTIFIED BY 'your_gogs_password';
MariaDB [(none)]> FLUSH PRIVILEGES;
MariaDB [(none)]> \q

Step 5. Configuring Apache web server for Gogs.

Create a new virtual host directive in Apache. For example, create a new Apache configuration file named ‘gogs.conf’ on your virtual server:

sudo a2enmod rewrite
touch /etc/apache2/sites-available/gogs.conf
ln -s /etc/apache2/sites-available/gogs.conf /etc/apache2/sites-enabled/gogs.conf
nano /etc/apache2/sites-available/gogs.conf

Add the following lines:

<VirtualHost *:80>
ServerAdmin [email protected]
DocumentRoot /var/www/html/gogs/
ServerName your-domain.com
ServerAlias www.your-domain.com
<Directory /var/www/html/gogs/>
Options FollowSymLinks
AllowOverride All
Order allow,deny
allow from all
</Directory>
ProxyRequests Off
ProxyPass / http://192.168.77.20:3000/
ProxyPassReverse / http://192.168.77.20:3000/
ErrorLog /var/log/apache2/your-domain.com-error_log
CustomLog /var/log/apache2/your-domain.com-access_log common
</VirtualHost>

Now, we can restart Apache web server so that the changes take place:

systemctl restart apache2.service

Step 6. Accessing Gogs.

Gogs will be available on HTTP port 80 and 3000 by default. Open your favorite browser and navigate to http://yourdomain.com or http://server-ip and complete the required the steps to finish the installation. If you are using a firewall, please open port 80 to enable access to the control panel.

Congratulations! You have successfully installed Gogs. Thanks for using this tutorial for installing Gogs in Ubuntu 16.04 Xenial Xerus systems. For additional help or useful information, we recommend you to check the official Gogs web site.

How To Install Open Visual Traceroute on Ubuntu 16.04 LTS

Install Open Visual Traceroute on Ubuntu 16

Open visual traceroute is a free and open-source graphical traceroute tool, available for Linux, Mac OS X and Windows and licensed under LGPL v3.. It can also perform packet sniffer and Whois lookup. Data is presented in a 3D map which can be exported to an image file and text file. The gantt view is useful to analyze network bottlenecks.

This article assumes you have at least basic knowledge of Linux, know how to use the shell, and most importantly, you host your site on your own VPS. The installation is quite simple and assumes you are running in the root account, if not you may need to add ‘sudo’ to the commands to get root privileges. I will show you through the step by step installation Open Visual Traceroute on Ubuntu 16.04 Xenial Xerus server.
Install Open Visual Traceroute on Ubuntu 16.04 LTS

Step 1. First, make sure that all your system packages are up-to-date by running these following apt-get commands in the terminal.

sudo apt-get update
sudo apt-get upgrade
sudo apt-get install gdebi

Step 2. Installing Oracle Java 8 on Ubuntu.

Before starting, Oracle Java is required to run Open Visual Traceroute. By default Oracle JDK 8 is not available in Ubuntu repository so you will need to add Webupd8 team PPA repository to your system:

add-apt-repository ppa:webupd8team/java
apt-get update
apt-get install java-common oracle-java8-installer

Step 3. Installing Open Visual Traceroute.

First thing to do is to go to Open Visual Traceroute’s download page and download the latest stable version of Open Visual Traceroute, At the moment of writing this article it is version 1.6.5:

### 32-bits ###
wget http://heanet.dl.sourceforge.net/project/openvisualtrace/1.6.5/ovtr_1.6.5-1_i386.deb
### 64-bits ###
wget https://sourceforge.net/projects/openvisualtrace/files/1.6.5/ovtr_1.6.5-1_amd64.deb

Once the download is completed, run the following command to install Open Visual Traceroute:

sudo dpkg -i ovtr_*.deb

Once installed, next you can start Open Visual Traceroute by searching for it Unity Dash. If the app icon doesn’t show up, try logging out and logging back in.

Congratulations! You have successfully installed open visual traceroute. Thanks for using this tutorial for installing Open visual traceroute in Ubuntu 16.04 Xenial Xerus systems. For additional help or useful information, we recommend you to check the official Open Visual Traceroute web site.

How To Install LiteCart on Ubuntu 16.04 LTS

Install LiteCart on Ubuntu 16

LiteCart is a free e-commerce, feature rich e-commerce solution. The framework is constructed to be lightweight and easy for developers to modify and build upon. LiteCart relies on the latest HyperText standard HTML 5, the latest CSS 3 for styling, the amazing jQuery framework for client-side dynamics, and the popular web scripting language PHP for server-side dynamics.

This article assumes you have at least basic knowledge of Linux, know how to use the shell, and most importantly, you host your site on your own VPS. The installation is quite simple and assumes you are running in the root account, if not you may need to add ‘sudo’ to the commands to get root privileges. I will show you through the step by step installation LiteCart on Ubuntu 16.04 Xenial Xerus server.
Install LiteCart on Ubuntu 16.04 LTS

Step 1. First make sure that all your system packages are up-to-date by running these following apt-get commands in the terminal.

sudo apt-get update
sudo apt-get upgrade

Step 2. Install LAMP (Linux, Apache, MariaDB and PHP) server.

A Ubuntu 16.04 LAMP server is required. If you do not have LAMP installed, you can follow our guide here. Also install all required PHP modules:

apt-get install php7.0-curl php7.0-gd php7.0-mbstring php7.0-mysql libapache2-mod-php7.0 php7.0-mcrypt php7.0-zip

Step 3. Installing LiteCart.

First thing to do is to go to LiteCart’s download page and download the latest stable version of LiteCart, At the moment of writing this article it is version 2.0.1.

Unpack the LiteCart archive to the document root directory on your server:

mkdir /var/www/html/litecart/
unzip litecart-2.0.1.zip -d /var/www/html/litecart/

We will need to change some folders permissions:

chown www-data:www-data -R /var/www/html/litecart/

Step 4. Configuring MariaDB for LiteCart.

By default, MariaDB is not hardened. You can secure MariaDB using the mysql_secure_installation script. you should read and below each steps carefully which will set root password, remove anonymous users, disallow remote root login, and remove the test database and access to secure MariaDB:

mysql_secure_installation

Configure it like this:

- Set root password? [Y/n] y
- Remove anonymous users? [Y/n] y
- Disallow root login remotely? [Y/n] y
- Remove test database and access to it? [Y/n] y
- Reload privilege tables now? [Y/n] y

Next we will need to log in to the MariaDB console and create a database for the LiteCart. Run the following command:

mysql -u root -p

This will prompt you for a password, so enter your MariaDB root password and hit Enter. Once you are logged in to your database server you need to create a database for LiteCart installation:

MariaDB [(none)]> CREATE DATABASE lite DEFAULT CHARACTER SET utf8 DEFAULT COLLATE utf8_general_ci;
MariaDB [(none)]> GRANT ALL PRIVILEGES ON lite.* TO 'liteuser'@'localhost' IDENTIFIED BY 'strong_password';
MariaDB [(none)]> FLUSH PRIVILEGES;
MariaDB [(none)]> \q

Step 5. Configuring Apache web server for LiteCart.

Create a new virtual host directive in Apache. For example, create a new Apache configuration file named ‘litecart.conf’ on your virtual server:

sudo a2enmod rewrite
touch /etc/apache2/sites-available/litecart.conf
ln -s /etc/apache2/sites-available/litecart.conf /etc/apache2/sites-enabled/litecart.conf
nano /etc/apache2/sites-available/litecart.conf

Add the following lines:

<VirtualHost *:80>
ServerAdmin [email protected]
DocumentRoot /var/www/html/litecart/
ServerName your-domain.com
ServerAlias www.your-domain.com
<Directory /var/www/html/litecart/>
Options FollowSymLinks
AllowOverride All
Order allow,deny
allow from all
</Directory>
ErrorLog /var/log/apache2/your-domain.com-error_log
CustomLog /var/log/apache2/your-domain.com-access_log common
</VirtualHost>

Next step, Create the directory and the logs files that you have mentioned in your configuration file:

mkdir /var/log/apache2/your-domain.com
touch /var/log/apache2/your-domain.com-error_log
touch /var/log/apache2/your-domain.com-access_log common

Now, we can restart Apache web server so that the changes take place:

systemctl restart apache2.service

Step 6. Accessing LiteCart.

LiteCart will be available on HTTP port 80 by default. Open your favorite browser and navigate to http://yourdomain.com or http://server-ip and complete the required the steps to finish the installation. If you are using a firewall, please open port 80 to enable access to the control panel.

Congratulations! You have successfully installed LiteCart. Thanks for using this tutorial for installing LiteCart in Ubuntu 16.04 Xenial Xerus systems. For additional help or useful information, we recommend you to check the official LiteCart web site.

How To Install Monstra on Ubuntu 16.04 LTS

Install Monstra on Ubuntu 16

Monstra is a modern and lightweight content management system written in PHP. Monstra is the best CMS to manage a small-business website. Monstra provides amazing api’s for plugins, themes and core developers.

This article assumes you have at least basic knowledge of Linux, know how to use the shell, and most importantly, you host your site on your own VPS. The installation is quite simple and assumes you are running in the root account, if not you may need to add ‘sudo’ to the commands to get root privileges. I will show you through the step by step installation Monstra on a Ubuntu 16.04 (Xenial Xerus) server.
Install Monstra on Ubuntu 16.04 LTS

Step 1. First make sure that all your system packages are up-to-date by running these following apt-get commands in the terminal.

sudo apt-get update
sudo apt-get upgrade

Step 2. Install LAMP (Linux, Apache, MariaDB and PHP) server.

A Ubuntu 16.04 LAMP server is required. If you do not have LAMP installed, you can follow our guide here. Also install all required PHP modules:

apt-get install php7.0-readline php7.0-curl php7.0-gd php7.0-mbstring libapache2-mod-php7.0 php7.0-mcrypt php7.0-bz2 php7.0-zip

Step 3. Installing Monstra.

First thing to do is to go to Monstra’s download page and download the latest stable version of Monstra, At the moment of writing this article it is version 3.0.4:

wget https://bitbucket.org/Awilum/monstra/downloads/monstra-3.0.4.zip

Unpack the Monstra archive to the document root directory on your server:
unzip monstra-3.0.4.zip

mv monstra-3.0.4 /var/www/html/monstra

We will need to change some folders permissions:

chown -R www-data:www-data /var/www/html/monstra

Step 4. Configuring Apache web server for Monstra.

Create a new virtual host directive in Apache. For example, create a new Apache configuration file named ‘monstra.conf’ on your virtual server:

touch /etc/apache2/sites-available/monstra.conf
ln -s /etc/apache2/sites-available/monstra.conf /etc/apache2/sites-enabled/monstra.conf
nano /etc/apache2/sites-available/monstra.conf

Add the following lines:

<VirtualHost *:80>
ServerAdmin [email protected]
DocumentRoot /var/www/html/monstra
ServerName your-domain.com
ServerAlias www.your-domain.com
<Directory /var/www/html/monstra>
Options FollowSymLinks
AllowOverride All
</Directory>
ErrorLog /var/log/apache2/your-domain.com-error_log
CustomLog /var/log/apache2/your-domain.com-access_log common

Save and close the file. Restart the apache service for the changes to take effects:

systemctl restart apache2

Step 5. Accessing Monstra.

Monstra will be available on HTTP port 80 by default. Open your favorite browser and navigate to http://yourdomain.com/install.php or http://server-ipinstall.php and complete the required the steps to finish the installation. If you are using a firewall, please open port 80 to enable access to the control panel.

Congratulation’s! You have successfully installed Monstra. Thanks for using this tutorial for installing Monstra content management system on Ubuntu 16.04 LTS (Xenial Xerus) system. For additional help or useful information, we recommend you to check the official Monstra web site.

How To Install KeePass Password Manager on Ubuntu 16.04 LTS

Install KeePass Password Manager on Ubuntu 16

KeePassX offers a little utility for secure password generation. The password generator is very customizable, fast and easy to use. Especially someone who generates passwords frequently will appreciate this feature. The complete database is always encrypted either with AES or Twofish encryption algorithm using a 256 bit key. Therefore the saved information can be considered as quite safe. KeePassX uses a database format that is compatible with KeePass Password Safe. This makes the use of that application even more favourable.

This article assumes you have at least basic knowledge of Linux, know how to use the shell, and most importantly, you host your site on your own VPS. The installation is quite simple and assumes you are running in the root account, if not you may need to add ‘sudo’ to the commands to get root privileges. I will show you through the step by step installation KeePass on Ubuntu 16.04 xenial xerus server.
Install KeePass Password Manager on Ubuntu 16.04 LTS

Step 1. First, make sure that all your system packages are up-to-date by running these following apt-get commands in the terminal.

sudo apt-get update
sudo apt-get upgrade

Step 2. Installing KeePass.

Run the following commands in terminal to install the KeePass password manager on Linux Ubuntu:

add-apt-repository ppa:jtaylor/keepass
apt-get update
apt-get install keepass2

Once installed, next you can start KeePass by searching for it Unity Dash. If the app icon doesn’t show up, try logging out and logging back in.

Congratulations! You have successfully installed KeePass. Thanks for using this tutorial for installing KeePass Password Manager in Ubuntu 16.04 xenial xerus systems. For additional help or useful information, we recommend you to check the official KeePass web site.

How To Install Let’s Encrypt SSL With Nginx on Ubuntu 16.04 LTS

Install Let’s Encrypt SSL With Nginx on Ubuntu 16

LetsEncrypt is a free open certificate authority (CA) that provides free certificates for websites and other services. The service, which is backed by the Electronic Frontier Foundation, Mozilla, Cisco Systems, and Akamai. Unfortunately, LetsEncrypt.org certificates currently have a 3 month lifetime. This means you’ll need to renew your certificate quarterly for now.

This article assumes you have at least basic knowledge of Linux, know how to use the shell, and most importantly, you host your site on your own VPS. The installation is quite simple and assumes you are running in the root account, if not you may need to add ‘sudo’ to the commands to get root privileges. I will show you through the step by step installation Let’s Encrypt SSL with Nginx on a Ubuntu 16.04 LTS xenial xerus server.
Install Let’s Encrypt SSL With Nginx on Ubuntu 16.04 LTS

Step 1. First, make sure that all your system packages are up-to-date by running these following apt-get commands in the terminal.

sudo apt-get update
sudo apt-get upgrade

Step 2. Installing Let’s Encrypt SSL on Ubuntu 16.04

The first step is to install certbot, the software client which will automate almost everything in the process:

add-apt-repository ppa:certbot/certbot
apt-get update
apt-get install certbot

You will also need to have nginx installed and running. Of course, if you are adding certificates onto a previously configured web host this would already be installed:

apt-get install nginx
systemctl start nginx

The first step to install let’s encrypt ssl on Ubuntu Linux is to add a simple configuration inside your nginx server block configuration. Add this line to your server block configuration:

location ~ /.well-known {
  allow all;
  }

Save and exit to apply changes:

### nginx -t
nginx: the configuration file /etc/nginx/nginx.conf syntax is ok
nginx: configuration file /etc/nginx/nginx.conf test is successful

Restart Nginx:

systemctl restart nginx

Obtaining a certificate with Certbot:

Run the command as you see below, replace “wpcademy.com” with your real domain name and /var/www/wpcademy.com with your real webroot path:

certbot certonly -a webroot --webroot-path=/var/www/wpcademy.com -d wpcademy.com -d www.wpcademy.com

Result:

[[email protected]:~]certbot certonly -a webroot --webroot-path=/var/www/wpcademy.com -d wpcademy.com -d www.wpcademy.com
Saving debug log to /var/log/letsencrypt/letsencrypt.log
Obtaining a new certificate
Performing the following challenges:
http-01 challenge for wpcademy.net
Using the webroot path /var/www/html for all unmatched domains.
Waiting for verification...
Cleaning up challenges
Generating key (2048 bits): /etc/letsencrypt/keys/0001_key-certbot.pem
Creating CSR: /etc/letsencrypt/csr/0001_csr-certbot.pem
IMPORTANT NOTES:
 - Congratulations! Your certificate and chain have been saved at
   /etc/letsencrypt/live/wpcademy.com/fullchain.pem. Your cert
   will expire on 2017-07-16. To obtain a new or tweaked version of
   this certificate in the future, simply run certbot again. To
   non-interactively renew *all* of your certificates, run "certbot
   renew"
 - If you like Certbot, please consider supporting our work by:

   Donating to ISRG / Let's Encrypt:   https://letsencrypt.org/donate
   Donating to EFF:                    https://eff.org/donate-le
[[email protected]:~]
/[php]


&lt;strong&gt;Step 3. Configure SSL/TLS on NGINX web server.&lt;/strong&gt;

First, edit the server block file you specified during configuration through Certbot and add this three directives:
[php]
listen 443 ssl http2;
ssl_certificate /etc/letsencrypt/live/wpcademy.com/fullchain.pem;
ssl_certificate_key /etc/letsencrypt/live/wpcademy.com/privkey.pem;
The full nginx server block configuration may look like this:
server {
     listen 80;
     server_name wpcademy.com www.wpcademy.com;
     rewrite ^(.*) https://wpcademy.com$1 permanent;
}
server {
     access_log off;
     log_not_found off;
     error_log  logs/wpcademy.com-error_log warn;

    server_name  wpcademy.com; 
    root   /var/www/wpcademy.com;
    index  index.php index.html index.htm;

    listen 443 ssl http2;
    ssl_certificate /etc/letsencrypt/live/wpcademy.com/fullchain.pem;
    ssl_certificate_key /etc/letsencrypt/live/wpcademy.com/privkey.pem;

  ## Stuff required by certbot
     location ~ /.well-known {
     allow all;
     }

  ## SSL
   ssl_session_cache shared:SSL:20m;
   ssl_session_timeout 10m;

   ssl_prefer_server_ciphers On;
   ssl_protocols TLSv1 TLSv1.1 TLSv1.2;
   ssl_ciphers ECDH+AESGCM:DH+AESGCM:ECDH+AES256:DH+AES256:ECDH+AES128:DH+AES:ECDH+3DES:DH+3DES:RSA+AESGCM:RSA+AES:RSA+3DES:!aNULL:!MD5:!DSS;

   ssl_stapling on;
   ssl_stapling_verify on;
   resolver 8.8.8.8 8.8.4.4 valid=300s;
   resolver_timeout 10s;

   access_log /var/www/wpcademy.com/logs/access.log;
   error_log /var/www/wpcademy.com/logs/error.log;

   # php-script handler
   location ~ \.php$ {
      fastcgi_index index.php;
      fastcgi_pass 127.0.0.1:9000;       fastcgi_read_timeout 150;
      root    /var/www/wpcademy.com/public_html;
      fastcgi_param SCRIPT_FILENAME /var/www/wpcademy.com$fastcgi_script_name;
      include /etc/nginx/fastcgi_params;
   }
 location  ~ /\.ht {
               deny  all;
           }
    }

Save and close the file when you are finished.

Step 5. Set Up Let’s Encrypt SSL Auto Renewal.

We will add a cronjob to run the renewal command every week, run this command:

export VISUAL=nano; crontab -e

Paste the following lines:

01 1 * * 0 /usr/bin/certbot renew &gt;&gt; /var/log/ssl-renew.log 
06 1 * * 0 /usr/bin/systemctl nginx reload

Save and Exit from the crontab table.

This will create a new cronjob that will be executed every Sunday at 01 AM, and then it will reload Nginx web server to apply the changes. The output will be logged into /var/log/ssl-renew.log file for further analysis if needed.

Congratulation’s! You have successfully installed Let’s Encrypt. Thanks for using this tutorial for installing Let’s Encrypt SSL on Ubuntu 16.04 LTS system. For additional help or useful information, we recommend you to check the official Let’s Encrypt web site.