How To Hide Nginx Server Default Header

Hide Nginx Server Default Header

In this tutorial we will learn How To Hide Nginx Server Default Header on your Linux server.  In default Nginx configuration, the server sends HTTP Header with the information of Nginx version number of the Server. The HTTP response header “Server” displays the version number of the server. This information can be used to try to exploit any vulnerabilities in the Nginx, specially if you are running an older version with known vulnerabilities.

Hiding nginx version is very easy and it’s done using server_tokens directive. This tutorial helps you customize the name of the server on your host.

Hide Nginx Server Header

Step 1. Go to nginx/conf folder (it can be located at /etc/nginx/nginx.conf or /usr/local/nginx/conf/nginx.conf file)

Step 2. Hide Nginx version.

Add following in nginx.conf under server section:

 server_tokens off;

Step 3. Restart nginx web server:

 service nginx restart

Let’s verify if we see the server information now:

curl -I https://wpcademy.com/
HTTP/1.1 200 OK
Server: nginx
Date: Sun, 03 Aug 2014 06:06:52 GMT
Content-Type: text/html; charset=UTF-8
Connection: keep-alive
Vary: Accept-Encoding
X-Pingback: https://wpcademy.com/xmlrpc.php

Congratulation’s! You have successfully hide Nginx version. For additional help or useful information, we recommend you to check the official Nginx web site.

You Might Also Like: How To Install Nginx Web Server On CentOS

How To Check Disk Space Usage on Linux With Ncdu Utility

Disk Space Usage on Linux With Ncdu

Ncdu (NCurses Disk Usage)  is a command line tool to view and analyse disk space usage on linux. It can drill down into directories and report space used by individual directories. This way it is very easy to track down space consuming files/directories. This article walks you through the process of installing and using NCDU on a Linux server.

In this tutorial we will learn How To Check Disk Space Usage on Linux With Ncdu Utility on linux server.

Check Disk Space Usage With Ncdu Utility

 apt-get install ncdu -y

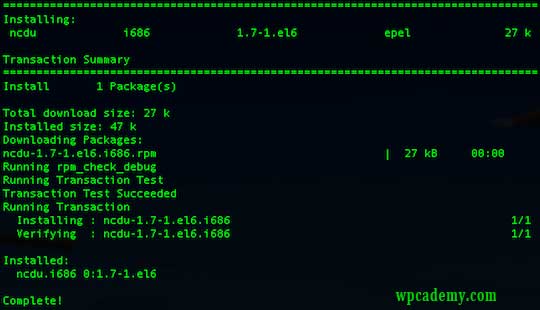
Install ncdu on RHEL/CentOS

 yum install ncdu -y

Ncdu-linux

Ncdu sample usage

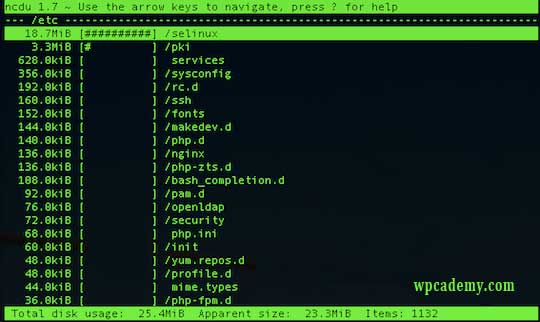
To start  ncdu type following command on your terminal:

 ncdu

Ncdu-sample-usage

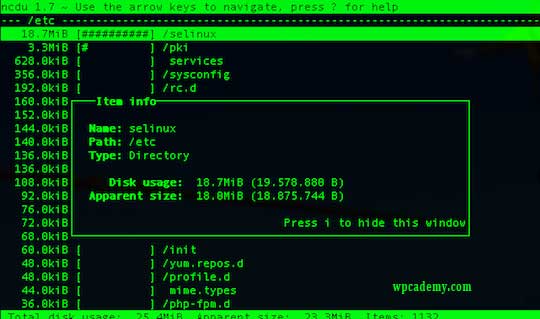
To get more information on selected directory press “i” button:

Disk Space Usage on Linux With Ncdu

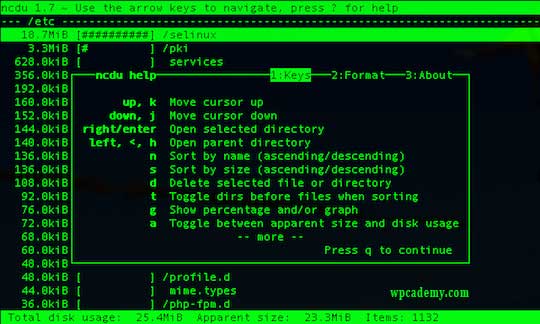
To see help window with ncdu available options press  “Shift+?” key combination. You can use arrow keys to move up and down for more options.

Ncdu windows help

For command line options and other information, go through the man page of ncdu command.

If you are not satisfied with the standard du command and are looking for a fast, ncurses based du-like utility then try out ncdu. It provides lots of customization options. You’ll definitely like it. Follow Wpcademy Facebook page

You Might Also Like: How To Install NCDU on Ubuntu 17.04

How To Backup and Restore MySQL Database Using Command Line

Backup and Restore MySQL Database

Many of the world’s largest and fastest-growing organizations including Facebook, Google, Adobe, Alcatel Lucent and Zappos rely on MySQL to save time and money powering their high-volume Web sites, business-critical systems and packaged software.

In this tutorial we will guide you through two easy ways to backup and restore the data in your MySQL database using mysqldump. You can also use this process to move your data to a new web server. We assume that you already have MySQL installed on Linux system with administrative privileges and we assume that you already have badic knowledge on MySQL and command line or terminal.

The parameters of the said command as follows.

  • [uname] Your database username.
  • [passwd] The password for your database (note there is no space between -p and the password).
  • [dbname] The name of your database.
  • [backupdb.sql] The filename for your database backup.

Backup and Restore MySQL Database Using Command Line

Backup MySQL database

First, you can check MySQL databases from your server:

#mysql -h localhost -u root -p
#mysql> show databases;

The following command will dump all databases to an sql file. Replace pass with your root database password and filename with the name of the file you wish to create such as backupdb.sql

Back up multiple databases in MySQL

 #mysqldump –u[uname] –p[passwd] [database name 1] [database name 2] > backup.sql

Example:

 #mysqldump –u root –pidroidus chedelics radiks > backup.sql

Backup all databases in MySQL

 #mysqldump –u [uname] –p[passwd] –all-databases > backup.sql

Example:

 #mysqldump –u root –pidroidus –all-databases > backup.sql

Back up your MySQL Database with Compress

 #mysqldump -u root -p[passwd] --databases [dbname] | gzip > backup.sql.gz

Example:

 #mysqldump -u root -pidroidus --databases  | gzip > backup.sql.gz

Restore MySQL database from a backup file

Above we backup the Tutorials database into backupdb.sql file. To re-create the Tutorials database you should follow two steps:

  • Create an appropriately named database on the target machine
  • Load the file using the mysql command:
 #mysqladmin -u root -p create [dbname]
 #gzip -d backupdb.sql.gz #mysql -uroot -p[passwd] [dbname] < backupdb.sql

Example:

#mysqladmin -u root -p create chedelics
#gzip -d backupdb.sql.gz
#backupdb.sql
#mysql -uroot -pidroidus chedelics < backupdb.sql

You Might Also Like: How To Reset Root Password on MySQL Server

How To Install Nginx Web Server on Ubuntu

Install Nginx Web Server on Ubuntu

Nginx is one of the most popular web servers in the world and is responsible for hosting some of the largest and highest-traffic sites on the internet. It is more resource-friendly than Apache in most cases and can be used as a web server or a reverse proxy. So today I’m going to show you how to setup Nginx webserver on Ubuntu or Debian. It’s really not that difficult. Let’s start with Nginx.

This tutorial we will learn how to install Nginx on Ubuntu so that you can successfully run a superior performance based web server while easing the load on your system resources.

Install Nginx on Ubuntu

Step 1. To install, first you must update apt repository and packages by typing the below command:

 sudo apt-get install nginx -y

Step 2. Install Nginx,

Installing Nginx is as simple as running just one command:

 sudo apt-get install nginx

Starting and stopping the Nginx server

To start the Nginx server, issue the following command:

 sudo service nginx start

Top stop the Nginx server, issue the following command:

 sudo service nginx stop

Configuration Nginx files/folders

  • The main configuration file for Nginx is /etc/nginx/nginx.conf
  • Virtual hosts are defined in /etc/nginx/sites-available/default
  • PHP will be configured in /etc/php5/fpm/php.ini

Before you close that terminal window, it’s necessary to set the Nginx service to start at boot. Just issue the following command:

 update-rc.d nginx defaults

This should already be enabled by default, so you may see a message like this:

 System start/stop links for /etc/init.d/nginx already exist

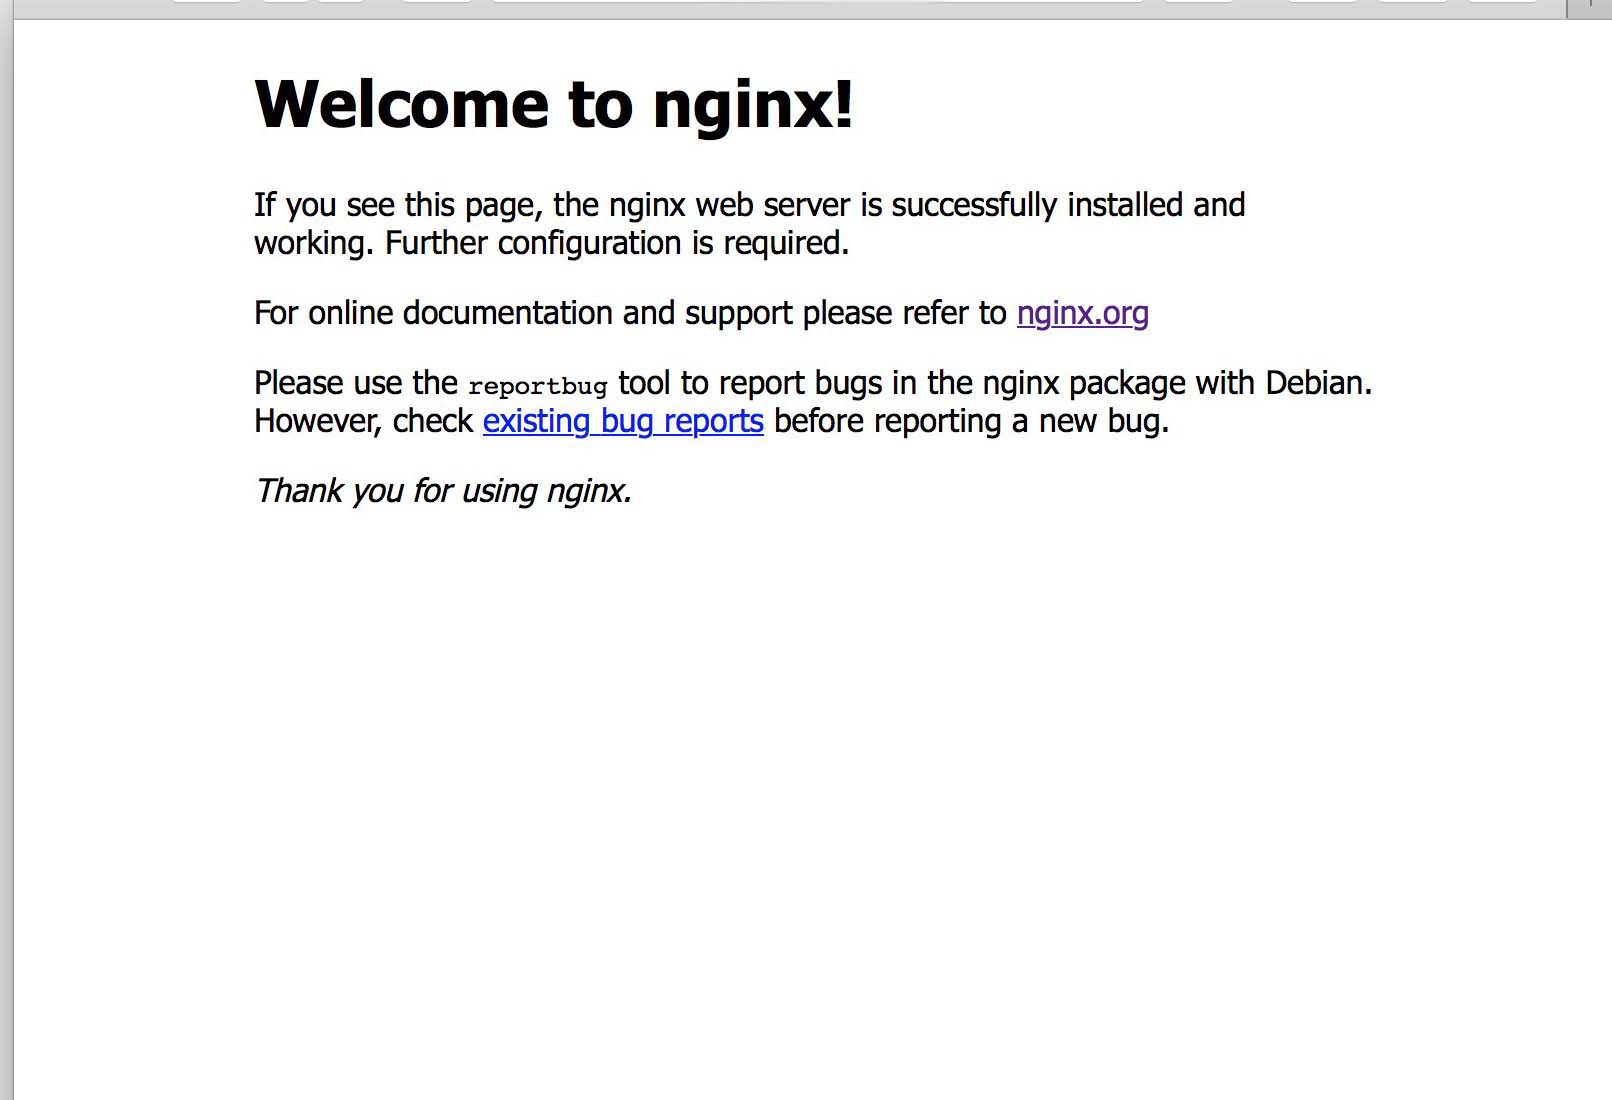
Navigating to your Server’s IP address (assuming you have no other server listening on port 80), you will be greeted with the standard welcome page:

nginx-default

The steps above should produce a running Nginx which serves the Nginx default pages on port 80. We’ll start working through various configurations and optimizations to round out the series. Enjoy your new web server! For additional help or useful information, we recommend you to check the official Nginx web site.


How to install Java on Ubuntu

How to install Java on Ubuntu

There are many programs and scripts that require java to run it, but usually Java is not installed by default on VPS/Dedicated Server. In this tutorial we are going to learn a simple step to install Java on your Ubuntu machine.

Java is at the heart of our digital lifestyle. It’s the platform for launching careers, exploring human-to-digital interfaces, architecting the world’s best applications, and unlocking innovation everywhere—from garages to global organizations.

Java technology allows you to work and play in a secure computing environment. Upgrading to the latest Java version improves the security of your system, as older versions do not include the latest security updates.

Java allows you to play online games, chat with people around the world, calculate your mortgage interest, and view images in 3D, just to name a few.

install Java on Ubuntu

First step, update apt-get repository

 apt-get update

Second step, install java run time

 apt-get install default-jre

Third step, install java development kit

 apt-get install default-jdk

Fourth step, check java installation

 java -version

Result:

java version "1.7.0_55"
OpenJDK Runtime Environment (IcedTea 2.4.7) (7u55-2.4.7-1ubuntu1)
OpenJDK 64-Bit Server VM (build 24.51-b03, mixed mode)

OK that’s all for now the tutorial to install Java Runtime and Java Development Kit on Ubuntu.

Congratulation’s! You have successfully installed Java. Thanks for using this tutorial for installing Oracle Java on Ubuntu system. For additional help or useful information, we recommend you to check the official Java web site.

You Might Also Like: How To Install Oracle Java on Ubuntu 17.04

How To Install Transmission on Ubuntu 14.04

Install Transmission on Ubuntu

Transmission BitTorrent Client features a simple interface on top of a cross-platform back-end. Transmission is licensed as a free software under the terms of the GNU General Public License (GPL), with parts under the MIT License. Transmission, like any other BitTorrent client allows users to download files from the Internet and upload their own files or torrents. By grabbing items and adding them to the interface, users can create queues of files to be downloaded and uploaded.

This article assumes you have at least basic knowledge of linux, know how to use the shell, and most importantly, you host your site on your own VPS. The installation is quite simple. I will show you through the step by step installation Transmission on Ubuntu 14.04.

In this tutorial we will show you how to will help you with your install and configuration of Transmission on your Ubuntu 14.04 server.

Install Transmission on Ubuntu 14.04

Step 1. First, add transmission into the repository.

 sudo add-apt-repository ppa:transmissionbt/ppa

Step 2. Install Transmission.

sudo apt-get update
sudo apt-get install transmission-cli transmission-common transmission-daemon

Step 3. Configure users and permissions for Transmission.

After the installation, create the directory where you want to put all your downloaded files.

cd /var/www/html/
mkdir transmission
cd transmission
mkdir completed incomplete torrents

Add the current user to debian-transmission group.

 sudo usermod -a -G debian-transmission wpcademy

Now, when Transmission downloads torrents, it automatically sets the rights of the files that it downloads to the Transmission user group. We need to make sure that our username is a part of that group, and we need to set the correct permissions on the downloads folders. Issue the following commands:

sudo chgrp -R debian-transmission /var/www/html/transmission
sudo chmod -R 775 /var/www/html/transmission

Configure Transmission

Step 4. Configure Transmission.

The configuration file is easy to understand. Here is my sample configuration:

#sudo nano /etc/transmission-daemon/settings.json

"download-dir": "/var/www/html/trasmission/completed",
...
"incomplete-dir": "/var/www/html/trasmission/incomplete",
"incomplete-dir-enabled": true,
...
"rpc-authentication-required": true,
"rpc-bind-address": "0.0.0.0",
"rpc-enabled": true,
"rpc-password": "password",
"rpc-port": 9091,
"rpc-username": "username",
"rpc-whitelist": "127.0.0.1,*.*.*.*",
"rpc-whitelist-enabled": true,
...
"umask": 2,
...
"watch-dir": "/media/datadrive/downloads",
"watch-dir-enabled": true

Step 5. Start Transmission daemon.

 sudo service transmission-daemon start

Once it has reloaded and if it starts back up, go ahead and go to your browser and navigate to: 0.0.0.0:9091 (where 0.0.0.0 is the IP address of your Ubuntu server). You should be greeted with the Transmission WebUI. After logging in, you will notice that the value for the rpc-password inside the settings.json file will be hashed.

Congratulation’s! You have successfully installed transmission. Thanks for using this tutorial for installing Transmission BitTorrent Client in Ubuntu 14.04 system. For additional help or useful information, we recommend you to check the official transmission web site

You Might Also Like: How To Install Transmission on CentOS 6

How To Install GNOME on Ubuntu 14.04

Install GNOME on Ubuntu

By default, Ubuntu 14.04 Trusty Tahr LTS server installed as minimal without any Graphical Desktop support. Installing GNOME desktop on Ubuntu is faily straightforward. Most Ubuntu servers are run on CLI (Command-Line Interface) mode. But in some cases, one may need to have a desktop to install some applications with GUI (Grapich User Interface) mode. In this case, we will use GNOME, the most popular user-friendly desktop for any UNIX based system.

This article assumes you have at least basic knowledge of linux, know how to use the shell, and most importantly, you host your site on your own VPS. The installation is quite simple. We will show you through the step by step installation GNOME on Ubuntu 14.04.

Install GNOME on Ubuntu 14.04

Step 1. First, You just need to install a couple of Gnome apps, add the gnome3-staging prepository and do a dist-upgrade:

sudo add-apt-repository ppa:gnome3-team/gnome3-staging
sudo apt-get update
sudo apt-get dist-upgrade

Step 2. Installing additional applications.

GNOME 3.12 has some new applications like: gnome-weather, gnome-maps, gnome-photos and gnome-music etc, which are not installed by default on Ubuntu GNOME 14.04. To install additional applications, run the following command:

sudo apt-get update
sudo apt-get install bijiben polari gnome-clocks gnome-weather gnome-maps gnome-music gnome-photos gnome-documents gnome-contacts epiphany-browser gnome-sushi gnome-boxes gnome-shell-extensions

Step 3. Reboot the system.

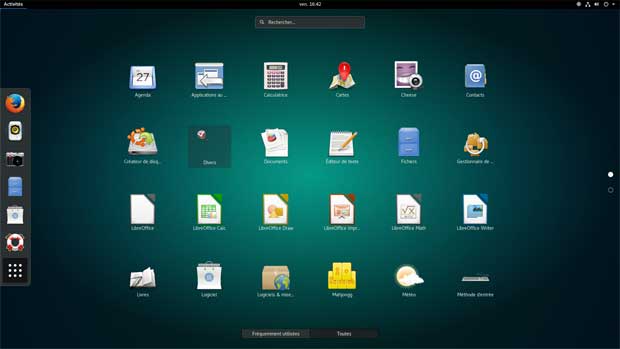
After you reboot the system, the system will enter into the Gnome GUI interface automatically.

ubuntu gnome interface

If you encounter issues of you simply don’t like GNOME 3.12, you can revert the changes by using PPA Purge. To purge the GNOME 3 PPAs and go back to GNOME 3.10 (which is default in Ubuntu 14.04), use the following commands:

sudo apt-get install ppa-purge
sudo ppa-purge ppa:gnome3-team/gnome3
sudo ppa-purge ppa:gnome3-team/gnome3-staging

Congratulation’s! You have successfully installed GNOME. Thanks for using this tutorial for installing GNOME in Ubuntu 14.04 system. For additional help or useful information, we recommend you to check the official GNOME web site.

You Might Also Like: How To Install Gnome GUI on CentOS 7