How To Install Cherokee Web Server on Ubuntu 16.04 LTS

Install Cherokee Web Server on Ubuntu 16

Cherokee is an free and open source high-performance web server. It is very fast, flexible and easy to configure. It offers support for the widespread technologies nowadays: FastCGI, SCGI, PHP, CGI, SSI, TLS and SSL encrypted connections, Virtual hosts, Authentication, on the fly encoding, Load Balancing, Apache compatible log files, Data Base Balancer, downtime-free updates and upgrades, Reverse HTTP Proxy, and much more.

This article assumes you have at least basic knowledge of linux, know how to use the shell, and most importantly, you host your site on your own VPS. The installation is quite simple and assumes you are running in the root account, if not you may need to add ‘sudo’ to the commands to get root privileges. I will show you through the step by step installation Cherokee Web Server on a Ubuntu 16.04 (Xenial Xerus) server.

Install Cherokee Web Server on Ubuntu 16.04 LTS

Step 1. First make sure that all your system packages are up-to-date by running these following apt-get commands in the terminal.

sudo apt-get update
sudo apt-get upgrade

Step 2. Enable Cherokee PPA (Personal Package Archive) repository.

add-apt-repository ppa:cherokee-webserver
apt-get update

Step 3.Installing Cherokee Web Server.

Install Cherokee Web Server using apt-get, Enter the following command to install the Cherokee web server including Module SSL:

sudo apt-get install cherokee cherokee-doc libcherokee-mod-libssl libcherokee-mod-streaming libcherokee-mod-rrd

Start Cherokee service daemon.

systemctl start cherokee
systemctl enable cherokee

Step 4. Configuring Cherokee.

The best part about using Cherokee Web Server is being able to manage all of its configurations through a simple to use web interface. It can be started through the cherokee-admin command.

sudo cherokee-admin

By default, cherokee-admin can only accessed from localhost. If you need to access the admin for other network address using the parameter ‘-b’. If you doesn’t mention any ip address, it will automatically listen to all network interfaces. Then you can connect to cherokee-admin from other network address.

sudo cherokee-admin -b

Access cherokee admin from specific network address:

sudo cherokee-admin -b 192.169.1.2
#sudo cherokee-admin -b

Cherokee Web Server 1.2.103 (Dec 059 2014): Listening on port 127.0.0.1:9090,
TLS disabled, IPv6 enabled, using epoll, 4096 fds system limit, max. 2041
connections, caching I/O, 2 threads, 1020 connections per thread, standard
scheduling policy

Login:
 User: admin
 One-time Password: wpcademyEMfQRznWWa6h

Web Interface:
 URL: http://127.0.0.1:9090/

Important: The password is for one time use only. If you need to login again, you should use the same command for generating it.

Step 5. Now access Cherokee-Admin by navigating your browser to http://127.0.0.1:9090. Type user name and password for accessing it.
cherokee-admin-panel

Congratulation’s! You have successfully installed Cherokee Web Server. Thanks for using this tutorial for installing Cherokee Web Server on Ubuntu 16.04 LTS (Xenial Xerus) system. For additional help or useful information, we recommend you to check the official Cheroke web site.

How To Enable HTTP/2.0 Support on Apache

Enable HTTP/2.0 Support on Apache

HTTP/2 is the new updated HTTP protocol, and its supposed to be much more efficient than the now outdated http/1.1 version. Its goal is to reduce the latency as well as to make the web applications faster by allowing multiple concurrent requests between the web browser and the server across a single TCP connection. If you are looking to speed up the loading time of your website or blog then you should enable http/2.0 in your web server.

This article assumes you have at least basic knowledge of linux, know how to use the shell, and most importantly, you host your site on your own VPS. The installation is quite simple and assumes you are running in the root account, if not you may need to add ‘sudo’ to the commands to get root privileges. I will show you through the step by step enable HTTP/2.0 support in Apache running Ubuntu 16.04 (Xenial Xerus) server.
Enable HTTP/2.0 Support on Apache running Ubuntu 16.04 LTS

Step 1. First make sure that all your system packages are up-to-date by running these following apt-get commands in the terminal.

sudo apt-get update
sudo apt-get upgrade

Step 2. Enable HTTP/2.0 Apache web server.

So make sure that your Apache version supporting HTTP/2 protocol. If you have not installed Apache or using older version upgrade it first. Use the following commands to add PPA for installing latest Apache2 version on your Ubuntu system:

sudo apt-get install python-software-properties
sudo add-apt-repository ppa:ondrej/apache2
sudo apt-get update
sudo apt-get install apache2

Once installed, verify Apache version:

### apache2 -v
Server version: Apache/2.4.17 (Ubuntu)
Server built:   2017-03-05T00:00:00

Enable the HTTP/2.0 module by typing this commands:

sudo a2enmod http2

Restart Apache for the changes to take effect:

systemctl restart apache2

Now open your VirtualHost file ( e.g. most likely at this path /etc/apache2/sites-available/ ) and put this code in:

Protocols h2 http/1.1

Step 3. Verify HTTP/2.

Go to https://tools.keycdn.com/http2-test and test if http/2.0 is detected in your domain.

https://tools.keycdn.com/http2-test

Congratulation’s! You have successfully enable HTTP/2.0 apache web server. Thanks for using this tutorial for enable HTTP/2.0 support on Apache running Ubuntu 16.04 LTS (Xenial Xerus) system. For additional help or useful information, we recommend you to check the official Apache web site.

How To Install VnStat Network Monitoring on Ubuntu 16.04 LTS

Install VnStat Network Monitoring on Ubuntu 16

VnStat is a console based network traffic monitoring tool design for Linux and BSD. It allows the users to maintain a log of network traffic for the selected interfaces. In this Vnstat tool, the interface bandwidth will reduce automatically.

This article assumes you have at least basic knowledge of linux, know how to use the shell, and most importantly, you host your site on your own VPS. The installation is quite simple and assumes you are running in the root account, if not you may need to add ‘sudo’ to the commands to get root privileges. I will show you through the step by step installation VnStat Network Monitoring on a Ubuntu 16.04 (Xenial Xerus) server.
VnStat Features

Multiple output options.
Generate png graphic output.
Consumes lite portion of system resources.
Monitor multiple network interfaces at same time.
Sort the data by month, week, hour and day.
Low CPU usage.

Install VnStat Network Monitoring on Ubuntu 16.04 LTS

Step 1. First make sure that all your system packages are up-to-date by running these following apt-get commands in the terminal.

sudo apt-get update
sudo apt-get upgrade

Step 2. Installing VnStat.

Use apt-get command line utility to install vnstat package on your system:

apt-get install vnstat

Once installed, start and enable the Vnstat services:

systemctl start vnstat
systemctl enable vnstat

Step 3. Show Statics using vnStat Command Line.

Using vnstat command line utility you can view statistics on bandwidth on per day, per month and per hour basis. It also provides option to show statistics in real-time:

### Show Statistics for a day ###
vnstat -d 

### Show Statistics for a Month ###
vnstat -m

### Show Statistics for a Hour ###
vnstat -h

### Show Statistics for a Real Time ###
vnstat -l

### For more available options you can use the --help ###
vnstat --help

Step 4. Configure vnStat PHP Web Based Interface.

vnStat also provides php based web interface to show graphical statistics. In order to set up vnStat web interface, it required install LAMP stack on Ubuntu 16.04 LTS.

Download vnStat php code using below given url.

get http://www.sqweek.com/sqweek/files/vnstat_php_frontend-1.5.1.tar.gz

Extract downloaded archive in web accessible directory, eg: /var/www/html/:

tar xzf vnstat_php_frontend-1.5.1.tar.gz
mv vnstat_php_frontend-1.5.1 /var/www/html/

Edit the config.php file and set the following parameters:

$language = 'en';
$iface_list = array('eth0', 'sixxs');
$iface_title['eth0'] = 'Public Interface';
$vnstat_bin = '/usr/bin/vnstat';

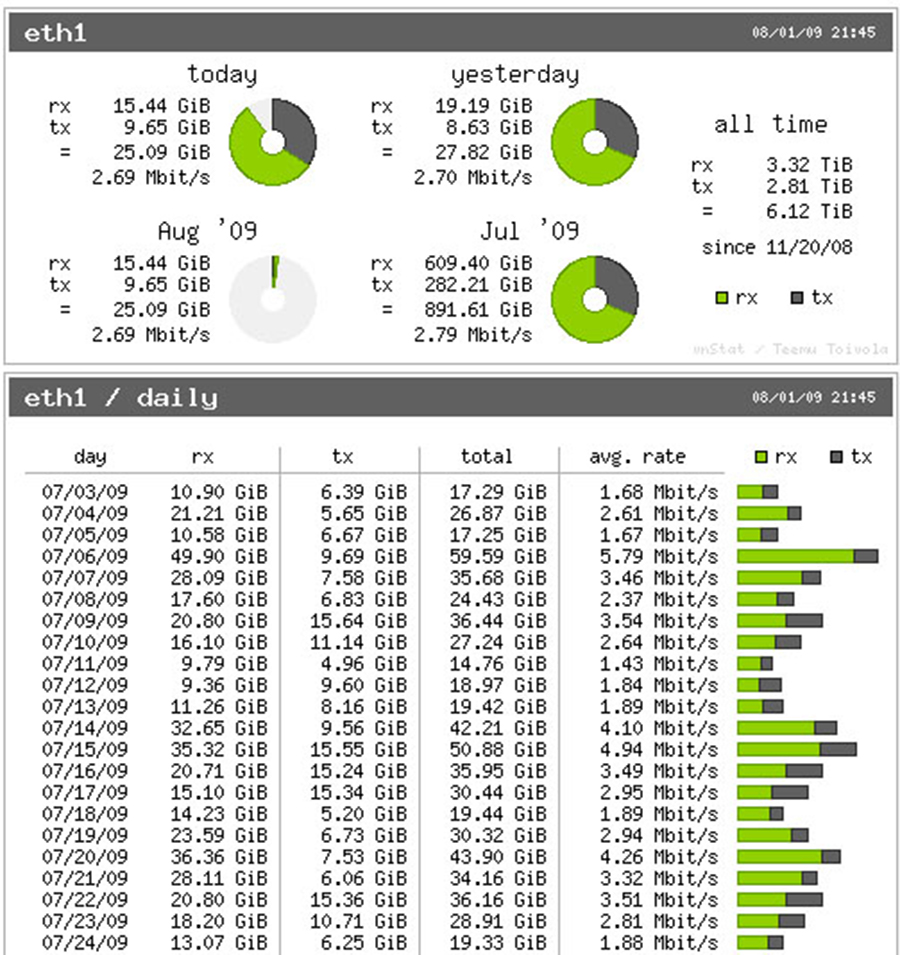
Accessing VnStat via web browser, Open your favorite browser and navigate to http://yourdomain.com/ or http://server-ip.

vnstat-web-based

Congratulation’s! You have successfully installed VnStat. Thanks for using this tutorial for installing VnStat network monitoring tool on Ubuntu 16.04 LTS (Xenial Xerus) system. For additional help or useful information, we recommend you to check the official VnStat web site.

How To Install Varnish on Ubuntu 16.04 LTS

Install Varnish on Ubuntu 16

Varnish Cache is a powerful open source HTTP accelerator that can be installed in front of any Webserver such as Apache or Nginx. Varnish Cache can improve overall performance of your web server by caching contents. The Varnish cache stores the copy of user request’s and serves the same page when the user revisits the webpage. It makes your website really fast and accelerate your web site performance up-to 300 – 1000x (means 80% or more).

This article assumes you have at least basic knowledge of linux, know how to use the shell, and most importantly, you host your site on your own VPS. The installation is quite simple and assumes you are running in the root account, if not you may need to add ‘sudo’ to the commands to get root privileges. I will show you through the step by step installation Varnish Cache on a Ubuntu 16.04 (Xenial Xerus) server.
Install Varnish on Ubuntu 16.04 LTS

Step 1. First make sure that all your system packages are up-to-date by running these following apt-get commands in the terminal.

sudo apt-get update
sudo apt-get upgrade

Step 2. Install Apache web server.

For this part we will be assuming that you have already installed Apache on your server and have it running properly. If not write this command in your terminal:

sudo apt-get install apache2

Step 3. Installing Varnish.

Install Varnish using apt-get command:

apt-get install varnish

After the installation is finished, start and enable varnish.service using the systemctl command:

systemctl start varnish.service
systemctl enable varnish.service

Step 4. Configuring Varnish.

Varnish is automatically configured to server content over port 80 and fetch contents from Apache on port 8080, we need to update Apache to serve content over port 8080:

### nano /etc/apache2/ports.conf
Listen 127.0.0.1:8080

If you have any virtual hosts configured, you will need to update these as well – ensure your configuration looks like this:

<VirtualHost 127.0.0.1:8080>

We need to configure varnish to run on port 80. First, create a file called varnish.service inside the /etc/systemd/system directory:

### nano /etc/systemd/system/varnish.service

Then, add the following configuration:

[Service]
ExecStart=/usr/sbin/varnishd -j unix,user=vcache -F -a :80 -T localhost:6082 -f /etc/varnish/default.vcl -S /etc/varnish/secret -s malloc,256m

Once you save and exit out of that file, open up the default.vcl file:

### nano /etc/varnish/default.vcl
backend default {
    .host = "127.0.0.1";
    .port = "8080";
}

Restart the Apache and Varnish service for the changes to take effect:

systemctl restart apache2.service
systemctl restart varnish.service

You can check to see if varnish is working by typing the following command:

varnishstat

Step 5. Testing Varnish.

The test consists in making a HTTP request via curl and verifying that it is handled by Varnish:

[root@wpcademy ~ ]# curl -I 192.168.146.161
 HTTP/1.1 403 Forbidden
 Date: Mon, 01 May 2017 24:06:10 GMT
 Server: Apache/2.4.6 (Ubuntu) PHP/7.0.16
 Last-Modified: Thu, 16 Dec 2016 19:30:58 GMT
 ETag: "1321-5058ranty728280"
 Accept-Ranges: bytes
 Content-Length: 4897
 Content-Type: text/html; charset=UTF-8
 X-Varnish: 32779
 Age: 4
 Via: 1.1 varnish-v4
 Connection: keep-alive

Congratulation’s! You have successfully installed Varnish. Thanks for using this tutorial for installing Varnish Cache on Ubuntu 16.04 LTS (Xenial Xerus) system. For additional help or useful information, we recommend you to check the official Varnish web site.

How To Secure SSH Using Two Factor Authentication on Ubuntu 16.04 LTS

Two Factor Authentication on Ubuntu 16

Securing SSH with two factor authentication using Google Authenticator Two-step verification (also known as Two-factor authentication, abbreviated to TFA) is a process involving two stages to verify the identity of an entity trying to access services in a computer or in a network. This is a special case of a multi-factor authentication which might involve only one of the three authentication factors (a knowledge factor, a possession factor, and an inheritance factor) for both steps.

This article assumes you have at least basic knowledge of linux, know how to use the shell, and most importantly, you host your site on your own VPS. The installation is quite simple and assumes you are running in the root account, if not you may need to add ‘sudo’ to the commands to get root privileges. I will show you through the step by step secure SSH using two factor authentication on a Ubuntu 16.04 (Xenial Xerus) server.
Secure SSH Using Two Factor Authentication on Ubuntu 16.04 LTS

Step 1. First make sure that all your system packages are up-to-date by running these following apt-get commands in the terminal.

sudo apt-get update
sudo apt-get upgrade

Step 2. Installing the Google Authenticator.

To install the package on Ubuntu, run the following command:

apt-get install libpam-google-authenticator

The next step is to get the verification code. It’s a very simple command to get the verification code and scratch codes by just answering simple questions of server which he will ask you. You can do that step by running the following command:

google-authenticator

You will be prompted to answer a few questions; answer the first two questions with yes (y):

Do you want authentication tokens to be time-based (y/n) y

Big QR code will be generated in your terminal. You can scan the code with the authenticator application on your Android/iOS/Windows phone or tablet or enter the secret key generated on the screen.

Emergency scratch codes will also be generated. You can use these codes for authentication in case you lose your mobile device:
Your emergency scratch codes are:

80461001
68335920
89765548
12485672
11145603
/php]


Save the authentication settings for the root user by answering YES to the next question:
[php]
Do you want me to update your "/root/.google_authenticator" file (y/n) y

Next, you can configure the authenticator to generate one-time passwords. Since they last 30 seconds, all generated passwords can be used once. Answer y to create the file that stores these settings:

Do you want to disallow multiple uses of the same authentication
token? This restricts you to one login about every 30s, but it increases
your chances to notice or even prevent man-in-the-middle attacks (y/n) y

You can use the next setting if you have time syncing issues across your devices, so we will not use this option:

By default, tokens are good for 30 seconds and in order to compensate for
possible time-skew between the client and the server, we allow an extra
token before and after the current time. If you experience problems with poor
time synchronization, you can increase the window from its default
size of 1:30min to about 4min. Do you want to do so (y/n) n

The next setting prevents brute-force attacks. You will only have three chances per 30 seconds to enter the correct password:

If the computer that you are logging into isn't hardened against brute-force
login attempts, you can enable rate-limiting for the authentication module.
By default, this limits attackers to no more than 3 login attempts every 30s.
Do you want to enable rate-limiting (y/n) y

Congratulations! You have finished generating your key and adding it to your client, but some additional configuration is needed before these settings will go into effect.

The next step is to configure the authentication settings in openSSH. To do so, open the “/etc/pam.d/sshd” file and add the following line to the end of the file:

### nano /etc/pam.d/sshd
auth required pam_google_authenticator.so

Save the changes, and open the “/etc/ssh/sshd_config” file and enable Challenge Response Authentication:

### nano /etc/ssh/sshd_config
ChallengeResponseAuthentication yes

Finally, save the file and restart the SSH server for the changes to take effect:

systemctl restart ssh

Congratulation’s! You have successfully secure SSH. Thanks for using this tutorial for secure SSH using two factor authentication on Ubuntu 16.04 LTS (Xenial Xerus) system. For additional help or useful information, we recommend you to check the official SSH web site.

How To Upgrade From Ubuntu 16.10 to Ubuntu 17.04

Upgrade From Ubuntu 16.10 to Ubuntu 17

Ubuntu 17.04 released, codenamed “Zesty Zapus”;  bringing yet another version of a remarkable operating system in the Ubuntu ecosystem, with the latest and some of the greatest open source technologies in a high-quality, easy-to-use Linux distribution.

This article assumes you have at least basic knowledge of linux, know how to use the shell, and most importantly, you host your site on your own VPS. The installation is quite simple and assumes you are running in the root account, if not you may need to add ‘sudo’ to the commands to get root privileges. We will show you through the step by step upgrade from Ubuntu 16.10 to Ubuntu 17.04 (Zesty Zapus).

Prerequisites:

There a couple of things you should do before performing an Ubuntu upgrade, like making a backup of important files and folders, disabling or purging third-party PPAs (the upgrade process will disable these, but it doesn’t hurt to be proactive), and installing all available updates.
Upgrade From Ubuntu 16.10 to Ubuntu 17.04

Step 1. First make sure that all your system packages are up-to-date by running these following apt-get commands in the terminal.

sudo apt update
sudo apt dist-upgrade

Step 2. Upgrade Ubuntu 16.10 to 17.04.

You can upgrade to Ubuntu 17.04 in one of two ways, using the Software Updater app, or using the command line.
Upgrade Ubuntu 16.10 to Ubuntu 17.04 Using Command Line

Then make sure you have update-manager-core package installed:

sudo apt install update-manager-core

Next, edit a configuration file using nano or your preferred command line text editor:

sudo nano /etc/update-manager/release-upgrades

At the bottom of this file, change the value of Prompt from lts to normal:

Prompt=normal

Afterwards, launch the upgrade tool with the command below:

sudo do-release-upgrade
[php]


Once that upgrade has completed reboot, login and run the command again, this time to upgrade to Ubuntu 17.04:
[php]
sudo do-release-upgrade -d

Upgrade Ubuntu 16.10 to Ubuntu 17.04 Using Graphical Update Manager

Ensure that you system is fully up-to-date, run the commands below:

sudo apt update
sudo apt dist-upgrade

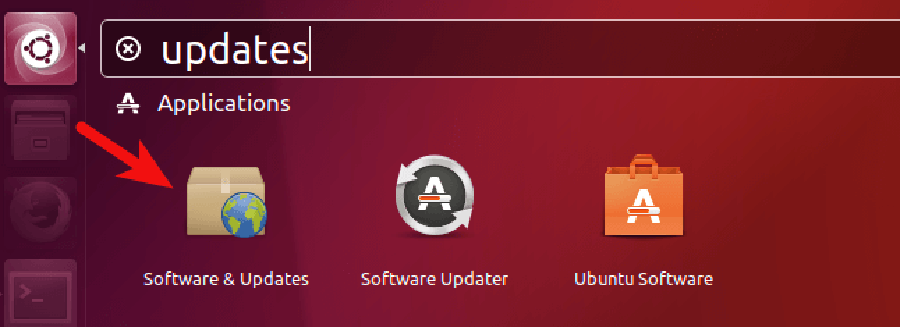
Then open Software & Updates from Unity Dash or your favorite application menu:

software center and updates
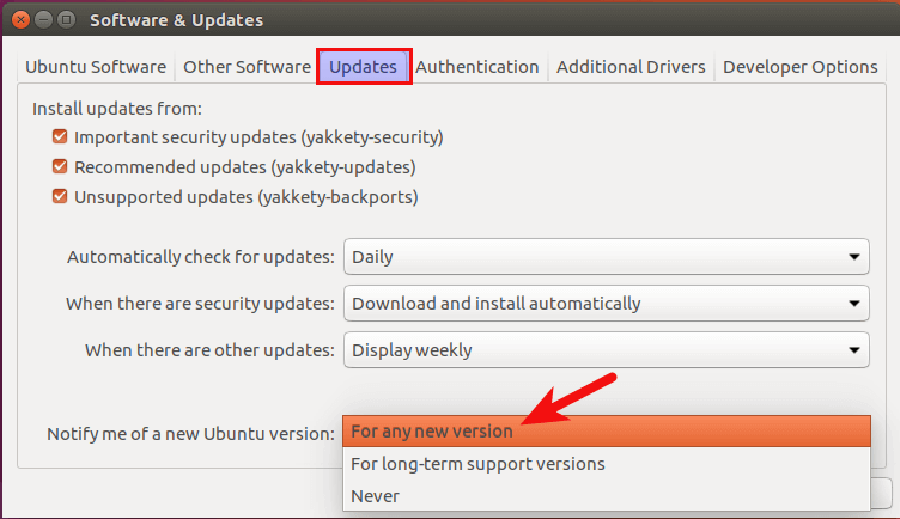
Next, Select the Updates tab and then at the bottom of window, change notification settings from For long-term support version to For any new version:
click on updates then select new version
Click the close button. You will be asked to enter your password to apply the above changes. Next, issue the following command in terminal:

update-manager -d

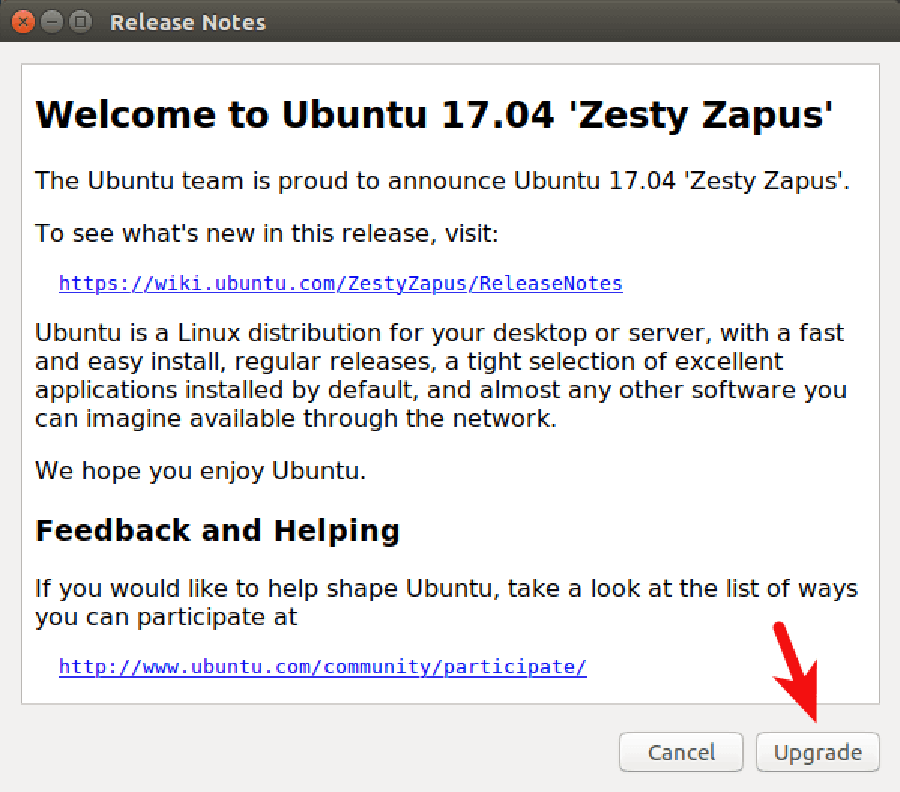
You should be notified that software is up-to-date and Ubuntu 17.04 is now available. Click the Upgrade button:
click on upgrade
Then enter your password. The Ubuntu 17.04 release notes window will appear. Click Upgrade and wait for the upgrade to finish:
Upgrade From Ubuntu 16.10 to Ubuntu 17

Congratulation’s! You have successfully upgrade Ubuntu. Thanks for using this tutorial for upgrade from Ubuntu 16.10 to Ubuntu 17.04 (Zesty Zapus) system. For additional help or useful information, we recommend you to check the official Ubuntu web site.

You Might Also Like: How To Install Ubuntu 17.04 Server Zesty Zapus

How To Install KVM and Create Virtual Machines on Ubuntu 16.04 LTS

Install KVM and Create Virtual Machines on Ubuntu 16

Kernel-based Virtual Machine (KVM) is free and open source virtualisation software. You can create multiple VM (virtual machines) , each VM has its own private virtualised hardware like disk, CPU, RAM etc.

This article assumes you have at least basic knowledge of linux, know how to use the shell, and most importantly, you host your site on your own VPS. The installation is quite simple and assumes you are running in the root account, if not you may need to add ‘sudo’ to the commands to get root privileges. I will show you through the step by step installation KVM and Create Virtual Machines on a Ubuntu 16.04 (Xenial Xerus) server.
Install KVM and Create Virtual Machines on Ubuntu 16.04 LTS

Step 1. First make sure that all your system packages are up-to-date by running these following apt-get commands in the terminal.

sudo apt-get update
sudo apt-get upgrade

Step 2. Installing KVM.

First, let us check if your system supports hardware virtualization. To do so, run the following command:

egrep -c ‘(svm|vmx)’ /proc/cpuinfo

A 0 indicates that your CPU doesn’t support hardware virtualization, while a 1 or more indicates that it does. You may still have to enable hardware virtualization support in your computer’s BIOS, even if this command returns a 1 or more.

Install KVM and other required packages to setup a virtualization environment in Linux:

apt-get install qemu-kvm libvirt-bin bridge-utils virt-manager virtinst virt-viewer

The bridge-utils is used to create bridge networking so other devices on your network can see your virtual machine.

Verify the KVM installation:
virsh -c qemu:///system list

After running this command, log out and log back in. Run this command after logging back in and you should see an empty list of virtual machines. This indicates that everything is working correctly.

Step 3. Create Virtual Machines.

You can open the Virtual Machine Manager by typing the same in Dash Home.Click the icon , it will open the application.

Create-Virtual-Machines-KVM
In the virtual machine manager window, click the first icon in the toolbar
Create-Virtual-Machines-KVM-1
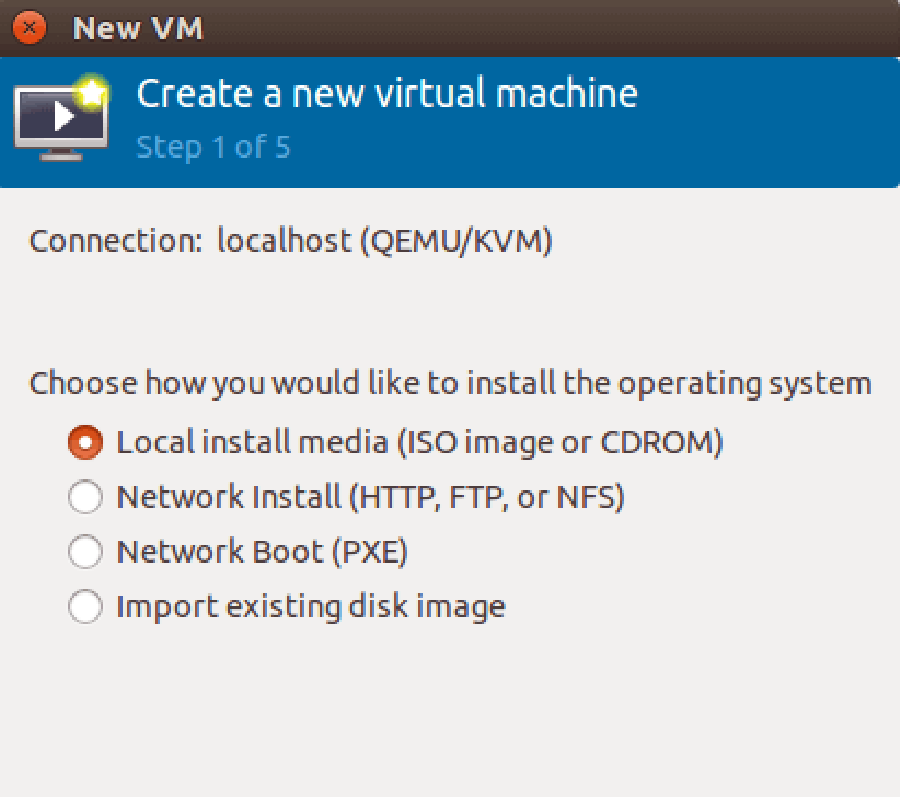
Next, Choose the location of your installation media.
Create-Virtual-Machines-KVM-2
You can install from a disc, ISO image, or even a network location.
Create-Virtual-Machines-KVM-3
Next, allocate memory and CPU to your virtual machine
Create-Virtual-Machines-KVM-4
After that, specify the size of your virtual disk. If you check the box before allocate entire disk now, then the disk size is fixed.
Create-Virtual-Machines-KVM-5
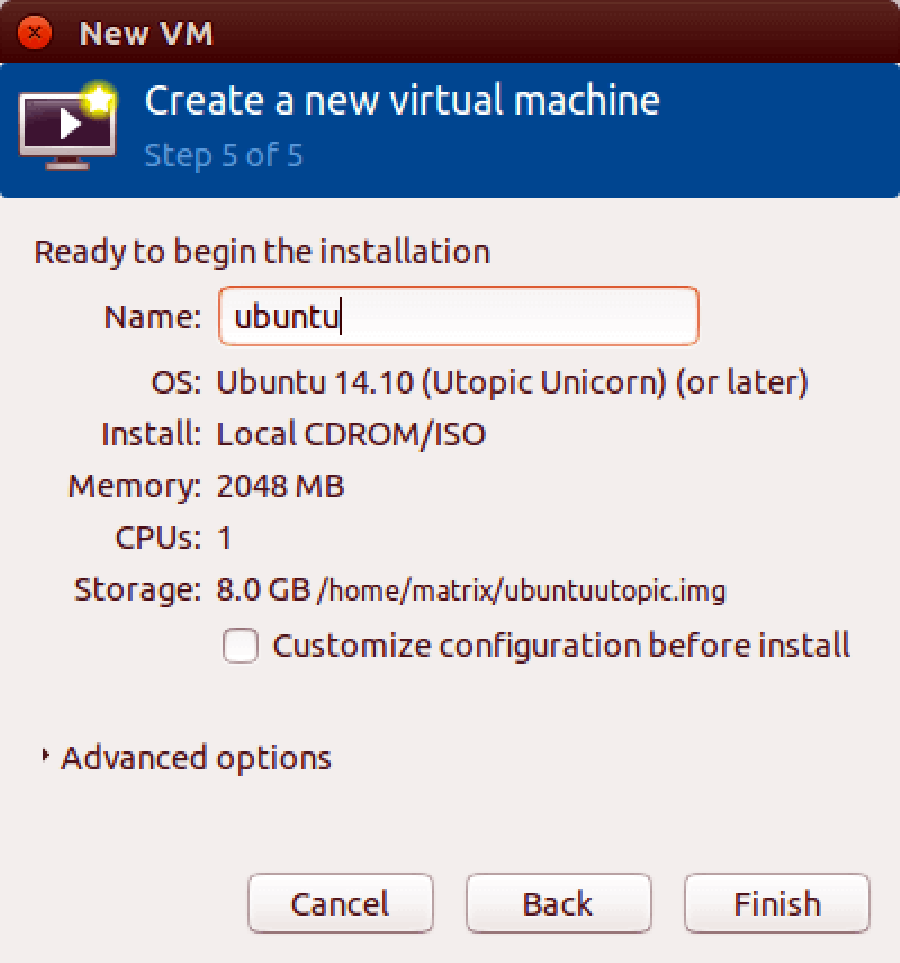
In the next window, you can give your virtual machine a name. Then click finish to begin installing OS to your virtual machine.
Create-Virtual-Machines-KVM-6
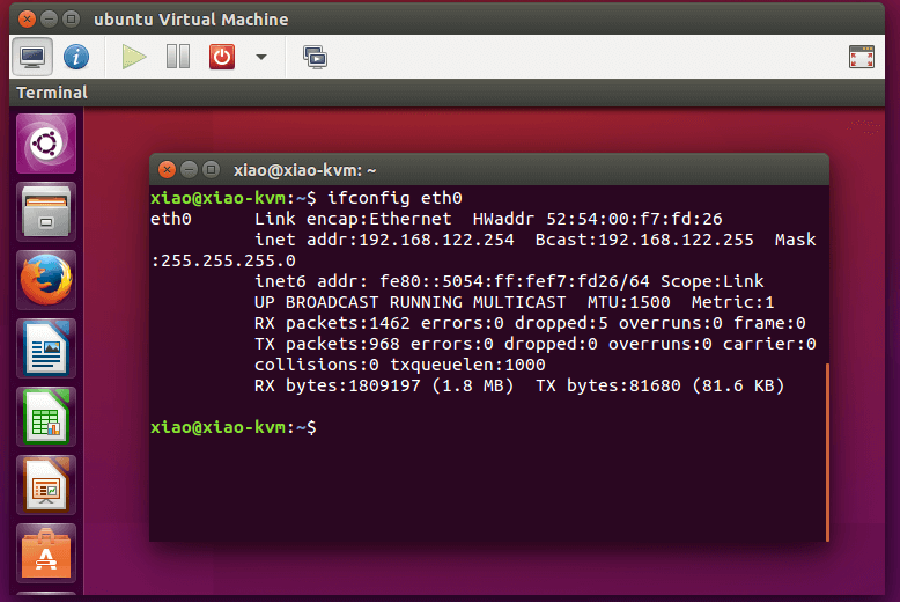
Here’s a screenshot of ubuntu virtual machine running in virt-manager window.
Create-Virtual-Machines-KVM-7
Congratulation’s! You have successfully installed KVM. Thanks for using this tutorial for installing KVM and Create Virtual Machines on Ubuntu 16.04 LTS (Xenial Xerus) system. For additional help or useful information, we recommend you to check the official KVM web site.