Easy Guide to Add Custom Styles to WordPress Visual Editor

In this tutorial, we will learn how to add custom styles to the WordPress visual editor.

Note: This tutorial requires basic working knowledge of CSS.

Why and When You Need Custom Styles for WordPress Visual Editor

By default, WordPress visual editor comes with some basic formatting and style options. However, sometimes you may need custom styles of your own to add CSS buttons, content blocks, taglines, etc.

You can always switch from visual to text editor and add custom HTML and CSS. But if you regularly use some styles, then it would be best to add them into visual editor so that you can easily reuse them.

This will save you time spent on switching back and forth between text and visual editor. It will also allow you to consistently use the same styles throughout your website.

Most importantly, you can easily tweak or update styles without having to edit posts on your website.

Method 1: Add Custom Styles in Visual Editor Using Plugin

First thing you need to do is install and activate the TinyMCE Custom Stylesplugin. For more details, see our step by step guide on how to install a WordPress plugin.

Upon activation, you need to visit Settings » TinyMCE Custom Styles page to configure the plugin settings.
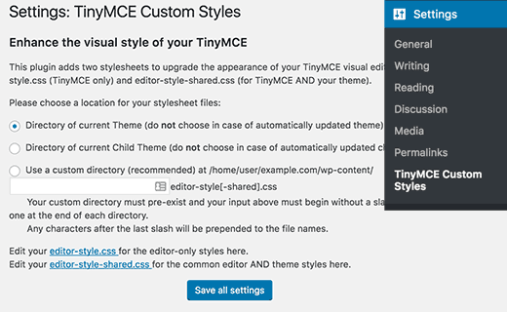
tinymce custom style

The plugin allows you to choose the location of stylesheet files. It can use your theme or child theme’s stylesheets, or you can choose a custom location of your own.

After that, you need to click on the ‘Save All Settings’ button to store your changes.

Now you can add your custom styles. You need to scroll down a little to the style section and click on the Add new style button.

First you need to enter a title for the style. This title will be displayed in the drop down menu. Next, you need to choose whether it is an inline, block, or selector element.

After that add a CSS class and then add your CSS rules as shown in the screenshot below.
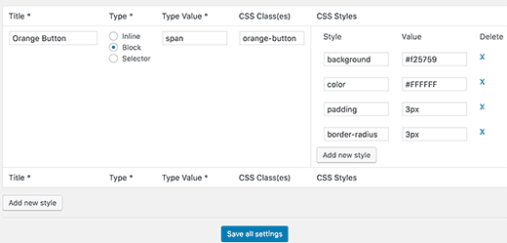
custom style change in wp

Once you have added a CSS style, simply click on the ‘Save All Settings’ button to store your changes.

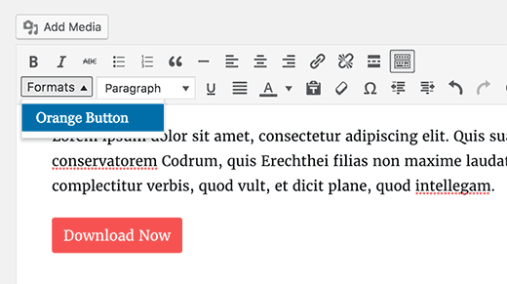
You can now edit an existing post or create a new one. You will notice a Format drop down menu in the second row of WordPress visual editor.
Add Custom Styles to WordPress

Simply select some text in the editor and then select your custom style from the Formats dropdown menu to apply it.

You can now preview your post to see that your custom styles are applied correctly.

Method 2: Manually Add Custom Styles to WordPress Visual Editor

This method requires you to manually add code to your WordPress files. If this is your first time adding code to WordPress, then please see our guide on adding code snippets from web into WordPress.

Step 1: Add a custom styles drop down menu in WordPress Visual Editor

First, we will add a Formats drop down menu in the WordPress visual editor. This drop down menu will then allow us to select and apply our custom styles.

You need to add the following code to your theme’s functions.php file or a site-specific plugin.

function wpb_mce_buttons_2($buttons) {
    array_unshift($buttons, 'styleselect');
    return $buttons;
}
add_filter('mce_buttons_2', 'wpb_mce_buttons_2');

Step 2: Add select options to drop down menu

Now you will need to add the options to the drop down menu you just created. You will then be able to select and apply these options from the Formats drop down menu.

For the sake of this tutorial, we are adding three custom styles to create content block and buttons.

You will need to add the following code to your theme’s functions.php file or a site-specific plugin.

/*
* Callback function to filter the MCE settings
*/
 
function my_mce_before_init_insert_formats( $init_array ) {  
 
// Define the style_formats array
 
    $style_formats = array(  
/*
* Each array child is a format with it's own settings
* Notice that each array has title, block, classes, and wrapper arguments
* Title is the label which will be visible in Formats menu
* Block defines whether it is a span, div, selector, or inline style
* Classes allows you to define CSS classes
* Wrapper whether or not to add a new block-level element around any selected elements
*/
        array(  
            'title' => 'Content Block',  
            'block' => 'span',  
            'classes' => 'content-block',
            'wrapper' => true,
             
        ),  
        array(  
            'title' => 'Blue Button',  
            'block' => 'span',  
            'classes' => 'blue-button',
            'wrapper' => true,
        ),
        array(  
            'title' => 'Red Button',  
            'block' => 'span',  
            'classes' => 'red-button',
            'wrapper' => true,
        ),
    );  
    // Insert the array, JSON ENCODED, into 'style_formats'
    $init_array['style_formats'] = json_encode( $style_formats );  
     
    return $init_array;  
   
} 
// Attach callback to 'tiny_mce_before_init' 
add_filter( 'tiny_mce_before_init', 'my_mce_before_init_insert_formats' ); 

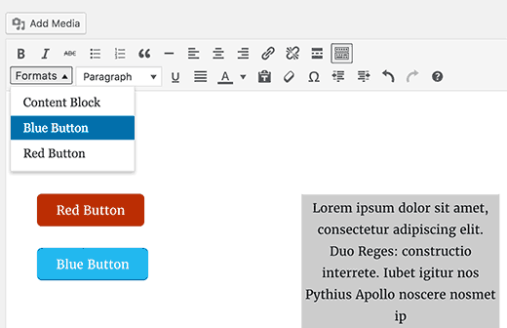
You can now add a new post in WordPress and click on the Formats drop down menu in the Visual editor. You will notice that your custom styles are now visible under formats.

However, selecting them does not make any difference in the post editor right now.

Step 3: Add CSS Styles

Now the final step is to add CSS style rules for your custom styles.

You will need to add this CSS into your theme or child theme’s style.css and editor-style.css files.

.content-block { 
    border:1px solid #eee; 
    padding:3px;
    background:#ccc;
    max-width:250px;
    float:right; 
    text-align:center;
}
.content-block:after { 
    clear:both;
} 
.blue-button { 
    background-color:#33bdef;
    -moz-border-radius:6px;
    -webkit-border-radius:6px;
    border-radius:6px;
    border:1px solid #057fd0;
    display:inline-block;
    cursor:pointer;
    color:#ffffff;
    padding:6px 24px;
    text-decoration:none;
}
 
.red-button {
    background-color:#bc3315;
    -moz-border-radius:6px;
    -webkit-border-radius:6px;
    border-radius:6px;
    border:1px solid #942911;
    display:inline-block;
    cursor:pointer;
    color:#ffffff;
    padding:6px 24px;
    text-decoration:none;
}
Add Custom Styles to WordPress

The editor stylesheet controls the appearance of your content in the visual editor. Check your theme’s documentation to find out the location of this file.

If your theme doesn’t have an editor stylesheet file, then you can always create one. Simply create a new CSS file and name it custom-editor-style.css.

You need to upload this file to your theme’s root directory and then add this code in your theme’s functions.php file.

function my_theme_add_editor_styles() {
    add_editor_style( 'custom-editor-style.css' );
}
add_action( 'init', 'my_theme_add_editor_styles' );

That’s all. You have successfully added your custom styles into WordPress visual editor. Feel free to play around with the code by adding your own elements and styles.

We hope this tutorial helped you learn how to add custom styles to WordPress visual editor.
Easy Guide to Fix “Upload: Failed to Write File to Disk” Error in WordPress

In this tutorial, we will learn how to fix “Upload: failed to write file to disk” error in WordPress.

What Causes Failed To Write File To Disk Error in WordPress?

This error can occur due to a number of reasons. However, the most common one is incorrect folder permissions.

Each file and folder on your website has a set of permissions. Your web server controls access to the files based on these permissions.

Incorrect permissions to a folder can take away your ability to write files on server. This means your web server cannot create or add new files to that particular folder.

If you try to upload images or any other files from WordPress admin area, you will get one of the following error messages:

  • WordPress failed to write to disk
  • WordPress has failed to upload due to an error failed to write file to disk
  • Unable to create directory wp-content/uploads/2016/03. Is its parent directory writable by the server?

Fix Upload Failed to Write to Disk Error in WordPress

First, you need to connect to your WordPress site using a FTP client.

For this tutorial, we are using the free FileZilla FTP client. If you are using some other FTP client, then it might look a little different.

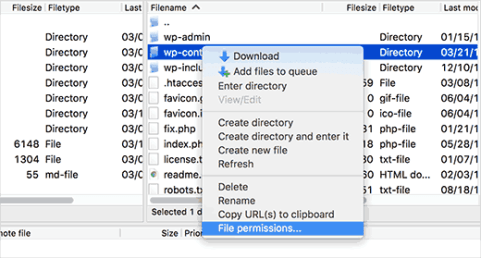
Once you are connected, you need to right click on the wp-content folder and select file permissions.

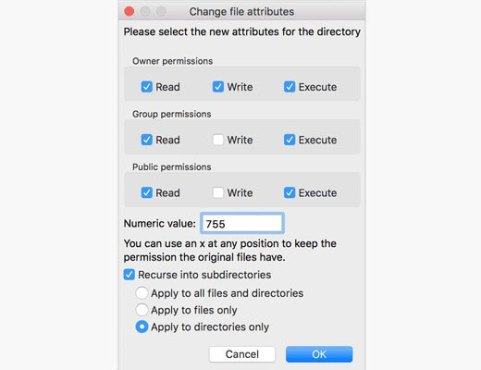
This will bring up file permissions dialog box in your FTP client. It will show you file permissions for owner, group, and public.

You need to enter 755 in the numeric value field.

After that, you need to check the box next to ‘Recurse into subdirectories’.

Lastly, you need to click on ‘Apply to directories only’ option.

Click on the OK button to continue.

Your FTP client will now set folder permissions to 755 and apply it to all sub-folders inside wp-content. This includes uploads folder where all your images are stored.

You also want to make sure that file permissions for individual files in your wp-content folder are correct.

Once again, right click on wp-content folder and select file permissions. This time we will change permissions for files.

Enter 644 in the numeric value and then check the box next to ‘Recurse into subdirectories’.

Lastly, you need to click on ‘Apply to files only’ option.

Click on the OK button to continue. Your FTP client will now set file permissions to 644 for all files in wp-content folder.

You can now visit your WordPress site and try uploading files.

If you still see the error, then you will need to contact your WordPress hostingprovider and ask them to empty the temporary files directory.

WordPress uploads your images using PHP which first saves the uploads to a temporary directory on your web server. After that it moves them to your WordPress uploads folder.

If this temporary directory is full or is poorly configured, then WordPress will not be able to write the file to disk.

This temporary folder is located on your server and in most cases you cannot access it using FTP. You will need to contact your web host and ask them to empty it for you.

We hope this tutorial helped you resolve ‘Upload: Failed to Write File to Disk’ Error in WordPress.

Easy Guide to Add Google Search in WordPress Site

In this  tutorial, we will learn how to easily add Google Search in a WordPress site.

Why You Should Use Google Search in WordPress?

The default WordPress search feature is not very useful. It often fails to find the relevant results. This forces site owners to look for alternatives.

There are plenty of search plugins for WordPress like SearchWP, Swiftype, etc. The problem is that you still have to manage them, and they will have an impact on your server resources.

On the other hand, you can use Google’s reliable and powerful search feature instead. It is free, allows you to limit the search to your sites only, and can be run from your own site.

Other benefits of using Google search are speed, users already trust Google brand, and you will not have to maintain or update it.

Having said that, let’s see how you can easily add Google site search to your WordPress site.

To make it easy, we have created a video tutorial on how to add Google search that you can watch below.

However if you just want to follow text-instructions, then you can follow our step by step tutorial on how to add Google search in a WordPress site.

Method 1: Adding Google Search in WordPress with Plugin

This first method is easier and recommended for beginners. It allows you to add Google search to your WordPress site without modifying your theme files.

First thing you need to do is install and activate the WP Google Search plugin. For more details, see our step by step guide on how to install a WordPress plugin.

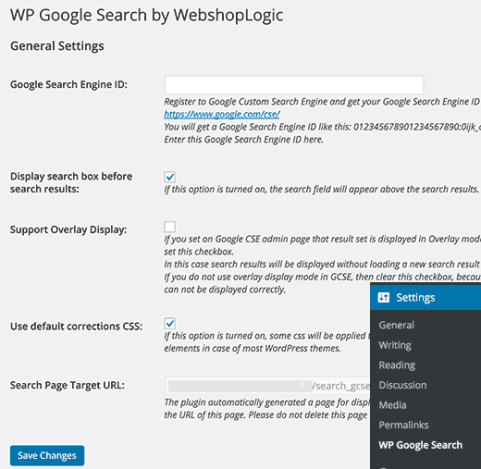
Upon activation, you need to visit Settings » WP Google Search to setup the plugin.

The plugin will ask you to provide a Google Search Engine id. Here is how you will get a search engine ID.

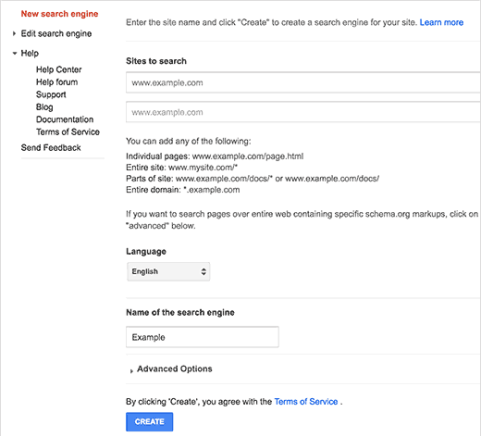
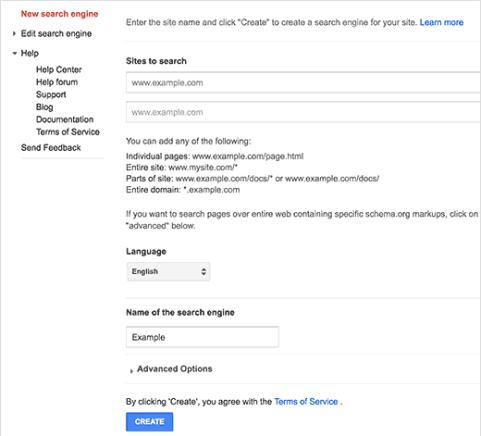
Visit Google Custom Search website and click on New Search Engine link on the left.

Simply provide your WordPress site’s URL in ‘Sites to Search’ field. Next, you need to choose the language of your website. Lastly, click on the create button to continue.

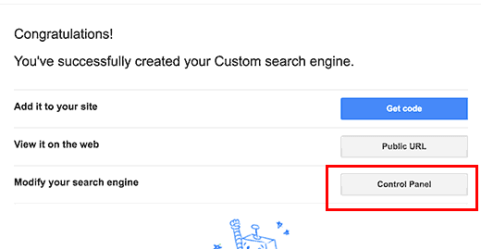
Google will now create your custom search engine and will show you a success message with links to further actions. You need to click on the control panel button to continue editing your search engine.

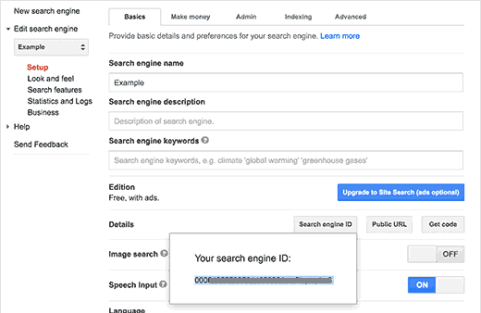
This will take you to the control panel for your custom search engine. First, you need to click on the ‘Search engine ID’ button and copy your search engine ID.

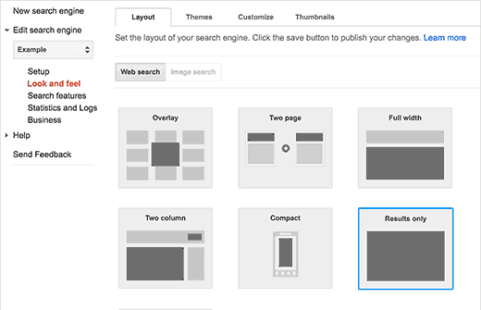
Next, you need to click on the ‘Look and Feel’ section. Under the layout tab, select results only.

Once you are done, click on the save button at the bottom of the page to store your changes.

Now you can switch back to your WordPress site. Paste the search engine ID you copied earlier in the WP Google Search’s settings page and then click on the save changes button to store plugin settings.

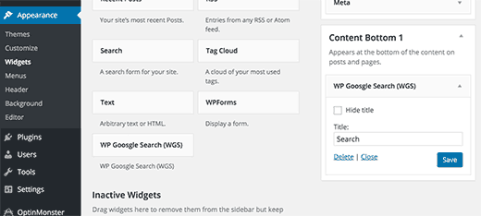
After that you need to visit Appearance » Widgets page. There you will notice WP Google Search widget in the list of available widgets. Drag and drop the widget to a sidebar where you want to display the search form.

Click on the save button to store your widget settings.

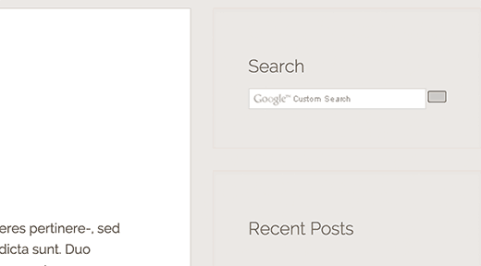
You can now visit your website to see the search form in action.

Method 2: Manually Adding Google Search in WordPress

This method requires making changes to your WordPress theme or child theme files. It is not recommended for beginners. Make sure to backup your WordPress site before making any changes to your theme files.

Visit Google Custom Search website and click on New Search Engine link on the left.

Simply provide your WordPress site’s URL in ‘Sites to Search’ field. Next, you need to choose the language of your website. Lastly, click on the create button to continue.

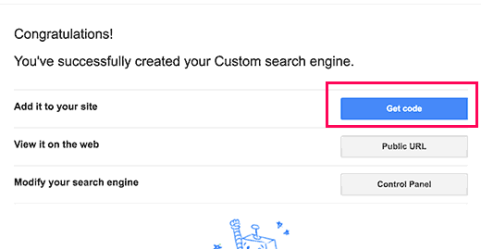
Google will now create your custom search engine and will show you a success message with links to further actions. You need to click on the Get Code button to continue.

On the next screen, you will see some code in a textarea. You need to copy this code.

For this next step, you will need an FTP client. If you need help, then see our guide on how to use FTP to upload WordPress files.

Connect to your website using FTP and then go to /wp-content/themes/your-current-theme/ folder. Replace your current theme folder with the name of your current theme.

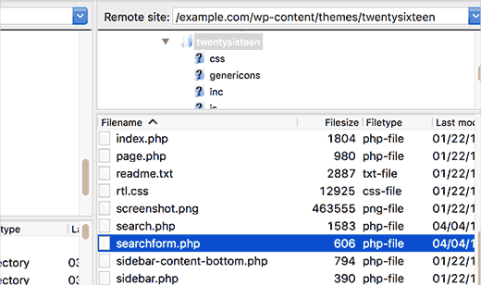
Locate the searchform.php file in your WordPress theme directory. Download this file to your computer and open it in a plain text editor like Notepad.

Delete all contents of the file and paste your Google custom search engine code. Save the file and then upload it to back to your WordPress site using FTP.

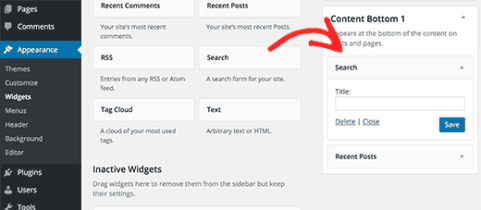
After pasting Google custom search code, go to Appearance » Widgets to drag and drop the Search widget into your sidebar.

Click on the save button to store your widget settings.

You can now visit your website to see the Google search in action on your WordPress site.

Customizing Google Custom Search Engine Colors and Looks

Go to Google Custom Search website and edit your search engine. This will show settings for your custom search engine. Click on Look and Feel from sidebar.

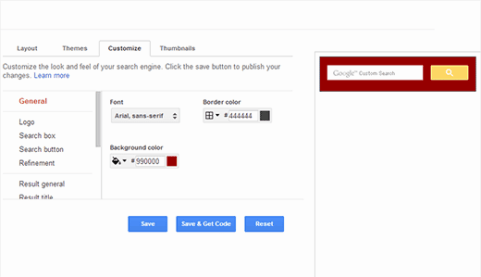
Google custom search has some pre-made themes available to choose from. You can also click on customize tab and choose your own font, border, and background colors.

Once you are done customizing the look of your search box, simply save your changes. You don’t need to paste the code again, these changes will be automatically applied to your search form.

We hope this tutorial helped you learn how to add Google search in a WordPress site.

Easy Guide to Fix WordPress RSS Feed Errors

In this tutorial, we will learn how to find and fix WordPress RSS feed errors.

Most Common WordPress RSS Feed Errors

Most common WordPress RSS feed errors are caused by poor formatting. WordPress outputs RSS feeds in XML which is a strict markup language. A missing line break or an extra tab can break your RSS feed.

The RSS error message will look something like this:

XML Parsing Error: XML or text declaration not at start of entity
Location: http://example.com/feed
Line Number 2, Column 1:

Depending on what browser you are using, your RSS feed error message may vary.

You can also see this error message when visiting your feed in a browser.

Warning: Cannot modify header information – headers already sent by (output started at /home/username/example.com/wp-content/themes/twentysixteen/functions.php:433) in /home/username/example.com/wp-includes/pluggable.php on line 1228

If you are using FeedBurner, then your errors may look different.

Having said that, let’s take a look at what causes these RSS feed errors and how to fix them.

Manually Fixing RSS Feed Errors in WordPress

The most likely reason for your RSS feeds to show error is poor formatting. This poor formatting can be caused by a blank space after closing php tag in a plugin or in your theme’s functions.php file.

If you recently added a code snippet to your theme or child theme‘s functions.php file. Then you need to edit your functions file.

If there is a closing php tag at the end of your functions file, make sure that there is no extra space or line breaks after it.

Ideally, the closing PHP tag is not required at the end of the file. This is why it would be best if you remove the closing php tag altogether.

This should fix the problem in most cases. However, if it does not fix your RSS feed error, then continue reading.

Fixing WordPress RSS Feed Errors Using Plugin

First thing you need to do is install and activate the Fix My Feed RSS Repair plugin. Upon activation, simply go to Tools » RSS Feed Fix page.

Click on the Fix feed button and that’s all.

You can now visit your feed in a browser window or test it with a feed validator tool.

We hope this tutorial helped you fix WordPress RSS feed errors on your site.

Easy Guide to List Scheduled Posts in WordPress

In this tutorial, we will learn how to display future upcoming posts in WordPress sidebar.

What is Scheduled or Future Upcoming Posts in WordPress?

If you have been blogging for a while, then you have probably noticed that publishing posts on a certain time gets more people to read it. If you are new to blogging and don’t know what time you get the most visitors, then you should start using Google Analytics to track this information.

The problem is that you cannot just sit around and wait for that time to hit the publish button. That’s why WordPress comes with built-in scheduling feature. It allows you to schedule your posts to be published later.

Using scheduling you can focus on creating content and managing your editorial calendar like a pro.

Having said that, let’s see how you can show off your upcoming posts in WordPress and use it to get more subscribers.

Method 1: Showing Scheduled or Future Posts with Plugin

First thing you need to do is install and activate SOUP – Show off Upcoming Posts plugin. For more details, see our step by step guide on how to install a WordPress plugin.

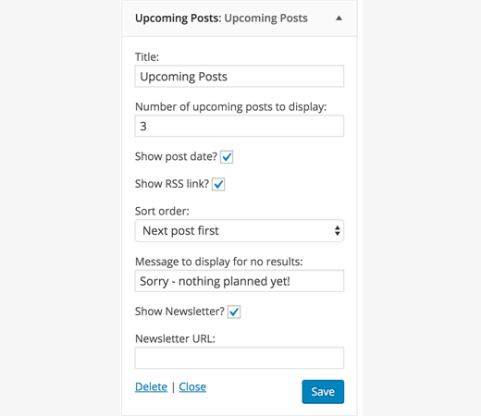
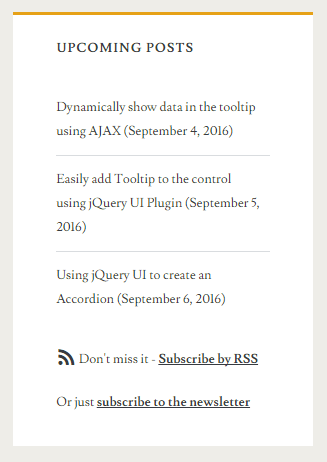
Upon activation, you need to visit Appearance » Widgets page. There you will find ‘Upcoming Posts’ widget under the list of available widgets. Simply add the widget to your sidebar where you to display scheduled posts.

Upcoming posts widget

The widget settings allow you to choose the number of scheduled posts you want to show. You can also show dates next to them, link to your RSS feed, or link to a page where users can signup for your email list.

Click on the save button to store your widget settings.

You can now visit your website to see the widget in action.

display schedule post

Method 2: Showing Scheduled or Upcoming Posts Manually

Simply add this code to your theme’s functions.php file or a site-specific plugin.

function wpb_upcoming_posts() { 
    // The query to fetch future posts
    $the_query = new WP_Query(array( 
        'post_status' => 'future',
        'posts_per_page' => 3,
        'orderby' => 'date',
        'order' => 'ASC'
    ));
 
// The loop to display posts
if ( $the_query->have_posts() ) {
    echo '


'; while ( $the_query->have_posts() ) { $the_query->the_post(); $output .= '
 	' . get_the_title() .' ('. get_the_time('d-M-Y') . ')

'; } echo '

'; } else { // Show this when no future posts are found $output .= '

No posts planned yet.

'; } // Reset post data wp_reset_postdata(); // Return output return $output; } // Add shortcode add_shortcode('upcoming_posts', 'wpb_upcoming_posts'); // Enable shortcode execution inside text widgets add_filter('widget_text', 'do_shortcode');

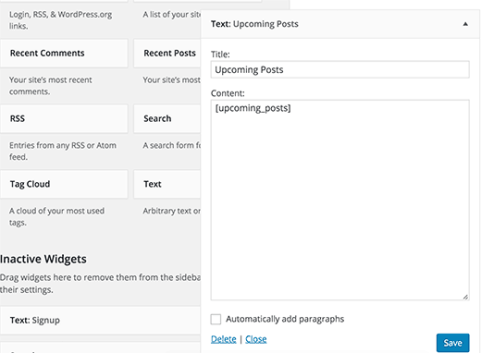
Now you can visit Appearance » Widgets page. Add a text widget to your sidebar where you want to display upcoming posts and add this shortcodeinside the widget.

[upcoming_posts]

Adding upcoming posts shortcode in a text widget

Click on the save button to store your widget settings.

You can now visit your website to see the upcoming scheduled posts in your sidebar. You can also use this shortcode in a post, page, or a template in your child theme.

We hope this tutorial helped you learn how to show scheduled posts in your WordPress sidebar.

Easy Guide to Change WordPress JPEG Image Compression

WordPress compresses your images for better performance. Recently one of our readers asked if it was possible to change the image compression setting in WordPress. In this article, we will show you how to increase or decrease JPEG image compression in WordPress.

Every time you upload a JPEG image in WordPress, it would automatically compress the image to 90% quality. In WordPress 4.5, this number was further decreased to 82% to improve site performance for mobile users.

If you are a photographer who wants to showcase high quality images on your website, then you can turn off image compression in WordPress.

How to Disable Image Compression in WordPress

All you need to do is paste the following code in your theme’s functions.php file or in a site-specific plugin.

 add_filter('jpeg_quality', function($arg){return 100;});

When you set the value to 100, it means that WordPress compress the image at its highest quality.

If you’re not a photographer or an artist, then you would probably not see much of a difference in quality. But for those who work with high quality images on a daily basis, the difference in quality is obvious.

How to Increase Image compression in WordPress

There are definitely performance benefits to leaving the compression quality as is. If you want, you can change the number from 100 to 80 or something lower to squeeze a few more kBs, then all you have to do is paste the following code:

 add_filter('jpeg_quality', function($arg){return 75;});

When you do make these image quality changes, you want to make sure that you regenerate your thumbnails.

We hope this tutorial helped you learn how to change JPEG image compression in WordPress.