Easy Guide to Find and Replace Text in your WordPress Database

In this tutorial, we will learn how to find and replace text in your WordPress database.

When You May Need Find & Replace for WordPress Database?

Let’s suppose that you have added specific text or URL to a number of your posts. You don’t know which posts you have added that text to, but you do know that there are a lot of them.

Now you can manually search your site and edit every single post one by one. That’s going to take time and has a high chance of you missing some occurrences.

Using a single command to automatically find and replace will do the same thing but much quicker and efficiently.

There is one downside to it though. If you made a mistake, then you will not be able to undo it. Once you replace the text, it is gone. You will need to carefully type the text you are looking for and the text you want to replace it with.

Having said that, let’s see how you can easily find and replace text in your WordPress database.

Lets Start

As we mentioned earlier that the changes you make to your database will not be reversible. You need to take every precaution to make sure that you don’t lose data.

First you need to create a WordPress database backup. You can do that by using a WordPress backup plugin. Alternatively, you can also create a database backup using phpMyAdmin.

After creating the backup of your WordPress database, you can move on to run your find and replace commands.

Running Find and Replace with a WordPress plugin

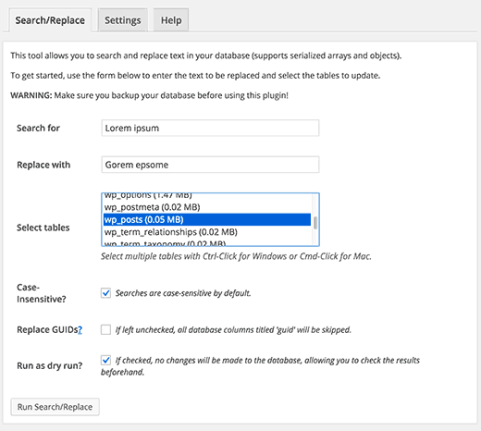
If you are not familiar with code and don’t want to write a custom SQL query, then there is an easy to use find and replace WordPress plugin called Better Search Replace.

It allows you to run search and replace commands from inside your WordPress admin area. We have a detailed guide on how to search and replace in WordPress with Better Search Replace plugin.

Running Find & Replace MySQL Query with phpMyAdmin

You can also use phpMyAdmin to find and replace text from your WordPress database.

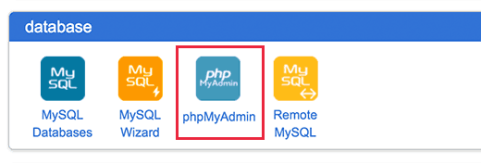
First you need to login to cPanel dashboard of your WordPress hosting. Scroll down to the database section and then click on phpMyAdmin.

The screenshot above is showing the cPanel dashboard on BlueHost. Your cPanel dashboard may look slightly different.

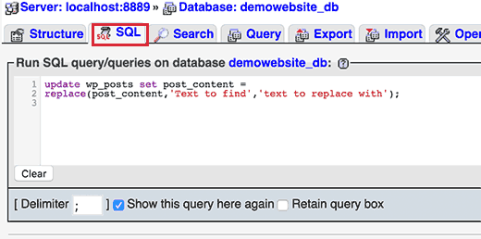
This will launch phpMyAdmin where you will need to click on your WordPress database name and then click on SQL.

You will need to enter your SQL query in this format:

update TABLE_NAME set FIELD_NAME =
replace(FIELD_NAME, 'Text to find', 'text to replace with');

For example, if you wanted to search for text in a WordPress post’s content, then you would write your query like this:

update wp_posts set post_content =
replace(post_content,'Text to find','text to replace with');

Click on the ‘Go’ button to continue.

PhpMyAdmin will run your SQL query and upon success it will show the number of rows affected by the query.

You can now visit your WordPress site to see your changes in action.

We hope this tutorial helped you learn how to find and replace text with one click in your WordPress database.

Easy Guide to Remove the Welcome Panel in WordPress Dashboard

In this tutorial, we will learn how to remove the welcome panel in WordPress dashboard.

Why Remove Welcome Panel in WordPress?

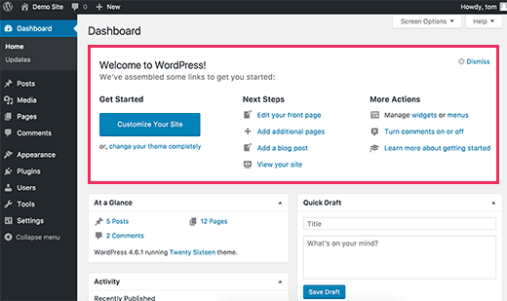
Welcome panel is a meta box added to the dashboard screen of WordPress admin area. It shows shortcuts to different sections of your WordPress site.

wordpress dashboard

The purpose of the welcome panel is to help beginners find their way around WordPress.

However as you become more familiar to all these locations, this panel will become less useful for you.

Having it on the screen, pushes down other important dashboard widgets and make them less noticeable.

Let’s see how you can easily get rid of the welcome panel from your WordPress dashboard screen.

Removing Welcome Panel from WordPress Dashboard

There are multiple ways to hide and even completely remove the welcome panel.

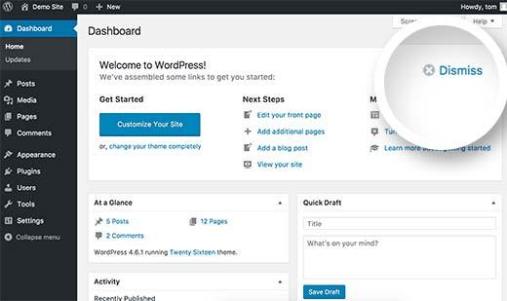
The easiest way to remove it is by simply clicking on the Dismiss button at the top right corner of the panel.

wordpress dashboard dismiss

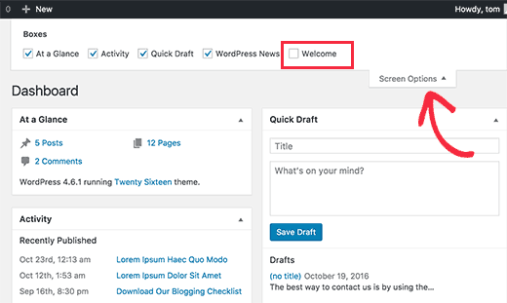
You can also remove the welcome panel by clicking on the Screen Optionsbutton at the top right corner of the screen.

This will bring a fly down menu. You need to uncheck the checkbox next to ‘Welcome’ option.

wordpress screen options

Both methods mentioned above will hide the welcome panel. You can access it again by clicking on the Screen Options button and checking the box next to Welcome option.

However if you want to completely remove the welcome panel even from the Screen Options, then that’s also possible.

This method requires you to add code to your WordPress site. If you haven’t done this before, then take a look at our guide on pasting snippets from the web into WordPress.

You will need to add this code to your theme’s functions.php file or a site-specific plugin.

remove_action('welcome_panel', 'wp_welcome_panel');

This code simply removes the action that adds the welcome panel to the admin dashboard.

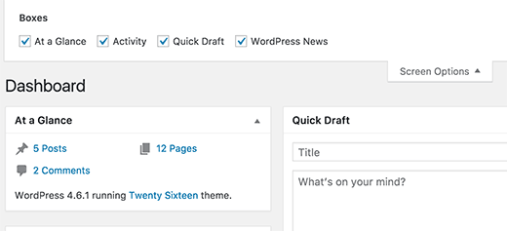
You can now visit the dashboard screen and click on the Screen Options menu. You will notice that the welcome panel option will no longer be available.

wp dashboard at a glance

That’s all. We hope this tutorial helped you remove the welcome panel in WordPress dashboard.

Easy Guide to Improve WordPress Email Deliverability with SendGrid

In this tutorial, we will learn how to improve WordPress email deliverability with SendGrid.

The Problem with Emails in WordPress

By default, WordPress uses the PHP mail function to send out emails. Many WordPress hosting providers do not have this function configured properly. Some even block it to make sure that their servers aren’t used to send spam.

This becomes problematic for site owners because their WordPress site fails to send some or all emails.

WordPress emails are crucial for resetting passwords, sending notification emails, running an online store, getting contact form notifications, and more. If WordPress can’t send emails, you could get locked out of your site or lose customers by missing out on important notifications.

Having said that, let’s take a look at how to improve WordPress email deliverability with SendGrid (for free).

What is SendGrid?

SendGrid is an email service provider. They offer highly optimized email servers that you can use to send out your emails.

They offer both transactional email service (one-to-one emails like WordPress notices, order receipts, password resets, etc.) and email marketing services.

Like all good email service providers, SendGrid spends significant resources to improve deliverability. This ensures that your WordPress emails land in your users’ inboxes, instead of being marked as spam. This is why companies like Uber, Spotify, Airbnb, Yelp, and thousands of others use SendGrid.

Sending WordPress Emails Using SendGrid

To set up SendGrid to work with your WordPress site, first you’ll need to visit the SendGrid website and sign up for an account.

SendGrid is a paid service, but they also offer a free plan which allows you to send up to 12,000 emails each month. That’s plenty for most small to medium-sized websites.

As your site grows, you can upgrade to their paid plan. It starts at $9.90 per month for up to 40,000 emails. You can scale your pricing based on how many emails you need to send every month, but in our experience the free plan is sufficient for most folks.

Next, you need to install and activate the SendGrid WordPress plugin. For more details, see our step by step guide on how to install a WordPress plugin.

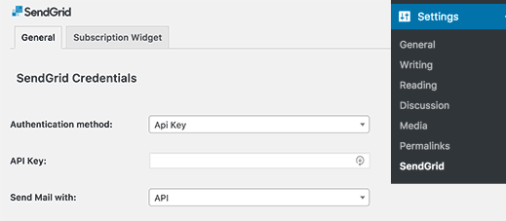
Upon activation, visit Settings » SendGrid to configure the plugin.

sengrid mail

The plugin allows you to connect your WordPress site to SendGrid. You can do that by adding an API key or by using your SendGrid username or password.

We recommend using the API key method because it’s more secure. We will only cover the API method in this tutorial.

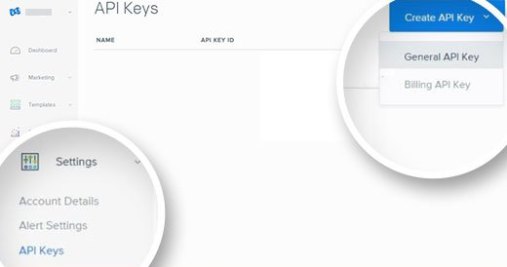
Start by visiting your SendGrid account dashboard and then click on Settings » API Keys.

api settings

Next, you need to choose how to send mail. You can send it using the SendGrid API, or with SMTP.

The SMTP method requires Swift Mailer support. You can add it by installing and activating the Swift Mailer plugin on your WordPress site.

But you don’t need that. We recommend using the API method, since it’s easier to set up and more secure.

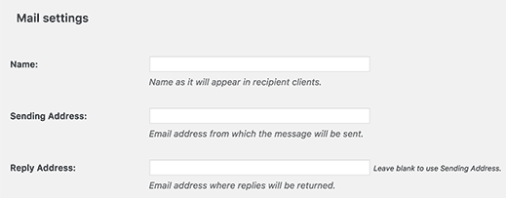
Go back to the Settings » SendGrid page in your WordPress dashboard. Under the Mail Settings heading, you’ll need to provide the sender name, email address, and reply-to address.

sendgrid mail settings

The name can be your website name, and the sending address can be your professional email address.

In other optional settings, you can choose to use email templates from SendGrid website and add their template ID in plugin settings. You can also create and use categories for emails you send through WordPress.

Don’t forget to click on the Save Changes button to store your settings.

That’s all! SendGrid will now replace the default WordPress mail function with SendGrid API, providing more reliable email service.

You can test it by performing any action that generates an email notification from WordPress. For example, you could reset your password, add a new user, or fill out your contact form.

We hope this tutorial helped you improve your WordPress email deliverability with SendGrid.

Easy Guide to Add Your WordPress Blog to Apple News

In this tutorial, we will learn how to add your WordPress blog to Apple news.

Before Getting Started

Apple News app allows users to read news and blogs articles in one single app on their Apple devices. It provides a better reading experience and makes it easier for users to stay updated with their favorite content from a single app.

The Apple News program for publishers allows you to submit your blog as an Apple News channel. It also allows you to monetize your content by showing advertisements.

However the monetization program is still in beta, and it is only available in the United States, UK, and Australia. You will have to wait for a couple weeks for your application to get reviewed.

Please note: this guide is for self-hosted WordPress blogs and not for WordPress.com blogs. See our guide on the difference between WordPress.org vs WordPress.com. If you’re on WordPress.com, then you can use this guide to move from WordPress.com to WordPress.org.

Having said that, let’s learn how to add your WordPress blog to Apple News.

Adding a WordPress Site to Apple News

First thing you need to visit the News Publisher app on the iCloud website. You will need to login with your Apple ID.

Once you are logged in, you will see News Publisher terms of service. Click on I agree and then click on the submit button.

Next, you will be asked to provide publisher information. Fill in the form and then click on Next.

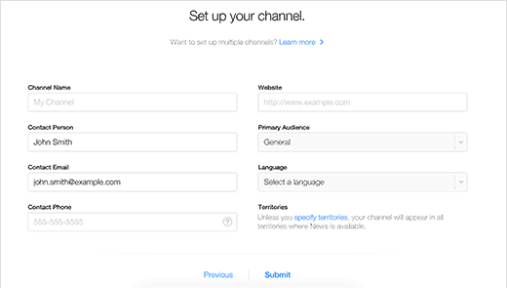
In the following step, you will be asked to setup your channel by providing information about your website. Fill in the required fields and click on the next button to proceed.

You will now be asked to provide a type based logo for your channel. A type based logo is just an image with your site name in readable text format. It should have a transparent background, and the file size should be less than 2 MB.

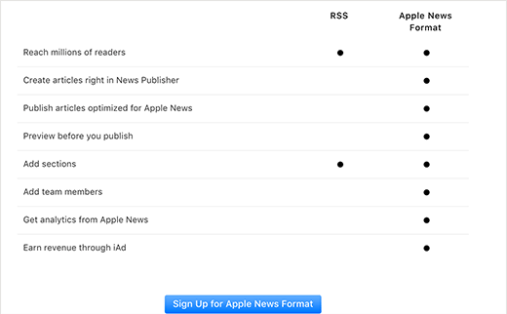
Next, you will be asked to choose between RSS or Apple News Format. Go ahead and choose Apple News Format, we will cover this in the next step.

If you use the RSS feed option, then you will not be able to monetize your content in Apple News. It also prevents you from using other Apple News features as a publisher.

See the comparison chart below:

Once you are done, click on the Signup for Apple News Format button.

That’s all, you have successfully finished your application for joining the Apple News. You will now see a thank you page like this one:

Now you will have to wait to hear back from Apple News. An application can take up to two weeks to be approved.

You may want to bookmark this article now and come back to complete step 2 once your application is approved. Press Ctrl + D to bookmark the article in your browser (Cmd + D for Mac users).

Submitting Articles to Apple News

Once your application is approved, you will be able to submit articles from your WordPress blog to the Apple news app.

You will have to manually submit your first article via your News Publisher account on iCloud. Since Apple is notorious for quality, your first article will be manually reviewed by the Apple News team, and this could also take some time (anywhere between 1-2 weeks).

After that Apple News will automatically start showing articles from your RSS Feed.

Here is how to automatically publish your WordPress blog posts to Apple News.

First thing you need to do is install and activate the Publish to Apple Newsplugin. For more details, see our step by step guide on how to install a WordPress plugin.

Upon activation, you need to visit Settings » Apple News page to configure plugin settings.

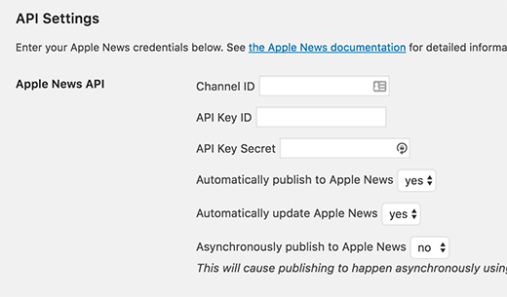
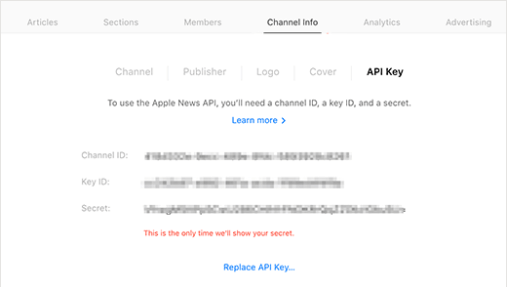
Next, you need to enter your channel ID, API key, and API key secret. You can find this information by signing into your Apple News Publisher account.

After that you need to select which post types you would like to generate in Apple News format. In most cases, the only post type you need to select is Posts.

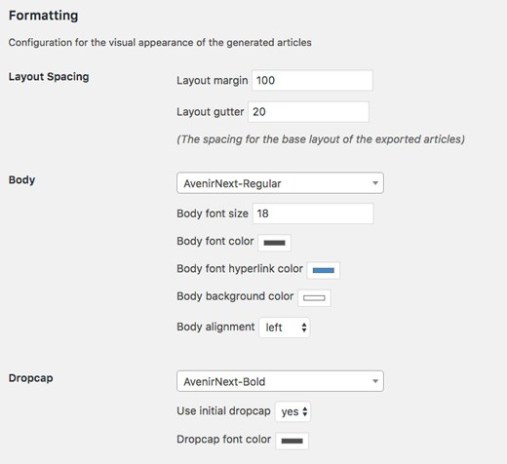
The last section is to configure the visual appearance of different elements in your generated articles. Feel free to customize the settings as you need.

Don’t forget to click on the save changes button when you are done.

That’s all, Publish to Apple News will now start publishing your article in the Apple News Format.

We hope this tutorial helped you learn how to add your WordPress blog to Apple News.

Easy Guide to Create a “Sticky” Floating Footer Bar in WordPress

In this tutorial, we will learn how to create a sticky floating footer bar in WordPress.

What is Floating Footer Bar?

A sticky floating footer bar allows you to prominently display your important content to users. This bar remains visible to users at all time, so they are more likely to click on it and discover more useful content.

You can use the floating footer bar to:

  • Drive more clicks to other blog posts
  • Build your email list
  • Bring attention to special offers / sale

In this article, we will show you two methods to add a sticky floating footer bar on your WordPress site. One uses a plugin while the other is a code method that we’re using on WPCademy. You can choose the one you find easier to use.

Method 1: Manually Create Sticky Floating Footer Bar in WordPress

This method requires you to add code in your WordPress files. If you are new to adding code, then please take a look at our guide on how to paste snippets from web into WordPress.

First, you need to connect to your WordPress site using an FTP client or file manager in cPanel.

In your FTP client, you need to locate the footer.php file in your WordPress theme folder and download it to your desktop. It would be located at a path like this:

/wp-content/themes/your-theme-folder/

Next, you need to open the footer.php file in a plain text editor like Notepad and add the following code just before the </body> tag.

You can add as many list items as you want. We will show you how to randomly rotate them on each page load.

The next step is adding the CSS styles.

You can add CSS to your WordPress theme’s style.css file or use the Simple Custom CSS plugin.

/*Footer Bar*/
 
.fixedbar {
background: #000; 
bottom: 0px; 
color:#fff; 
font-family: Arial, Helvetica, sans-serif; 
left:0; 
padding: 0px 0; 
position:fixed; 
font-size:16px; 
width:100%; 
z-index:99999; 
float:left; 
vertical-align:middle; 
margin: 0px 0 0; 
opacity: 0.95; 
font-weight: bold;
}
.boxfloat {
text-align:center; 
width:920px; 
margin:0 auto;
}
 
#tips, #tips li {
margin:0; 
padding:0; 
list-style:none
}
#tips {
width:920px; 
font-size:20px; 
line-height:120%;
}
#tips li {
padding: 15px 0; 
display:none;
}
#tips li a{
color: #fff;
}
#tips li a:hover {
text-decoration: none;
}

After adding the CSS, you may not be able to see the changes on your website. This is because we have set the display for items in our list to none.

Next, we will use jQuery to randomly display one item from our list on each page load.

You need to open a plain text editor like Notepad on your computer and add this code to a blank file:

(function($) {
this.randomtip = function(){
    var length = $("#tips li").length;
    var ran = Math.floor(Math.random()*length) + 1;
    $("#tips li:nth-child(" + ran + ")").show();
};
 
$(document).ready(function(){   
    randomtip();
});
})( jQuery );

Once you are done, you need to save this file as floatingbar.js on your desktop.

Now open your FTP client and connect to your web server. Go to your theme folder and locate js folder. It would be at a path like this:

/wp-content/themes/your-theme-folder/js

If there is no js folder in your theme directory, then you need to create one.

Now you need to upload floatingbar.js file you created earlier to the js folder you just created.

The next step is to enqueue (load) the JavaScript file in your WordPress theme.

Paste this code in your theme’s functions.php file or a site-specific plugin.

function wpb_floating_bar() {
    wp_enqueue_script( 'wpb-footerbar', get_stylesheet_directory_uri() . '/js/floatingbar.js', array( 'jquery' ) );
}
add_action( 'wp_enqueue_scripts', 'wpb_floating_bar' );

That’s all, you can now visit your website to see the floating footer bar in action. Reload the page a couple of times to see footer bar randomly showing different items from your list.

The benefit of using this method is that you get to randomly rotate multiple links in the floating footer bar like we’re doing.

However the difficulty is that you need to add code. Furthermore, you can’t use this floating bar for other things without doing too much CSS customizations.

Method 2: Using OptinMontser to Add Floating Footer Bar in WordPress

OptinMonster is a popular lead generation plugin that works on all websites. It helps you convert website visitors into subscribers and customers.

One of the features OptinMonster has is a floating header and footer bar that you can use to display an email optin form as well as to promote single links / offers.

The benefit of using this method is:

  • Easy to Setup (no code)
  • You can show custom floating bars on different pages / categories of your website.
  • You can use it to build your email list as well as promote offers.

The only downside is that OptinMonster is a paid service. But you can use our OptinMonster Coupon: WPB10 to get 10% discount on any OptinMonster plan.

After you have purchased OptinMonster (Plus or Pro plan), you can use the OptinMonster WordPress API plugin on your site. For more details, see our step by step guide on how to install a WordPress plugin.

This plugins just acts as a connector between your WordPress site and OptinMonster.

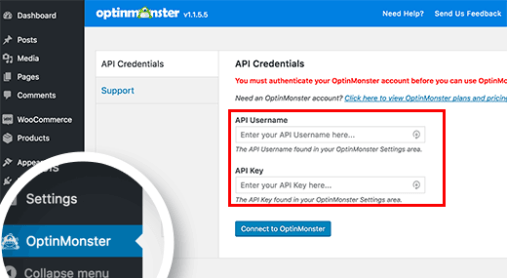
Upon activation, the plugin will add a new menu item labeled OptinMonster to your WordPress admin bar. Clicking on it will take you to plugin’s settings page.

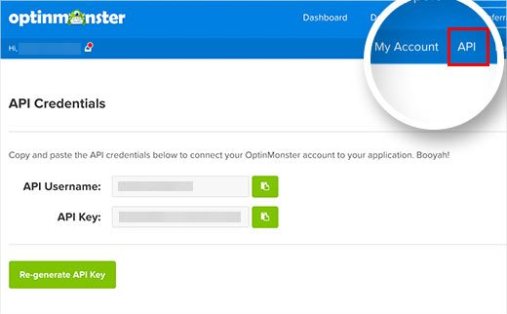
You will be asked to provide your OptinMonster API username and key. You can get these keys from your OptinMonster account.

Copy and paste the keys into the plugin settings and click on ‘Connect to OptinMonster’ button. The plugin will now connect your WordPress site to your OptinMonster account.

Next, you need to click on the ‘Create New Optin’ button.

This will take you to ‘Create New Optin’ page on OptinMonster website.

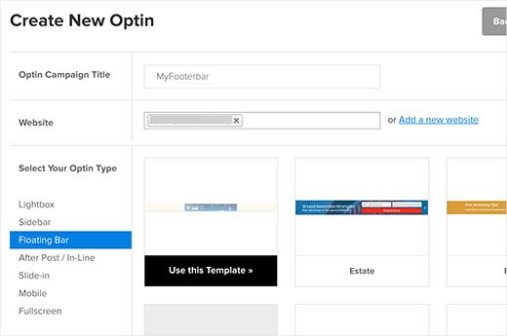
First you need to provide a title for your Optin Campaign and select a website where you will be using this optin. If your site is not listed then click on ‘Add a new website’ link.

Next, you can click on the Floating bar under the ‘Select your optin type’ to use templates available to use as a floating bar.

You can customize all these templates to your own liking. Select the one that looks closest to what you have in mind.

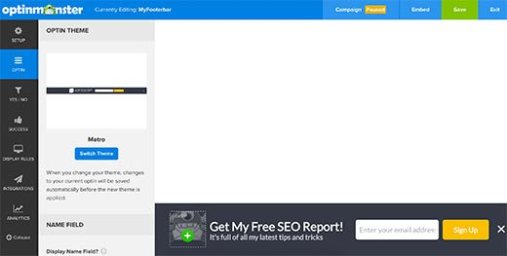
As soon as you select a template, OptinMonster will launch their design customizer. It is a point-and-click builder where you can configure appearance and settings for your optin.

When you are done configuring the appearance of your optin, be sure to click on the save button.

While these are called optins, they don’t always have to be. You can use the Yes / No feature to add the button to view a blog post or claim a special discount.

When you first create your floating bar, it’s Paused by default.

Once you’ve finished configuring it, hover over to the status bar in the top menu and choose Start Campaign.

Your floating bar is now ready to be added to your WordPress site.

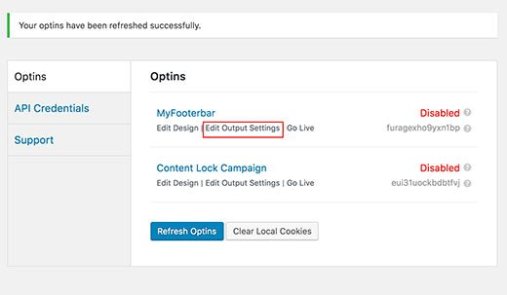
Return to the admin area of your WordPress site and visit OptinMonster » Optins. You will see your optin listed here. If you don’t see it, then click on Refresh Optins button and the plugin will display it.

Click on the ‘Edit output settings’ link to continue.

On the next page, check the box next to ‘Enable optin on site’ option and then click on the save settings.

You can also use the Advanced option to only show the floating bar on specific posts, pages, categories, and other areas.

That’s all, floating footer bar optin is now live on your WordPress site.

We hope this tutorial helped you add a floating footer bar to your WordPress site.

Easy Guide to Start an Online Store in 2019 (Step by Step)

What Do You Need to Start an Online Store?

There had never been a better time to start an online business than today.

Anyone with a computer can get started within a matter of minutes and without acquiring any special skills.

The three things you need to start an online store are:

  1. A domain name idea (this will be the name of your online store i.e wpcademy.com)
  2. A web hosting account (this is where your website lives on the internet)
  3. Your undivided attention for 30 minutes.

Yep, it is really that simple.

You can setup your own online store with WordPress in less than 30 minutes and we’ll walk you through each step of the process.

Step 1: Setting up Your Online Store Platform

The biggest mistake most users make is not choosing the right platform for their online store.

Thankfully you’re here, so you won’t be making that mistake.

There are two popular eCommerce platforms that we recommend: Shopify or WordPress + WooCommerce.

Shopify is a fully hosted eCommerce solution that starts at $29 / month. It’s a hassle-free solution where you just login and start selling. The downside to Shopify is that it gets quite expensive, and your payment options are limited unless you pay additional fees.

This is why most users choose WordPress + WooCommerce because of the flexibility it offers. It does require some setup, but it’s worth doing it for the long run. WooCommerce is the world’s largest eCommerce platform (see: Shopify vs WooCommerce comparison).

In this tutorial, we will walk you through how to setup an online store in WordPress using WooCommerce.

To setup your store, you need to have a domain name, web hosting, and a SSL certificate.

A domain name is your website’s address on the internet. It is what users will type in their browsers to reach your website (for example: google.com or wpcademy.com).

Web hosting is where your website lives on the internet. It’s your website’s house on the internet. Every website on the internet needs web hosting.

SSL certificate adds a special security layer on your website, so you can accept sensitive information such as credit card numbers and other personal information. This is required for you to accept credit card payments on your website.

Normally a domain name costs around $14.99 / year, web hosting costs around $7.99 / month, and SSL certificate costs around $69.99 / year.

That’s a lot of startup cost.

Thankfully, Bluehost, an official WordPress and WooCommerce recommended hosting provider, has agreed to offer our users a free domain namefree SSL certificate, and a discount on web hosting.

Basically, you can get started for $6.95 / month.

Bluehost is one of the oldest web hosting companies, started in 1996 (that’s before Google). They are also the largest brand name when it comes to WordPress hosting because they host millions of websites including our own.

NOTE: At WPCademy we believe in transparency. If you sign up with Bluehostusing our referral link, we will earn a small commission at no extra cost to you (in fact, you will save money and get a free domain). We would get this commission for recommending just about any WordPress hosting company, but we only recommend products that we use personally use and believe will add value to our readers.

Let’s go ahead and purchase your domain + hosting + SSL.

Open up Bluehost in a new window using this link and follow along.

First thing you need to do is click on the green Get Started Now button to get started.

On the next screen, select the plan that you need (starter and plus are the most popular).

After that, you will be asked to enter the domain name for your website.
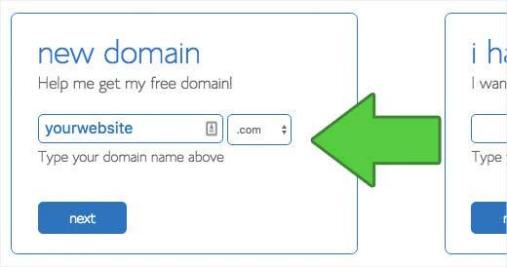
Lastly, you will need to add your account information and finalize the package info to complete the process. On this screen, you will see optional extras that you can purchase.

It’s entirely up to you whether or not you purchase these, but we generally don’t recommend purchasing these. You can always add them later on, if you decide that you need them.


Once completed, you will receive an email with details on how to login to your web hosting control panel (cPanel). This is where you manage everything from support, emails, among other things.

Go ahead and login to your cPanel. You will be greeted with a popup informing you that WordPress with WooCommerce is pre-installed on your website.
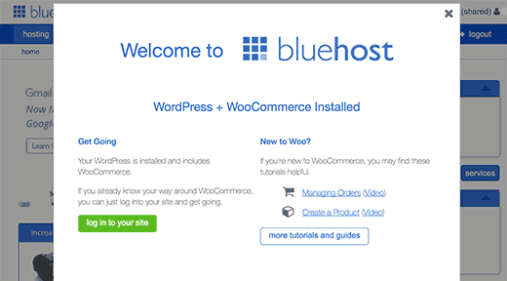
You just need to click on ‘Login to your site’ button, and it will take you to your WordPress site’s dashboard.

Congrats, you have finished setting up hosting and domain part.

The next step is to setup your WordPress site and then your online store.

Step 2. Setting up WordPress

Bluehost has automatically installed WordPress and WooCommerce on your website.

When you first login to WordPress, you will see a welcome message. You will be asked what kind of website you want to set up.
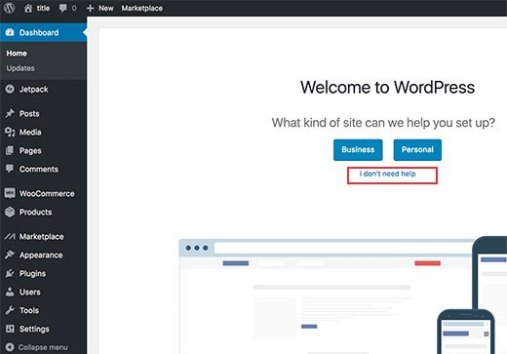
Go ahead and click on ‘I don’t need help’ link. Don’t worry we will walk you through all the necessary steps.

Closing the setup wizard will show your WordPress admin dashboard which looks like this:
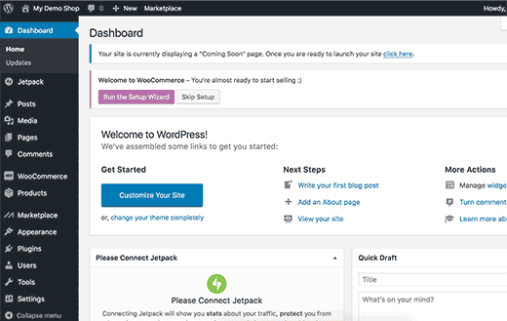
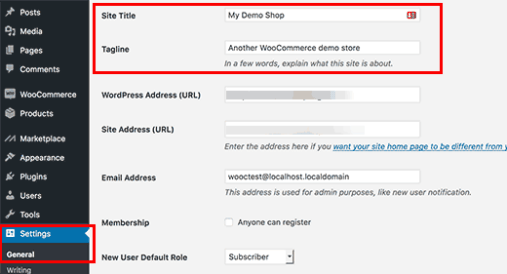
First, you need to visit Settings » General page to setup your WordPress site title and description.
Setting up HTTPS to Use SSL

Your WordPress hosting package came with a free SSL Certificate. This certificate is pre-installed for your domain name. However, your WordPress site needs to be configured, so it loads as https vs http.

On the Settings » General page, you need to change your WordPress Address and Site Address to use https instead of http.
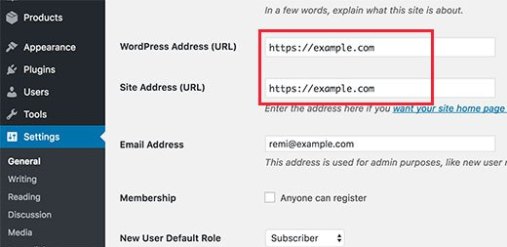
Don’t forget to scroll down to the bottom of the page and click on the save changes button to store your settings.

Your basic WordPress setup is complete. Now it is time to setup your online store.

Step 3. Setting up Your WooCommerce Store

Before you can start selling, there are a few things like currency, payments, and shipping information that you need to set up.

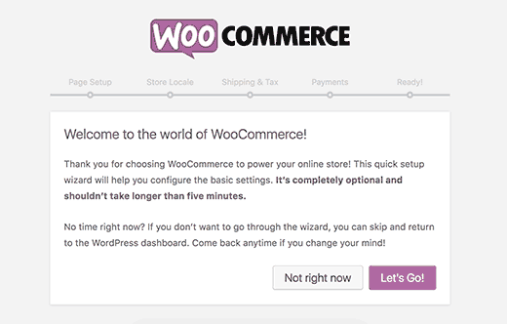
You will be seeing a ‘Welcome to WooCommerce’ notification on your WordPress admin pages. Go ahead and click on the ‘Run setup wizard’ button in the notification.


This will launch the WooCommerce setup wizard where you need to click on the ‘Let’s go’ button to get started.
WooCommerce needs few essential pages for cart, account, shop, and checkout. You can click on the continue button to automatically create these pages.
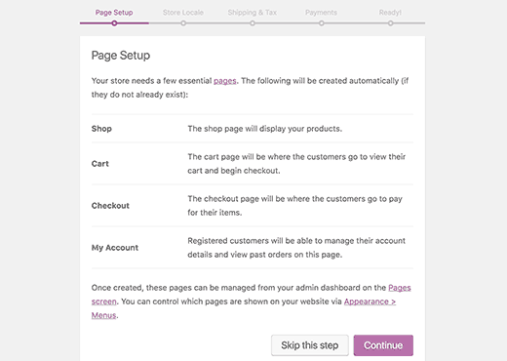
This will bring you to the next step.

Now you will need to tell WooCommerce where your store is located and which currency and unit measures to use.
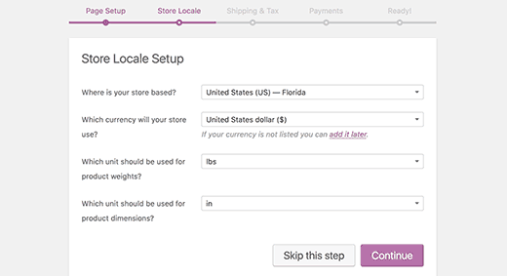
After selecting your location and currency, click on the continue button to move on.

Next, you need to enter shipping and tax information.
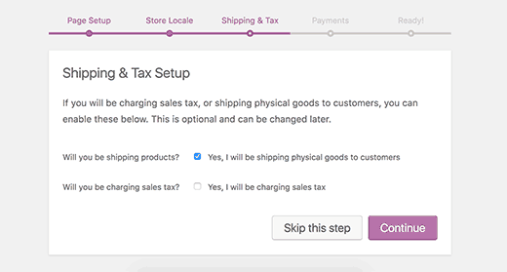
WooCommerce can be used to sell both digital downloads and physical goods that need shipping.

You need to check the box if you will be shipping goods, or you can leave it unchecked if you will only be selling digital goods.

Next you need to answer the tax question. WooCommerce can help you automatically calculate and add taxes to your prices.

If you are not sure, then you can leave it unchecked. You can always add tax information later from WooCommerce settings.

Click on the continue button to move on.

Next, you will be asked to choose a payment method for your online store.
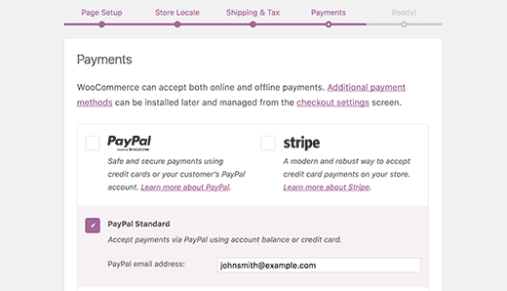
By default, WooCommerce comes with support for PayPal, PayPal Standard, and Stripe payment gateways. There are many other payment methods available for WooCommerce which you can install later if you need.

The easiest way to accept payment is using PayPal Standard.

Simply enter your PayPal email address and click on the continue button.

A lot of people including us, use both PayPal and Stripe. By using Stripe, you allow your users to enter their credit card information on the checkout page without having to leave your site and going to PayPal.

You can setup Stripe by following the instructions on the WooCommerce screen.

Once you’re done, your WooCommerce online store is all setup.
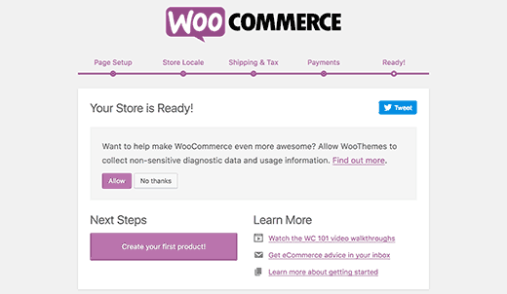
You need to click on the ‘Return to WordPress dashboard’ link to exit the setup wizard.

After finishing the WooCommerce setup, you are now ready to add products to your online store.

Step 4. Adding Products to Your Online Store

Let’s start with adding the first product to your online store.

You need to visit Products » Add New page to add a new product.
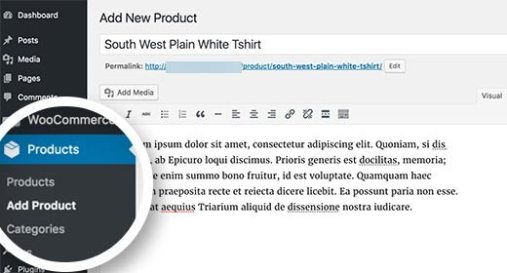
First, provide a title for your product and then some detailed description.

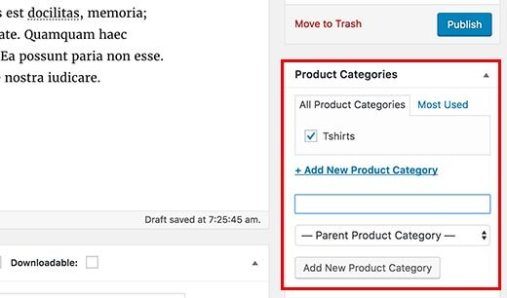
On the right hand column, you will see the ‘Product Categories’ box. Click on the ‘+Add New Product Category’ to create a category for this product. This allows you and your customers to sort and browse products easily.
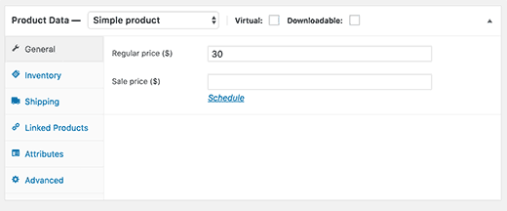
Scroll down a little and you will notice the Product Data box. This is where you will provide product related information like pricing, inventory, shipping etc.
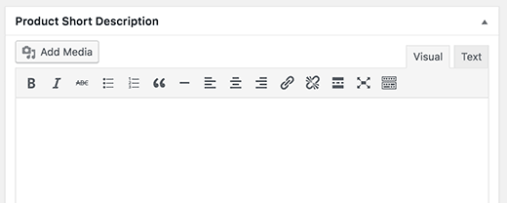
Below product data box, you will see a box to add product short description. This short description will be used when users are viewing multiple products on a page.
Lastly, on your right hand column you will see boxes to add a main product image and a product gallery.
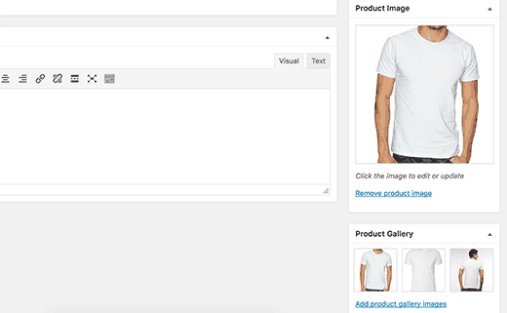
Once you are satisfied with all the product information you have added, you can click on the Publish button to make it live on your website.

Repeat the process to add more products as needed.

Step 5. Select and Customize WordPress Theme

Themes control how your WordPress sites look to the users when they visit it. For a WooCommerce shop, they also control how your products are displayed.

There are thousands of paid and free WordPress themes available.

Your Bluehost hosting account, automatically installs the Storefront theme for your website. You will need to customize it to meet your needs.

Head over to Appearance » Customize page. This will launch theme customizer where you can change different theme settings.
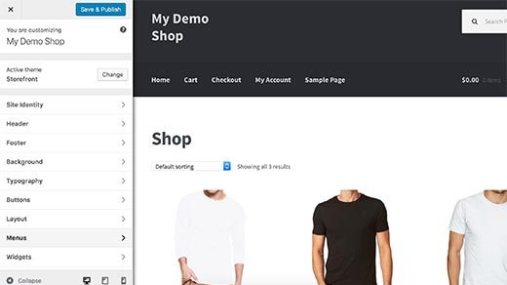
If you don’t like the Storefront theme, then you can use another theme by visiting Appearance » Themes page.
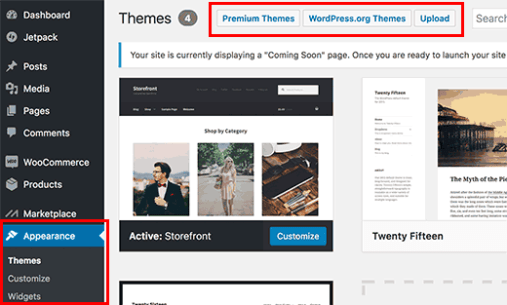
If you need help selecting a theme, then please refer to our guide on 9 things you should consider when selecting a perfect WordPress theme.

Step 6. Extend Your Online Store With Plugins

Now that you have your online store ready, you probably want to get started with adding other usual elements on your website such as a contact form, about page, and more.

To further customize WordPress and add features like contact forms, galleries, sliders, etc, you need to use WordPress plugins.

WordPress plugins are apps that allow you to add new features to your website.

There are over 46,000 WordPress plugins available. At WPCademy, we feature the best WordPress plugins to help you add the functionality that you need.
Easy Guide to Exclude Specific Categories from WordPress RSS Feed

In this tutorial, we will learn how to exclude specific categories from WordPress RSS feed.

Method 1: Exclude Specific Categories from WordPress RSS Feed Using Plugin

01: First thing you need to do is install and activate the Ultimate Category Excluder plugin. For more details, see our step by step guide on how to install a WordPress plugin.

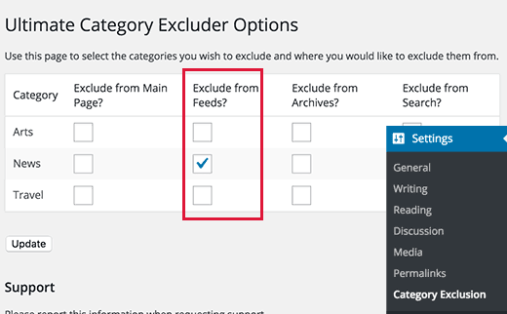
02: Upon activation you need to visit Settings » Category Exclusion to configure plugin settings.

Exclude Specific Categories from wordpress rss

03:The settings page will display all categories on your WordPress blog with options to hide them from front page, RSS feeds, archive pages, and search results.

04:Simply select the exclude from feed box next to the categories that you want to exclude from your RSS feed.

05: Don’t forget to click on update button to save your settings.

That’s all, posts filed under your selected categories will disappear from your WordPress RSS feed.

Method 2: Manually Exclude Specific Categories from WordPress RSS Feed

This method requires you to paste code in your WordPress files. You can use this method if you are comfortable with pasting code snippets from web into WordPress.

You need to add this code to your theme’s functions.php file or a site-specific plugin.

function exclude_category($query) {
    if ( $query->is_feed ) {
        $query->set('cat', '-5, -2, -3');
    }
return $query;
}
add_filter('pre_get_posts', 'exclude_category');

This code simply excludes categories that match the given IDs. Simply replace the category IDs in the code with the IDs of categories that you want to exclude.

See our guide on how to find category IDs in WordPress.

If you just want to exclude a single category, then change the code like this:

function exclude_category($query) {
    if ( $query->is_feed ) {
        $query->set('cat', '-15');
    }
return $query;
}
add_filter('pre_get_posts', 'exclude_category');

Replace -15 with the ID of category that you want to exclude from RSS feed.

We hope this tutorial helped you learn how to exclude specific categories from WordPress RSS feed.