Easy Guide to Fix Render-Blocking JavaScript and CSS in WordPress

In this tutorial, we will learn how to easily fix render blocking JavaScript and CSS in WordPress to improve your Google PageSpeed score.

What is Render-Blocking JavaScript and CSS?

Every WordPress site has a theme and plugins that add JavaScript and CSSfiles to the front-end of your website. These scripts can increase your site’s page load time, and they can also block rendering of the page.

A user’s browser will have to load those scripts and CSS before loading rest of the HTML on the page. This means that users on a slower connection will have to wait a few milliseconds more to see the page.

These scripts and stylesheets are referred to as render-blocking JavaScript and CSS.

Website owners who are trying to achieve the Google PageSpeed score of 100 will need to fix this issue to attain that perfect score.

What is Google PageSpeed Score?

Google PageSpeed Insights is an online tool created by Google to help website owners optimize and test their websites. This tool tests your website against Google’s guidelines for speed and offers suggestions to improve your site’s page load time.

It shows you a score based on the number of rules that your site passes. Most websites get somewhere between 50-70. However, some website owners feel compelled to achieve 100 (the highest a page can score).

Do You Really Need the Perfect “100” Google PageSpeed Score?

The purpose of Google PageSpeed insights is to provide you guidelines to improve speed and performance of your website. You are not required to follow these rules strictly.

A better user experience requires a lot more than just speed. You also need to offer useful information, better user interface, and engaging content with text, images, and videos.

Your goal should be to create a fast website that offers great user experience.

We recently redesigned WPCademy, and we kept our focus on speed as well as improving user experience.

We recommend that you use Google Pagespeed rules as suggestions, and if you can implement them easily without ruining user experience, then that’s great. Otherwise, you should strive to do as much as you can and then don’t worry about the rest.

Having said that, let’s take a look at what you can do to fix render blocking JavaScript and CSS in WordPress.

We will cover two methods that will fix the render blocking JavaScript and CSS in WordPress. You can choose the one that works best for your website.

1. Fix Render Blocking Scripts and CSS with Autoptimize

This method is simpler and recommended for most users.

First thing you need to do is install and activate the Autoptimize plugin. For more details, see our step by step guide on how to install a WordPress plugin.

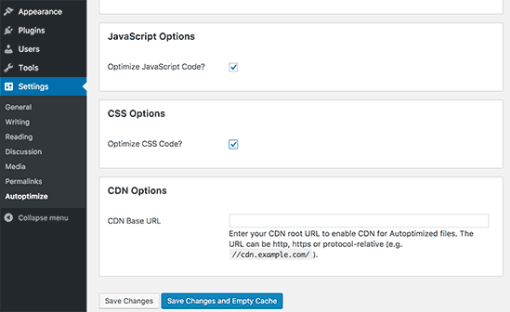
Upon activation, you need to visit the Settings » Autoptimize page to configure the plugin settings.
Fix Render-Blocking JavaScript and CSS in WP

You can start by checking the box next to JavaScript Options and CSS Options and then click on the save changes button.

You can now test your website using PageSpeed tool. If there are still render blocking scripts, then you need to come back to the plugin’s settings page and click on ‘Show Advanced Settings’ button at the top.
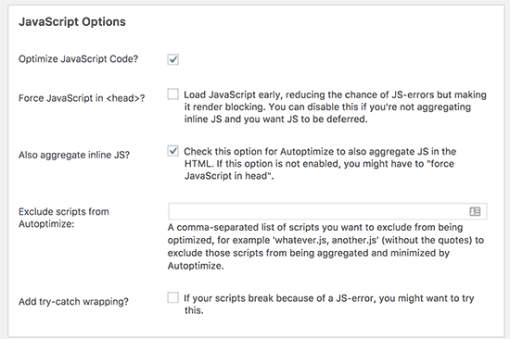
Here you can allow plugin to include inline JS and remove scripts that are excluded by default like seal.js or jquery.js.

Next, scroll down to CSS option and allow plugin to aggregate inline CSS.

Click on the ‘Save changes and Empty Cache’ button to save your changes and empty plugin cache.

Once you are done, go ahead and check your website again with the PageSpeed tool.

Make sure that you thoroughly test your website to see that nothing is broken by optimizing your JavaScripts or CSS.

How does it work?

Autoptimize aggregates all enqueued JavaScript and CSS. After that, it creates minified CSS and JavaScripts files and serves cached copies to your website as async or deferred.

This allows you to fix the render blocking scripts and styles issue. However, please keep in mind that it can also affect the performance or appearance of your website.

2. Fix Render Blocking JavaScript using W3 Total Cache

This method requires a little more work and is recommended for users already using W3 Total Cache plugin on their website.

First you will need to install and activate the W3 Total Cache plugin. If you need help, then see our guide on how to install and setup W3 Total Cache for Beginners.

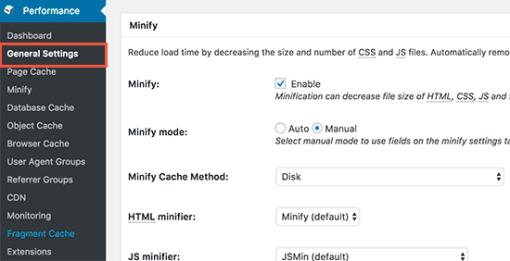
Next, you need to visit Performance » General Settings page and scroll down to Minify section.
Fix Render-Blocking JavaScript and CSS in WP

First you need to check ‘Enable’ next to Minify option and then select ‘Manual’ for minify mode option.

Click on the save all settings button to store your settings.

Next, you need to add the scripts and CSS that you want to minify.

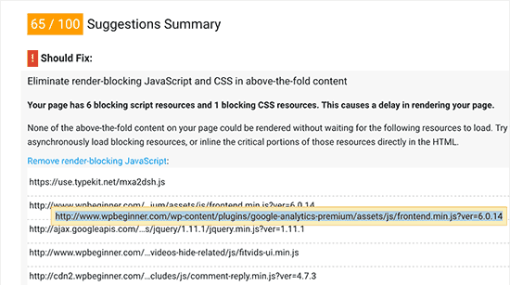
You can get the URLs of all the scripts and stylesheets that are render blocking from Google PageSpeed Insights tool.

Under the suggestions where it says: ‘Eliminate render-blocking JavaScript and CSS in above-the-fold content’, click on ‘Show how to fix’. It will show you the list of scripts and stylesheets.
Fix Render-Blocking JavaScript and CSS in WP

Take your mouse over to a script and it will show you the full URL. You can select this URL and then use your keyboard’s CTRL+C (Command+C on Mac) keys to copy the URL.

Now head over to your WordPress admin area and go to Performance » Minify page.

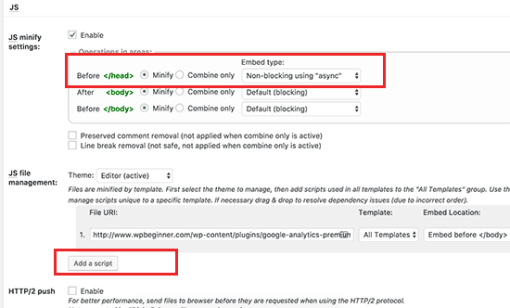
First you need to add JavaScript files that you want to be minified. Scroll down to JS section and then under the ‘Operations in areas’ set the embed type to ‘Non-blocking async’ for the <head> section.
Fix Render-Blocking JavaScript and CSS in WP

Next, you need to click on the ‘Add script’ button and then start adding script URLs that you copied from Google PageSpeed tool.

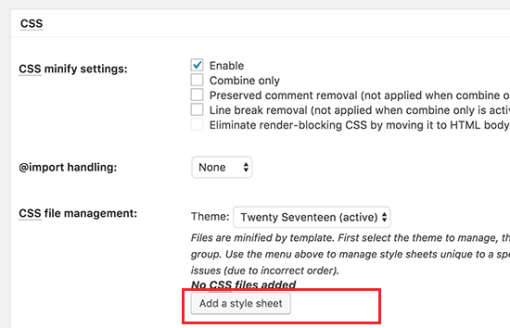
Once you are done, scroll down to CSS section and then click on the ‘Add a stylesheet’ button. Now start adding stylesheet URLs you copied from Google PageSpeed tool.
Fix Render-Blocking JavaScript and CSS in WP

Now click on the ‘Save settings and purge cache’ button to store your settings.

Visit the Google PageSpeed tool and test your website again.

Make sure that you also test your website thoroughly to see that everything is working fine.

Troubleshooting

Depending on how the plugins and your WordPress themes uses JavaScript and CSS, it could be quite challenging to completely fix all render blocking JavaScript and CSS issues.

While the above tools can help, your plugins may need certain scripts at a different priority level to work properly. In that case, the above solutions can break your plugins or they could behave unexpectedly.

Google may still show you certain issues like optimizing CSS delivery for above the fold content. Autoptimize allows you to fix that by manually adding inline CSS required to display the above fold area of your theme.

However, it could be quite difficult to find out what CSS code you will need to display above the fold content.

That’s all, we hope this tutorial helped you learn how to fix render blocking JavaScript and CSS in WordPress.

Easy Guide to Display Related Posts by Same Author in WordPress

In this tutorial, we will learn how to display related posts by same author in WordPress.
Method 1: Display Related Posts by Author in WordPress Using Plugin

This method is easier and is recommended for all users.

First thing you need to do is install and activate the Similar Posts plugin. For more details, see our step by step guide on how to install a WordPress plugin.

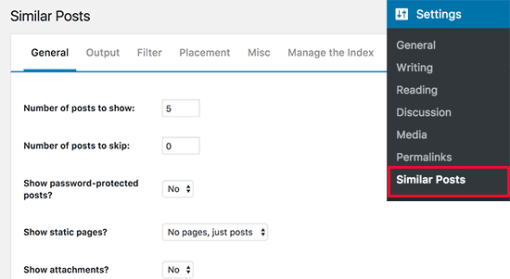
Upon activation, you need to visit Settings » Similar Posts page to configure plugin settings.

Related Posts by Same Author in WordPress

The settings page is divided into different tabs, and you will land on the General tab by default. You can review the options and change them to match your requirements.

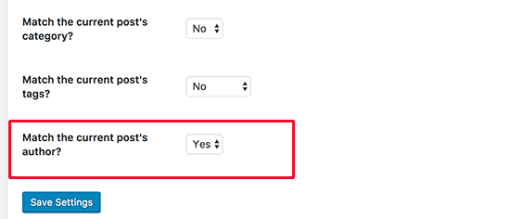
On this page, you need to scroll down to the bottom and select ‘Yes’ next to ‘Match the current post’s author’ option. You can uncheck other matching options to make sure that the plugin only fetches posts by author.

Related Posts by Same Author in WordPress

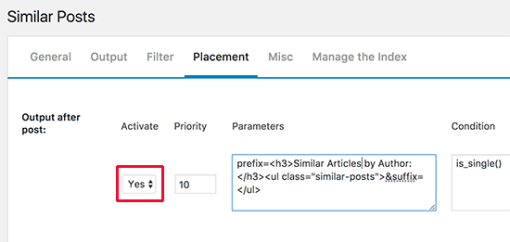
Next, you need to switch to the ‘Placement’ tab and activate ‘Output after post’ option. You can also edit output template by editing the text in the ‘Parameters’ box.

Related Posts by Same Author in WordPress

Don’t forget to click on the ‘Save Settings’ button to store your changes.

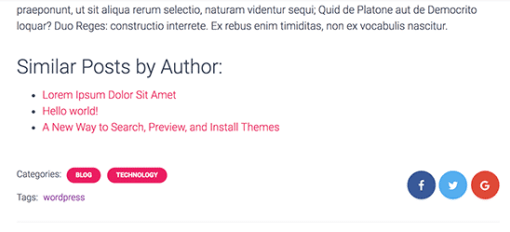
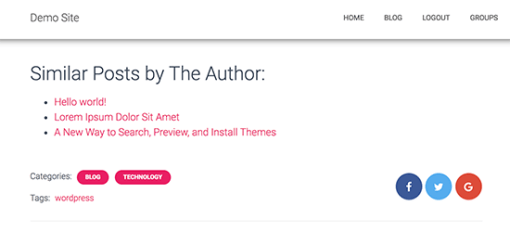
You can now visit any single post on your website, and you’ll see related posts by the same author after the post content.

Related Posts by Same Author in WordPress

Method 2: Manually Display Related Posts by Same Author in WordPress

This method requires you to add code to your WordPress theme files. If you haven’t done this before, then check out our guide on how to copy and paste code in WordPress.
You will need to add the following code to your theme’s functions.php file or in a site-specific plugin.

function wpb_related_author_posts($content) {
 
if ( is_single() ) { 
    global $authordata, $post;
     
    $content .= '

Similar Posts by The Author:

‘; $authors_posts = get_posts( array( ‘author’ => $authordata->ID, ‘post__not_in’ => array( $post->ID ), ‘posts_per_page’ => 5 ) ); $content .= ‘

‘; } $content .= ‘

‘; return $content; } else { return $content; } } add_filter(‘the_content’,’wpb_related_author_posts’);

You can now visit any single post on your website, and you’ll see related posts by the same author below the content.

Related Posts by Same Author in WordPress

We hope this tutorial helped you learn how to easily display related posts by same author in WordPress.

Easy Guide to Disable PDF Thumbnail Previews in WordPress

In this tutorial, we will learn how to easily disable PDF thumbnail previews in WordPress.
Why Disable PDF Thumbnail Previews in WordPress?

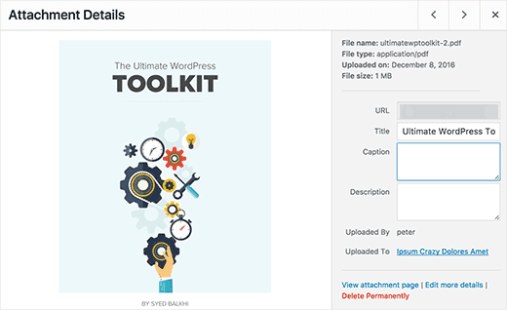
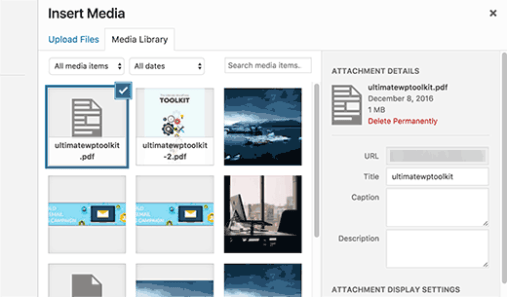
WordPress 4.7 started generating thumbnail previews of PDF files uploaded from WordPress media uploader.

Easy Guide to Disable PDF Thumbnail Previews

This is a very useful feature for most WordPress sites.

However, some site owners may already be using PDF plugins that handle thumbnail previews and the overall display of the PDF downloads on their website.

If the new feature is conflicting with their existing PDF uploads, then they may want to disable PDF thumbnail previews in WordPress.
Having said that, let’s take a look at how to easily disable PDF thumbnail previews in WordPress 4.7 and later versions.

Disable PDF Thumbnail Previews in WordPress

This tutorial requires you to add a simple code snippet on your WordPress site. If you haven’t done this before, then you may want to see our guide on pasting code snippets from web into WordPress.
You will need to add this code to your theme’s functions.php file or a site-specific plugin.

function wpb_disable_pdf_previews() { 
$fallbacksizes = array(); 
return $fallbacksizes; 
} 
add_filter('fallback_intermediate_image_sizes', 'wpb_disable_pdf_previews');

Don’t forget to save your changes.

This code simply gives WordPress an empty array for PDF thumbnail sizes and stops WordPress from generating thumbnail previews.

You can now try uploading a PDF file to your WordPress site using the media uploader. You will notice that WordPress will not generate any thumbnail previews for your PDF file.

Easy Guide to Disable PDF Thumbnail Previews in WP

We hope this tutorial helped you learn how to disable PDF thumbnail previews in WordPress.

Easy Guide to Sell Ads on Your WordPress Blog (Step by Step)

In this tutorial, we will show you how to sell adds on your WordPress blog and explain the different types of ad options available to you.

What Do You Need to Sell Ads on Your WordPress Blog?

First, you need to make sure you are using the right blogging platform. There are two types of WordPress blogs, WordPress.com which is a hosted blogging service and WordPress.org also called self-hosted WordPress. See the difference in our comparison of WordPress.com vs WordPress.org.
WordPress.com have their own WordAds program and only allows third-party ads if you sign up for the business plan.

On the other hand, you can run ads on your self-hosted WordPress.org website out of the box.

If you don’t yet have a WordPress.org website, then follow the instructions in our guide on how to start a WordPress blog, and you will be up and running in no time.

That being said, let’s take a look at what kind of ads you can sell on your WordPress blog.

Types of Ads You Can Sell on Your WordPress Blog

There are different types of ads that you can sell on your WordPress blog. One ad type may work better than the other depending on your website’s topic, audience, and overall traffic.

You can also choose to combine different ad types to create an effective monetization strategy for your blog.

1. CPC or Cost-Per-Click Ads

Cost-per-click ads are the most common type of ads displayed on the majority of websites. Ads are sold on a per-click basis which means you are only eligible to get paid when a user clicks on the ad.

The reason this ad type is so successful is that it works effectively for both publishers and advertisers. Advertisers get traffic to their websites which they can use to generate leads or increase sales. The publisher is able to get paid for sending traffic.

Advertising programs like Google AdSense allow you to easily sell cost per click ads on your website. Once you sign up with the Google AdSenseprogram, your website will become available to Google’s enormous network of advertisers.

For more details see our guide on how to properly add Google AdSense in WordPress.

One downside is that if you have low traffic, or your ads are not placed at strategic locations, then you may get a very low click-through rate for ads on your website. However, many website owners quickly overcome this by optimizing their ads in WordPress.
2. CPM or Cost-Per-Thousand-Impressions Ads

CPM (cost per mille) or cost-per-thousand-impression are ads that are sold based on how many times they are displayed. This means you get paid for displaying ads on your website whether users click on them or not.

CPM ads often fail to generate the same amount of revenue as you would generate with cost-per-click ads alone. However, they can be a significant source of income if you have a high traffic website, and you don’t want to place ads too close to your content.

Advertisers are particularly keen on buying CPM ads on websites with a high reputation among their target audiences.

3. Flat Fee Ads

Flat fee ads allow you to sell ad spots on your website for a specific time-period. You can price your ads based on how much traffic your website generates on an average.

This type of ads provide more impressions and clicks to advertisers and allow website owners to know exactly how much they will earn at the end of the period.

Advertisers usually purchase this type of ads on websites with higher traffic matching their target demographics. You can sell ads directly through your website by creating an ‘Advertise Here’ page. Alternatively, you can also join programs like BuySellAds or DoubleClick by Google.

4. Affiliate Ads

Affiliate ads can also be called action based ads. Basically, you send traffic to an advertiser’s website, but you only get paid if a user completes an action. This action could be anything like making a purchase, downloading software, creating an account, etc.

Affiliate programs provide you a unique URL with your referral ID. You can then use this URL to create banners, graphics, or add links directly in your articles.

The benefit of affiliate ads is that you get paid substantially higher than what you would get paid on a cost per click or cost per mille ad.

You can sign up for affiliate programs of different products and services that you want to promote. Each product, service, and affiliate program comes with its own commission rates, terms, and conditions.

For example, WPEngine’s affiliate program allows you to earn on each new sign up you send their way. Your commission will be based on the user’s entire first month payment or fixed $200 whichever is higher.

You can easily manage your affiliate links in WordPress using ThirstyAffiliates. You will also find plenty of tools and plugins to boost your affiliate marketing.

Setting up Banner Ads on Your Website

After looking at the different ad types you can come up with a monetization strategy that works for you. Don’t worry if you are still not sure which is the right choice for you.

Most website owners use multiple ad types and then prioritize them based on their earning potential.

Once you have chosen a monetization strategy, you are now ready to add banner ads to your website. WordPress has several really good ad management plugins that you can use.

We recommend using AdSanity, it is one of the most beginner-friendly ad management plugin for WordPress.

First thing you need to do is install and activate the AdSanity plugin. For more details, see our step by step guide on how to install a WordPress plugin.

Upon activation, simply go to Adsanity » Create Ad to create your first ad.

AdSanity allows you to create any kind of ad. You can create a self-hosted ad, local ad, or add the ad code provided by an ad program like Google AdSense.

If you are running a local ad, then you can upload a banner image and graphics. If it is a third-party ad, then you can go ahead and enter the ad code.

Under the publish meta box, you can also schedule the ad to run for a specific period or allow it to run indefinitely. Don’t forget to click on the publish or update button to save your changes.

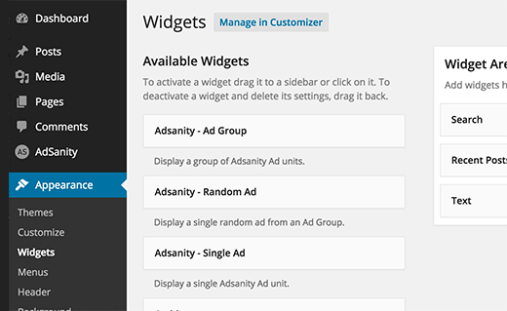
AdSanity allows you to display ads anywhere on your website using widgets and shortcodes. Simply go to Appearance » Widgets page and drag and drop the AdSanity single ad widget to a sidebar.


We hope this tutorial helped you learn how to sell ads on your WordPress blog.

Easy guide to Add Your WordPress Site in Yandex Webmaster Tools

Add your Wordpress in yandex

In this tutorial, we will share how to add your WordPress site in Yandex webmaster tools to monitor your search engine traffic.

What is Yandex?

Yandex is a popular search engine like Google and Bing based in Russia. You can optimize your site for SEO in Yandex to get more visitors from Russia.


Yandex has a range of tools like generalized search engine, image search, email, videos, maps and more. It also has webmaster tools to help you rank your site, monitor traffic stats, search queries, keywords, and more.

You can connect your WordPress site with Yandex using the Yoast SEO plugin. It works similar to Google search console and Bing Webmaster tools.

Adding WordPress Site in Yandex Webmaster Tools

Before we start, you would need a Yandex Webmaster tools account to connect your site. Once you have created your account, you can login to your WordPress site to configure Yandex webmaster tools with Yoast SEO plugin.

Let’s take a look on how you can add your site in Yandex webmaster tools and start optimizing it right away.

Step 1: Create an Account at Yandex

First thing you need to do is login to your Yandex webmaster tools account. If you don’t have a Yandex account, then you can create one using this link.

After creating the account, you’ll see the Yandex Webmaster page. On this page, you need to click on the ‘+‘ button in top bar to add your site in Yandex.

In the site address field, you need to add your website’s full domain name and click on the Add button.

Note: If your main domain uses ‘www’ in the URL, then you need to add it before the domain (for example www.wpcademy.com)

On the next page, you will be asked to verify website ownership by adding meta content in your WordPress site. Go ahead and copy the content code from this page because you will need it in Step 2.

Step 2: Login to WordPress Admin Area and Add the Code

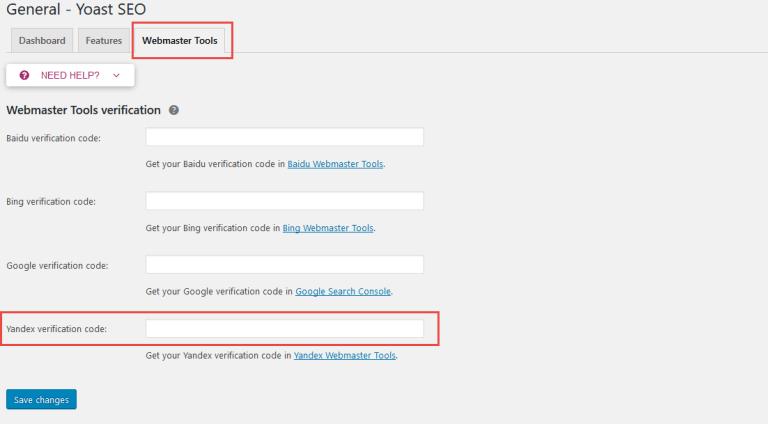
Now you need to login to your WordPress admin area and add the verification code in the Yoast SEO webmaster settings.

Simply head over to the SEO » General area and click on the Webmaster tools tab.

Next, you need to paste the code in the Yandex verification code field and click on the Save Changes button.

After adding the code in your WordPress site, you need to go back to the Yandex Webmaster tools page where you copied the code from and click on the Check button to verify ownership.

After successful verification, it will show your username that has the rights to manage your site in Yandex Webmaster tools. You can also delegate the rights to other users by adding their username and clicking on the Delegate rights button.

Now that your site is verified and added in Yandex Webmaster tools, you can see traffic stats, search errors, search queries, internal and external links, site information, robots.txt analysis, audit pages for mobile, and more on the Yandex dashboard. You can use the menu on left side of the screen to find any information that you may need.

Yandex Webmaster tools have options for site optimization that are filtered from troubleshooting to important settings like robots.txt and .htaccess. You can further optimize your robots.txt for SEO separately and regularly perform WordPress maintenance tasks to keep your site up to date.

Easy Guide to Convert WooCommerce Visitors into Customers

In this tutorial, we will show you how to easily convert WooCommerce visitors into customers like a pro.

Why I Need to Conversion Optimization for My WooCommerce Store

Most eCommerce stores rely on search engines or paid advertising campaigns for traffic. There are many other ways to get more traffic to your website.

However, more than 75% visitors who find your website through search engines will never find it again. Those who stick around, only a small percentage of them will add products to the cart.

In the end, more than 69% shopping carts are abandoned without making the purchase. Shipping costs, complicated checkout experience, and bad design are among the top reasons for abandoned carts.

Now, considering these statistics, your eCommerce website will continue losing potential customers if you don’t work on converting those visitors into customers.

How do I Convert Visitors into Customers?

The process and technique that are used to convert visitors into customers is called conversion rate optimization (CRO). Marketers and usability experts use CRO to successfully drive visitors to become a customer or a potential customer.

Basically, you remove obstacles that affect a user’s experience on your website. You also incentivize users to make a purchasing decision.

Lastly if a user must leave without making a purchase, then your goal is to try and get their information through lead generation. This allows you to communicate with them via email and offer personalized messages, special discounts, or new product announcements.

In early days of eCommerce, you would have needed programming skills to work on all these but not anymore. Now you have tools that make it extremely easy to do all these things without writing code or acquiring any new technical skills.

That being said let’s take a look at how to convert WooCommerce visitors into customers.

What You Need to Boost WooCommerce Conversions

First, you will need a WooCommerce store. If you don’t already have one, see our guide on how to create an online store.

This tutorial is about WooCommerce, so we will be using it in our screenshots. However, all these techniques would also work on any other eCommerce platform including Shopify.

We will be using the OptinMonster tool. It is the best conversion optimization software on the market and helps you easily convert WooCommerce visitors into customers.

OptinMonster is a paid service, and you will need at least their Pro plan to access all the features mentioned later in this article.

Ready? let’s begin.

Disclosure: We believe in full transparency. WPCademy founder, Syed Balkhi, is also the co-founder of OptinMonster. We only recommend tools that we personally use and believe will add value to our readers.

Installing and Setting up OptinMonster

After you have purchased OptinMonster, you will need to install the OptinMonster plugin. For more details, see our step by step guide on how to install a WordPress plugin.

This plugin is just a connector between your WooCommerce store and OptinMonster.

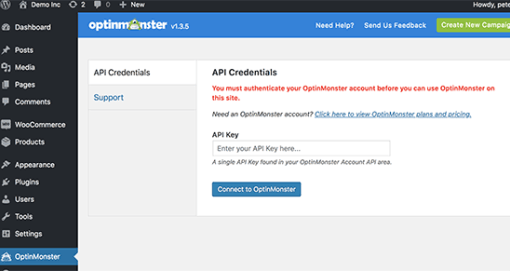
Upon activation, you need to click on the OptinMonster menu item in your WordPress admin sidebar. You will be asked to enter your license key. You can find this information under your account on OptinMonster website.

You have now successfully connected your WooCommerce store to OptinMonster, and you can now start optimizing your conversion rates.

Creating Your First WooCommerce Conversion Optimization Campaign

Let’s create your first WooCommerce conversion optimization campaign using OptinMonster. Our first campaign will reduce shopping cart abandonment ratewhile increasing conversions at the same time.

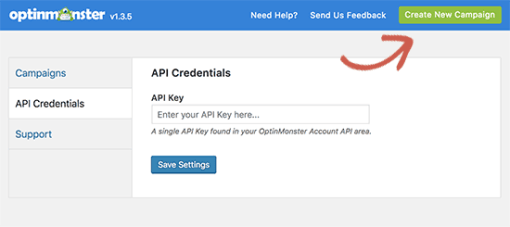
Visit the OptinMonster page in WordPress admin area and then click on ‘Create New Campaign’ button.

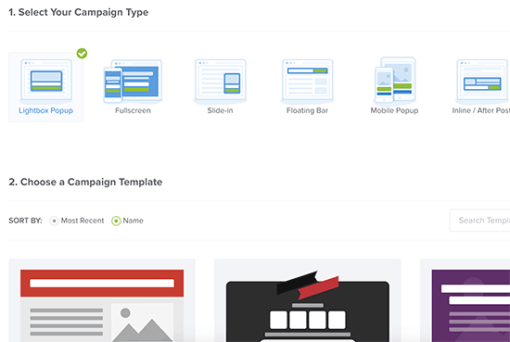
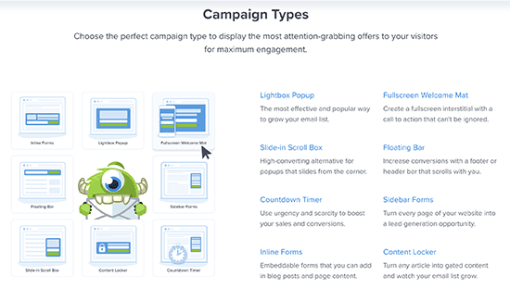
This will take you to the OptinMonster website where you will be asked to select a campaign type and a campaign template. For this tutorial, you need to select lightbox as your campaign type. We will be using the ‘Coupon’ template in this tutorial, but you can use any template that you like.

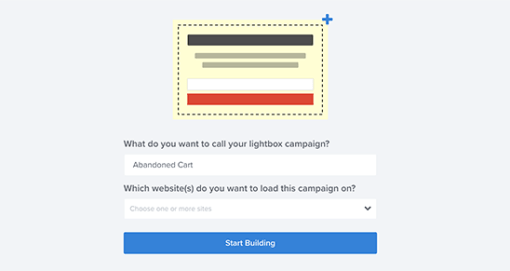
As soon as you select a template, you will be asked to provide a name for your campaign and enter the website address where you will be using it.

After entering this information, click on the ‘Start Building’ button to continue.

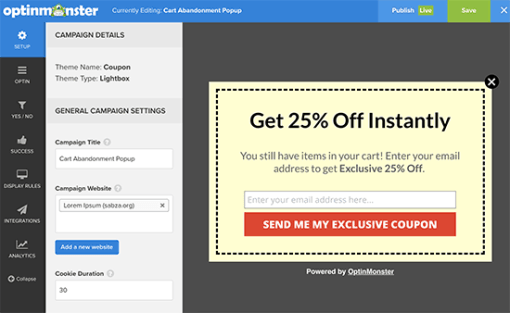
This will launch the OptinMonster builder interface with a live preview of your popup. You can simply point and click on any item to edit it.

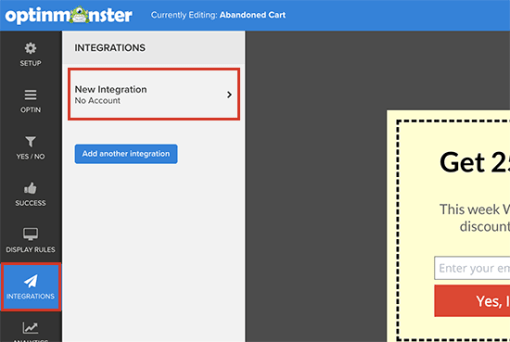
As you can see we are using a popup that collects user’s email address. You can connect OptinMonster to your favorite email service provider by clicking on the integrations tab.

From here you can add a new integration to connect with your email service by following the on-screen prompts.

Next, you need to choose which users will see the popup and when.

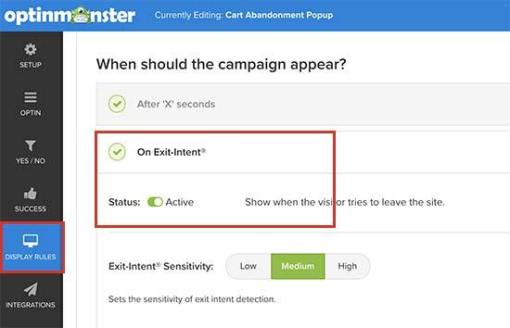
Click on the ‘Display Rules’ tab from the left menu, and OptinMonster will show you a list of default display rulesets that you can use.

First, click on the ‘Exit Intent’ ruleset to expand it, and then make sure it is active. Exit-Intent basically detects user’s behavior and prompt them with a message at the precise moment they’re about to leave.

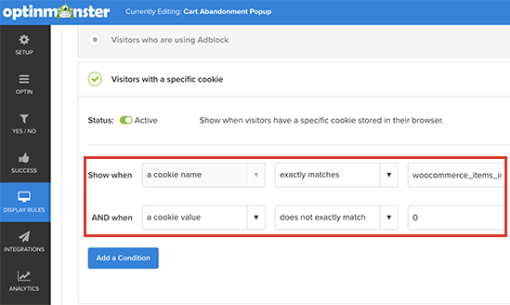
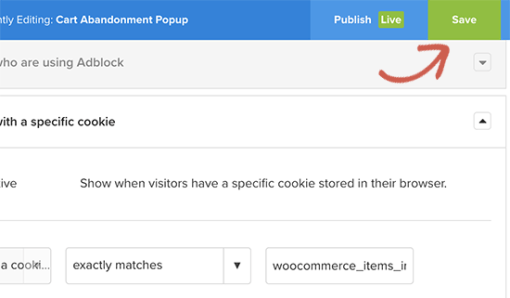
When a visitor adds a product to the cart, WooCommerce automatically sets a cookie ‘woocommerce_items_in_cart’ in their browser with the number of items in their cart.

We only want to show our popup to users who have products in their cart. To do that, scroll down a little and then click on ‘Select visitors with a specific cookie’ ruleset to expand it.

This ruleset allows you to trigger a campaign when a specific cookie is found. From here you need to switch the status toggle to ‘Active’.

First, option in this ruleset is to show when a cookie name is matched. After that, click on ‘Add a condition’ button and select ‘Cookie value’ does not exactly match 0.

Lastly, click on the save button at the top right corner of the screen to save your changes and then click on the publish button next to it.

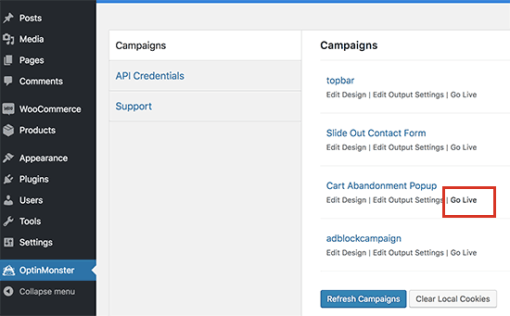
Your campaign is now ready to be served on your WooCommerce store. You just need to click on the ‘OptinMonster’ tab in your WordPress admin area and then click on ‘Campaigns’ tab.

You will see the campaign you just created listed there. If you don’t see your campaign, then click on the ‘Refresh campaigns’ button.

Next, you need to click on the ‘Go Live’ link below your campaign.

That’s all your lightbox popup is live now. To test it out, you will need to open a new browser window in the incognito mode and visit your store. Simply add a few products to your cart and then try to leave.

Congratulations! you have just set up your first conversion optimization campaign targeting users who are about to abandon their cart and leave without purchasing.

Other Campaign Ideas to Boost WooCommerce Conversions

OptinMonster is a powerful tool with tons of different campaign styles that you can use with a wide range of display rules. This allows you to target customers with highly effective messaging at the perfect time.

Here are some more campaign ideas that can help you boost WooCommerce conversions.

Using Multiple Campaign Types

OptinMonster comes with several campaign styles including lightbox popups, slide-in scroll box, floating bar, countdown timer, sidebar forms, in-line forms, and more.

You can maximize your WooCommerce conversion rates by using multiple campaign types. For example, you can target users leaving your website with an Exit-Intent ® popup while showing other campaigns throughout your store.

Page Level Targeting

OptinMonster allows you to display your campaigns on any page on your website. This page can be a product, product category, a blog post, homepage, or a landing page.

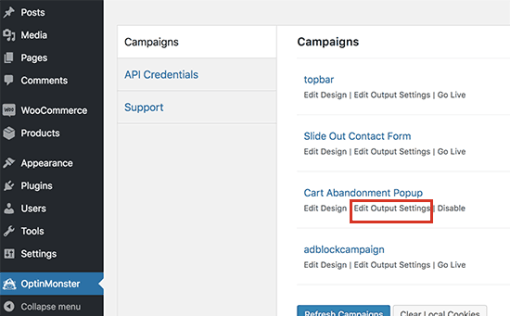
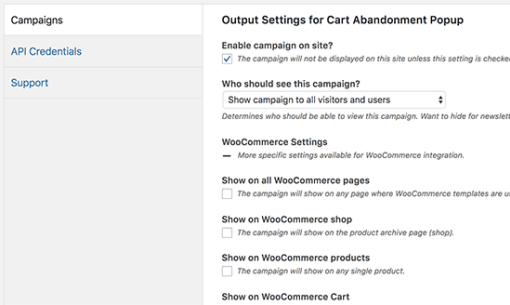
Simply go to OptinMonster page in your WordPress admin area and click on the ‘Edit output settings’ link below your campaign.

This will show you a variety of page level targeting options that you can use. It also includes WooCommerce specific targeting options.

Apart from these options, you also have display rulesets in the OptinMonster app which provide even more page level targeting options.

Peronalization and Behavioral Targeting

Personalization helps you improve user experience by making it more personal for each user. Behavioral targetting allows you to target your campaigns based on customer behavior.

For example, you can greet logged in customers with their name, show them products based on their browsing history, offer them discount or coupon.

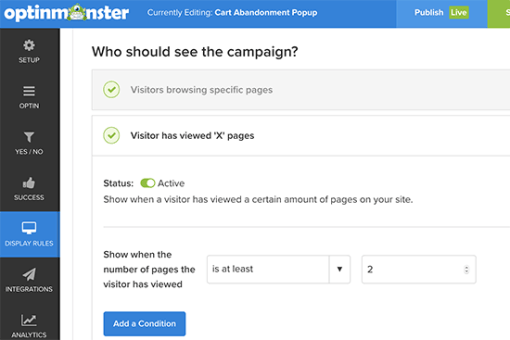
Edit your campaign in the OptinMonster app and click on the ‘Display Rules’ tab. Scroll down to the ‘Who should see the campaign’ section, and you will find a treasure of targeting options.

Click on any of these options to expand them. From here you can activate the ruleset and set it up.

Using FOMO to Increase WooCommerce Conversions

FOMO or ‘fear of missing out’ is a psychological term used to describe anxiety about missing out on something exciting and trendy.

As an eCommerce store owner, you can take advantage of this human behavior with your marketing strategy and improve your conversions.

OptinMonster comes with the countdown timer templates, floating bars, and coupon themes that you can use to build up FOMO in your marketing campaigns.

Combine it with behavioral targeting and customization to make your campaigns even more effective.

For more on this topic, see our article on how to use FOMO on your WordPress site to increase conversions or see these clever FOMO marketing examples from across the web.

We hope this article helped you learn how to convert WooCommerce visitors into customers.

Easy Guide to Fix the WordPress Failed to Open Stream Error

In this tutorial, we will show you how to easily fix the WordPress failed to open stream error.

Why Failed to Open Stream Error Occurs?

Before we try to fix the error, it would be helpful to understand what causes the ‘Failed to open stream’ error in WordPress.

This error occurs when WordPress is unable to load the file mentioned in website code. When this error occurs, sometimes WordPress will continue loading the site and only show a warning message, while other times WordPress will show a fatal error and will not load anything else.

The message phrasing will be different depending on where the error occurs in the code and the reason for failure. It will also give you clues about what needs to be fixed.

Typically, this message would look something like this:

Warning: require(/home/website/wp-includes/load.php): failed to open stream: No such file or directory in /home/website/wp-settings.php on line 19 
 
Fatal error: require(): Failed opening required ‘/home/website/wp-includes/load.php’ (include_path=’.:/usr/share/php/:/usr/share/php5/’) in /home/website/wp-settings.php on line 19

Here is another example:

Last Error: 2018-04-04 14:52:13: (2) HTTP Error: Unable to connect: ‘fopen(compress.zlib://https://www.googleapis.com/analytics/v3/management/accounts/~all/webproperties/~all/profiles?start-index=1): failed to open stream: operation failed’

Having said that, let’s take a look at how to troubleshoot and fix ‘failed to open stream’ error in WordPress.

Fixing Failed to Open Stream Error in WordPress

As we mentioned earlier, the error can be caused by a variety of reasons and the error message will be different depending on the cause and location of the file that’s causing the error.

In each instance, failed to open stream phrase would be followed by a reason. For example, permission denied, no such file or directory, operation failed, and more.

Now if your error message contains ‘no such file or directory’, then you need to look in the code to figure out which file is mentioned at that particular line.

If it is a plugin or theme file, then this means that the plugin or theme files were either deleted or not installed correctly. Simply deactivate and reinstall the theme / plugin in question to fix the error.

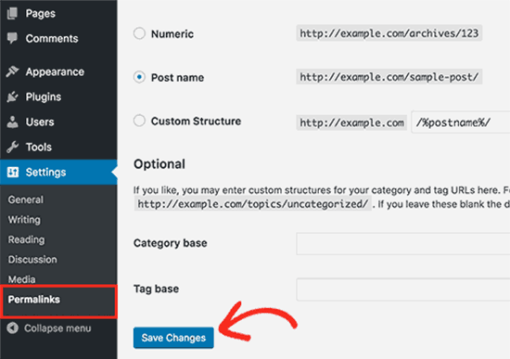
However, it is also possible that WordPress is unable to locate the files because of a missing .htaccess file in your root folder. In that case, you need to go to Settings » Permalinks page in your WordPress admin and just click on the ‘Save changes’ button to regenerate the .htaccess file.

If the error message is followed by ‘Permission denied’, then this means that WordPress does not have the right permission to access the file or directory referenced in the code.

To fix this, you need to check WordPress files and directory permissions and correct them if needed.

Lastly, some WordPress plugins load scripts from third-party sources like Google Analytics, Facebook APIs, Google Maps, and other third-party APIs.

Some of these APIs may require authentication or may have changed the way developers can access them. A failure to authenticate or incorrect access method will result in WordPress failing to open the required files.

To fix this, you will need to contact the plugin author for support. They will be able to help you fix the error.

If none of these tips help you resolve the issue, then follow the steps mentioned in our WordPress troubleshooting guide. This step by step guide will help you pinpoint the issue, so you can easily find the solution.

We hope this tutorial helped you fix the WordPress ‘failed to open stream’ error.