
VNC (Virtual Network Computing) server is a free and open source software which is designed for allowing remote access to the Desktop Environment of the server to the VNC Client whereas VNC viewer is used on remote computer to connect to the server. To use VNC you must have TCP/IP connection and VNC viewer client to connect to a computer running VNC server component. The server transmits a duplicate display of a remote computer to the viewer.
This article assumes you have at least basic knowledge of linux, know how to use the shell, and most importantly, you host your site on your own VPS. The installation is quite simple. I will show you through the step by step installation VNC server on CentOS 6.
Step 1. First, you need to update the system to ensure that we have all of the latest software installed.
yum update
Step 2. Install required packages.
yum groupinstall Desktop
yum install tigervnc-server
yum install xorg-x11-fonts-Type1
yum install vnc
Step 3. Enabling VNC Server service.
service vncserver start
chkconfig vncserver on
Step 4. Create VNC password for user.
vncpasswd
Step 5. Configure VNC server.
nano /etc/sysconfig/vncservers
Add the following to the end of the file:
VNCSERVERS="1:wpcademy"
VNCSERVERARGS[1]="-geometry 1024x600"
Step 6. Configure firewall rules to allow the VNC connection.
iptables -A INPUT -m state --state NEW -m tcp -p tcp --dport 5801  -j ACCEPT
iptables -A INPUT -m state --state NEW -m tcp -p tcp --dport 5901  -j ACCEPT
iptables -A INPUT -m state --state NEW -m tcp -p tcp --dport 6001  -j ACCEPT
service iptables save
service iptables restart
Step 7. Setting Gnome session VNC.
Restart VNC service.
service vncserver restart
Now kill the VNC Server:
vncserver -kill :1
Edit the xstartup file in .vnc directory:
nano .vnc/xstartup
Comment the last line and run the Gnome:
#twm &
exec gnome-session &
Restart the service:
service vncserver restart
Step 8.
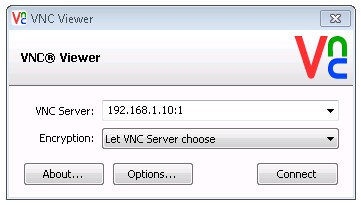
Now go to your Windows or Linux machine and download VNC Viewer client and install in your system to access the desktop. Now you can able to connect VNC server using IP and Port ( Eg : 192.168.1.10:1) and you will be asked to enter the password, enter the password that you have created earlier.

Congratulation’s! You have successfully installed VNC server. Thanks for using this tutorial for installing VNC server on CentOS 6 system.
You Might Also Like: How To Install VNC Server on CentOS 7