How To Install WordPress on Ubuntu 16.04

Install WordPress on Ubuntu 16

WordPress is an online, open source website creation tool written in PHP. But in non-geek speak, it’s probably the easiest and most powerful blogging and website content management system (or CMS) in existence today.

This article assumes you have at least basic knowledge of linux, know how to use the shell, and most importantly, you host your site on your own VPS. The installation is quite simple and assumes you are running in the root account, if not you may need to add ‘sudo’ to the commands to get root privileges. I will show you through the step by step installation WordPress content management systems on a Ubuntu 16.04 server.

Install WordPress on Ubuntu 16.04

Step 1. First make sure that all your system packages are up-to-date by running these following apt-get commands in the terminal.

sudo apt-get update
sudo apt-get upgrade

Step 2. Install LAMP (Linux, Apache, MariaDB, PHP) server.

A Ubuntu 16.04 LAMP server is required. If you do not have LAMP installed, you can follow our guide here. Also install all required PHP modules:

apt-get install php7.0-mysql php7.0-curl php7.0-json php7.0-cgi php7.0 libapache2-mod-php7.0 php7.0-mcrypt php7.0-xmlrpc php7.0-gd

Step 3. Installing WordPress.

First thing to do is to go to WordPress’s download page and download the latest stable version of WordPress, At the moment of writing this article it is version 4.5.1:

wget http://wordpress.org/latest.zip

Unpack the WordPress archive to the document root directory on your server:

unzip -q latest.zip -d /var/www/html/
cd wordpress
cp -a * ..

We will need to change some folders permissions:

chown www-data:www-data -R /var/www/html/

We need to create the upload directory manually:

mkdir -p /var/www/html/wp-content/uploads

Allow the Apache web server to write to the uploads directory. Do this by assigning group ownership of this directory to your web server which will allow Apache to create files and directories. Issue the following command:

chown www-data:www-data -R /var/www/html/wp-content/uploads

Step 4. Configuring MariaDB for WordPress.

By default, MariaDB is not hardened. You can secure MariaDB using the mysql_secure_installation script. you should read and below each steps carefully which will set root password, remove anonymous users, disallow remote root login, and remove the test database and access to secure MariaDB:

mysql_secure_installation

Configure it like this:

- Set root password? [Y/n] y
- Remove anonymous users? [Y/n] y
- Disallow root login remotely? [Y/n] y
- Remove test database and access to it? [Y/n] y
- Reload privilege tables now? [Y/n] y

Next we will need to log in to the MariaDB console and create a database for the WordPress. Run the following command:

mysql -u root -p

This will prompt you for a password, so enter your MariaDB root password and hit Enter. Once you are logged in to your database server you need to create a database for WordPress installation:

CREATE DATABASE wordpress character set utf8 collate utf8_bin;
GRANT ALL PRIVILEGES on wordpress.* to 'wpuser'@'localhost' identified by 'your_password';
FLUSH PRIVILEGES;
exit

Step 5. Configuring WordPress

In this step we will configure the main configuration file of WordPress, where we need to configure it’s basic parameters so that it can be connected with the database and user:

mv wp-config-sample.php wp-config.php

Now open it using any of your favourite editor, to make any changes in the WordPress configuration file:

nano wp-config.php

Here are the values that we need to update according to our previous database and user’s setup:

// ** MySQL settings - You can get this info from your web host ** //
/** The name of the database for WordPress */
define('DB_NAME', 'wordpress');

/** MySQL database username */
define('DB_USER', 'wpuser');

/** MySQL database password */
define('DB_PASSWORD', 'your_password');

/** MySQL hostname */
define('DB_HOST', 'localhost');

Step 6. Configuring Apache web server for WordPress.

Create a new virtual host directive in Apache. For example, create a new Apache configuration file named ‘wordpress.conf’ on your virtual server:

sudo a2enmod rewrite
touch /etc/apache2/sites-available/wordpress.conf
ln -s /etc/apache2/sites-available/wordpress.conf /etc/apache2/sites-enabled/wordpress.conf
nano /etc/apache2/sites-available/wordpress.conf

Add the following lines:

ServerAdmin [email protected]
DocumentRoot /var/www/html/
ServerName your-domain.com
ServerAlias www.your-domain.com

Options FollowSymLinks
AllowOverride All
Order allow,deny
allow from all

ErrorLog /var/log/apache2/your-domain.com-error_log
CustomLog /var/log/apache2/your-domain.com-access_log common

Now, we can restart Apache web server so that the changes take place:

systemctl restart apache2.service

Step 7. Accessing WordPress.

WordPress will be available on HTTP port 80 by default. Open your favorite browser and navigate to http://yourdomain.com or http://server-ip/ and complete the required the steps to finish the installation. If you are using a firewall, please open port 80 to enable access to the control panel.

Congratulation’s! You have successfully installed WordPress. Thanks for using this tutorial for installing WordPress CMS (Content Management Systems) on your Ubuntu 16.04 system. For additional help or useful information, we recommend you to check the official WordPress web site.

How To Install Prosper202 on Ubuntu 16.04

Install Prosper202 on Ubuntu 16

Prosper202 is a free tracking software which can be used to do advance tracking. The best part about this software is that it is a self-hosted software which helps us to track and run campaigns.

This article assumes you have at least basic knowledge of linux, know how to use the shell, and most importantly, you host your site on your own VPS. The installation is quite simple and assumes you are running in the root account, if not you may need to add ‘sudo’ to the commands to get root privileges. I will show you through the step by step installation Prosper202 on a Ubuntu 16.04 server.

Install Prosper202 on Ubuntu 16.04

Step 1. First make sure that all your system packages are up-to-date by running these following apt-get commands in the terminal.

sudo apt-get update
sudo apt-get upgrade

Step 2. Install LAMP (Linux, Apache, MariaDB, PHP) server.

A Ubuntu 16.04 LAMP server is required. If you do not have LAMP installed, you can follow our guide here. Also install all required PHP modules:

sudo apt-get install php5 libapache2-mod-php5 php5-xmlrpc php5-mysql php5-curl php5-gd

Step 3. Installing Prosper202.

First thing to do is to go to Prosper202’s download page and download the latest stable version of Prosper202, At the moment of writing this article it is version 1.9.30:

mkdir /var/www/prosper202
cd /var/www/prosper202/
wget http://my.tracking202.com/clickserver/download/latest && unzip latest

We will need to change some folders permissions:

chown www-data:www-data -R /var/www/prosper202

Step 4. Configuring MariaDB for Prosper202.

By default, MariaDB is not hardened. You can secure MariaDB using the mysql_secure_installation script. you should read and below each steps carefully which will set root password, remove anonymous users, disallow remote root login, and remove the test database and access to secure MariaDB:

mysql_secure_installation

Configure it like this:

- Set root password? [Y/n] y
- Remove anonymous users? [Y/n] y
- Disallow root login remotely? [Y/n] y
- Remove test database and access to it? [Y/n] y
- Reload privilege tables now? [Y/n] y

Next we will need to log in to the MariaDB console and create a database for the Prosper202. Run the following command:

mysql -u root -p

This will prompt you for a password, so enter your MariaDB root password and hit Enter. Once you are logged in to your database server you need to create a database for Prosper202 installation:

CREATE DATABASE prosper202DB;
GRANT ALL PRIVILEGES ON prosper202DB.* TO 'prosper202'@'localhost' IDENTIFIED BY 'YoUrPaSsWoRd';
FLUSH PRIVILEGES;
\q

Step 5. Configuring Apache web server for WordPress.

Create a new virtual host directive in Apache. For example, create a new Apache configuration file named ‘wordpress.conf’ on your virtual server:

sudo a2enmod rewrite
touch /etc/apache2/sites-available/prosper.conf
ln -s /etc/apache2/sites-available/prosper.conf /etc/apache2/sites-enabled/prosper.conf
nano /etc/apache2/sites-available/prosper.conf

Add the following lines:

ServerAdmin [email protected]
DocumentRoot /var/www/prosper202/
ServerName your-domain.com
ServerAlias www.your-domain.com

Options FollowSymLinks
AllowOverride All
Order allow,deny
allow from all

ErrorLog /var/log/apache2/your-domain.com-error_log
CustomLog /var/log/apache2/your-domain.com-access_log common

Now, we can restart Apache web server so that the changes take place:

systemctl restart apache2.service

Step 6. Accessing Prosper202.

Prosper202 will be available on HTTP port 80 by default. Open your favorite browser and navigate to http://yourdomain.com or http://server-ip/ and complete the required the steps to finish the installation. If you are using a firewall, please open port 80 to enable access to the control panel.

Congratulation’s! You have successfully installed Prosper202. Thanks for using this tutorial for installing Prosper202 on your Ubuntu 16.04 system. For additional help or useful information, we recommend you to check the official Prosper202 web site.

How To Install Drupal on Ubuntu 16.04

Install Drupal on Ubuntu 16

Drupal is an open-source and one of the most popular PHP based content Management System (CMS) platform for building personal blogs or big corporate websites. It has thousands of templates and plugins that are mostly free to download and install. Due to the stability of the base, the adaptability of the platform, and its active community, Drupal remains a popular choice after more than a decade on the scene.

This article assumes you have at least basic knowledge of linux, know how to use the shell, and most importantly, you host your site on your own VPS. The installation is quite simple and assumes you are running in the root account, if not you may need to add ‘sudo’ to the commands to get root privileges. I will show you through the step by step installation Drupal on a Ubuntu 16.04 LTS (Xenial Xerus) server.

Install Drupal on Ubuntu 16.04

Step 1. First make sure that all your system packages are up-to-date by running these following apt-get commands in the terminal.

sudo apt-get update
sudo apt-get upgrade

Step 2. Install LAMP (Linux, Apache, MariaDB, PHP) server.

A Ubuntu 16.04 LAMP server is required. If you do not have LAMP installed, you can follow our guide here. Also install all required PHP modules:

apt-get install php5 php5-mysql php5-gd php5-curl libssh2-php

Step 3. Installing Drupal.

First thing to do is to go to Drupal’s download page and download the latest stable version of Drupal, At the moment of writing this article it is version 8.1.1:

wget https://ftp.drupal.org/files/projects/drupal-8.1.1.zip

Unpack the Drupal archive to the document root directory in your server:

unzip drupal*.zip
cp -rf drupal*/* /var/www/html/

1

We will need to change some folders permissions:

chown www-data:www-data -R /var/www/html/
chmod -R 755 /var/www/html/

Step 4. Configuring MariaDB for Drupal.

By default, MariaDB is not hardened. You can secure MariaDB using the mysql_secure_installation script. you should read and below each steps carefully which will set root password, remove anonymous users, disallow remote root login, and remove the test database and access to secure MariaDB:

mysql_secure_installation

Configure it like this:

- Set root password? [Y/n] y
- Remove anonymous users? [Y/n] y
- Disallow root login remotely? [Y/n] y
- Remove test database and access to it? [Y/n] y
- Reload privilege tables now? [Y/n] y

Next we will need to log in to the MariaDB console and create a database for the Drupal. Run the following command:

mysql -u root -p

This will prompt you for a password, so enter your MariaDB root password and hit Enter. Once you are logged in to your database server you need to create a database for Drupal installation:

create database drupal;
grant all privileges on drupal.* to drupaluser@localhost identified by 'your_password';
flush privileges;
exit

Step 5. Configuring Apache web server for Drupal.

Create a new virtual host directive in Apache. For example, create a new Apache configuration file named ‘drupal.conf’ on your virtual server:

sudo a2enmod rewrite
touch /etc/apache2/sites-available/drupal.conf
ln -s /etc/apache2/sites-available/drupal.conf /etc/apache2/sites-enabled/drupal.conf
nano /etc/apache2/sites-available/drupal.conf

Add the following lines:

ServerAdmin [email protected]
DocumentRoot /var/www/html/
ServerName your-domain.com
ServerAlias www.your-domain.com

Options FollowSymLinks
AllowOverride All
Order allow,deny
allow from all

ErrorLog /var/log/apache2/your-domain.com-error_log
CustomLog /var/log/apache2/your-domain.com-access_log common

Now, we can restart Apache web server so that the changes take place:

systemctl restart apache2.service

Step 6. Accessing Drupal.

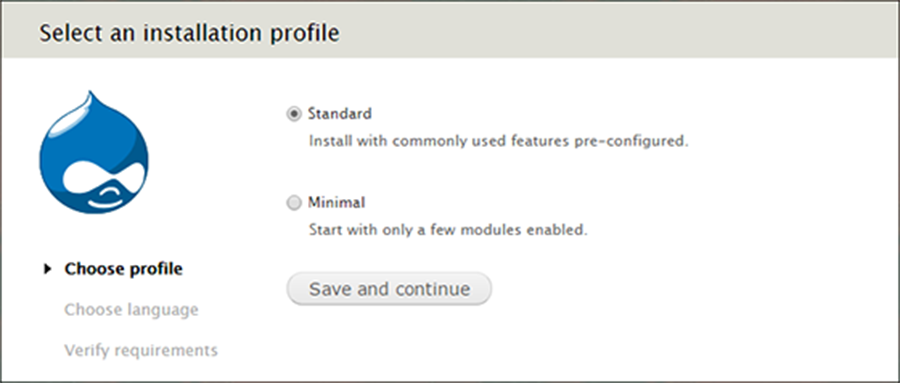
Drupal will be available on HTTP port 80 by default. Open your favorite browser and navigate to http://yourdomain.com or http://server-ip and complete the required the steps to finish the installation. Remember that you’ll need the database name, username and password you created earlier to connect. If you are using a firewall, please open port 80 to enable access to the control panel.
install-drupal
Congratulation’s! You have successfully installed Drupal. Thanks for using this tutorial for installing Drupal content management system (CMS) on Ubuntu 16.04 LTS (Xenial Xerus) system. For additional help or useful information, we recommend you to check the official Drupal web site.

You Might Also Like: How To Install WordPress on Ubuntu 16.04

How To Install PrestaShop on Ubuntu 16.04

Install PrestaShop on Ubuntu 16

PrestaShop is an open-source e-commerce solution which allows you to maintain your own online shop. It PrestaShop is 100% free. This software is published under the Open Software License (OSL). It is written in PHP programming language with support for the MySQL database management system. More than 250,000 ecommerce sites run on PrestaShop. It supports many different payment gateway systems like PayPal, Google Checkout etc etc. Continue reading “How To Install PrestaShop on Ubuntu 16.04”