LetsEncrypt is a free open certificate authority (CA) that provides free certificates for websites and other services. The service, which is backed by the Electronic Frontier Foundation, Mozilla, Cisco Systems, and Akamai. Unfortunately, LetsEncrypt.org certificates currently have a 3 month lifetime. This means you’ll need to renew your certificate quarterly for now.
Prerequisites
This article assumes you have at least basic knowledge of linux, know how to use the shell, and most importantly, you host your site on your own VPS. The installation is quite simple and assumes you are running in the root account, if not you may need to add ‘sudo’ to the commands to get root privileges. I will show you through the step by step installation Let’s Encrypt SSL with Nginx on a CentOS 7 server.
Install Let’s Encrypt SSL With Nginx on CentOS 7
Step 1. First let’s start by ensuring your system is up-to-date.
yum clean all
yum -y update
Step 2. Installing Let’s Encrypt SSL on CentOS 7.

In CentOS 7, you can find Certbot on the EPEL repository; if you enable it, just install what you need:
yum install epel-release
yum install certbot
You will also need to have nginx installed and running. Of course, if you are adding certificates onto a previously configured web host this would already be installed:
yum install nginx
systemctl start nginx
The first step to install let’s encrypt ssl on CentOS Linux is to add a simple configuration inside your nginx virtual host configuration. Add this line to your vhost configuration:
location ~ /.well-known {
allow all;
}
Save and exit to apply changes:
nginx -t
systemctl restart nginx
Obtaining a certificate with Certbot:
Run the command as you see below, replace “wpcademy.com” with your real domain name and /var/www/wpcademy.com with your real webroot path:
certbot certonly -a webroot --webroot-path=/var/www/wpcademy.com -d wpcademy.com -d www.wpcademy.com
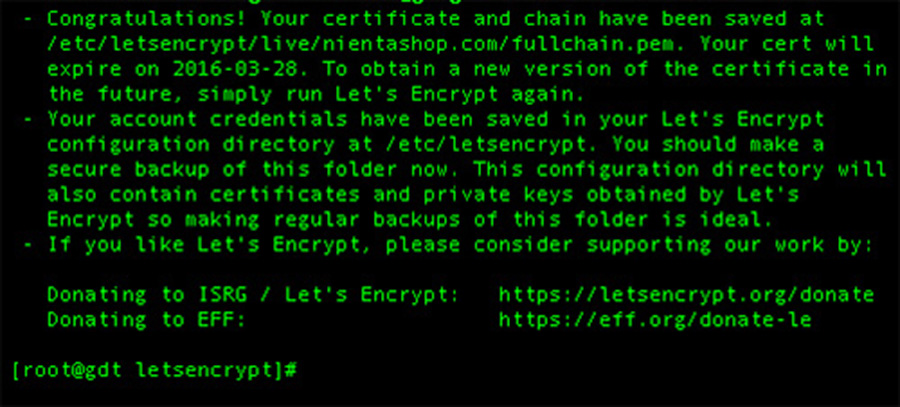
Result:
[[email protected]:~]certbot certonly -a webroot --webroot-path=/var/www/wpcademy.com -d wpcademy.com -d www.wpcademy.com
Saving debug log to /var/log/letsencrypt/letsencrypt.log
Obtaining a new certificate
Performing the following challenges:
http-01 challenge for wpcademy.com
Using the webroot path /var/www/html for all unmatched domains.
Waiting for verification...
Cleaning up challenges
Generating key (2048 bits): /etc/letsencrypt/keys/0001_key-certbot.pem
Creating CSR: /etc/letsencrypt/csr/0001_csr-certbot.pem
IMPORTANT NOTES:
- Congratulations! Your certificate and chain have been saved at
/etc/letsencrypt/live/idroot.us/fullchain.pem. Your cert
will expire on 2017-07-16. To obtain a new or tweaked version of
this certificate in the future, simply run certbot again. To
non-interactively renew *all* of your certificates, run "certbot
renew"
- If you like Certbot, please consider supporting our work by:

Donating to ISRG / Let's Encrypt: https://letsencrypt.org/donate
Donating to EFF: https://eff.org/donate-le
[[email protected]:~]
Step 3. Configure Let’s Encrypt TLS/SSL on Nginx Web Server.
First, edit the Virtual Host file you specified during configuration through Certbot and add this three directives:
listen 443 ssl http2;
ssl_certificate /etc/letsencrypt/live/idroot.us/fullchain.pem;
ssl_certificate_key /etc/letsencrypt/live/idroot.us/privkey.pem;
The full nginx vhost configuration may look like this:
server {
listen 80;
server_name wpcademy.com www.wpcademy.com;
rewrite ^(.*) https://wpcademy.com$1 permanent;
}

server {
access_log off;
log_not_found off;
error_log logs/idroot.us-error_log warn;

server_name wpcademy.com;
root /var/www/wpcademy.com;
index index.php index.html index.htm;

listen 443 ssl http2;
ssl_certificate /etc/letsencrypt/live/wpcademy.com/fullchain.pem;
ssl_certificate_key /etc/letsencrypt/live/wpcademy.com/privkey.pem;

## Stuff required by certbot
location ~ /.well-known {
allow all;
}

## SSL
ssl_session_cache shared:SSL:20m;
ssl_session_timeout 10m;

ssl_prefer_server_ciphers On;
ssl_protocols TLSv1 TLSv1.1 TLSv1.2;
ssl_ciphers ECDH+AESGCM:DH+AESGCM:ECDH+AES256:DH+AES256:ECDH+AES128:DH+AES:ECDH+3DES:DH+3DES:RSA+AESGCM:RSA+AES:RSA+3DES:!aNULL:!MD5:!DSS;

ssl_stapling on;
ssl_stapling_verify on;
resolver 8.8.8.8 8.8.4.4 valid=300s;
resolver_timeout 10s;

access_log /var/www/wpcademy.com/logs/access.log;
error_log /var/www/wpcademy.com/logs/error.log;

# php-script handler
location ~ \.php$ {
fastcgi_index index.php;
fastcgi_pass 127.0.0.1:9000; fastcgi_read_timeout 150;
root /var/www/wpcademy.com/public_html;
fastcgi_param SCRIPT_FILENAME /var/www/idroot.us$fastcgi_script_name;
include /etc/nginx/fastcgi_params;
}
location ~ /\.ht {
deny all;
}
}
Step 5. Set Up Let’s Encrypt SSL Auto Renewal.
We will add a cronjob to run the renewal command every week, run this command:
export VISUAL=nano; crontab -e
Paste the following lines:
01 1 * * 0 /usr/bin/certbot renew >> /var/log/ssl-renew.log
06 1 * * 0 /usr/bin/systemctl nginx reload
Save and Exit from the crontab table.
This will create a new cronjob that will be executed every Sunday at 01 AM, and then it will reload Nginx web server to apply the changes. The output will be logged into /var/log/ssl-renew.log file for further analysis if needed.
Congratulation’s! You have successfully installed Let’s Encrypt. Thanks for using this tutorial for installing Let’s Encrypt SSL on CentOS 7 system. For additional help or useful information, we recommend you to check the official Let’s Encrypt web site.