How To Install OpenCart v3.0.3.2 on Ubuntu 18.04 LTS

Install OpenCart on Ubuntu 18

OpenCart is a free open source ecommerce platform for online merchants. OpenCart provides a professional and reliable foundation from which to build a successful online store. In this tutorial we will learn you how to install OpenCart on Ubuntu 18.04 LTS.

This article assumes you have at least basic knowledge of Linux, know how to use the shell, and most importantly, you host your site on your own VPS. The installation is quite simple and assumes you are running in the root account, if not you may need to add ‘sudo’ to the commands to get root privileges. I will show you through the step by step installation OpenCart on a Ubuntu 18.04 (Bionic Beaver) server.

Install OpenCart on Ubuntu 18.04 LTS

Step 1. First make sure that all your system packages are up-to-date

sudo apt update
sudo apt upgrade

Step 2. Install LAMP (Linux, Apache, MariaDB and PHP) server.

A Ubuntu 18.04 LAMP server is required. If you do not have LAMP installed, you can follow our guide here. Also install all required PHP modules:

apt-get install php7.1-cli php7.1-mbstring php7.1-gd php7.1-opcache php7.1-mysql php7.1-json php7.1-mcrypt php7.1-xml php7.1-curl

Step 3. Download OpenCart

First thing to do is to go to OpenCart’s download page and download the latest stable version of OpenCart:

sudo mkdir -p /var/www/html/example.com
cd /tmp
wget https://github.com/opencart/opencart/releases/download/3.0.3.1/opencart-3.0.3.1.zip
unzip opencart-*.zip
sudo mv /tmp/upload/* /var/www/html/example.com/

Next, copy the configurations files:

sudo cp /var/www/html/example.com/{config-dist.php,config.php}
sudo cp /var/www/html/example.com/admin/{config-dist.php,config.php}

We will need to change some folders permissions:

sudo chown -R www-data: /var/www/html

Step 4. Configuring MariaDB for OpenCart.

By default, MariaDB is not hardened. You can secure MariaDB using the mysql_secure_installation script. You should read and below each steps carefully which will set root password, remove anonymous users, disallow remote root login, and remove the test database and access to secure MariaDB.

mysql_secure_installation

Configure it like this:

- Set root password? [Y/n] y
- Remove anonymous users? [Y/n] y
- Disallow root login remotely? [Y/n] y
- Remove test database and access to it? [Y/n] y
- Reload privilege tables now? [Y/n] y

Next we will need to log in to the MariaDB console and create a database for the OpenCart. Run the following command:

mysql -u root -p

This will prompt you for a password, so enter your MariaDB root password and hit Enter. Once you are logged in to your database server you need to create a database for OpenCart installation:

MariaDB [(none)]> CREATE DATABASE opencart;
MariaDB [(none)]> GRANT ALL PRIVILEGES ON opencart.* TO 'opencartuser'@'localhost' IDENTIFIED BY 'opencartuser_passwd';
MariaDB [(none)]> FLUSH PRIVILEGES;
MariaDB [(none)]> \q

Step 5. Configuring Apache web server for OpenCart.

Create a new virtual host directive in Apache. For example, create a new Apache configuration file named ‘opencart.conf’ on your virtual server:
[/php]
touch /etc/apache2/sites-available/opencart.conf
ln -s /etc/apache2/sites-available/opencart.conf /etc/apache2/sites-enabled/opencart.conf
nano /etc/apache2/sites-available/opencart.conf
[/php]

Add the following lines:

<VirtualHost *:80>
ServerAdmin [email protected]
DocumentRoot /var/www/html/example.com
ServerName your-domain.com
ServerAlias www.your-domain.com
<Directory /var/www/html/example.com/>
Options FollowSymLinks
AllowOverride All
</Directory>
ErrorLog /var/log/apache2/your-domain.com-error_log
CustomLog /var/log/apache2/your-domain.com-access_log common

Save and close the file. Restart the apache service for the changes to take effects:

sudo a2ensite magento.conf
sudo a2enmod rewrite
sudo systemctl restart apache2

Step 6. Accessing OpenCart.

OpenCart will be available on HTTP port 80 by default. Open your favorite browser and navigate to http://your-domain.com/ or http://server-ip and complete the required the steps to finish the installation. If you are using a firewall, please open port 80 to enable access to the control panel.

Congratulation’s! You have successfully installed OpenCart. Thanks for using this tutorial for installing OpenCart e-commerce on Ubuntu 18.04 systems. For additional help or useful information, we recommend you to check the official OpenCart website.

How To Install Let’s Encrypt SSL on Ubuntu With Apache

Install Let’s Encrypt SSL on Ubuntu With Apache

LetsEncrypt is a free open certificate authority (CA) that provides free certificates for websites and other services. The service, which is backed by the Electronic Frontier Foundation, Mozilla, Cisco Systems, and Akamai. Unfortunately, LetsEncrypt.org certificates currently have a 3 month lifetime. This means you’ll need to renew your certificate quarterly for now.

This article assumes you have at least basic knowledge of linux, know how to use the shell, and most importantly, you host your site on your own VPS. The installation is quite simple and assumes you are running in the root account, if not you may need to add ‘sudo’ to the commands to get root privileges. I will show you through the step by step installation Let’s Encrypt SSL on a Ubuntu 16.04 LTS (Xenial Xerus) server.

Install Let’s Encrypt SSL on Ubuntu With Apache

Step 1. First make sure that all your system packages are up-to-date by running these following apt-get commands in the terminal.

apt-get update
apt-get upgrade
apt-get install git

Step 2. Install LAMP (Linux, Apache, MariaDB, PHP) server.

A Ubuntu 16.04 LAMP server is required. If you do not have LAMP installed, you can follow our guide here.

Step 3. Installing Let’s Encrypt SSL.

Next, run the commands below to clone Let’s Encrypt git project to your server and this will create a folder called letencrypt in the /opt directory:

git clone https://github.com/letsencrypt/letsencrypt /opt/letsencrypt

Generating Let’s Encrypt certificates:

cd /opt/letsencrypt

Run the commands below to generate a SSL certificate for your domain (example.com) or website:

./letsencrypt-auto --apache -d example.com

You can also use a single certificate on multiple domains and sub-domains, to do that, you’ll have to add them as additional perimeters to the command:

./letsencrypt-auto --apache -d example.com -d www.example.com

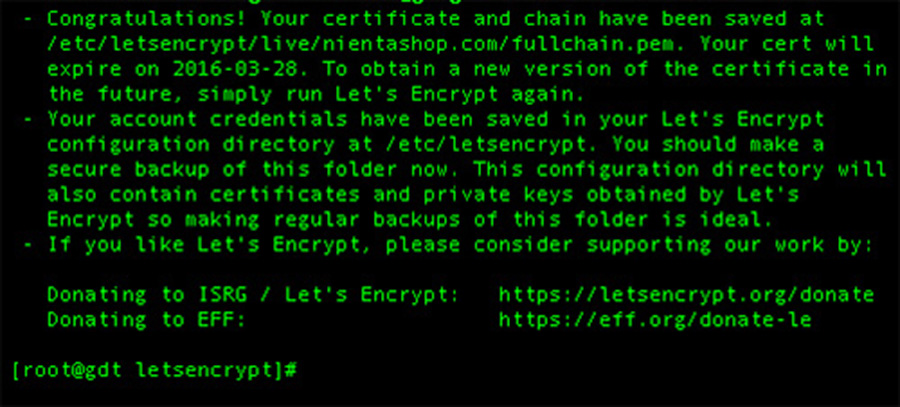
After the installation process finishes successfully a congratulation message is displayed on your console informing you about the expiration date and how you can test the configuration as illustrated on the below screenshots and you should be able to find the generated certificate files at /etc/letsencrypt/live.

letsencrypt-ssl-generate

Finally, now your domain should be accessible via HTTPS! Check it out at https://yourdomain.com.

Step 4. Set up auto renewal Let’s Encrypt.

Let’s Encrypt certificates are valid for 3 month, but it’s recommended that you renew the certificates every 2 month to allow a margin of error. To renew that certificate, you’ll have to come back into the /opt/letsencrypt directory and run the commands below:

./letsencrypt-auto renew

Or you can also setup a cron job to automatically renew your certificate before it expires by editing cron and specifying how often you want to check/renew:

sudo crontab -e

Add the line below and save:

0 0 * * 0 /opt/letsencrypt/letsencrypt-auto renew >> /var/log/le-renew.log

Congratulation’s! You have successfully installed Let’s Encrypt SSL. Thanks for using this tutorial for installing Let’s Encrypt SSL with Apache on your Ubuntu 16.04 LTS (Xenial Xerus) system. For additional help or useful information, we recommend you to check the official LetsEncrypt SSL web site.

How To Install Unison on Ubuntu 16.04 LTS

Install Unison on Ubuntu 16

Unison is a GUI and terminal-based tool which allows files and directories to be kept in sync with each other, between different local directories and drives or on a network, which could be on different operating systems. The application is available for Unix operating systems (Linux and Mac OS X) and Windows. Changes can be made on the different places, and Unison will update the machines with the correct versions of files and folders, copying, deleting, renaming or deleting files and directories as necessary.

Unison doesn’t currently work well with USB sticks that are formatted as VFAT (FAT32 FAT16 etc) due to file permissions. You might like to try usbsync for this instead. Or, as a workaround, you may try adding a line like ‘perms = 0’ to your ~/.unison/*.prf file, or running with ‘-perms 0’ option.

Examples of uses

Heres a few scenarios on which Unison would be useful:

  • Justine has a lot of music and would want to back it up to another drive in case her main drive fails. Unison can synchronize any new music she has added on her main hard drive, and will delete any music she has deleted from her main drive.
  • Ryan has a laptop and a desktop computer. He works on both regularly and wants to be able to have his latest work available on the computer he wants to use. Unison will be able to syncronise both computers over the network using SSH so that work he has done on his desktop will appear on his laptop, and when he wants to use his desktop again, he can sync the files so they are updated there.


Install Unison on Ubuntu 16.04 LTS

This article assumes you have at least basic knowledge of linux, know how to use the shell, and most importantly, you host your site on your own VPS. The installation is quite simple and assumes you are running in the root account, if not you may need to add ‘sudo’ to the commands to get root privileges. I will show you through the step by step installation Unison on a Ubuntu 16.04 (Xenial Xerus) server.

Step 1. First make sure that all your system packages are up-to-date by running these following apt-get commands in the terminal.

sudo apt-get update
sudo apt-get upgrade

Step 2. Installing Unison.

Add the PPA repository to your system, update the local repository index and install the unison package:

sudo add-apt-repository ppa:eugenesan/ppa
sudo apt-get update

After updating the apt sources-list, run the following command to install the package:

sudo apt-get install unison

Once it is done, use the following command to view the Basic and Advanced options:

root@:wpcademy.com~# unison -help
Usage: unison [options]
or unison root1 root2 [options]
or unison profilename [options]

Basic options:
-auto automatically accept default (nonconflicting) actions
-batch batch mode: ask no questions at all
-doc xxx show documentation ('-doc topics' lists topics)
-fat use appropriate options for FAT filesystems
-group synchronize group attributes
-ignore xxx add a pattern to the ignore list
-ignorenot xxx add a pattern to the ignorenot list
.
.
watch when set, use a file watcher process to detect changes (default true)
-xferbycopying optimize transfers using local copies (default true)

Check the version of Unison:

unison --version

Further Help

man unison

Or

unison --help

Congratulation’s! You have successfully installed Unison. Thanks for using this tutorial for installing Unison on Ubuntu 16.04 LTS (Xenial Xerus) system. For additional help or useful information, we recommend you to check the official Unison web site.

How To Install HAProxy on Ubuntu 16.04 LTS

Install HAProxy on Ubuntu 16

HAProxy is a free HTTP/TCP high availability load balancer and proxy server. It spreads requests among multiple servers to mitigate issues resulting from single server failure. HA Proxy is used by a number of high-profile websites including GitHub, Bitbucket, Stack Overflow, Reddit, Tumblr, Twitter and Tuenti and is used in the OpsWorks product from Amazon Web Services.

Install HAProxy on Ubuntu 16.04 LTS

This article assumes you have at least basic knowledge of linux, know how to use the shell, and most importantly, you host your site on your own VPS. The installation is quite simple and assumes you are running in the root account, if not you may need to add ‘sudo’ to the commands to get root privileges. I will show you through the step by step installation HAProxy on a Ubuntu 16.04 (Xenial Xerus) server.

Step 1. First make sure that all your system packages are up-to-date by running these following apt-get commands in the terminal.

sudo apt-get update
sudo apt-get upgrade

Step 2. Network Details.

Below is our network server. There are 3 web servers running with Apache2 and listening on port 80 and one HAProxy server:
Web Server Details:

Server 1: web1.wpcademy.com 192.168.1.101
Server 2: web2.wpcademy.com 192.168.1.102
Server 3: web3.wpcademy.com 192.168.1.103
HAProxy Server:
HAProxy: haproxy 192.168.1.16

Step 3. Installing HAProxy.

Now install HAProxy with the following command:

apt-get -y install haproxy

After the installation you can double check the installed version number with the following:

haproxy -v

Step 4. Configuring HAProxy.

We have to modify the configuraion file of haproxy i.e. /etc/haproxy/haproxy.cfg as per our requirement. (Change this configuration as your network requirements). For more configuration details check this url.

### nano /etc/haproxy/haproxy.cfg

global
log /dev/log local0
log /dev/log local1 notice
chroot /var/lib/haproxy
stats socket /run/haproxy/admin.sock mode 660 level admin
stats timeout 30s
user haproxy
group haproxy
daemon

# Default SSL material locations
ca-base /etc/ssl/certs
crt-base /etc/ssl/private

# Default ciphers to use on SSL-enabled listening sockets.
# For more information, see ciphers(1SSL). This list is from:
# https://hynek.me/articles/hardening-your-web-servers-ssl-ciphers/
ssl-default-bind-ciphers ECDH+AESGCM:DH+AESGCM:ECDH+AES256::RSA+AES:RSA+3DES:!aNULL:!MD5:!DSS
ssl-default-bind-options no-sslv3

defaults
log global
mode http
option httplog
option dontlognull
timeout connect 5000
timeout client 50000
timeout server 50000
errorfile 400 /etc/haproxy/errors/400.http
errorfile 403 /etc/haproxy/errors/403.http
errorfile 408 /etc/haproxy/errors/408.http
errorfile 500 /etc/haproxy/errors/500.http
errorfile 502 /etc/haproxy/errors/502.http
errorfile 503 /etc/haproxy/errors/503.http
errorfile 504 /etc/haproxy/errors/504.http

frontend Local_Server
bind 192.168.1.16:80
mode http
default_backend My_Web_Servers

backend My_Web_Servers
mode http
balance roundrobin
option forwardfor
http-request set-header X-Forwarded-Port %[dst_port]
http-request add-header X-Forwarded-Proto https if { ssl_fc }
option httpchk HEAD / HTTP/1.1rnHost:localhost
server web1.wpcademy.com 192.168.1.101:80
server web2.wpcademy.com 192.168.1.102:80
server web3.wpcademy.com192.168.1.103:80

listen stats *:1936
stats enable
stats hide-version
stats refresh 30s
stats show-node
stats auth username:password
stats uri /stats

Since you have done with all necessary configurations for proxy server, verify configuration file before restarting service using following command:

haproxy -c -f /etc/haproxy/haproxy.cfg

If above command return output as “configuration file is valid” then restart HAProxy service:

systemctl restart haproxy

Step 5. Accessing HAProxy.

Open your favorite browser and access port 80 on ip 192.168.0.16 (as configured above) in web browser and hit refresh. You will see that HAProxy is sending requests to backend server one by one (as per round robin algorithm).

Congratulation’s! You have successfully installed HAProxy. Thanks for using this tutorial for installing HAProxy load balancing on Ubuntu 16.04 LTS (Xenial Xerus) system. For additional help or useful information, we recommend you to check the official HAProxy web site.

You Might Also Like: How To Install and Configure HAproxy on CentOS 6

How To Install Deb File on Ubuntu Using Gdebi

Install Deb File on Ubuntu Using Gdebi

Gdebi is a simple tool to install deb files. It lets you install local deb packages resolving and installing its dependencies. apt does the same, but only for remote (http, ftp) located packages. It can also resolve build-depends of debian/control files.

This article assumes you have at least basic knowledge of linux, know how to use the shell, and most importantly, you host your site on your own VPS or Dedicated server. The installation is quite simple and assumes you are running in the root account, if not you may need to add ‘sudo’ to the commands to get root privileges. I will show you through the step by step installation deb file on Ubuntu using Gdebi on a Ubuntu 16.04 (Xenial Xerus) server.
Install Deb File on Ubuntu Using Gdebi

Step 1. First make sure that all your system packages are up-to-date by running these following apt-get commands in the terminal.

sudo apt-get update
sudo apt-get upgrade

Step 2. Installing Gdebi.

Gdebi isn’t installed by default on Ubuntu. To use gdebi on Ubuntu, first install gdebi using the following command:

sudo apt-get install gdebi

Once gdebi is installed, it can be used to install a local deb package. The command format to install deb file using gdebi is:

sudo gdebi package_name.deb

There are many gdebi command options:

–version Show program’s version number and exit.
-h, –help Show this help message and exit.
–n, –non-interactive Run non-interactive (dangerous!).
–o APT_OPTS, –option=APT_OPTS Set an APT configuration option.
–q, –quiet Do not show progress information.
–apt-line Simulate only and print a apt-get install compatible line to stderr.
–root=ROOTDIR Use alternative root dir.

Congratulation’s! You have successfully installed Gdebi. Thanks for using this tutorial for installing deb using Gdebi on Ubuntu 16.04 LTS (Xenial Xerus) system. For additional help or useful information, we recommend you to check the official Gdebi web site.

How To Install SugarCRM on Ubuntu 16.04 LTS

Install SugarCRM on Ubuntu 16

SugarCRM is a popular customer relationship management system that has an open source version, SugarCRM Community Edition, with many devoted Linux users. It provides many functions such as activity management, contacts, accounts, campaigns, web-to-lead forms, dashboards, email clients and marketing, project management, bug tracking, shared calendars etc. that allow maximum management for business and client relationships.

Install SugarCRM on Ubuntu 16.04 LTS

This article assumes you have at least basic knowledge of linux, know how to use the shell, and most importantly, you host your site on your own VPS. The installation is quite simple and assumes you are running in the root account, if not you may need to add ‘sudo’ to the commands to get root privileges. I will show you through the step by step installation SugarCRM on a Ubuntu 16.04 (Xenial Xerus) server.

Step 1. First make sure that all your system packages are up-to-date by running these following apt-get commands in the terminal.

sudo apt-get update
sudo apt-get upgrade

Step 2. Install LAMP (Linux, Apache, MariaDB, PHP) server.

A Ubuntu 16.04 LAMP server is required. If you do not have LAMP installed, you can follow our guide here. Also install all required PHP modules:

apt-get install imagemagick php7.0-curl php7.0-gd php7.0-mbstring php7.0-mysql libapache2-mod-php7.0 php7.0-mcrypt php7.0-bz2 php7.0-zip php7.0-json

You’ll need to also adjust some settings in your php.ini. Open up the file and edit these two variables:

nano /etc/php/7.0/apache2/php.ini

Also, add/modify the following settings:

post_max_size = 32M
upload_max_filesize = 32M
memory_limit = 768M

The required php modules will need to be manually enabled:

phpenmod imap
phpenmod zip
phpenmod mbstring

Step 3. Installing SugarCRM.

First thing to do is to go to SugarCRM’s download page and download the latest stable version of SugarCRM, At the moment of writing this article it is version 6.5.24:

wget https://nchc.dl.sourceforge.net/project/sugarcrm/1 - SugarCRM 6.5.X/SugarCommunityEdition-6.5.X/SugarCE-6.5.24.zip

Unpack the SugarCRM archive to the document root directory on your server:

unzip SugarCE-6.5.24.zip
rm -rf /var/www/html/*
cd SugarCE-Full-6.5.24/
cp -R * /var/www/html/

We will need to change some folders permissions:

chown -R www-data:www-data /var/www/html/

Step 4. Configuring MariaDB for SugarCRM.

By default, MariaDB is not hardened. You can secure MariaDB using the mysql_secure_installation script. you should read and below each steps carefully which will set root password, remove anonymous users, disallow remote root login, and remove the test database and access to secure MariaDB:

mysql_secure_installation

Configure it like this:

- Set root password? [Y/n] y
- Remove anonymous users? [Y/n] y
- Disallow root login remotely? [Y/n] y
- Remove test database and access to it? [Y/n] y
- Reload privilege tables now? [Y/n] y

Next we will need to log in to the MariaDB console and create a database for the SugarCRM. Run the following command:

mysql -u root -p

This will prompt you for a password, so enter your MariaDB root password and hit Enter. Once you are logged in to your database server you need to create a database for SugarCRM installation:

CREATE USER sugar@localhost;
SET PASSWORD FOR 'sugar'@'localhost' = PASSWORD("sugar-password");
GRANT ALL PRIVILEGES ON sugarcrm.* TO 'sugar'@'localhost' IDENTIFIED BY 'sugar-password' WITH GRANT OPTION;
flush privileges;
exit

Step 5. Configuring Apache web server for SugarCRM.

Create a new virtual host directive in Apache. For example, create a new Apache configuration file named ‘sugarcrm.conf’ on your virtual server:

touch /etc/apache2/sites-available/sugarcrm.conf
ln -s /etc/apache2/sites-available/sugarcrm.conf /etc/apache2/sites-enabled/sugarcrm.conf
nano /etc/apache2/sites-available/sugarcrm.conf

Add the following lines:


ServerAdmin [email protected]
DocumentRoot /var/www/html/
ServerName your-domain.com
ServerAlias www.your-domain.com

Options FollowSymLinks
AllowOverride All

ErrorLog /var/log/apache2/your-domain.com-error_log
CustomLog /var/log/apache2/your-domain.com-access_log common

Save and close the file. Restart the apache service for the changes to take effects:

systemctl restart apache2

Step 6. Accessing SugarCRM.

SugarCRM will be available on HTTP port 80 by default. Open your favorite browser and navigate to http://yourdomain.com/ or http://server-ip and complete the required the steps to finish the installation. If you are using a firewall, please open port 80 to enable access to the control panel.

Congratulation’s! You have successfully installed SugarCRM. Thanks for using this tutorial for installing SugarCRM on Ubuntu 16.04 LTS (Xenial Xerus) system. For additional help or useful information, we recommend you to check the official SugarCRM web site.

How To Install TeamViewer on Ubuntu 16.04 LTS

Install TeamViewer on Ubuntu 16

TeamViewer is a proprietary computer software package for remote control, desktop sharing, online meetings, web conferencing and file transfer between computers. Versions are available for the Microsoft Windows, OS X, Desktop Linux, iOS, Android Linux, Windows RT and Windows Phone operating systems. It is also possible to access a machine running TeamViewer with a web browser. While the main focus of the application is remote control of computers, collaboration and presentation features are included.

TeamViewer features:

TeamViewer is available for Microsoft Windows, macOS, Linux, Chrome OS, iOS, Android, Windows RT, Windows Phone 8 and BlackBerry operating systems. It is also possible to access a machine running TeamViewer with a web browser. While the main focus of the application is remote control of computers, collaboration and presentation features are included.

Install TeamViewer on Ubuntu 16.04 LTS

This article assumes you have at least basic knowledge of linux, know how to use the shell, and most importantly, you host your site on your own VPS. The installation is quite simple and assumes you are running in the root account, if not you may need to add ‘sudo’ to the commands to get root privileges. I will show you through the step by step installation TeamViewer on a Ubuntu 16.04 (Xenial Xerus) server.

Step 1. First make sure that all your system packages are up-to-date by running these following apt-get commands in the terminal.

sudo apt-get update
sudo apt-get upgrade

Step 2. Installing TeamViewer.

First, Go to TeamViewer 12 beta download page and download the deb file via your Web browser:

wget https://downloadus2.teamviewer.com/download/version_12x/teamviewer_12.0.71510_i386.deb

Install gdebi command line package installer with the following command:

sudo apt install gdebi-core

Then install the TeamViewer 12 deb package with:

sudo gdebi teamviewer*.deb

Once installed, In order to use TeamViewer on Linux, the TeamViewer remote control daemon must be running. You can check out its status by executing the command below:

systemctl start teamviewerd
systemctl enable teamviewerd
systemctl status teamviewerd

Congratulation’s! You have successfully installed TeamViewer. Thanks for using this tutorial for installing TeamViewer on Ubuntu 16.04 LTS (Xenial Xerus) system. For additional help or useful information, we recommend you to check the official TeamViewer web site.