How To Install GNOME on Ubuntu 14.04

Install GNOME on Ubuntu

By default, Ubuntu 14.04 Trusty Tahr LTS server installed as minimal without any Graphical Desktop support. Installing GNOME desktop on Ubuntu is faily straightforward. Most Ubuntu servers are run on CLI (Command-Line Interface) mode. But in some cases, one may need to have a desktop to install some applications with GUI (Grapich User Interface) mode. In this case, we will use GNOME, the most popular user-friendly desktop for any UNIX based system.

This article assumes you have at least basic knowledge of linux, know how to use the shell, and most importantly, you host your site on your own VPS. The installation is quite simple. We will show you through the step by step installation GNOME on Ubuntu 14.04.

Install GNOME on Ubuntu 14.04

Step 1. First, You just need to install a couple of Gnome apps, add the gnome3-staging prepository and do a dist-upgrade:

sudo add-apt-repository ppa:gnome3-team/gnome3-staging
sudo apt-get update
sudo apt-get dist-upgrade

Step 2. Installing additional applications.

GNOME 3.12 has some new applications like: gnome-weather, gnome-maps, gnome-photos and gnome-music etc, which are not installed by default on Ubuntu GNOME 14.04. To install additional applications, run the following command:

sudo apt-get update
sudo apt-get install bijiben polari gnome-clocks gnome-weather gnome-maps gnome-music gnome-photos gnome-documents gnome-contacts epiphany-browser gnome-sushi gnome-boxes gnome-shell-extensions

Step 3. Reboot the system.

After you reboot the system, the system will enter into the Gnome GUI interface automatically.
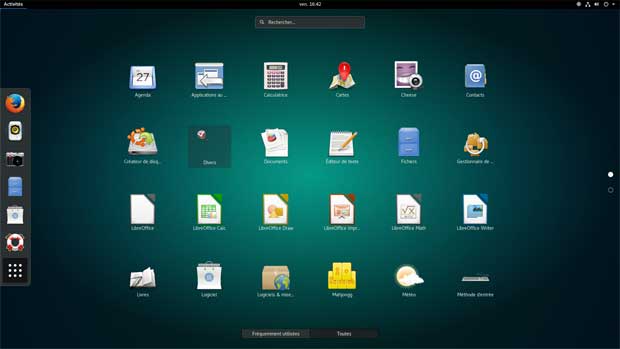
ubuntu gnome interface

If you encounter issues of you simply don’t like GNOME 3.12, you can revert the changes by using PPA Purge. To purge the GNOME 3 PPAs and go back to GNOME 3.10 (which is default in Ubuntu 14.04), use the following commands:

sudo apt-get install ppa-purge
sudo ppa-purge ppa:gnome3-team/gnome3
sudo ppa-purge ppa:gnome3-team/gnome3-staging

Congratulation’s! You have successfully installed GNOME. Thanks for using this tutorial for installing GNOME in Ubuntu 14.04 system. For additional help or useful information, we recommend you to check the official GNOME web site.

You Might Also Like: How To Install Gnome GUI on CentOS 7

How To Install Apache SVN on Ubuntu 14.04

Install Apache SVN on Ubuntu

Apache Subversion which is commonly referred to in its abbreviated form as SVN, (named after the command name SVN) is a popular software versioning and revision control system which is distributed as a free software under the Apache License. Mainly used by developers to maintain present and historic file versions like documentation, source code, and web pages, it primarily aims to be a compatible successor to the extensively used CVS (Concurrent Versions System).

SVN supports several protocols for network access: SVN, SVN+SSH, HTTP, HTTPS. If you are behind a firewall, HTTP-based Subversion is advantageous since SVN traffic will go through the firewall without any additional firewall rule setting. This article assumes you have at least basic knowledge of linux, know how to use the shell, and most importantly, you host your site on your own VPS. The installation is quite simple. In this tutorial we will guide you through the step by step installation Apache SVN on Ubuntu 14.04 server.

Install Apache SVN on Ubuntu 14.04

Step 1. First, you need update the repositories using the following command.

 sudo apt-get update

Step 2. Install SVN and apache webserver.

 sudo apt-get install subversion apache2 libapache2-svn apache2-utils

Step 3. Create and configure SVN repository.

mkdir -p /svn/repos/
cd /svn/repos/
svnadmin create testrepo
chown -R www-data:www-data /testrepo

Step 4. Configure Subversion with Apache.

Once installing the package, you must open the subversion httpd config file.

#nano /etc/apache2/mods-enabled/dav_svn.conf

## Uncomment following lines ##

<Location /svn>
DAV svn
SVNParentPath /svn/repos/
AuthType Basic
AuthName "Subversion Repository"
AuthUserFile /etc/subversion/passwd
Require valid-user
</Location>

Step 5. Create account and password for SVN.

Following commands will add two users for svn. It will prompt for users password to be assigned.

htpasswd -cm /etc/svn-users wpcademy
htpasswd -m /etc/svn-users userwpcad

Step 6. Restart Apache2 Server.

 etc/init.d/apache2 restart

Step 7. Finally, You can visit the url http://your-ip-address/svn/testrepo to check out the content, you will be asked to enter the user name and password.

Congratulation’s! You have successfully installed Apache SVN. Thanks for using this tutorial for installing Apache Subversion server on Ubuntu 14.04 system. For additional help or useful information, we recommend you to check the official Apache Subversion web site.

You Might Also Like: How To Install Apache SVN on CentOS 7

How To Install MongoDB on Ubuntu 14.04

Install MongoDB on Ubuntu

MongoDB is a NoSQL document-oriented database. Refers to a database with a data model other than the tabular format used in relational databases such as MySQL, PostgreSQL, and Microsoft SQL. MongoDB features include: full index support, replication, high availability, and auto-sharding. It is a cross-platform and it makes the process of data integration faster and much easier. Since it is free and open-source, MongoDB is used by number of websites and organizations.

This article assumes you have at least basic knowledge of linux, know how to use the shell, and most importantly, you host your site on your own VPS. The installation is quite simple. We will show you through the step by step installation MongoDB on Ubuntu 14.04 in this tutorial.

Step 1. First, add the official MongoDB public key used by the package management system.

sudo apt-key adv --keyserver hkp://keyserver.ubuntu.com:80 --recv 7F0CEB10
echo 'deb http://downloads-distro.mongodb.org/repo/ubuntu-upstart dist 10gen' | sudo tee /etc/apt/sources.list.d/mongodb.list

Step 2. Install mongoDB packages.

sudo apt-get update
sudo apt-get install -y mongodb-org

If you want to install any specific version of MongoDB, define the version number like below:

 apt-get install mongodb-org=2.6.0 mongodb-org-server=2.6.0 mongodb-org-shell=2.6.0 mongodb-org-mongos=2.6.0 mongodb-org-tools=2.6.0

MongoDB daemon should be enabled to start on boot:

service mongod start
chkconfig mongod on

The main configuration file is located in the /etc directory on your Linux VPS as mongod.conf. To edit it, you can use your favorite text editor.

 nano /etc/mongod.conf

Step 3. Verifying mongoDB database.

Connect MongoDB using command line and execute some test commands for checking proper working.

#mongo

MongoDB shell version: 2.6.7
connecting to: test
Welcome to the MongoDB shell.

A good way to start using MongoDB on your CentOS 6 is to read the MongoDB manual on the official web site.

You Might Also Like: How To Install MongoDB on CentOS 6

How To Install OwnCloud 8 on Ubuntu 14.04

Install OwnCloud 8 on Ubuntu

OwnCloud is a free and open-source software which enables you to create a private “file-hosting” cloud. OwnCloud is similar to DropBox service with the diference of being free to download and install on your private server. Owncloud made by PHP and backend database MySQL (MariaDB), SQLLite or PostgreSQL. OwnCloud also enables you to easily view and sync address book, calendar events, tasks and bookmarks. You can access it via the good looking and easy to use web interface or install OwnCloud client on your Desktop or Laptop machine (supports Linux, Windows and Mac OSX).

This article assumes you have at least basic knowledge of linux, know how to use the shell, and most importantly, you host your site on your own VPS. The installation is quite simple. I will show you through the step by step installation OwnCloud 8 on Ubuntu 14.04.

Install OwnCloud 8 on Ubuntu 14.04

Step 1. First of all log in to your server as root and make sure that all packages are up to date.

apt-get update
apt-get upgrade

Step 2. Instal Apache web server on your Ubuntu 14.04 VPS if it is not already installed.

 apt-get install apache2

Step 3. Next, install PHP on your server.

 apt-get install php5 php5-mysql

Once the installation is done add the following PHP modules required by OwnCloud:

 apt-get install php5-gd php5-json php5-curl php5-intl php5-mcrypt php5-imagick

Step 4. Install MySQL database server.

 apt-get install mysql-server

By default, MySQL is not hardened. You can secure MySQL using the mysql_secure_installation script. you should read and below each steps carefully which will set root password, remove anonymous users, disallow remote root login, and remove the test database and access to secure MySQL.

 mysql_secure_installation

Step 5. Create a new MySQL database for OwnCloud using the following commands.

#mysql -u root -p
Enter password:

mysql> CREATE USER 'ownclouduser'@'localhost' IDENTIFIED BY 'YOURPASSWORD';
mysql> CREATE DATABASE ownclouddb;
mysql> GRANT ALL ON ownclouddb.* TO 'ownclouduser'@'localhost';
mysql> FLUSH PRIVILEGES;
mysql> exit

Step 6. Installing Owncloud 8.

First we will need to download the latest stable release of OwnCloud on your server (at the time version 8.0.0).

wget https://download.owncloud.org/community/owncloud-8.0.0.tar.bz2
tar -xvf owncloud-8.0.0.tar.bz2 -C /var/www/html/

Set the directory permissions:

 chown www-data:www-data -R /var/www/html/owncloud/

Step 7. Configuring Apache for OwnCloud.

While configuring Apache web server, it is recommended that you to enable .htaccess to get a enhanced security features, by default .htaccess is disabled in Apache server. To enable it, open your virtual host file and make AllowOverride is set to All.For example, here i used external config file instead of modifying main file.

### nano /etc/apache2/sites-available/owncloud.conf

<IfModule mod_alias.c>
Alias /owncloud /var/www/html/owncloud
</IfModule>
<Directory “/var/www/html/owncloud”>
Options Indexes FollowSymLinks
AllowOverride All
Order allow,deny
allow from all
</Directory>

Remember to restart all services related to Apache server.

 service apache2 restart

Step 8. Access OwnCloud application.

Navigate to http://your-domain.com/ and follow the easy instructions. Enter username and password for the administrator user account, click on the ‘Advanced options’ hyperlink and enter the data directory (or leave the default setting), then enter database username, database password, database name, host (localhost) and click ‘Finish setup’.

You Might Also Like: How To Install OwnCloud 8 on CentOS 6

How To Install MariaDB on Ubuntu 14.04

Install MariaDB on Ubuntu 14.04

MariaDB is a drop-in replacement for MySQL. It is easy to install, offers many speed and performance improvements, and is easy to integrate into most MySQL deployments. MariaDB is widely used and several Linux distributions and large companies have already switched from MySQL to MariaDB.

This article assumes you have at least basic knowledge of linux, know how to use the shell, and most importantly, you host your site on your own VPS.

The installation is quite simple. I will show you through the step by step installation MariaDB on Ubuntu 14.04.

Install MariaDB on Ubuntu 14.04

Step 1. First need to enable MariaDB repository.

sudo apt-get install software-properties-common
sudo apt-key adv --recv-keys --keyserver hkp://keyserver.ubuntu.com:80 0xcbcb082a1bb943db

Step 2. Installation of MariaDB.

Once the key is imported and the repository added you can install MariaDB with:

apt-get update
apt-get install mariadb-server

At the time of installation mariadb would ask for the password of user root. Enter the password and make sure not to forget.

Step 3. Secure MariaDB after installation to.

By default, MariaDB is not hardened. You can secure MariaDB using the mysql_secure_installation script. you should read and below each steps carefully which will set root password, remove anonymous users, disallow remote root login, and remove the test database and access to secure MariaDB.

# mysql_secure_installation 

NOTE: RUNNING ALL PARTS OF THIS SCRIPT IS RECOMMENDED FOR ALL MariaDB
SERVERS IN PRODUCTION USE!  PLEASE READ EACH STEP CAREFULLY!

In order to log into MariaDB to secure it, we’ll need the current
password for the root user.  If you’ve just installed MariaDB, and
you haven’t set the root password yet, the password will be blank,
so you should just press enter here.

Enter current password for root (enter for none):
OK, successfully used password, moving on…

Setting the root password ensures that nobody can log into the MariaDB
root user without the proper authorisation.

Set root password? [Y/n] y
New password: 
Re-enter new password: 
Password updated successfully!
Reloading privilege tables..
 ... Success!

By default, a MariaDB installation has an anonymous user, allowing anyone
to log into MariaDB without having to have a user account created for
them.  This is intended only for testing, and to make the installation
go a bit smoother.  You should remove them before moving into a
production environment.

Remove anonymous users? [Y/n] y
 ... Success!

Normally, root should only be allowed to connect from ‘localhost’.  This
ensures that someone cannot guess at the root password from the network.

Disallow root login remotely? [Y/n] y
 ... Success!

By default, MariaDB comes with a database named ‘test’ that anyone can
access.  This is also intended only for testing, and should be removed
before moving into a production environment.

Remove test database and access to it? [Y/n] y
 - Dropping test database...
 ... Success!
 - Removing privileges on test database...
 ... Success!

Reloading the privilege tables will ensure that all changes made so far
will take effect immediately.

Reload privilege tables now? [Y/n] y
 ... Success!

Cleaning up…

All done!  If you’ve completed all of the above steps, your MariaDB
installation should now be secure.

Thanks for using MariaDB!
[root@wpcademy]#

Step 4. Start MariaDB service.

 service mysql start

Step 5. Login into MariaDB.

After completing installation you can connect to MariaDB using following command.

 mysql -u root -p

You Might Also Like: How To Install MariaDB On CentOS 6

How To Install and Configure VSFTPD on Ubuntu 14.04

Install and Configure VSFTPD on Ubuntu 14.04

FTP stands for “file transfer protocol”, and it allows you to transfer files to a remote computer. The most common FTP server software for Ubuntu is the vsftpd package, which stands for “very secure FTP daemon.” It’s the default FTP package for Ubuntu, and most other Linux distributions as well.

This article assumes you have at least basic knowledge of linux, know how to use the shell, and most importantly, you host your site on your own VPS. The installation is quite simple. I will show you through the step by step installation vsftpd on Ubuntu 14.04.

In this tutorial we will show you how to install and configuration of vsftpd on your Ubuntu 14.04 server.

Install and Configure VSFTPD on Ubuntu 14.04

Step 1. Install vsftpd (Very Secure FTP Deamon) package.

 apt-get install vsftpd

Step 2. Configure vsftpd.

Let’s edit the configuration file for vsftpd:

#nano /etc/vsftpd.conf

listen=YES
anonymous_enable=NO
local_enable=YES
write_enable=YES
local_umask=022
nopriv_user=vsftpd
virtual_use_local_privs=YES
guest_enable=YES
user_sub_token=$USER
chroot_local_user=YES
hide_ids=YES
guest_username=vsftpd

Step 3. Creating and applying the SSL certificate.

Lets go and create our encryption key or certificate to use to connect to the server. First, create a folder that will be used to store the keys.

 mkdir /etc/ssl/certificates

Then run the commands below to create the encryption key that will last for 365 days.

 sudo openssl req -x509 -nodes -days 365 -newkey rsa:2048 -keyout /etc/ssl/certificates/vsftpd.pem -out /etc/ssl/certificates/vsftpd.pem

Once creating the key, go and change add and change these parameters in the default VSFTPD configuration file.

#nano /etc/vsftpd.conf

rsa_cert_file=/etc/ssl/certificates/vsftpd.pem
rsa_private_key_file=/etc/ssl/certificates/vsftpd.pem
ssl_enable=YES
allow_anon_ssl=NO
force_local_data_ssl=YES
force_local_logins_ssl=YES
ssl_tlsv1=YES
ssl_sslv2=YES
ssl_sslv3=YES
require_ssl_reuse=NO
ssl_ciphers=HIGH

Step 4. Restart the vsftpd service.

 service vsftpd restart

Step 5. Configuring user access.

With the vsftpd FTP server you have the option to leave the FTP service authentication for only anonymous access or you can allow users , defined in /etc/passwd or in relevant access list, to login.

Step 6. Configure the user’s home directory.

With certain version of vsftpd you may receive the following error: 500 OOPS: vsftpd: refusing to run with writable root inside chroot(). Not to worry! Create a new directory for the user receiving the error(wpcademy in this case) that is a subdirectory of their home directory (/home/wpcademy). For example:

Fix permissions for wpcademy home directory:

 chmod a-w /home/wpcademy/

Make a new directory for uploading files:

mkdir /home/wpcademy/files
chown wpcademy:wpcademy/home/wpcademy/files/

Congratulation’s! You have successfully installed vsftpd. Thanks for using this tutorial for installing vsftpd in Ubuntu 14.04 system. For additional help or useful information, we recommend you to check the official vsftpd web site.

You Might Also Like: How To Install Vesta Control Panel on Ubuntu 16.04 LTS

How To Install Rar/Unrar Packages on Ubuntu

Install Rar/Unrar Packages on Ubuntu

RAR is most popular tool for creating and extracting compressed archive (.rar) files, but unfortunately rar tool doesn’t pre-installed under Linux systems, we need to install it using third-party tools to open, extract, uncompress or unrar a archive files.

By default the rar and the unrar packages do not come pre-installed in the Ubuntu operating system. This means you cannot create a rar archive or unrar an existing one! It is pretty simple to install them. You need to enable multiverse repositories to install rar. There’s also a separate package called unrar. This article assumes you have at least basic knowledge of linux, know how to use the shell, and most importantly, you host your site on your own VPS.

In this tutorial we will learn how to install and configuration of Rar/Unrar on your Ubuntu.

Install Rar/Unrar Packages on Ubuntu

Step 1. First, enable multiverse repositories.

 sudo software-properties-gtk

Step 2. Installing rar and unrar packages.

Run the following command in terminal and type the password for the user, when prompted.

sudo apt-get update
sudo apt-get install rar unrar

Commands for Rar/Unrar archive

Following are the some useful and helpful rar/unrar archive commands:

# unrar x (file_name).rar           extract with full path
# unrar e -kb (file_name).rar       (Keep broken)
# unrar l (file_name).rar           list files inside
# unrar e (file_name).rar           dump files excluding folders
# rar a (file_name).rar (file_name) create a archive Rar file
# rar r (file_name).rar             recover or fix a archive file or files
# rar a -p (file_name).rar          create a archive Rar file with password

Congratulation’s! You have successfully installed rar/unrar.

You Might Also Like: Click here to learn How To Install Rar/Unrar Packages on CentOS