How To Install lnav on CentOS 7

lnav on CentOS 7

The Log File Navigator (lnav) is an enhanced log file viewer that takes advantage of any semantic information that can be gleaned from the files being viewed, such as timestamps and log levels. Using this extra semantic information, lnav can do things like interleaving messages from different files, generate histograms of messages over time, and providing hotkeys for navigating through the file. It is hoped that these features will allow the user to quickly and efficiently zero in on problems.

Prerequisites

This article assumes you have at least basic knowledge of linux, know how to use the shell, and most importantly, you host your site on your own VPS. The installation is quite simple and assumes you are running in the root account, if not you may need to add ‘sudo’ to the commands to get root privileges. I will show you through the step by step installation lnav log file navigator on a CentOS 7 server.
lnav Features

Single log view: all log file contents are merged into a single view based on message timestamps. No need to manually correlate timestamps across multiple windows or figure out the order in which to view rotated log files.
Automatic format detection for several common log files. It also detects gzip/bzi2 files and decompress them automatically on the fly.
Filters: display only lines that match or do not match a set of regular expressions. Filter by error level.
Timeline view: shows a histogram of messages over time. The number of warnings and errors are highlighted in the display so that you can easily see where problems have occurred.
Query logs using SQL: log files are directly used as the backing for SQLite virtual tables.
Automatic data extraction: built-in log message parser can automatically discover and extract interesting data from plainly formatted log messages.
Live operation: Search as you type. New log lines are automatically loaded and searched as they are added; filters apply to lines as they are loaded; and, SQL queries are checked for correctness as you type.
Syntax highlighting with configurable colourizing
Tab completion
Sessions
Supports Linux and Mac

Install lnav on CentOS 7

Step 1. First let’s start by ensuring your system is up-to-date.

yum clean all
yum -y update

Step 2. Installing lnav.

For CentOS 7 or older versions, you need to include EPEL Repository to your YUM first:

yum install epel-release -y

Now, install lnav using yum command:

yum install lnav -y

How to Use lnav

First look at all the options taken by lnav:

usage: lnav [options] [logfile1 logfile2 ...]

A curses-based log file viewer that indexes log messages by type
and time to make it easier to navigate through files quickly.

Key bindings:
? View/leave the online help text.
q Quit the program.

Options:
-h Print this message, then exit.
-H Display the internal help text.
-I path An additional configuration directory.
-i Install the given format files and exit.
-C Check configuration and then exit.
-d file Write debug messages to the given file.
-V Print version information.

-a Load all of the most recent log file types.
-r Load older rotated log files as well.
-t Prepend timestamps to the lines of data being read in
on the standard input.
-w file Write the contents of the standard input to this file.

-c cmd Execute a command after the files have been loaded.
-f path Execute the commands in the given file.
-n Run without the curses UI. (headless mode)
-q Do not print the log messages after executing all
of the commands or when lnav is reading from stdin.

Optional arguments:
logfile1 The log files or directories to view. If a
directory is given, all of the files in the
directory will be loaded.

Examples:
To load and follow the syslog file:
$ lnav

To load all of the files in /var/log:
$ lnav /var/log

To watch the output of make with timestamps prepended:
$ make 2>&1 | lnav -t
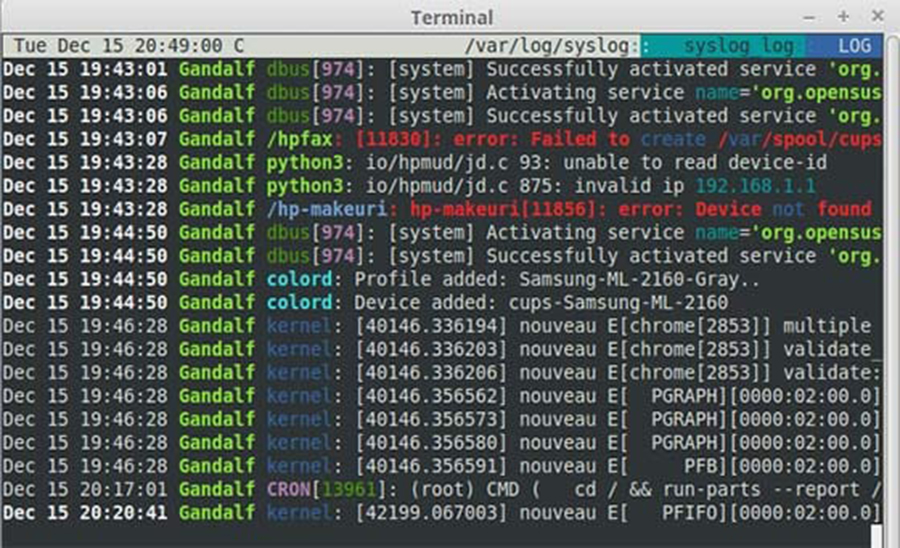
Let’s use some examples to demonstrate the working of this tool, run lnav command and it will start displaying the real time information on the basis of most recent time stamps from all log files:
lnav

lnav-log-viewer

Congratulation’s! You have successfully installed Seafile. Thanks for using this tutorial for installing lnav log file navigator on CentOS 7 system. For additional help or useful information, we recommend you to check the official lnav web site.

How To Install Seafile on CentOS 7

Seafile on CentOS 7

Seafile is a open source cloud storage software. It offers file sharing and syncing for individual users and groups, it provides client side encryption and easy access from mobile devices. Also easily integrated with local services such as LDAP and WebDAV or can be deployed using advanced network services and databases like MySQL, SQLite, PostgreSQL, Memcached, Nginx or Apache Web Server.

Prerequisites

This article assumes you have at least basic knowledge of linux, know how to use the shell, and most importantly, you host your site on your own VPS. The installation is quite simple and assumes you are running in the root account, if not you may need to add ‘sudo’ to the commands to get root privileges. I will show you through the step by step installation Seafile Secure Cloud Storage on a CentOS 7 server.
Install Seafile on CentOS 7

Step 1. First let’s start by ensuring your system is up-to-date.

yum clean all
yum -y update

Step 2. Installing required packages.

Seafile storage setup requires some Python modules that must be installed on your server:

yum install python-imaging MySQL-python python-memcached python-ldap python-urllib3

Step 3. Installing MariaDB.

Install MariaDB using Yum:

yum install epel-release
yum install mariadb mariadb-server

Start MariaDB and enable it to start on boot of the server:

systemctl start mariadb.service
systemctl enable mariadb.service

Configuring MariaDB for Seafile.

By default, MariaDB is not hardened. You can secure MariaDB using the mysql_secure_installation script. you should read and below each steps carefully which will set root password, remove anonymous users, disallow remote root login, and remove the test database and access to secure MariaDB:

mysql_secure_installation

Configure it like this:

- Set root password? [Y/n] y
- Remove anonymous users? [Y/n] y
- Disallow root login remotely? [Y/n] y
- Remove test database and access to it? [Y/n] y
- Reload privilege tables now? [Y/n] y

Step 4. Installing Seafile.

First thing to do is to go to Seafile’s download page and download the latest stable version of Seafile, At the moment of writing this article it is version 6.0.8:

wget https://bintray.com/artifact/download/seafile-org/seafile/seafile-server_6.0.8_x86-64.tar.gz

Unpack the Seafile archive to the document root directory on your server:

sudo mkdir -p /opt/seafile/installed
sudo mv seafile-server_6.0.8_x86-64.tar.gz /opt/seafile/installed
sudo mv seafile-server-6.0.8/ /opt/seafile

Run this script which will create the required databases and directories for the Seafile server and and answer all questions using the following configuration options, after the script verifies the existence of all Python required modules:

cd /opt/seafile/seafile-server-6.0.8
sudo ./setup-seafile-mysql.sh

After the installation finishes, run the following commands to start Seafile server and setup an admin user account:

sudo ./seafile.sh start
sudo ./seahub.sh start

Step 5. Configure firewall rules for Seafile.

You need to modify firewall rules using these commands:

sudo firewall-cmd --zone=public --permanent --add-port=8082/tcp
sudo firewall-cmd --zone=public --permanent --add-port=8000/tcp
sudo firewall-cmd --reload

Step 6. Accessing Seafile.

Seafile will be available on HTTP port 8000 by default. Open your favorite browser and navigate to http://yourdomain.com:8000 or http://server-ip:8000. Enter the admin email id and password to login which you have created at the time of installation. If you are using a firewall, please open port 8000 to enable access to the control panel.
seafile-web-interface-login
Congratulation’s! You have successfully installed Seafile. Thanks for using this tutorial for installing Seafile Secure Cloud Storage on CentOS 7 system. For additional help or useful information, we recommend you to check the official Seafile web site.

How To Install Tmux Terminal Multiplexer on Linux

Tmux Terminal Multiplexer on Linux

Tmux is a terminal multiplexer that lets you switch easily between several programs in one terminal, detach them (they keep running in the background) and reattach them to a different terminal.

Prerequisites

This article assumes you have at least basic knowledge of linux, know how to use the shell, and most importantly, you host your site on your own VPS. The installation is quite simple and assumes you are running in the root account, if not you may need to add ‘sudo’ to the commands to get root privileges. I will show you through the step by step installation Tmux Terminal Multiplexer on a Linux server.
Install Tmux Terminal Multiplexer on Linux

Step 1. First make sure that all your system packages are up-to-date by running these following apt-get commands in the terminal.

sudo apt-get update
sudo apt-get upgrade

Step 2. Installing Tmux.

Installation is pretty straightforward if you have Ubuntu or CentOS distribution you can install tmux with:

### Debian / Ubuntu based ###
apt-get install tmux

### On RedHat / CentOS based ###
yum install tmux

After the installation is finish, then type tmux on your console to run tmux:

tmux

Step 3. Tmux Commands QuickStart.

Ctrl+b is the Tmux command prefix. Here below for the sake of Clarity the Ctrl+b will be repeated for every command:

To List the Available Commands:

Ctrl+b ?

To Create a New Pane:

Ctrl+b "

To Change Panes Layouts:

Ctrl+b Space

To Rotate Panes into Layout:

Ctrl+b Ctrl+o

To Switch into another Pane:

Ctrl+b ;

Congratulation’s! You have successfully installed Tmux. Thanks for using this tutorial for installing Tmux Terminal Multiplexer on Linux server. For additional help or useful information, we recommend you to check the official Tmux web site.

How To Install Mattermost on CentOS 7

Mattermost on CentOS 7

Mattermost is an open source, private cloud Slack-alternative. A workplace messaging system for web, PCs and phones, released under the MIT license.

As an alternative to proprietary SaaS messaging, Mattermost brings all your team communication into one place, making it searchable and accessible anywhere. Mattermost is “Slack-compatible, not Slack-limited”, supporting a superset of Slack’s incoming and outgoing webhook integrations, including compatibility with existing Slack integrations. From your existing Slack teams, you can import users, public channel history and even theme setting colors into Mattermost.

Prerequisites

This article assumes you have at least basic knowledge of linux, know how to use the shell, and most importantly, you host your site on your own VPS. The installation is quite simple and assumes you are running in the root account, if not you may need to add ‘sudo’ to the commands to get root privileges. I will show you through the step by step installation Mattermost on a CentOS 7 server.
Install Mattermost on CentOS 7

Step 1. First let’s start by ensuring your system is up-to-date.

yum clean all
yum -y update

Step 2. Installing MySQL database.

Install and set up the database for use by the Mattermost server. You can install MySQL using command below:

wget http://dev.mysql.com/get/mysql57-community-release-el7-9.noarch.rpm
yum localinstall mysql57-community-release-el7-9.noarch.rpm

Next, install MySQL:

sudo yum install mysql-community-server

Start the MySQL server:

systemctl start mysqld.service
chkconfig mysqld on

Configuring MySQL for SugarCRM.

By default, MySQL is not hardened. You can secure MySQL using the mysql_secure_installation script. you should read and below each steps carefully which will set root password, remove anonymous users, disallow remote root login, and remove the test database and access to secure MySQL:

mysql_secure_installation

Configure it like this:

- Set root password? [Y/n] y
- Remove anonymous users? [Y/n] y
- Disallow root login remotely? [Y/n] y
- Remove test database and access to it? [Y/n] y
- Reload privilege tables now? [Y/n] y

Next we will need to log in to the MySQL console and create a database for the Mattermost. Run the following command:

mysql -u root -p

This will prompt you for a password, so enter your MariaDB root password and hit Enter. Once you are logged in to your database server you need to create a database for Mattermost installation:

mysql> CREATE USER 'mmuser'@'localhost' IDENTIFIED BY 'mmuser_strong_password';
mysql> CREATE DATABASE mattermostdb;
mysql> GRANT ALL PRIVILEGES ON mattermostdb.* TO 'mmuser'@'localhost';
mysql> FLUSH PRIVILEGES;
mysql> EXIT;

Step 3. Installing Mattermost Server.

First thing to do is to go to Mattermost’s download page and download the latest stable version of Mattermost, At the moment of writing this article it is version 3.6.2:

wget https://releases.mattermost.com/3.6.2/mattermost-3.6.2-linux-amd64.tar.gz

Unpack the Mattermost archive to the document root directory on your server:

tar xf *.gz
mv mattermost /opt/

Create the storage directory for files:

mkdir /opt/mattermost/data

Set up a system user and group called mattermost that will run this service, and set the ownership and permissions:

useradd --system --user-group mattermost
chown -R mattermost:mattermost /opt/mattermost
chmod -R g+w /opt/mattermost

Set up the database driver through the /opt/mattermost/config/config.json file. In it, search for “DriverName” and “DataSource” lines and change as follows:

"DriverName": "mysql"
"DataSource": "mmuser:@tcp(localhost:3306)/mattermost?charset=utf8"

Save, exit, and test the Mattermost Server with the following command:

sudo -u mattermost /opt/mattermost/bin/platform

When the server starts, it shows some log information and the text Server is listening on :8065. You can stop the server by pressing CTRL+C in the terminal window.

Step 4. Create a systemd unit for Mattermost.

Create a systemd file for Mattermost, /etc/systemd/system/mattermost.service and, in it, paste the following configuration:

[Unit]
Description=Mattermost
After=syslog.target network.target postgresql-9.4.service

[Service]
Type=simple
WorkingDirectory=/opt/mattermost/bin
User=mattermost
ExecStart=/opt/mattermost/bin/platform
PIDFile=/var/spool/mattermost/pid/master.pid
LimitNOFILE=49152

[Install]
WantedBy=multi-user.target

Make the service executable:

chmod 664 /etc/systemd/system/mattermost.service

And reload the services:

systemctl daemon-reload

Enable Mattermost service:

chkconfig mattermost on

And start it with systemd:

systemctl start mattermost

Step 5. Installing and configure NGINX.

In a production system, use a proxy server in front of Mattermost Server. In this case, NGINX. The main benefits of doing this are:

SSL termination
Port mapping :80 to :8065
HTTP to HTTPS redirect
Standard request logs

In order to install NGINX on CentOS 7, create a yum repository file, /etc/yum.repos.d/nginx.repo, with the following content:
[nginx]
name=nginx repo
baseurl=http://nginx.org/packages/rhel/7.1/$basearch/
gpgcheck=0
enabled=1

Install Nginx using YUM command:

yum install nginx.x86_64

After the installation is complete, start NGINX:

systemctl start nginx
systemctl enable nginx

Configuration Nginx.

In order to configure NGINX as proxy server, create the file /etc/nginx/sites-available/mattermost and past:

upstream backend {
server localhost:8065;
}

proxy_cache_path /var/cache/nginx levels=1:2 keys_zone=mattermost_cache:10m max_size=3g inactive=120m use_temp_path=off;

server {
listen 80;
server_name mattermost.mydomain.com;

location /api/v3/users/websocket {
proxy_set_header Upgrade $http_upgrade;
proxy_set_header Connection "upgrade";
client_max_body_size 50M;
proxy_set_header Host $http_host;
proxy_set_header X-Real-IP $remote_addr;
proxy_set_header X-Forwarded-For $proxy_add_x_forwarded_for;
proxy_set_header X-Forwarded-Proto $scheme;
proxy_set_header X-Frame-Options SAMEORIGIN;
proxy_buffers 256 16k;
proxy_buffer_size 16k;
proxy_read_timeout 600s;
proxy_pass http://backend;
}

location / {
client_max_body_size 50M;
proxy_set_header Connection "";
proxy_set_header Host $http_host;
proxy_set_header X-Real-IP $remote_addr;
proxy_set_header X-Forwarded-For $proxy_add_x_forwarded_for;
proxy_set_header X-Forwarded-Proto $scheme;
proxy_set_header X-Frame-Options SAMEORIGIN;
proxy_buffers 256 16k;
proxy_buffer_size 16k;
proxy_read_timeout 600s;
proxy_cache mattermost_cache;
proxy_cache_revalidate on;
proxy_cache_min_uses 2;
proxy_cache_use_stale timeout;
proxy_cache_lock on;
proxy_pass http://backend;
}
}

Remove the existing default sites-enabled file:

rm /etc/nginx/sites-enabled/default

Enable the mattermost configuration:

ln -s /etc/nginx/sites-available/mattermost /etc/nginx/sites-enabled/mattermost

Finally, restart Nginx service:

systemctl restart nginx

Step 7. Accessing Mattermost.

Mattermost will be available on HTTP port 80 by default. Open your favorite browser and navigate to http://mattermost.mydomain.com/ and continue to configure Mattermost by entering an email address and creating an account. If you are using a firewall, please open port 80 to enable access to the control panel.

Congratulation’s! You have successfully installed Mattermost. Thanks for using this tutorial for installing Mattermost on CentOS 7 system. For additional help or useful information, we recommend you to check the official Mattermost web site.

How To Install Apache on CentOS 7

Apache on CentOS 7

Apache Web Server is an open source Web server creation, deployment and management software. Initially developed by a group of software programmers, it is now maintained by the Apache Software Foundation. Apache HTTP Server is the most popular web server in the world and has been so since April 1996. It played a key role in the growth of the World Wide Web. It is estimated that Apache Server is serving 54.2% of all active websites and 53.3% of the top servers across all domains.

Prerequisites

This article assumes you have at least basic knowledge of linux, know how to use the shell, and most importantly, you host your site on your own VPS. The installation is quite simple and assumes you are running in the root account, if not you may need to add ‘sudo’ to the commands to get root privileges. I will show you through the step by step installation Apache web server on a CentOS 7 server.
Install Apache on CentOS 7

Step 1. First let’s start by ensuring your system is up-to-date.

yum clean all
yum -y update

Step 2. Installing Apache on CentOS 7.

We will be installing Apache with yum, which is the default package manager for CentOS 7:

yum install httpd openssl mod_ssl

Once Apache has finished installing, the httpd service will need to be started and enabled so it will run automatically when the server starts:

sudo systemctl restart httpd
sudo systemctl status httpd
sudo systemctl enable httpd

You can verify that Apache is really running by opening your favorite web browser and entering the URL http://your-server’s-address. you should get a “Testing 123″ page similar to the image below:

Install Apache on CentOS 7

Step 3. Configure Firewalld for Apache.

Add new rule to Firewalld:

firewall-cmd --permanent --zone=public --add-service=http

## OR ##

firewall-cmd --permanent --zone=public --add-port=80/tcp

Restart firewalld service:

systemctl restart firewalld.service

Congratulation’s! You have successfully installed Apache. Thanks for using this tutorial for installing Apache web server on CentOS 7 system. For additional help or useful information, we recommend you to check the official Apache web site.

How To Install Dropbox on CentOS 7

Dropbox on CentOS 7

Dropbox is a useful file-sharing and syncing service that lets you sync files between different machines over the Internet for free. It’s very useful for backing up your important documents, pictures, MP3 files, video files, and other data.

Prerequisites

This article assumes you have at least basic knowledge of linux, know how to use the shell, and most importantly, you host your site on your own VPS. The installation is quite simple and assumes you are running in the root account, if not you may need to add ‘sudo’ to the commands to get root privileges. I will show you through the step by step installation Dropbox on a CentOS 7 server.
Install Dropbox on CentOS 7

Step 1. First let’s start by ensuring your system is up-to-date.

yum clean all
yum -y update

Step 2. Installing Dropbox.

Download the latest Linux Dropbox client from the below link:

### 32-Bit ###
curl -Lo dropbox-linux-x86.tar.gz https://www.dropbox.com/download?plat=lnx.x86

### 64-Bit ###
curl -Lo dropbox-linux-x86_64.tar.gz https://www.dropbox.com/download?plat=lnx.x86_64

After downloading, we need to create a folder for client software and extract the compressed file:

mkdir -p /opt/dropbox-client
tar xzfv dropbox-linux-x86_64.tar.gz --strip 1 -C /opt/dropbox-client

Step 3. Linking Dropbox client.

We needed to run the below command on the server in the folder where we want to store the Dropbox files:

cd /usr/share/dropbox
/opt/dropbox-client/dropboxd

The first time you run the client, you should see output that looks like this:

This computer isn't linked to any Dropbox account...
Please visit https://www.dropbox.com/cli_link_nonce?nonce=9c4d26a095e82e2abmwe468029d66236f to link this device.

We needed to copy above link code and paste it on any browser and enter the credentials of your Dropbox account and save when we click on continue.
dropbox-client
The next step is to set up some scripts so that Dropbox will run as a service, so that you don’t need to be logged in for the client to keep running:

curl -o /etc/init.d/dropbox https://gist.githubusercontent.com/thisismitch/6293d3f7f5fa37ca6eab/raw/2b326bf77368cbe5d01af21c623cd4dd75528c3d/dropbox
curl -o /etc/systemd/system/dropbox.service https://gist.githubusercontent.com/thisismitch/6293d3f7f5fa37ca6eab/raw/99947e2ef986492fecbe1b7bfbaa303fefc42a62/dropbox.service

Make the scripts executable with this command:

chmod +x /etc/systemd/system/dropbox.service /etc/init.d/dropbox

The script expects the /etc/systemd/dropbox file to contain a list of system users that will run Dropbox. Create the file and open it for editing with this command:

nano /etc/sysconfig/dropbox

Next, add a line that specifies that DROPBOX_USERS is equal to your system username. For example, if your username is “wpcademy”, it should look like this and don’t forget Save and exit:

DROPBOX_USERS="wpcademy"

Finally, We needed to start and enable them to start at boot time with the below commands:

systemctl daemon-reload
systemctl start dropbox
systemctl enable dropbox

Congratulation’s! You have successfully installed Dropbox. Thanks for using this tutorial for installing Dropbox on CentOS 7 system. For additional help or useful information, we recommend you to check the official Dropbox web site.

How To Install Plesk on Linux System

Plesk on Linux System

Plesk is one of the widely used web hosting control panels in the web hosting business. It offers simple server and website management solutions with single-click mechanisms. Plesk consists of webserver suite (LAMP), Mail server, FTP Server, Name Server applications etc.

Plesk supports a wide range of Linux releases, including all of the commonly used distributions like CentOS, Ubuntu, Debian and Cloudlinux. Plesk is a an enterprise hosting control panel and it requires license to work effectively. They also offers 15 day trial license which is intended for testing purposes.

Prerequisites

This article assumes you have at least basic knowledge of linux, know how to use the shell, and most importantly, you host your site on your own VPS. The installation is quite simple and assumes you are running in the root account, if not you may need to add ‘sudo’ to the commands to get root privileges. I will show you through the step by step installation Plesk web hosting control panels on a Linux system server.
Install Plesk on Linux System

Step 1. Download the autoinstaller from Plesk website:

wget http://autoinstall.plesk.com/plesk-installer

Add execute permissions to the autoinstaller:

chmod +x plesk-installer

Launch the autoinstaller:

./plesk-installer

Follow the script prompts and pick the options that best suits your use case.

Step 2. Accessing Plesk.

Once this is complete, you’ll be able to access your Plesk server via the web management interface. To do this, open a browser and point it to https://yourserverip:8443 and login to the control panel as root user.

Congratulation’s! You have successfully installed Plesk. Thanks for using this tutorial for installing Plesk web hosting control panels on a Linux system. For additional help or useful information, we recommend you to check the official Plesk web site.