How To Install Linux Dash on Ubuntu 14.04

Install Linux Dash on Ubuntu

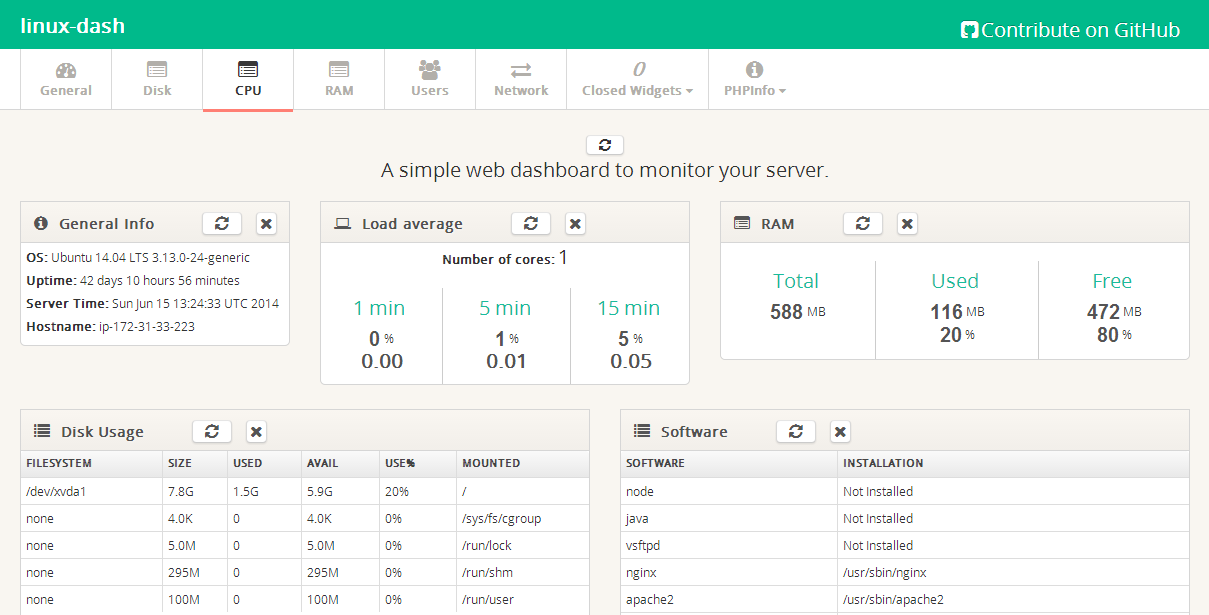
Linux-dash is a web-based lightweight monitoring dashboard for Linux machines, which can display, in real-time, various system properties, such as CPU load, RAM usage, disk usage, Internet speed, network connections, installed software’s, running processes and many more. The web statistics page allows you to drag and drop the various widgets and rearrange the display as you desire.

This article assumes you have at least basic knowledge of linux, know how to use the shell, and most importantly, you host your site on your own VPS. The installation is quite simple. I will show you through the step by step installation linux-dash on Ubuntu 14.04.

Step 1. First, install Nginx web server with php-fpm.

apt-get update
apt-get install git nginx php5-json php5-fpm php5-curl

Step 2. Configure Nginx web server.

Create Nginx virtual host for linux-dash.

 ##nano /etc/nginx/conf.d/your-domain.com
server {
   listen  80;
   server_name  your-domain.com www.your-domain.com;
 
   access_log  /var/www/your-domain.com/logs/access.log ;
   error_log    /var/www/your-domain.com/logs/error.log ;
 
   location / {
       root   /var/www/your-domain.com/public_html;
       index  index.php index.html index.htm;
 
   }
 
   error_page   500 502 503 504  /50x.html;
   location = /50x.html {
       root   /var/www/your-domain.com/public_html;
   }
 
  # pass the PHP scripts to FastCGI server listening on 127.0.0.1:9000
  location ~ .php$ {
  fastcgi_pass   127.0.0.1:9000;
  fastcgi_index  index.php;
  root    /var/www/your-domain.com/public_html;
  fastcgi_param  SCRIPT_FILENAME  /var/www/your-domain/public_html$fastcgi_script_name;
  include fastcgi_params;
  }
 
   location ~ /.ht {
       deny  all;
   }
}

Add virtual host on nginx.conf:

# nano /etc/nginx/nginx.conf
### add line like this on http section:
include /etc/nginx/conf.d/*.conf;

Configure php-fpm:

##nano /etc/php5/fpm/pool.d/www.conf 
. . .
listen = 127.0.0.1:9000
user = nginx
group = nginx
. . .

Step 3. Installing Linux Dash.

git clone https://github.com/afaqurk/linux-dash.git
cp -r linux-dash/ /var/www/your-domain.com/public_html
chown -R nginx:nginx /var/www/your-domain.com/public_htm


Step 4. Restart Nginx web server as well as php-fpm.

service php5-fpm restart
service nginx restart


Step 5. Access Linux Dash.

The linux-dash web based monitoring will be available on HTTP port 80 by default. Open your favorite browser and navigate to http://yourdomain.com or http://server-ip. Main page gives you all the information about system, memory, CPU and IO details. If you are using a firewall, please open port 80 to enable access to the control panel.

Linux-dash-web-interface

Congratulation’s! You have successfully installed Linux Dash. Thanks for using this tutorial for installing linux-dash web based monitoring on Ubuntu 14.04 system.

How To Install PowerDNS on Ubuntu 14.04

install powerdns on ubuntu

PowerDNS is a MySQL-based DNS server, written in C++ and licensed under the GPL. PowerDNS can be managed through a web interface (PowerAdmin). Unlike Bind, PowerDNS can be setup using a multitude of backends such as Bind Zone Files, or various Databases.

This article assumes you have at least basic knowledge of linux, know how to use the shell, and most importantly, you host your site on your own VPS. The installation is quite simple. I will show you through the step by step installation PowerDNS on Ubuntu 14.04.

Step 1. First you need to update repository on your system.

apt-get update
apt-get upgrade

Step 2. Install MySQL.

 apt-get install mysql-server mysql-client

By default, MySQL is not hardened. You can secure MySQL using the mysql_secure_installation script. you should read and below each steps carefully which will set root password, remove anonymous users, disallow remote root login, and remove the test database and access to secure MySQL.

 mysql_secure_installation

Step 3. Configuring MySQL.

Edit /etc/mysql/my.cnf to make MySQL to listen all interfaces:

 nano /etc/mysql/my.cnf
[...]
#bind-address           = 127.0.0.1
[...]

Restart MySQL service:

 service mysql restart

Step 4. Install the PowerDNS server and MySql backend.

 apt-get install pdns-server pdns-backend-mysql

Step 5. Create PowerDNS Database and User in MySQL.

Login as a MySQL root and create a new database and tables:

 mysql -u root -p
create database powerdns;
GRANT ALL PRIVILEGES ON powerdns.* TO 'powerdns'@'localhost' IDENTIFIED BY 'powerdnsPassword';
use powerdns;

CREATE TABLE domains (
id INT auto_increment,
name VARCHAR(255) NOT NULL,
master VARCHAR(128) DEFAULT NULL,
last_check INT DEFAULT NULL,
type VARCHAR(6) NOT NULL,
notified_serial INT DEFAULT NULL,
account VARCHAR(40) DEFAULT NULL,
primary key (id)
);
CREATE UNIQUE INDEX name_index ON domains(name);

CREATE TABLE records (
id INT auto_increment,
domain_id INT DEFAULT NULL,
name VARCHAR(255) DEFAULT NULL,
type VARCHAR(6) DEFAULT NULL,
content VARCHAR(255) DEFAULT NULL,
ttl INT DEFAULT NULL,
prio INT DEFAULT NULL,
change_date INT DEFAULT NULL,
primary key(id)
);
CREATE INDEX rec_name_index ON records(name);
CREATE INDEX nametype_index ON records(name,type);
CREATE INDEX domain_id ON records(domain_id);

CREATE TABLE supermasters (
ip VARCHAR(25) NOT NULL,
nameserver VARCHAR(255) NOT NULL,
account VARCHAR(40) DEFAULT NULL
);
exit;

Step 6. Configure PowerDNS.

Remove the existing PowerDNS configuration files:

 sudo rm /etc/powerdns/pdns.d/*.*

Create file /etc/powerdns/pdns.d/pdns.local.gmysql.conf file:

 nano /etc/powerdns/pdns.d/pdns.local.gmysql.conf

Add the following lines and set the correct database name and database user which we created earlier:

launch=gmysql
gmysql-host=localhost
gmysql-user=powerdns
gmysql-password=powerdnsPassword
gmysql-dbname=powerdns

Finally, restart the PowerDNS service:

 service pdns restart

Congratulation’s! You have successfully installed PowerDNS. Thanks for using this tutorial for installing PowerDNS on Ubuntu 14.04 system.

You Might Also Like: How To Install PowerDNS on CentOS 6

How To Install PowerDNS on CentOS 6

install powerdns on centos

PowerDNS is a MySQL-based DNS server, written in C++ and licensed under the GPL. PowerDNS can be managed through a web interface (PowerAdmin). Unlike Bind, PowerDNS can be setup using a multitude of backends such as Bind Zone Files, or various Databases.

This article assumes you have at least basic knowledge of linux, know how to use the shell, and most importantly, you host your site on your own VPS. The installation is quite simple. I will show you through the step by step installation PowerDNS on CentOS 6.

Step 1. First, you need to enable EPEL repository on your system.

## RHEL/CentOS 6 64-Bit ##
# wget http://download.fedoraproject.org/pub/epel/6/x86_64/epel-release-6-8.noarch.rpm
# rpm -ivh epel-release-6-8.noarch.rpm
## RHEL/CentOS 6 32-Bit ##
# wget http://download.fedoraproject.org/pub/epel/6/i386/epel-release-6-8.noarch.rpm
# rpm -ivh epel-release-6-8.noarch.rpm

Step 2. Install MySQL.

 yum -y install mysql mysql-server

Enable MySQL on boot and start MySQL server:

service mysqld start
chkconfig mysqld on

Step 3. Configuring MySQL.

By default, MySQL is not hardened. You can secure MySQL using the mysql_secure_installation script. you should read and below each steps carefully which will set root password, remove anonymous users, disallow remote root login, and remove the test database and access to secure MySQL.

 mysql_secure_installation


Step 4. Create PowerDNS Database and User in MySQL.

Login as a MySQL root and create a new database and tables:

 mysql -uroot -p
create database powerdns;
GRANT ALL PRIVILEGES ON powerdns.* TO 'powerdns'@'localhost' IDENTIFIED BY 'powerdnsPassword';
use powerdns;

CREATE TABLE domains (
id INT auto_increment,
name VARCHAR(255) NOT NULL,
master VARCHAR(128) DEFAULT NULL,
last_check INT DEFAULT NULL,
type VARCHAR(6) NOT NULL,
notified_serial INT DEFAULT NULL,
account VARCHAR(40) DEFAULT NULL,
primary key (id)
);
CREATE UNIQUE INDEX name_index ON domains(name);

CREATE TABLE records (
id INT auto_increment,
domain_id INT DEFAULT NULL,
name VARCHAR(255) DEFAULT NULL,
type VARCHAR(6) DEFAULT NULL,
content VARCHAR(255) DEFAULT NULL,
ttl INT DEFAULT NULL,
prio INT DEFAULT NULL,
change_date INT DEFAULT NULL,
primary key(id)
);
CREATE INDEX rec_name_index ON records(name);
CREATE INDEX nametype_index ON records(name,type);
CREATE INDEX domain_id ON records(domain_id);

CREATE TABLE supermasters (
ip VARCHAR(25) NOT NULL,
nameserver VARCHAR(255) NOT NULL,
account VARCHAR(40) DEFAULT NULL
);
exit;

Step 5. Install PowerDNS.

 yum install pdns-backend-mysql pdns bind-utils

Enable PowerDNS on boot and start PowerDNS server:

service pdns start
chkconfig pdns on

Step 6. Configure PowerDNS.

Open the /etc/pdns/pdns.conf file and add the following lines:

launch=gmysql
gmysql-host=localhost
gmysql-user=powerdns
gmysql-password=powerdnsPassword
gmysql-dbname=powerdns

Finally, restart the Power DNS service:

 service pdns restart

Congratulation’s! You have successfully installed PowerDNS. Thanks for using this tutorial for installing PowerDNS on CentOS 6 system.

You Might Also Like: How To Install PowerDNS on Ubuntu 14.04

How To Install VNC Server on CentOS 6

Install VNC Server on CentOS 6

VNC (Virtual Network Computing) server is a free and open source software which is designed for allowing remote access to the Desktop Environment of the server to the VNC Client whereas  VNC viewer is used on remote computer to connect to the server. To use VNC you must have TCP/IP connection and VNC viewer client to connect to a computer running VNC server component. The server transmits a duplicate display of a remote computer to the viewer.

This article assumes you have at least basic knowledge of linux, know how to use the shell, and most importantly, you host your site on your own VPS. The installation is quite simple. I will show you through the step by step installation VNC server on CentOS 6.

Step 1. First, you need to update the system to ensure that we have all of the latest software installed.

 yum update

Step 2. Install required packages.

yum groupinstall Desktop
yum install tigervnc-server
yum install xorg-x11-fonts-Type1
yum install vnc

Step 3. Enabling VNC Server service.

service vncserver start
chkconfig vncserver on

Step 4. Create VNC password for user.

 vncpasswd

Step 5. Configure VNC server.

 nano /etc/sysconfig/vncservers

Add the following to the end of the file:

VNCSERVERS="1:wpcademy"
VNCSERVERARGS[1]="-geometry 1024x600"

Step 6. Configure firewall rules to allow the VNC connection.

iptables -A INPUT -m state --state NEW -m tcp -p tcp --dport 5801  -j ACCEPT
iptables -A INPUT -m state --state NEW -m tcp -p tcp --dport 5901  -j ACCEPT
iptables -A INPUT -m state --state NEW -m tcp -p tcp --dport 6001  -j ACCEPT
service iptables save
service iptables restart

Step 7. Setting Gnome session VNC.

Restart VNC service.

 service vncserver restart

Now kill the VNC Server:

 vncserver -kill :1

Edit the xstartup file in .vnc directory:

 nano .vnc/xstartup

Comment the last line and run the Gnome:

#twm & 
exec gnome-session &

Restart the service:

 service vncserver restart

Step 8.
Now go to your Windows or Linux machine and download VNC Viewer client and install in your system to access the desktop. Now you can able to connect VNC server using IP and Port ( Eg : 192.168.1.10:1) and you will be asked to enter the password, enter the password that you have created earlier.

install-vnc-server-centos6

vnc-remote-desktop-client

Congratulation’s! You have successfully installed VNC server. Thanks for using this tutorial for installing VNC server on CentOS 6 system.

You Might Also Like: How To Install VNC Server on CentOS 7

How To Install VNC Server on CentOS 7

Install VNC Server on CentOS 7

VNC (Virtual Network Computing) server is a free and open source software which is designed for allowing remote access to the Desktop Environment of the server to the VNC Client whereas  VNC viewer is used on remote computer to connect to the server .

This article assumes you have at least basic knowledge of linux, know how to use the shell, and most importantly, you host your site on your own VPS. The installation is quite simple. I will show you through the step by step installation VNC server on CentOS 7.

Step 1. First, you need to update the system to ensure that we have all of the latest software installed.

 yum update


Step 2. Install Gnome desktop.

 yum groupinstall "GNOME Desktop"

Step 3. Install tigervnc server and X11 fonts.

 yum install tigervnc-server xorg-x11-fonts-Type1

Copy the VNC server configuration file to /etc/systemd/system/ for configuring the system service. While copying, you can mention which port it should listen. By default VNC server listens on 5900:

 cp /lib/systemd/system/[email protected] /etc/systemd/system/vncserver@:5.service

Edit VNC server file configuration:

 nano /etc/systemd/system/vncserver@:5.service
## Replace <USER> with your real user, in my case i replaced with user called “wpcademy” with the screen size ##
[Unit]
Description=Remote desktop service (VNC)
After=syslog.target network.target[Service]
Type=forking
# Clean any existing files in /tmp/.X11-unix environment
ExecStartPre=/bin/sh -c ‘/usr/bin/vncserver -kill %i > /dev/null 2>&1 || :’
ExecStart=/sbin/runuser -l wpcademy-c “/usr/bin/vncserver %i -geometry 1280×1024″
PIDFile=/home/wpcademy/.vnc/%H%i.pid
ExecStop=/bin/sh -c ‘/usr/bin/vncserver -kill %i > /dev/null 2>&1 || :'[Install]
WantedBy=multi-user.target

Step 4. Configure firewall rules to allow the VNC connection.

firewall-cmd --permanent --zone=public --add-port=5905/tcp
firewall-cmd --reload

Step 5. Start VNC server.

 vncserver

Set the password.

You will require a password to access your desktops.

Password:
Verify:
xauth:  file /home/wpcademy/.Xauthority does not exist

New ‘localhost.localdomain:1 (wpcademy)’ desktop is server.wpcademy.net:1

Creating default startup script /home/wpcademy/.vnc/xstartup
Starting applications specified in /home/wpcademy/.vnc/xstartup
Log file is /home/wpcademy/.vnc/server.wpcademy.net:1.log

Step 6. Enabling and starting the VNC service

Reload the systemctl daemon as root.

 systemctl daemon-reload

Start the VNC service as root:

 systemctl start vncserver@:5.service

Enable it on system startup as root:

 systemctl enable vncserver@:5.service

Step 7. Now you can able to connect VNC server using IP and Port ( Eg : 192.168.2.109:5 ) and you will be asked to enter the password, enter the password that you have created earlier.

vnc server authentication

CentOS-7-VNC-Desktop

Congratulation’s! You have successfully installed VNC server. Thanks for using this tutorial for installing VNC server on CentOS 7 system.

You Might Also Like: How To Install VNC Server on CentOS 6

How To Install Apache Solr on Ubuntu 14.04

apache solr on ubuntu

Apache Solr is an open source enterprise search platform used to easily create search engines which searches websites, files and databases. Its major features include powerful full-text search, faceted search, distributed search, hit highlighting and index replication. But before you proceed, make sure you have already installed Tomcat which is necessary to access Solr from the browser.

This article assumes you have at least basic knowledge of linux, know how to use the shell, and most importantly, you host your site on your own VPS. The installation is quite simple. I will show you through the step by step installation Apache Solr on Ubuntu 14.04.

Step 1. First, Install Java.

Because tomcat and solr are Java based softwares we need the Java environment (As it is advised in the Solr wiki : prefere a full JDK to a simple JRE.)

Add the webupd8team Java PPA repository in your system:

 sudo add-apt-repository -y ppa:webupd8team/java
sudo apt-get update
sudo aptitude -y install oracle-java8-installer

Verify installed Java version:

#java -version
java version "1.8.0_40"
Java(TM) SE Runtime Environment (build 1.8.0_40-b25)
Java HotSpot(TM) 64-Bit Server VM (build 25.40-b25, mixed mode)

Step 2. Install Apache Solr.

Ubuntu provides 3 Solr packages by default: nsolr-commo, the package that contains the actual Solr code; solr-tomcat, Solr integrated with Tomcat; and solr-jetty, which is just like solr-tomcat but with the Jetty web server. In this article, we will install solr-tomcat, so execute the following command:

 sudo apt-get -y install solr-tomcat

Then let’s start the server:

 sudo service tomcat6 start

Important: the config & index will be stored at : /usr/share/solr/

Step 3. Install tomcat management utilities.

 sudo apt-get install tomcat6-admin

Once installed, you’ll have to grant some user:

 sudo nano /etc/tomcat6/tomcat-users.xml

Paste these lines (change username and password as you whish):

<role rolename="manager"/>
<role rolename="admin"/>
<user username="tomcat" password="tomcat" roles="manager,admin"/>

Step 4. Accessing Apache Solr.

Apache Solr will be available on HTTP port 8080 by default. Open your favorite browser and navigate to http://yourdomain.com:8080/solr  or http://server-ip:8080/solr. If you are using a firewall, please open port 8080 to enable access to the control panel.

apache solr web admin

Congratulation’s! You have successfully installed Apache Solr. Thanks for using this tutorial for installing Apache Solr on Ubuntu 14.04 system.

You might also like: How To Install Apache Solr on CentOS 6

How To Install Apache Solr on CentOS 6

install apache solr on centos

In this tutorial we will learn how to Install Apache Solr on CentOS.

Apache Solr is an open source enterprise search platform used to easily create search engines which searches websites, files and databases. Its major features include powerful full-text search, faceted search, distributed search, hit highlighting and index replication.

This article assumes you have at least basic knowledge of linux, know how to use the shell, and most importantly, you host your site on your own VPS. The installation is quite simple. I will show you through the step by step installation Apache Solr on CentOS 6.

Step 1. Install Java.

Download latest Java SE Development Kit 8 release from its official download page or use following commands to download from shell:

### CentOS 64-Bit ###
cd /opt/
wget --no-cookies --no-check-certificate --header "Cookie: gpw_e24=http%3A%2F%2Fwww.oracle.com%2F; oraclelicense=accept-securebackup-cookie" "http://download.oracle.com/otn-pub/java/jdk/8u40-b25/jdk-8u40-linux-x64.tar.gz"
tar xzf jdk-8u40-linux-x64.tar.gz
### CentOS 32-Bit ###
cd /opt/
wget --no-cookies --no-check-certificate --header "Cookie: gpw_e24=http%3A%2F%2Fwww.oracle.com%2F; oraclelicense=accept-securebackup-cookie" "http://download.oracle.com/otn-pub/java/jdk/8u40-b25/jdk-8u40-linux-i586.tar.gz"
tar xzf jdk-8u40-linux-i586.tar.g

Verify Installed Java version:

# java -version
java version "1.8.0_40"
Java(TM) SE Runtime Environment (build 1.8.0_40-b25)
Java HotSpot(TM) 64-Bit Server VM (build 25.40-b25, mixed mode)

Step 2. Install Solr.

Download the latest version of solr and extract it (5.0.0 is the latest at time of writing):

cd /opt
http://www.us.apache.org/dist/lucene/solr/5.0.0/solr-5.0.0.tgz
tar -xvf solr-5.0.0.tgz
mv /opt/solr-5.0.0 /opt/solr
mv /opt/solr/example /opt/solr/core

Step 3. Create script for handling the Solr server service.

Create a systemd service for Solr or if you are used to the old init scripts, you can keep using them. Create an init script for the Solr service:

 nano /etc/init.d/solr
#!/bin/bash
#
# chkconfig: 2345 20 20
# short-description: Solr
# description: Startup script for Apache Solr Server

SOLR_DIR="/opt/solr/core"
LOG_FILE="/var/log/solr.log"
JAVA="/usr/bin/java -DSTOP.PORT=8079 -DSTOP.KEY=stopkey -jar start.jar"

start() {
echo -n "Starting Solr... "
cd $SOLR_DIR
$JAVA > $LOG_FILE 2>&1 &
sleep 2
RETVAL=$?

    if [ $RETVAL = 0 ]
    then
        echo "done."
    else
        echo "failed. See error code for more information."
    fi
    return $RETVAL
}

stop() {
echo -n "Stopping Solr... "
pkill -f start.jar > /dev/null
RETVAL=$?

    if [ $RETVAL = 0 ]
    then
        echo "done."
    else
        echo "failed. See error code for more information."
    fi
    return $RETVAL
}

case "$1" in
start)
start
;;
stop)
stop
;;
restart)
stop
start
;;
*)
echo $"Usage: solr {start|stop|restart}"
exit 3
esac
exit $RETVAL

Save the file and make it executable:

chmod +x /etc/init.d/solr
chkconfig --add solr

Start Solr using the following command:

 /etc/init.d/solr start

Step 4. Configure Iptables or Firewall.

If you use iptables add a rule to allow access to Solr’s admin section and query Solr data:

 iptables -A INPUT -p tcp -m tcp --dport 8983 -j ACCEPT
service iptables save

Step 5. Accessing Apache Solr.

Apache Solr will be available on HTTP port 8983 by default. Open your favorite browser and navigate to http://yourdomain.com:8983/solr/  or http://server-ip:8983/solr/.

apache solr web admin

Congratulation’s! You have successfully installed Apache Solr. Thanks for using this tutorial for installing Apache Solr on CentOS 6 system.

You Might Also Like: How To Install Apache Solr on Ubuntu 14.04